Fender Champion 20, Champion 40 - Amplifier Manual
- Owner's manual (21 pages)
Advertisement
Introduction
Fender tone and quality...and incredible value!
Whether you're looking for your first practice amp, or affordable, powerful stage gear for playing in a band, there's a Champion amp that's right for you. They're versatile enough for any style of guitar playing, while being very simple to use.
Champion amps deliver world renowned Fender clean and overdrive tones plus an assortment of British and modern distortion flavors. From jazz to country, blues to metal, it's easy to dial up the right sound.
You've also got a built-in palette of effects to choose from, including reverb, delay/echo, chorus, tremolo, Vibratone, and more. Settings like delay time or tremolo speed can easily be set with the TAP button to match the song's tempo.
Other features include: Auxiliary input for jamming with media player; Headphone output for silent practice; and Classic Fender Black Panel cosmetics with black angled control panel, skirted knobs, silver grille cloth, and black "bronco" vinyl covering.
| Champion 40 | 40 Watts, 1 x 12" | Two channels (one clean, one with selectable amp voicing); optional 2-button footswitch for channel selection |
| Champion 20 | 20 Watts, 1 x 8" | One channel |
PRODUCT REGISTRATION — Please visit: http://www.fender.com/prodreg
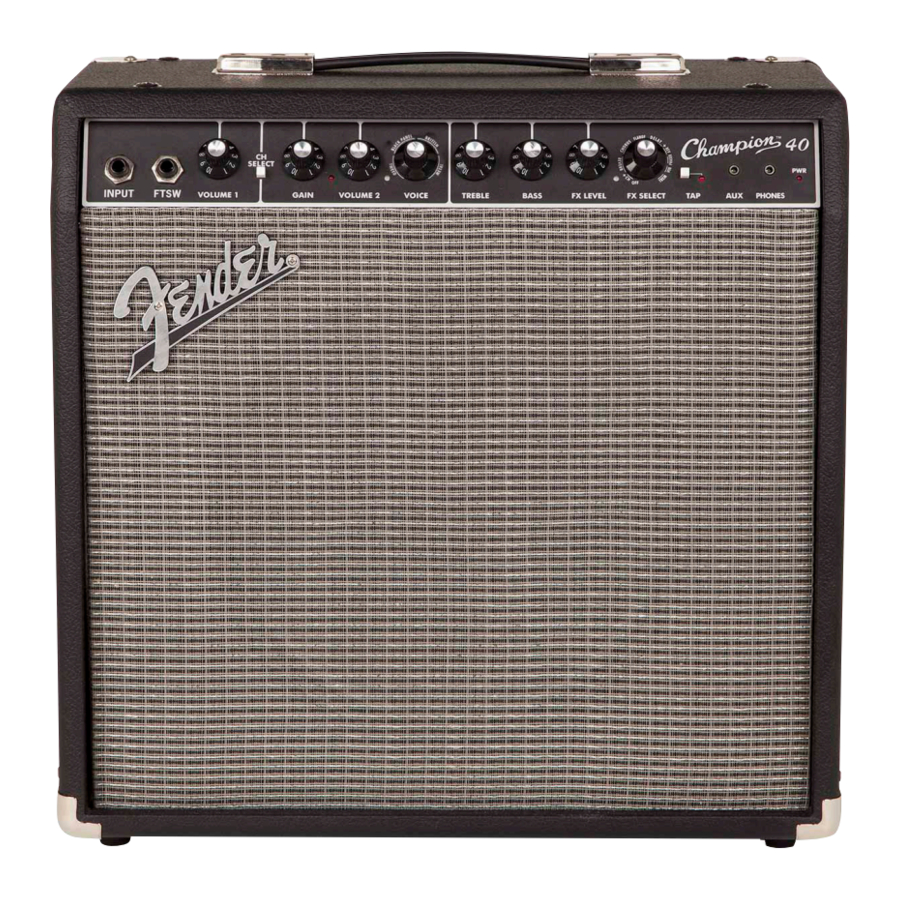
Control Panel

- INPUT — Plug your guitar in here.
- FTSW (Champion 40 only) — Plug the optional twobutton footswitch (P/N 0097298000) in here to enable remote channel selection and effects on-off switching.
![]()
- VOLUME (1/2) — Adjusts the channel volume level.
- CH SELECT (Champion 40 only) — Press to switch between amplifier channels, as indicated by the channel indicator light {F}. This switch is overridden by the CH SELECT switch on the footswitch {B} when connected.

Channel 1 provides a clean tone based on Fender Black Panel amplifiers such as the Twin Reverb amp.
- GAIN — Adjusts the channel distortion level. Use together with the channel VOLUME knob to set the overall loudness.
- CHANNEL INDICATOR (Champion 40 only) — Illuminates when channel 2 is selected.
- VOICE — Selects the channel voice type. The tri-color indicator to the left of the knob changes color as each different voice type is selected.
| 01 | Tweed Bassman | 07 | 60s British |
| 02 | Tweed Deluxe | 08 | 70s British |
| 03 | Tweed Champ | 09 | 80s British |
| 04 | '65 Twin-Amp | 10 | Super-Sonic |
| 05 | '65 Deluxe | 11 | 90s Metal |
| 06 | '65 Princeton | 12 | 2000 Metal |
- TREBLE/BASS — Adjusts the amplifier tone characteristics.
- FX LEVEL — Adjusts the level of effects.
- FX SELECT — Selects amplifier effects. The tri-color indicator to the left of the knob changes color as each different effect position is selected.
| 01 | Effects OFF | 08 | Delay Slapback |
| 02 | Reverb + Chorus | 09 | Delay Long |
| 03 | Reverb Hall | 10 | Delay + Reverb |
| 04 | Reverb Spring | 11 | Touch Wah |
| 05 | Chorus Fast Sweep | 12 | Vibrato |
| 06 | Chorus Deep Sweep | 13 | Tremolo |
| 07 | Flange |
- TAP — Use this button to tap in a custom delay time or modulation rate by pressing TAP rhythmically (twice minimum) in sync with the desired interval. The TAP LED blinks at the current delay/modulation interval. Press the TAP button just once to set the interval to its maximum value.
- AUX — Plug your media player in here for accompaniment. Adjust the input level using the volume control on your media player.
- PHONES — Plug your headphones in here to enjoy the amplifier effects in stereo. The amplifier speakers mute automatically. This output can also be used for recording or sound reinforcement.
- PWR — Illuminates when power is switched on to the unit.
Rear Panel
- POWER — Switch to the "ON" position to turn the unit on. Switch to the "OFF" position to turn the unit off.
![]()
- INPUT POWER — Connect the included power cord to a grounded outlet in accordance with the voltage and frequency ratings specified on the rear panel of your amplifier.
![]()


Specifications
| CHAMPION 40 | CHAMPION 20 | |
| TYPE: | PR 4222 | PR 4221 |
| POWER REQUIREMENTS: | 110W | 70W |
| INPUT IMPEDANCE: | >1MΩ | >1MΩ |
| POWER OUTPUT: | 40W RMS into 8Ω @ 5%THD | 20W RMS into 8Ω @ 5%THD |
| SPEAKERS: | One 12", 8Ω Fender Special Design (P/N 0082055000) | One 8", 8Ω Fender Special Design (P/N 0082054000) |
| FOOT SWITCH: | 2-button (P/N 0097298000) optional | N/A |
| DIMENSIONS | HEIGHT: 17.25 in (44 cm) WIDTH: 17.25 in (44 cm) DEPTH: 9 in (23 cm) | HEIGHT: 12.75 in (32.5 cm) WIDTH: 13.75 in (35 cm) DEPTH: 7.5 in (19 cm) |
| WEIGHT: | 19 lb (8.6 kg) | 12 lb (5.4 kg) |
Product specifications are subject to change without notice.
IMPORTANT SAFETY INSTRUCTIONS
 The lightning flash with arrowhead symbol within an equilateral triangle is intended to alert the user to the presence of uninsulated "dangerous voltage" within the product's enclosure that may be of sufficient magnitude to constitute a risk of electric shock to persons.
 The exclamation point within an equilateral triangle is intended to alert the user to the presence of important operating and maintenance (servicing) instructions in the literature accompanying the product.
- Read these instructions.
- Keep these instructions.
- Heed all warnings.
- Follow all instructions.
- Do not use this apparatus near water.
- Clean only with dry cloth.
- Do not block any ventilation openings. Install in accordance with the manufacturer's instructions.
- Do not install near any heat sources such as radiators, heat registers, stoves, or other apparatus (including amplifiers) that produce heat.
- Do not defeat the safety purpose of the polarized or grounding-type plug. A polarized plug has two blades with one wider than the other. A grounding type plug has two blades and a third grounding prong. The wide blade or the third prong are provided for your safety. If the provided plug does not fit into your outlet, consult an electrician for replacement of the obsolete outlet.
- Protect the power cord from being walked on or pinched particularly at plugs, convenience receptacles and the point where they exit from the apparatus.
- Only use attachments/accessories specified by the manufacturer.
- Use only with the cart, stand, tripod, bracket, or table specified by the manufacturer or sold with the apparatus. When a cart is used, use caution when moving the cart/ apparatus combination to avoid injury from tip-over.
![]()
- Unplug this apparatus during lightning storms or when unused for long periods of time.
- Refer all servicing to qualified service personnel. Servicing is required when the apparatus has been damaged in any way, such as power-supply cord or plug is damaged, liquid has been spilled or objects have fallen into the apparatus, the apparatus has been exposed to rain or moisture, does not operate normally, or has been dropped.
- To completely disconnect this apparatus from the AC mains, disconnect the power supply cord plug from the AC receptacle.
- The mains plug of the power supply cord shall remain readily operable.
![]()
To reduce the risk of fire or electric shock, do not expose this apparatus to rain or moisture.- Do not expose this equipment to dripping or splashing and ensure that no objects filled with liquids, such as vases, are placed on the equipment.
- Maintain at least 6 inches (15.25 cm) of unobstructed air space behind the unit to allow for proper ventilation and cooling of the unit.
![]()
For rack mounted power amplifiers, keep all wiring and materials away from the sides of the unit and allow the unit to cool down for 2 minutes before pulling from a rack enclosure.- Amplifiers and loudspeaker systems, and ear/headphones (if equipped) are capable of producing very high sound pressure levels which may cause temporary or permanent hearing damage. Use care when setting and adjusting volume levels during use.
![]()
To maintain product safety, products with internal or external (battery pack) batteries:- Batteries and/or the product in which they are installed, shall not be exposed to excessive heat such as sunshine, fire or the like.
- There may be a danger of explosion if the battery is incorrectly connected/ replaced. Replace only with the same or equivalent type battery specified in the instructions or on the product.
![]()
Unplug unit and allow it to cool before touching/ replacing vacuum tubes.![]()
Provide an earthing connection before the mains plug is connected to the mains. And, when disconnecting the earthing connection, be sure to disconnect after pulling out the mains plug from the mains.- Apparatus with CLASS I construction (grounded type with a three-prong plug) must be connected to a MAINS socket outlet with a protective earthing connection.
![]()
Use only the AC/DC adapter provided with the amplifier. The unit must only be connected to a safety agency certified power source (adapter), approved for use and compliant with applicable local and national regulatory safety requirements.


Documents / Resources
References
Download manual
Here you can download full pdf version of manual, it may contain additional safety instructions, warranty information, FCC rules, etc.
Advertisement
Thank you! Your question has been received!


Need Assistance?
Do you have a question about the Champion 20 that isn't answered in the manual? Leave your question here.