Denon DRA-CX3 - AM-FM STEREO RECEIVER Manual
- Service manual (38 pages) ,
- Operating instructions manual (19 pages) ,
- Owner's manual (18 pages)
Advertisement
Getting Started
Thank you for purchasing this DENON product. To ensure proper operation, please read this owner's manual carefully before using the product. After reading them, be sure to keep them for future reference.
Accessories
Check that the following parts are supplied with the product.
 | Owner's Manual | 1 |
 | Warranty (for North America model only) | 1 |
 | Service station list | 1 |
 | Power cord (Cord length: Approx. 6.5 ft / 2 m) | 1 |
 | Remote control (RC-1060) | 1 |
 | R03/AAA batteries | 2 |
 | AM loop antenna | 1 |
 | FM indoor antenna | 1 |
Cautions on handling
- Before turning the power switch on
Check once again that all connections are correct and that there are no problems with the connection cables. - Power is supplied to some of the circuitry even when the unit is set to the standby mode. When traveling or leaving home for long periods of time, be sure to unplug the power cord from the power outlet.
- Cautions on using mobile phones
Using a mobile phone near this unit may result in noise. If so, move the mobile phone away from this unit when it is in use. - Moving the unit
Turn off the power and unplug the power cord from the power outlet.
Next, disconnect the connection cables to other system units before moving the unit. - Note that the illustrations in these instructions may differ from the actual unit for explanation purposes.
Cautions on installation
Note:
For proper heat dispersal, do not install this unit in a confined space, such as a bookcase or similar enclosure.

About the remote control unit
The included remote control unit (RC-1060) can be used to control the DENON DCD-CX3 Super Audio CD player in addition to the DRA-CX3.
Inserting the batteries
- Remove the remote control unit's rear cover.
- Set two R03/AAA batteries in the battery compartment in the indicated direction.
- Put the rear cover back on.
NOTE
- Replace the batteries with new ones if the set does not operate even when the remote control unit is operated close to the unit. (The supplied batteries are only for verifying operation.)
- When inserting the batteries, be sure to do so in the proper direction, following the "q" and "w" marks in the battery compartment.
- To prevent damage or leakage of battery fluid:
- Do not use a new battery together with an old one.
- Do not use two different types of batteries.
- Do not attempt to charge dry batteries.
- Do not short-circuit, disassemble, heat or dispose of batteries in flames.
- If the battery fluid should leak, carefully wipe the fluid off the inside of the battery compartment and insert new batteries.
- Remove the batteries from the remote control unit if it will not be in use for long periods.
Operating range of the remote control unit
- Point the remote control unit at the remote sensor when operating it.
- The remote control unit can be used from a distance of up to about 23 feet / 7 meters, at a horizontal angle of up to 30° with respect to the sensor.
![]()

NOTE
The set may function improperly or the remote control unit may not operate if the remote control sensor is exposed to direct sunlight, strong artificial light from an inverter type fluorescent lamp or infrared light.
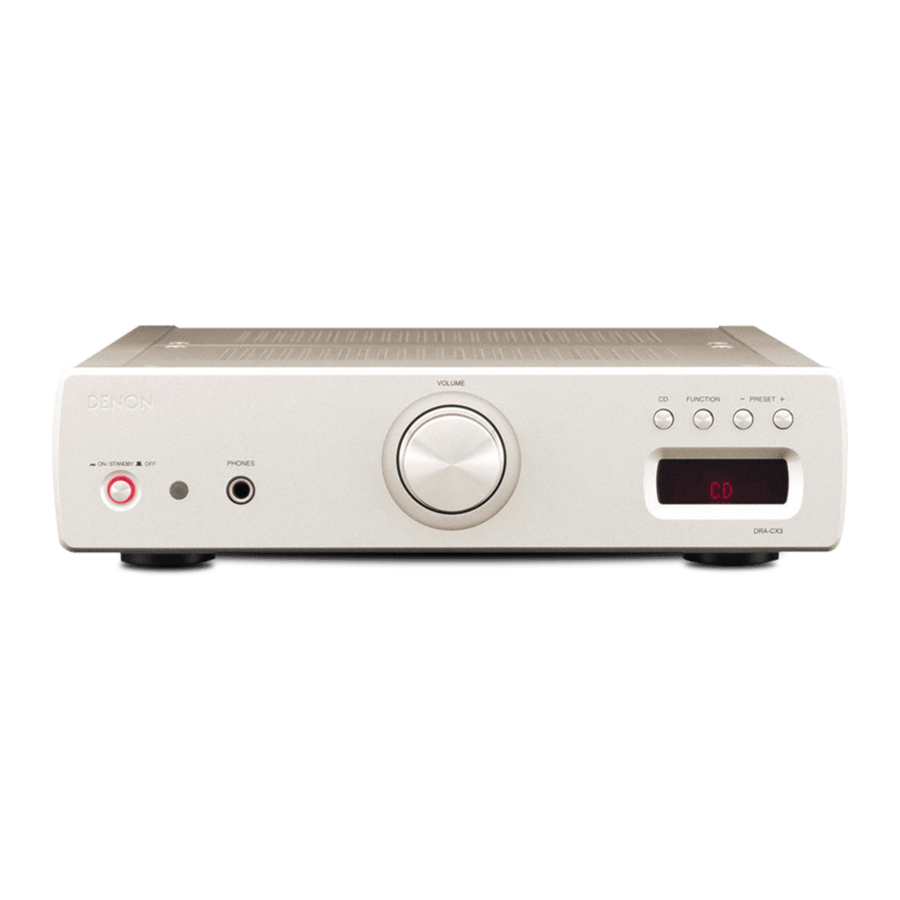
Part names and functions
For buttons not explained here, see the page indicated in parentheses ( ).
Front panel

- Power switch (
![]() ON/STANDBY
ON/STANDBY ![]() OFF)
OFF) - Power indicator
- Remote control sensor
- Headphones jack (PHONES)
When headphones are plugged in, the sound can only be heard from the headphones. - VOLUME control knob
- Display
- PRESET buttons
- FUNCTION button
- CD button
 ON/STANDBY
  OFF)
OFF)NOTE
Be careful not to set the volume too high when using headphones.
Display

- Information display
Various information is displayed here, depending on the operation mode. - Tuner reception mode indicators
Rear panel

- Input terminals
- Recording output terminals
- DOCK CONTROL jack
- Speaker terminals
- AC outlet
- AC inlet
- ANTENNA terminals
- SIGNAL GND terminal
- CARTRIDGE selection switch
Remote control unit
The operations of the remote control unit's buttons depend on the function that is currently set.


- The POWER, PURE DIRECT and DIMMER buttons function for the DENON DCD-CX3 Super Audio CD player as well, so the DCD-CX3 can be operated simultaneously with the DRA-CX3. When the two units have different settings, press and hold in the button for at least 2 seconds to reset them both to the default setting, then make the desired setting.
- The default settings are "on" for the power, "bright" for the dimmer and "off" for the pure direct mode.

- Use the separately sold Control Dock for iPod (ASD-1R, sold separately) to connect an iPod to the DRA- CX3.
- iPod playback modes include the browse mode and the remote mode. See "iPod playback"
Connections
NOTE
- Do not plug in the power cord until all connections have been completed.
- When making connections, also refer to the operating instructions of the other components.
- Be sure to connect the left and right channels properly (left with left, right with right).
- Do not bundle power cords together with connection cables. Doing so can result in humming or noise.
Cable indications
Connect using the connection cables shown below.
| Audio cables | Signal direction |
Analog connections (Stereo) |  Audio signal |
Speaker connections |
Speaker connections

Connecting the speaker cables
Carefully check the left (L) and right (R) channels and + (red) and – (black) polarities on the speakers being connected to the DRA-CX3, and be sure to interconnect the channels and polarities correctly.
- Peel off about 0.03 ft / 10 mm of sheathing from the tip of the speaker cable, then either twist the core wire tightly or terminate it.
![]()
- Turn the speaker terminal counterclockwise to loosen it.
![]()
- Insert the speaker cable's core wire to the hilt into the speaker terminal.
![]()
- Turn the speaker terminal clockwise to tighten it.
![]()


When using a banana plug
Tighten the speaker terminal firmly before inserting the banana plug.

NOTE
- Use speakers with an impedance of 4 to 16 Ω/ohms.
![burn hazard]() When making connections, take care that none of the strands in the speaker cable come in contact with adjacent terminals, other speaker cable strands, or with the rear panel and screws. NEVER touch the speaker terminals when the power is on. Doing so can result in electric shocks.
When making connections, take care that none of the strands in the speaker cable come in contact with adjacent terminals, other speaker cable strands, or with the rear panel and screws. NEVER touch the speaker terminals when the power is on. Doing so can result in electric shocks.
Protection circuit
When using speakers with an impedance below the designated value (for example 3 Ω/ohms), playing for long periods of time with the volume high can cause the temperature to rise, activating the protection circuit.
When this circuit is activated, the output to the speakers is cut off and the power indicator blinks. If this happens, unplug the power cord, wait for the set to cool off and improve ventilation around the unit. Also check the wiring of the input cables and the speaker cables. After doing this, plug the power cord back in and turn the unit's power back on.
If the protection circuit is activated again even though there are no problems with the wiring or the ventilation around the unit, switch off the power and contact a DENON service center.
Connecting the antenna terminals
An F-type FM antenna can be connected directly.

AM loop antenna assembly
- Remove the vinyl tie and take out the connection line.
![]()
- Connect to the AM antenna terminals.
![]()
- Bend in the reverse direction.
![]()
-
- With the antenna on top of any stable surface.
![]()
- With the antenna attached to a wall.
![]()
- With the antenna on top of any stable surface.


Connection of AM antennas
- Push the lever.
![]()
- Insert the conductor.
![]()
- Return the lever.
![]()


NOTE
- Do not connect two FM antennas simultaneously.
- Even if an AM outdoor antenna is used, do not disconnect the AM loop antenna.
- It is not possible to receive AM broadcasts with good quality if the AM loop antenna is near something metallic.
Note to CATV system installer:
This reminder is provided to call the CATV system installer's attention to Article 820-40 of the NEC which provides guidelines for proper grounding and, in particular, specifies that the cable ground shall be connected to the grounding system of the building, as close to the point of cable entry as practical.
Connecting a CD player

Connecting a turntable

- If connecting the turntable ground wire causes noise, disconnect it. For instructions on connecting the turntable ground wire, refer to the operating instructions included with the turntable.
- Set the CARTRIDGE selection switch to "MM" or "MC" according to the cartridge being used.
NOTE
- If a turntable is not connected to the PHONO input terminals, do not select PHONO since this can cause humming and noise, especially if the volume is turned up high. When not connecting a turntable, leave the included short-circuiting pin plugged in.
- The DRA-CX3's SIGNAL GND terminal (
![]() ) is not a safety ground.
) is not a safety ground.
 ) is not a safety ground.
 Connecting an iPod

- Use the separately sold Control Dock for iPod (ASD-1R) to connect an iPod to the DRA-CX3.
- When using a Control Dock for iPod (ASD-1R), the communications mode selection switch must be set.
For details, refer to the operating instructions of the Control Dock for iPod. - When connecting the exclusive Control Dock for iPod (ASD-1R, sold separately), connect the Control Dock for iPod with the system cable included with the dock.
- When the Control Dock for iPod is connected, the function indicator switches from "LINE1" to "iPod".
Connecting a tape deck/CD recorder or MD recorder

Connecting the power cord

AC OUTLET
SWITCHED (total capacity – 120 W (1 A))
The power turns on and off together with the power switch on the main unit, but not with the power switch on the remote control unit. Power is supplied to the AC outlet when the DRA-CX3 is in standby. NEVER connect devices with a power consumption of 120 W (1 A) or greater.
NOTE
- Insert the plugs securely. Incomplete connections will result in the generation of noise.
- Connect the power cord from one of the components connected to the DRA-CX3 into the DRA-CX3's AC outlet on the rear panel. Do not use this outlet for hairdryers or other non-audio devices.
Operation

| About the button names in these explanations | |
| < > | Buttons on the main unit |
| [ ] | Buttons on the remote control unit |
| Button name only: Buttons on the main unit and remote control unit | |
Turning the power on
Press <ON/STANDBY / OFF>.
- When the power is turned on, the function that was being used when the power was last turned off is selected (Last function memory).
- Setting the power to the standby mode:
Press [POWER]. - Canceling the standby mode:
Press [POWER] again. - Turning the power off:
Press <ON/STANDBY / OFF>.
| Power indicator | |
| Power on | Red |
| Standby | Orange |
Conducting playback
- Press FUNCTION to select the input function.
![]()
- The function can be switched directly to "TUNER" by pressing <PRESET>, to "CD" by pressing <CD>.

*The "iPod" indicator is displayed when a Control Dock for iPod is connected. ("NO iPod" is displayed if no iPod is connected to the Control Dock for iPod.)
- Start playback on the selected component.
- For instructions on operating, see the operating instructions of the connected component.
- Adjust the VOLUME.
- The volume can be adjusted within the range 0 to −90 dB to −∞. When set to −∞, the display reads "- -.- dB".
Adjusting the tone
- Press [TONE] to select the tone parameter to be adjusted.
![]()

| BASS: | Adjusts the bass sound. |
| TREBLE: | Adjusts the treble sound. |
| BALANCE: | Adjusts the left/right volume balance. |
- When the bass or treble level or the balance is displayed, adjust pressing [CHANNEL].
Playing with higher quality sound (Pure Direct mode)
Press [PURE DIRECT].
The display is turned off.
- The audio signals do not pass through the tone adjustment circuitry, so highly pure sound is played.
- Canceling the Pure Direct mode:
Press [PURE DIRECT] again.
When in the pure direct mode, the tone is set to "flat" and the balance to "center". The tone and balance cannot be adjusted when this mode is selected.
Recording
- Press FUNCTION to select the input function.
![]()
- The function can be switched directly to "TUNER" by pressing <PRESET> , to "CD" by pressing <CD> .

*The "iPod" indicator is displayed when a Control Dock for iPod is connected. ("NO iPod" is displayed if no iPod is connected to the Control Dock for iPod.)
- Set the recorder to the recording mode.
- For instructions on operating, see the operating instructions of the connected component.
- Start playback on the player.
- For instructions on operating, see the operating instructions of the connected component.
- The LINE3 input signal is not output to the recording output terminal (REC).
- Adjusting the volume or tone does not affect the sound being recorded.
Tuning in radio broadcasts
- Press [TUNER], <PRESET> or <FUNCTION> to select "TUNER".
The reception frequency is displayed. - Press [ BAND] to select the reception band.
![]()
- Press [ TUNING] to select the reception frequency.
The "TUNED" indicator lights when a station is tuned in.

- FM station reception conditions
- When the reception band mode is set to "FM AUTO", the "ST" indicator lights when a stereo broadcast is tuned in.
- If the signal is weak and the stereo broadcast reception is not stable, set the reception mode to "FM MONO". The "MONO" indicator lights.
- Auto tuning
Press and hold in <PRESET> or [TUNING] to search for and tune in the next stereo broadcast automatically.
Stations cannot be tuned in if the signal is too weak. - Canceling auto tuning
Press <PRESET> or [TUNING]. - Manual tuning
The frequency changes one step at a time each time [TUNING] is pressed.
Noise may be produced in the sound when receiving AM broadcasts if there is e.g. a TV nearby. If so, move the DRA-CX3 and TV as far apart as possible.
Presetting
Giving a name to the currently tuned in broadcast station and presetting it
- A total of 40 FM and AM broadcast stations combined can be preset.
- Preset stations can be given names of up to 8 characters.
- Tune in the broadcast station.
The reception frequency is displayed. - Press [EDIT].
The name input mode is set. - Press [CHANNEL] to select the desired character.
- Up to 8 characters can be input for each preset.
The characters that can be input are as shown below. - Press [TUNING] to move the cursor.
- Press [CLEAR] to delete characters.
- Up to 8 characters can be input for each preset.
- Press [ENTER].
The name input mode is set. - Press [CHANNEL] to select the preset number, then press [ENTER].
The reception frequency and reception mode are preset.
- To change the name of a preset station:
- Call out the preset name to be changed, then press [EDIT].
- Perform steps 3 , 4 under "Giving a name to the currently tuned in broadcast station and presetting it".
- To only preset the station:
- Press [ENTER] while the station is tuned in.
- Perform step 5 under "Giving a name to the currently tuned in broadcast station and presetting it".
NOTE
If a station is preset at a number where a station has already been preset, the old setting is deleted and replaced with the new setting.
Presetting broadcast stations automatically (Auto preset)
- Press [TUNER], <PRESET> or <FUNCTION> to select "TUNER".
The reception frequency is displayed. - Press and hold [ MENU/SET].
"A. PRESET" is displayed. - Press [ MENU/SET].
Broadcast stations are preset automatically.
- Broadcast stations whose signals are too weak cannot be preset automatically. To preset them, tune them in manually, then follow the operation described at "Giving a name to the currently tuned in broadcast station and presetting it".
- Once auto presetting starts, it cannot be stopped before it is completed. (It takes about 60 seconds for auto presetting to be completed.)
Listening to preset broadcast stations
Select the preset number by pressing <PRESET> or [CHANNEL].
iPod playback

| About the button names in these explanations | |
| < > | Buttons on the main unit |
| [ ] | Buttons on the remote control unit |
| Button name only: Buttons on the main unit and remote control unit | |
The music on an iPod can be played by using the Control Dock for iPod (ASD-1R, sold separately).
The iPod can be controlled using the buttons on the main unit and the remote control unit.
- The iPod may only be used to copy or play contents that are not copyrighted or contents for which copying or playback is legally permitted for your private use as an individual. Be sure to comply with applicable copyright legislation.
- Connect the DRA-CX3 and iPod using the Control Dock for iPod (ASD-1R).
- Press [LINE1/iPod] or < FUNCTION> to select "LINE1".
The display switches from "LINE1" to "iPod". - Press [MODE] for 2 seconds or more to select the play mode.
Browse![]() Remote
Remote
 Remote
Browse:
Displays menu or track information on the display of the main unit. ("DENON" is displayed on the iPod display.)
Remote:
Displays menu or track information on the iPod display. ("iPod" is displayed on the display of the main unit.)
- Select the remote mode to enjoy iPod video information such as slide shows and videos.
- Press [iPod
![]() ].
]. - When pressed again, the pause mode is set. For remote control unit buttons that can be used when the function is set to "iPod", see "Remote control unit" section.
 ].
]. NOTE
- DENON will accept no responsibility whatsoever for possible loss of iPod data when using an iPod connected to the DRA-CX3.
- Depending on the type of iPod and the software version, some functions may not operate.
Troubleshooting
If a problem should arise, first check the following:
- Are the connections correct?
- Is the set being operated as described in the operating instructions?
- Are the other components operating properly?
If this unit does not operate properly, check the items listed in the table below. Should the problem persist, there may be a malfunction.
In this case, disconnect the power immediately and contact your store of purchase.
| Symptom | Cause | Measures |
| When the power is turned on, the power indicator does not light and no sound is produced. |
|
|
| The power indicator lights but no sound is produced. |
|
|
|
| |
|
| |
| No sound is produced from one side. |
|
|
|
| |
|
| |
| For stereo sources, the positions of the instruments are inverted. |
|
|
| Buzzing noise in FM broadcasts. |
|
|
|
| |
| Hissing or buzzing noise is heard in AM broadcasts. |
|
|
| Humming noise is heard in AM broadcasts. |
|
|
| When playing records, a wailing noise (howling) is produced when the volume is raised. |
|
|
|
| |
| Remote control unit does not operate. |
|
|
|
| |
|
| |
|
| |
|
|
Specifications
| Receiver section | |
| Rated output: | 2-channel driving (CD SP OUT) 75 W + 75 W (8 Ω/ohms, DIN, 1 kHz, T.H.D. 0.7%) 150 W + 150 W (4 Ω/ohms, DIN, 1 kHz, T.H.D. 0.7%) |
| High frequency distortion: | 0.05% (Rated output: –3 dB), 8 Ω/ohms, 1 kHz |
| Output terminals: | Speaker 4 ~ 16 Ω/ohms Suited for headphones/stereo headphones |
| Equalizer amplifier output (REC OUT terminals): | Rated output: 150 mV |
| Input sensitivity/Input impedance: | PHONO (MM): 2.5 mV / 47 kΩ/kohms PHONO (MC): 0.2 mV / 100 Ω/ohms CD, LINE1, LINE2, LINE3: 130 mV / 47 kΩ/kohms |
| RIAA deviation: | PHONO (MM): 20 Hz ~ 20 kHz ±0.5 dB PHONO (MC): 30 Hz ~ 20 kHz ±0.5 dB |
| Reception frequency range: | FM: 87.5 MHz ~ 107.9 MHz AM: 520 kHz ~ 1710 kHz |
| Reception sensitivity: | FM: 1.5 µV / 75 Ω/ohms AM: 20 µV |
| FM channel separation: | 35 dB (1 kHz) |
| FM S/N ratio: | Monaural : 74 dB Stereo : 70 dB |
| FM harmonic distortion: | Monaural : 0.3 % Stereo : 0.4% |
| Properties | |
| S/N ratio: | PHONO (MM): 84 dB (With input terminals short-circuited, 5 mV input signal) PHONO (MC): 70 dB (With input terminals short-circuited, 0.5 mV input signal) |
| (A-weighted network) | CD, LINE1, LINE2, LINE3: 95 dB (input terminals short-circuited) |
| Tone control: | BASS : 100 Hz ± 8 dB TREBLE : 10 kHz ± 8 dB |
| Frequency response: | 5 Hz ~ 40 kHz (+0.5 dB, –3 dB) (INPUT : CD, PURE DIRECT: ON) |
| General | |
| Power outlet: | 1 switched outlet, total capacity 120 W (1 A) |
| Power supply: | AC 120 V, 60 Hz |
| Power consumption: | 100 W Standby: 0.5 W or less |
| Maximum external dimensions: | 300 (W) x 80 (H) x 341 (D) mm (11-13/16" x 3-3/16" x 13-7/16") |
| Weight: | 5.5 kg (12 lbs 2 oz) |
| Remote control unit (RC-1060) | |
| Remote control method: | Infrared pulse method |
| Batteries: | R03/AAA Type (two batteries) |
| Maximum external dimensions: | 44 (W) x 233 (H) x 22 (D) mm (1-3/4" x 9-3/16" x 7/8") |
| Weight: | 165 g (Approx 5.8 oz) (including batteries) |
* For purposes of improvement, specifications and design are subject to change without notice.
SAFETY PRECAUTIONS

RISK OF ELECTRIC SHOCK
DO NOT OPEN
TO REDUCE THE RISK OF ELECTRIC SHOCK, DO NOT REMOVE COVER (OR BACK). NO USER-SERVICEABLE PARTS INSIDE. REFER SERVICING TO QUALIFIED SERVICE PERSONNEL.
 | The lightning flash with arrowhead symbol, within an equilateral triangle, is intended to alert the user to the presence of uninsulated "dangerous voltage" within the product's enclosure that may be of sufficient magnitude to constitute a risk of electric shock to persons. |
 | The exclamation point within an equilateral triangle is intended to alert the user to the presence of important operating and maintenance (servicing) instructions in the literature accompanying the appliance. |


TO REDUCE THE RISK OF FIRE OR ELECTRIC SHOCK, DO NOT EXPOSE THIS APPLIANCE TO RAIN OR MOISTURE.
- Location of Rating and Caution Labels: Bottom


IMPORTANT SAFETY INSTRUCTIONS
- Read these instructions.
- Keep these instructions.
- Heed all warnings.
- Follow all instructions.
- Do not use this apparatus near water.
- Clean only with dry cloth.
- Do not block any ventilation openings. Install in accordance with the manufacturer's instructions.
- Do not install near any heat sources such as radiators, heat registers, stoves, or other apparatus (including amplifiers) that produce heat.
- Do not defeat the safety purpose of the polarized or grounding-type plug. A polarized plug has two blades with one wider than the other. A grounding type plug has two blades and a third grounding prong. The wide blade or the third prong are provided for your safety. If the provided plug does not fit into your outlet, consult an electrician for replacement of the obsolete outlet.
- Protect the power cord from being walked on or pinched particularly at plugs, convenience receptacles, and the point where they exit from the apparatus.
- Only use attachments/accessories specified by the manufacturer.
- Use only with the cart, stand, tripod, bracket, or table specified by the manufacturer, or sold with the apparatus. When a cart is used, use caution when moving the cart/apparatus combination to avoid injury from tip-over.
![]()
- Unplug this apparatus during lightning storms or when unused for long periods of time.
- Refer all servicing to qualified service personnel. Servicing is required when the apparatus has been damaged in any way, such as power-supply cord or plug is damaged, liquid has been spilled or objects have fallen into the apparatus, the apparatus has been exposed to rain or moisture, does not operate normally, or has been dropped.
- Batteries shall not be exposed to excessive heat such as sunshine, fire or the like.


- The ventilation should not be impeded by covering the ventilation openings with items, such as newspapers, tablecloths, curtains, etc.
- No naked flame sources, such as lighted candles, should be placed on the unit.
- Observe and follow local regulations regarding battery disposal.
- Do not expose the unit to dripping or splashing fluids.
- Do not place objects filled with liquids, such as vases, on the unit.
To completely disconnect this product from the mains, disconnect the plug from the wall socket outlet. The mains plug is used to completely interrupt the power supply to the unit and must be within easy access by the user.
NOTE ON USE
- Avoid high temperatures. Allow for sufficient heat dispersion when installed in a rack.
![]()
- Handle the power cord carefully. Hold the plug when unplugging the cord.
![]()
- Keep the unit free from moisture, water, and dust.
![]()
- Unplug the power cord when not using the unit for long periods of time.
![]()
- Do not obstruct the ventilation holes.
* (For apparatuses with ventilation holes)
![]()
- Do not let foreign objects into the unit.
![]()
- Do not let insecticides, benzene, and thinner come in contact with the unit.
![]()
- Never disassemble or modify the unit in any way.
![]()


Denon Brand Company, D&M Holdings Inc.
www.denon.com

Documents / ResourcesDownload manual
Here you can download full pdf version of manual, it may contain additional safety instructions, warranty information, FCC rules, etc.
Advertisement
Thank you! Your question has been received!


Need Assistance?
Do you have a question about the DRA-CX3 that isn't answered in the manual? Leave your question here.