Table of Contents
Advertisement
Quick Links
User Manual of Product 1:
Pyle PLUTV41BK 2-Way Dual Waterproof Off-Road Speakers,
4 Inch 800 Watt Marine Grade Wakeboard Tower Speakers
System, Full Range Outdoor Audio Stereo Speaker for ATV,
UTV, Quad, Jeep, Boat -Black
User Manual of Product 2:
Pyle Marine Headunit Receiver Speaker Kit - In-Dash LCD
Digital Stereo Built-in Bluetooth & Microphone w/AM FM Radio
System 5.25'' Waterproof Speakers (2) MP3/SD Readers &
Remote Control - PLMRKT46BK
Advertisement
Table of Contents

Related Manuals for Pyle PLUTV41BK


Summary of Contents for Pyle PLUTV41BK
- Page 1 System, Full Range Outdoor Audio Stereo Speaker for ATV, UTV, Quad, Jeep, Boat -Black User Manual of Product 2: Pyle Marine Headunit Receiver Speaker Kit - In-Dash LCD Digital Stereo Built-in Bluetooth & Microphone w/AM FM Radio System 5.25’’ Waterproof Speakers (2) MP3/SD Readers &...
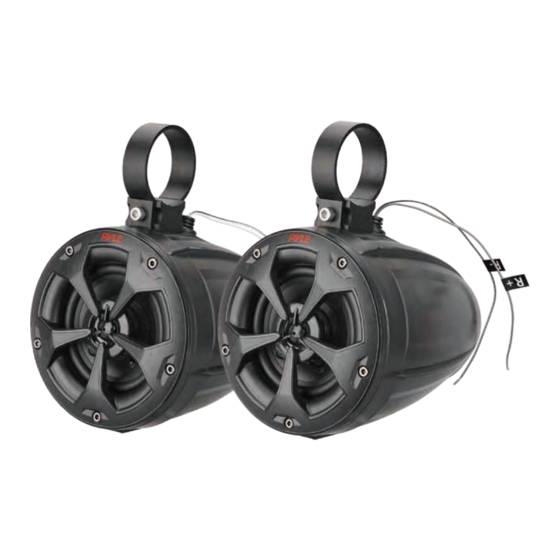
- Page 2 PLUTV41BK 4’’ Waterproof Rated Off-Road Speakers Compact PowerSport Vehicle Speaker System for ATV, UTV, 4x4, Jeep (800 Watt) (Pair)
- Page 3 PLUTV41BK Installation Speaker Mounting suggestion as below: Step 1: Unbolting the mounting bracket Step 2: Slide in the buckle with rubber pad attached to the bracket stand of the speaker Attach the set to handle bar of vehicle / ship...
- Page 4 Features: • Pro Audio PowerSport Speakers • Compact & High-Powered Output • Marine Grade Waterproof Rated Construction • Weatherproof & Water-Resistant Housing • Sound System: (2) x 4.0'' Woofers + (2) x 0.5’’ Tweeters • 2-Way Full Range Stereo Sound Reproduction •...
- Page 5 Questions? Issues? We are here to help! Phone: (1) 718-535-1800 Email: support@pyleusa.com...
- Page 6 Marine Grade In-Dash AM/FM Receiver with MP3 Playback & USB/SD/AUX Inputs USER’S MANUAL Receiver Models: PLRMR23BTW, PLRMR27BTB, PLMRKT36WT, PLMRKT46BK, PLMRKT38W, PLMRKT48BK - 0 -...
- Page 7 COTENTS COTENTS ............................... 1 PRECAUTIONS .............................. 2 Precautions & Warnings ........................2 Lithium Battery Cell Warnings ........................ 2 Drives and connections ......................... 2 Others Warnings ............................ 2 INSTALLATION ............................... 3 Installation Procedures .......................... 3 Installation Opening ..........................3 To Install the Receiver ........................... 3 Wiring Connections ..........................
- Page 8 PRECAUTIONS Precautions & Warnings To reduce the risk of fire, electric shock and interference, never attempt to repair this unit yourself. Refer all service to an authorized service centre. Some MP3/WMA files may not be playable. Keep the volume at a reasonable level to avoid distracted driving. High volume levels may make it difficult to concentrate on traffic and road conditions while driving.
-
Page 9: Installation
INSTALLATION Installation Procedures First complete the electrical connections and then check that all connections are correct. Installation Opening This unit can be installed in any dashboard that has an opening as illustrated as below figure. 53 mm 182 mm To Install the Ship/Car Receiver Be sure to first test all connections and then follow these steps to install this unit. - Page 10 Wiring Connections WIRING DIAGRAM Radio Antenna Socket FUSE 15A White: Front Left CH RCA Audio Output Red: Front Right CH RCA Audio Output Red: Rear Right CH RCA Audio Output White Front Left Speaker White: Rear Left CH RCA Audio Output White / Black Gray CAUTION...
-
Page 11: Control Panel Buttons
CONTROL PANEL BUTTONS MUTE 4 RDM 5 -10 2 INT 6 +10 3 RPT RESET (power)/MODE (source) button 2. SEL (select/menu) button and VOL (volume) knob button, BAND(band) button AMS (automatic store / preset station scan, automatic music search) button (pause/play), Preset station 1 button 5. -
Page 12: General Operation
GENERAL OPERATION Turn Unit On/Off Press the power ( ) /MODE button on the front panel to turn on the unit, and long press it again to turn off the unit. Press the power ( ) button on the remote control to turn the unit on or off. Adjust Volume (VOL) Rotate the VOL knob on the front panel or press the VOL+ /VOL-... - Page 13 Change the Source (MODE) Press the MODE button to switch between RADIO, BT(Bluetooth), USB(with USB device inserted), CARD(with SD card inserted) and AUX-IN(auxiliary input) modes. Mute on/off In power on mode, briefly press the MUTE button to toggle mute on or off. The muted state will be also released when the volume knob is used.
-
Page 14: Radio Operation
RADIO OPERATION Switch Between USA area and Europe area Frequency In radio mode, press and hold the VOL/SEL button to enter switch state of the US(USA) and EU (Europe) frequency, then rotate it to switch between US(USA) and EU(Europe) frequency. The system will change the frequency setting in about 3 seconds. -
Page 15: Usb / Sd Card Operation
USB / SD CARD OPERATION To insert USB / SD CARD To play files on a USB device, open the USB port cover and insert the USB storage device into the USB port. Playback will begin automatically. Insert an micro SD card into the micro SD slot. Playback will begin automatically. Eject USB/SD To eject a USB device, press the button to stop playback, then remove the USB device. -
Page 16: Bluetooth Operation
2. When the phone finds this ship/car audio system, the “PYLE” name will be displayed. 3. Choose the “PYLE” from the device list to pair and connect with this ship/car audio system. Upon confirming, the BT logo will stop flashing. -
Page 17: Remote Control
REMOTE CONTROL Remove Insulating Sheet The remote control comes with an insulating sheet attached to the underside of the remote control, as illustrated on the right. The remote control will not work until the insulating sheet is removed. Replace Lithium Battery Cell 1. -
Page 18: Specifications
SPECIFICATIONS General Chassis Dimensions..............178(W) x 108(D) x 50(H) mm Power Supply Requirement ...................DC 12V Current Consumption ..................15A (max.) Maximum Power Output ..................75W x 4CH Radio USA/ Europe Frequency Range........87.5 - 107.9 MHz (200KHz/Step) 87.5 - 108.0 MHz(50KHz/Step) Usable Sensitivity ....................30 dBu I.F. -
Page 19: Troubleshooting
TROUBLESHOOTING If you suspect something is wrong, immediately switch power off. Do not use the unit in abnormal condition, for example without sound, or with smoke or foul smell, can cause fire or electric shock. Immediately stop using it and call the store where you purchased it. Never try to repair the unit by yourself because it is dangerous to do so.