Table of Contents
Advertisement
Available languages
Available languages
Quick Links
P73121/F1U126-KIT/EU/man.qxd
4/28/00
1:06 PM
Page 1
En
Bitronics AutoSwitch Kit
User Manual
Guide de l'utilisateur du kit de
Fr
l'autocommutateur Bitronics
Bitronics AutoSwitch Set
Benutzerhandbuch
De
Handleiding Bitronics
AutoSwitch Kit
Ne
Manuale utente Kit
AutoSwitch Bitronics
It
F1U126-KIT
P73121
Advertisement
Table of Contents

Related Manuals for Belkin Bitronics AutoSwitch Kit


Summary of Contents for Belkin Bitronics AutoSwitch Kit
- Page 1 P73121/F1U126-KIT/EU/man.qxd 4/28/00 1:06 PM Page 1 Bitronics AutoSwitch Kit User Manual Guide de l’utilisateur du kit de l’autocommutateur Bitronics Bitronics AutoSwitch Set Benutzerhandbuch Handleiding Bitronics AutoSwitch Kit Manuale utente Kit AutoSwitch Bitronics F1U126-KIT P73121...
- Page 2 P73121/F1U126-KIT/EU/man.qxd 4/28/00 1:06 PM Page 2...
- Page 3 P73121/F1U126-KIT/EU/man.qxd 4/28/00 1:06 PM Page 3 Table of Contents English ......... 1 Français .
- Page 4 P73121/F1U126-KIT/EU/man.qxd 4/28/00 1:06 PM Page 4...
- Page 5 1:06 PM Page 1 Introduction Thank you for purchasing the Belkin Components Bitronics AutoSwitch Kit! Now, you can select between four different parallel devices from your desktop, or share one device between four computers. Plus, if you are using Windows ®...
-
Page 6: Technical Specifications
P73121/F1U126-KIT/EU/man.qxd 4/28/00 1:06 PM Page 2 Technical Specifications Compatible Standards: IEEE 1284 Parallel Port Communication Standard Electrical: Input Voltage: 9VDC Max Input Current: 600mA Max Power Consumption: 5.4W Max Heat Dissipation: 0.31 BTU/min Environmental: Storage Temperature: -10ºC to 50ºC Working Temperature: 0ºC to 40ºC Relative Humidity: 0 to 95%, Non-condensing... -
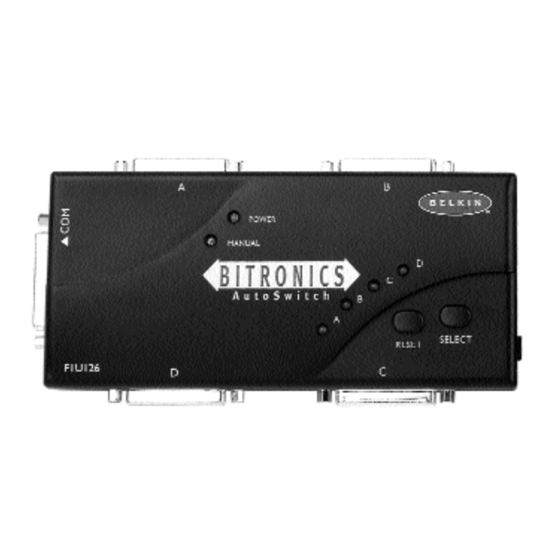
Page 7: Product Detail
P73121/F1U126-KIT/EU/man.qxd 4/28/00 1:06 PM Page 3 Product Detail External Power LED Port activity LEDs Port A Connector Port B Connector RESET button SELECT button COMMON Connector DIP switches (side) Manual Switching Port D Connector Port C Connector DC power jack (side) DIP switch settings (located on the side of the switch): SW1:... -
Page 8: Hardware Installation
From a computer to the AutoSwitch, use an IEEE DB25 M/M cable, such as the one included in the package. For connecting a printer to the AutoSwitch, use an IEEE printer cable, such as Belkin Part# F2A046-XX, where XX is the length in feet. - Page 9 Please consult your computer manufacturer’s manual, tech support, or website for information regarding how to do this. Please do not call Belkin Tech Support regarding this because each computer’s BIOS setup routine is different.
-
Page 10: Software Installation
P73121/F1U126-KIT/EU/man.qxd 4/28/00 1:06 PM Page 6 Software Installation There are two driver disks included with the package. Make sure you put in the correct disk in your computer depending on your operating system. When the setup program asks you what model switch you have, make sure you select F1U126. -
Page 11: File Transfer Function
P73121/F1U126-KIT/EU/man.qxd 4/28/00 1:06 PM Page 7 File Transfer Function When two PCs are connected to the AutoSwitch, they can exchange files through any standard file transfer program such as Windows ® Direct Cable Connection, Interlink or LapLink ™ ® NOTE: Port A can only file transfer to Port B and Port C to Port D only. - Page 12 P73121/F1U126-KIT/EU/man.qxd 4/28/00 1:06 PM Page 8 Windows 95 / 98 and NT ® ® B. Windows 3.x: ® • Click on “File Transfer”. C. MS-DOS: • At the command prompt, enter “SWPORT f”. You will see the LED of the port you are connected to on the Bitronics AutoSwitch turn GREEN.
- Page 13 P73121/F1U126-KIT/EU/man.qxd 4/28/00 1:06 PM Page 9 Windows 95 / 98 and NT ® ® (continued) Setting up the Bitronics Software for use with 1 PC to 4 Devices Before anything else, make sure that the drivers of the four devices are installed on the computer already, and that each device has been tested and works on its own.
- Page 14 P73121/F1U126-KIT/EU/man.qxd 4/28/00 1:06 PM Page 10 Windows 95 / 98 and NT ® ® (continued) Click on “Settings” button, configure the ports as shown: “Device Type” gives you a pull-down menu showing the types of printers installed on your computer and other possible parallel device types as well. Here, you must select the correct type for the device connected to that port.
- Page 15 P73121/F1U126-KIT/EU/man.qxd 4/28/00 1:06 PM Page 11 Windows 95 / 98 and NT ® ® (continued) In this example, we have a Zip Drive on Port A, so we chose “Mass Storage ® Device” for Port A. And in Port B, we have the Epson printer installed, so we chose that driver in the Device Type for Port B.
- Page 16 P73121/F1U126-KIT/EU/man.qxd 4/28/00 1:06 PM Page 12 Windows 95 / 98 and NT ® ® (continued) Change printer port from LPT1 to AutoSwitch port: (Windows ® 95/98 only, for Windows NT ® go to Page 15) If one of the four devices being shared is a printer, you must follow the procedure below to reconfigure the port connected to the printer.
- Page 17 P73121/F1U126-KIT/EU/man.qxd 4/28/00 1:06 PM Page 13 Windows 95 / 98 and NT ® ® (continued) Click on the “Details” tab. In the pull-down menu “Print to the following port:”, select the correct port this printer is connected to on the Bitronics switch: •...
- Page 18 P73121/F1U126-KIT/EU/man.qxd 4/28/00 1:06 PM Page 14 Windows 95 / 98 and NT ® ® (continued) Click on “Spool Settings” and then click on “Start printing after last page is spooled”. If NOT grayed out, click on “Disable bi-directional support for this printer”. Otherwise, ignore.
-
Page 19: Windows Nt
P73121/F1U126-KIT/EU/man.qxd 4/28/00 1:06 PM Page 15 Windows NT ® Change printer port from LPT1 to AutoSwitch port (Windows NT ® only): The Printer properties in Windows NT ® is slightly different. After installing the software and restarting the computer, go the printer properties and select the PORTS tab. - Page 20 P73121/F1U126-KIT/EU/man.qxd 4/28/00 1:06 PM Page 16 Windows NT ® (continued) To set the spool settings correctly, click on the “Scheduling” tab. Make sure “Start printing after last page is spooled” is selected. Also, set “Priority” to “Highest”: Click “OK” when finished.
-
Page 21: How Does It Work
P73121/F1U126-KIT/EU/man.qxd 4/28/00 1:06 PM Page 17 Using the Bitronics Software Example: Four Printers Used by One Computer The Bitronics Software automatically handles printing chores by directing your print jobs to the correct port on the Bitronics switch based on the settings you set in the “Printer Properties”... - Page 22 P73121/F1U126-KIT/EU/man.qxd 4/28/00 1:06 PM Page 18 Using the Bitronics Software (continued) Then if you wish to print to the second printer, let’s say a LaserJet ™ example, all you have to do is select that particular printer in the Print dialog box.
- Page 23 P73121/F1U126-KIT/EU/man.qxd 4/28/00 1:06 PM Page 19 Using the Bitronics Software (continued) EXAMPLE: Sharing One Printer and a Zip ® Drive (or any other mass storage device) When dealing with a mass storage device (devices that add a drive letter to your system like E:) such as a Zip ®...
- Page 24 P73121/F1U126-KIT/EU/man.qxd 4/28/00 1:06 PM Page 20 Using the Bitronics Software (continued) Click on the port that has the mass storage device connected. In this case, it is a Zip ® Drive on Port A. As you can see, the “Display Name” entered above appears below as you had entered it.
- Page 25 P73121/F1U126-KIT/EU/man.qxd 4/28/00 1:06 PM Page 21 Using the Bitronics Software (continued) Using any other parallel device (not printers or mass storage devices) with a printer When dealing with other parallel port devices, they are set as “Scanners” in the “Settings” (page 10). Examples of these are scanners, parallel port cameras, and tape drives.
- Page 26 To remove the icon, simply right click on it, and answer “Yes” to the prompt. • To reload the icon back into the system tray, click on “Start”, select “Programs”, select “Belkin Bitronics Switch”, and select “AutoSwitch-Multi PCs”. ADVANCED USER TIP: If you are using devices with pass-through ports (like Zip ®...
- Page 27 Do this on all the computers connected to the switch. If your computer is not listed here, please check their website, or call their technical support. Please do not call Belkin Tech Support regarding this particular issue. ACER While the computer is booting, follow the directions on the screen: To enter “Setup”, press CTRL+ALT+ESC.
-
Page 28: Hewlett-Packard
P73121/F1U126-KIT/EU/man.qxd 4/28/00 1:06 PM Page 24 Appendix (continued) Select “Advanced” from the menu bar. Select “Integrated Peripherals”. Following the legend directions, select “ECP” as the parallel port mode. Follow the legend directions to save the setting and exit “Setup”. Hewlett-Packard Steps for HP Pavillion PC Models At the HP Blue Screen, press F1 to enter “Setup”. - Page 29 P73121/F1U126-KIT/EU/man.qxd 4/28/00 1:06 PM Page 25 Appendix (continued) While the computer is booting, follow the directions on the screen: Press F1 to enter “Setup”. Follow the legend on how to scroll through the “Setup” options until you reach “Input/Output Ports”. Choose the mode with the highest performance (e.g.
- Page 30 P73121/F1U126-KIT/EU/man.qxd 4/28/00 1:06 PM Page 26 Appendix (continued) Configuration” on some models). Choose the parallel port mode with the highest performance (e.g. “ECP”). Follow the legend directions to save the setting and exit “Setup”. Steps for the Force 443 CD, AMBIOS BIOS v 1.00.12.1313oe While the computer is booting, follow the directions on the screen: Press F1 to Enter “Setup”.
- Page 31 P73121/F1U126-KIT/EU/man.qxd 4/28/00 1:06 PM Page 27 Appendix (continued) Select either “ECP”. Press ENTER. Scroll to “Parallel Port” and press ENTER. Select “Enabled” and press ENTER. 10. Press F10 to save these changes, confirm and exit. The system will restart into Windows ®...
-
Page 32: Fcc Statement
Belkin Components warrants this product against defects in materials and workmanship for one year. If a defect is discovered, Belkin will, at its option, repair or replace the product at no charge provided it is returned during the warranty period, with transportation charges prepaid, to the authorized Belkin dealer from whom you purchased the product. -
Page 33: Caractéristiques
Les câbles actuels de votre imprimante fonctionneront peut-être mais nous vous conseillons d’utiliser des câbles compatibles IEEE. • Câble de périphérique IEEE 1284, pièce Belkin n° F2A046fXX. Vous aurez besoin de ce câble pour raccorder un ordinateur à l’autocommutateur. REMARQUE :... -
Page 34: Spécifications Techniques
P73121/F1U126-KIT/f/EU/man.qxd 4/28/00 1:07 PM Page 30 Spécifications techniques Normes compatibles Norme de communication port parallèle IEEE 1284-1994 Électrique : Tension électrique à l’entrée : 9VDC Courant maximum à l’entrée : 600mA Consommation maximale de courant : 5.4W Dissipation maximale de chaleur : 0.31 BTU/min Environmental : Température de stockage :... - Page 35 P73121/F1U126-KIT/f/EU/man.qxd 4/28/00 1:07 PM Page 31 Détails relatifs au produit DEL d’alimentation externe DEL indiquant l’activité du port Connecteur du port A Connecteur du port B Bouton de remise à zéro (RESET) Bouton de sélection Connecteur (SELECT) COMMUN Interrupteurs DIP (côté) DEL de Connecteur Connecteur du port D...
-
Page 36: Installation Du Matériel
Bitronics Autoswitch en utilisant les câbles appropriés. D’un ordinateur à l’autocommutateur, utilisez un câble DB25 mâle/mâle IEEE tel que celui qui est inclus dans l’emballage. Pour raccorder une imprimante à l’autocommutateur, utilisez un câble d’imprimante IEEE tel que le câble Belkin F2A046fXX, où XX indique la longueur en pieds. - Page 37 Veuillez consulter le manuel, le support technique ou le site web du fabricant de votre ordinateur pour savoir comment procéder. Nous vous remercions de ne pas appeler le support technique de Belkin à ce sujet car le programme d’initialisation BIOS diffère selon les ordinateurs.
-
Page 38: Installation Du Logiciel
P73121/F1U126-KIT/f/EU/man.qxd 4/28/00 1:07 PM Page 34 Installation du logiciel Cet emballage contient deux disquettes de pilotes. Veillez à insérer dans votre ordinateur la disquette convenant à votre système d’exploitation. Lorsque le programme d’installation vous demande quel modèle de commutateur vous possédez, sélectionnez bien F1U125f. - Page 39 P73121/F1U126-KIT/f/EU/man.qxd 4/28/00 1:07 PM Page 35 Fonction de transfert de fichiers Lorsque deux PC sont reliés à l’autocommutateur, ils peuvent échanger des fichiers grâce à n’importe quel programme de transfert de fichiers tel que Windows ® Direct Cable Connection, Interlink ™...
- Page 40 P73121/F1U126-KIT/f/EU/man.qxd 4/28/00 1:07 PM Page 36 Windows 95 / 98 and NT ® ® B. Windows 3.x : ® • Cliquez sur « File Transfer ». C. MS-DOS: • A l’invite, tapez « SWPORT f ». Le voyant DEL du port auquel vous êtes raccordé (sur l’autocommutateur Bitronics) deviendra VERT.
- Page 41 P73121/F1U126-KIT/f/EU/man.qxd 4/28/00 1:07 PM Page 37 Windows 95 / 98 and NT ® ® (suite) Installation du logiciel Bitronics pour utiliser l’autocommutateur en raccordant 1 PC à 4 périphériques Vérifiez avant tout que les pilotes des quatre périphériques sont déjà installés sur l’ordinateur et que chaque périphérique a été...
- Page 42 P73121/F1U126-KIT/f/EU/man.qxd 4/28/00 1:07 PM Page 38 Windows 95 / 98 and NT ® ® (suite) Cliquez sur le bouton « Settings » et configurez le port comme indiqué ci-dessous : « Device Type » (type de périphérique) fait apparaître un menu déroulant précisant les types d’imprimantes installées sur votre ordinateur ainsi que d’autres types de périphériques parallèles possibles.
- Page 43 P73121/F1U126-KIT/f/EU/man.qxd 4/28/00 1:07 PM Page 39 Windows 95 / 98 and NT ® ® (suite) Dans cet exemple, comme nous avons un lecteur Zip sur le port A, nous ® choisissons « Mass Storage Device » pour le port A. L’imprimante Epson est installée sur le port B et nous avons donc choisi ce pilote dans le type de périphérique correspondant au port B.
- Page 44 P73121/F1U126-KIT/f/EU/man.qxd 4/28/00 1:07 PM Page 40 Windows 95 / 98 and NT ® ® (suite) Changez le port de l’imprimante en remplaçant LPT1 par AutoSwitch : (uniquement sous Windows ® 95/98 ; sous Windows veuillez vous référer à la page 43) ®...
- Page 45 P73121/F1U126-KIT/f/EU/man.qxd 4/28/00 1:07 PM Page 41 Windows 95 / 98 and NT ® ® (suite) Cliquez sur l’onglet « Details ». Dans le menu déroulant « Print to the following port : » (Imprimer vers :), sélectionnez le port auquel est reliée cette imprimante sur le commutateur Bitronics : •...
- Page 46 P73121/F1U126-KIT/f/EU/man.qxd 4/28/00 1:07 PM Page 42 Windows 95 / 98 and NT ® ® (suite) Cliquez sur « Spool Settings » (Paramètres du spouler) et sur « Start printing after last page is spooled » (Commencer l’impression après la dernière page). Cliquez sur «...
-
Page 47: Windows Nt
P73121/F1U126-KIT/f/EU/man.qxd 4/28/00 1:07 PM Page 43 Windows NT ® Changez le port de l’imprimante en remplaçant LPT1 par AutoSwitch (uniquement sous Windows NT ® Les propriétés de l’imprimante diffèrent légèrement sous Windows NT ® Après avoir installé le logiciel et redémarré l’ordinateur, allez aux propriétés de l’imprimante et sélectionnez l’onglet «... - Page 48 P73121/F1U126-KIT/f/EU/man.qxd 4/28/00 1:07 PM Page 44 Windows NT ® (suite) Pour configurer correctement les paramètres du spouleur, cliquez sur l’onglet « Scheduling ». Vérifiez que l’option « Start printing after last page is spooled » (Commencer l’impression après la dernière page) est sélectionnée. Optez pour la plus haute priorité...
- Page 49 P73121/F1U126-KIT/f/EU/man.qxd 4/28/00 1:07 PM Page 45 Utilisation du logiciel Bitronics Exemple : Un ordinateur utilise imprimantes. quatre Le logiciel Bitronics se charge automatiquement de l’impression en envoyant vos travaux d’impression au port approprié du commutateur Bitronics, et ce en fonction des paramètres que vous avez définis dans la fenêtre des propriétés de l’imprimante et des paramètres expliqués dans les 6 pages précédentes.
- Page 50 P73121/F1U126-KIT/f/EU/man.qxd 4/28/00 1:07 PM Page 46 Utilisation du logiciel Bitronics (suite) Ensuite, si vous voulez imprimer sur la deuxième imprimante (une imprimante LaserJet ™ par exemple), il vous suffit de sélectionner cette imprimante dans la boîte de dialogue « Print » relative à l’impression. Cliquez sur « OK » et le travail d’impression est automatiquement envoyé...
- Page 51 P73121/F1U126-KIT/f/EU/man.qxd 4/28/00 1:07 PM Page 47 Utilisation du logiciel Bitronics (suite) EXEMPLE : Partage d’une imprimante et d’un lecteur Zip ® (ou de tout autre unité de stockage à grande capacité) Lorsqu’il s’agit d’une unité de stockage à grande capacité (périphériques ajoutant une lettre de lecteur à...
- Page 52 P73121/F1U126-KIT/f/EU/man.qxd 4/28/00 1:07 PM Page 48 Utilisation du logiciel Bitronics (suite) Cliquez sur le port auquel est raccordé le « Mass Storage Device ». Dans ce cas, il s’agit d’un lecteur Zip ® sur le port A. Comme vous pouvez le constater, le « Display Name » indiqué plus haut apparaît au dessous tel que vous l’aviez saisi.
- Page 53 P73121/F1U126-KIT/f/EU/man.qxd 4/28/00 1:07 PM Page 49 Utilisation du logiciel Bitronics (suite) Utilisation de tout autre périphérique parallèle (ni imp- rimante ni unité de stockage à grande capacité) avec une imprimante. Lorsque vous utilisez d’autres périphériques sur port parallèle, ils sont considérés comme les «...
- Page 54 « OUI » à l’invite. • Pour réinsérer l’icône sur l’écran système, cliquez sur « Start » (Démarrer), « Programs » (Programmes), sélectionnez « Belkin Bitronics Switch » (Commutateur Bitronics de Belkin) et « AutoSwitch-Multi PCs ». ASTUCE POUR USAGER EXPERIMENTE : Si vous utilisez des périphériques avec des ports pass-through (comme les...
- Page 55 Nous vous remercions de ne pas appeler le support technique de Belkin à ce sujet. Nous vous remercions de ne pas appeler le support technique de Belkin à ce sujet.
-
Page 56: Hewlett-Packard
P73121/F1U126-KIT/f/EU/man.qxd 4/28/00 1:07 PM Page 52 Appendix (continued) l’écran : « To enter Setup, press DEL. » (Pour accéder à l’écran d’initialisation, appuyez sur DEL). (Si vous possédez un ordinateur 486, peut-être serez vous invité à appuyer sur F2). Appuyez sur ALT+P et choisissez « Parallel Mode ». Vous devriez voir apparaître la liste des modes disponibles. - Page 57 P73121/F1U126-KIT/f/EU/man.qxd 4/28/00 1:07 PM Page 53 Appendix (continued) l’écran : « Press F2 to "Enter" Setup. » (Appuyez sur F2 pour accéder à l’écran d’initialisation). Ceci apparaît au bas de l’écran de test de matériel système d’Hewlett Packard. Utilisez les touches flèches pour sélectionner « Parallel Port Mode ». Suivez les instructions pour modifier les options.
- Page 58 P73121/F1U126-KIT/f/EU/man.qxd 4/28/00 1:07 PM Page 54 Appendix (continued) Appuyez deux fois sur ESC (Echap). Appuyez sur « Enter » (Entrée) pour enregistrer les paramètres et quitter l’écran d’initialisation. Micron Instructions générales Lors du démarrage de votre ordinateur, suivez les instructions qui s’affichent à l’écran : «...
- Page 59 P73121/F1U126-KIT/f/EU/man.qxd 4/28/00 1:07 PM Page 55 Appendix (continued) Dans la barre de menu, sélectionnez « Advanced ». Utilisez la touche flèche bas pour sélectionner « Peripheral Config »et appuyez sur « Enter » (Entrée). Utilisez la touche flèche bas pour sélectionner « Parallel Port Mode » et appuyez ensuite sur «...
- Page 60 P73121/F1U126-KIT/f/EU/man.qxd 4/28/00 1:07 PM Page 56 Appendix (continued) Models PCV-200/210/220/230/240: Redémarrez votre ordinateur. Lorsqu’apparaît le premier écran Sony noir et blanc, appuyez sur F3 pour accéder à l’écran d’initialisation. Appuyez sur F1 pour accéder à l’écran BIOS. Utilisez la flèche de droite pour arriver au menu « Advanced ». Faites défiler, sélectionnez «...
- Page 61 P73121/F1U126-KIT/f/EU/man.qxd 4/28/00 1:07 PM Page 57 Appendix (continued) 1. « Normal » (Sortie uniquement) 2. « Bi-directional » (valeur par défaut) 3. « ECP » (nécessite un câble imprimante/parallèle IEEE 1284) Sélectionnez « ECP » et cliquez sur OK pour enregistrer les modifications et fermer la fenêtre.
-
Page 62: Déclaration De Conformité Ce
La présente garantie est caduque si le produit a été endommagé par accident, abus, usage impropre ou mauvaise application, si le produit a été modifié sans autorisation écrite de Belkin, ou si un numéro de série Belkin a été sup- primé... - Page 63 1:08 PM Page 59 Einleitung Vielen Dank für den Kauf des Bitronics AutoSwitch Sets von Belkin Components! Mit diesem Datenumschalter können Sie von Ihrem Desktop aus vier verschiedene parallele Geräte ansteuern oder sich ein Gerät mit vier Computern teilen. Darüber hinaus können Sie unter Windows 95, 98 oder ®...
-
Page 64: Technische Daten
P73121/F1U126-KIT/g/EU/man.qxd 4/28/00 1:08 PM Page 60 Technische Daten Kompatible Standards IEEE 1284-Kommunikationsstandard für Parallelschnittstellen Elektrische Daten Eingangsspannung: 9 VDC Max. Eingangsstrom: 600 mA Max. Leistungsaufnahme: 5,4 W Max. Wärmeableitung: 0,31 BTU/Min. Umgebungsbedingungen Lagertemperatur: -10ºC bis 50ºC Betriebstemperatur: 0ºC bis 40ºC Relative Luftfeuchtigkeit: 0 bis 95%, nicht-kondensierend Abmessungen... - Page 65 P73121/F1U126-KIT/g/EU/man.qxd 4/28/00 1:08 PM Page 61 Produktansicht Externe Netzanzeige LED für Geräteaktivität an Port Anschluß für Port A Anschluß für Port B RESET-Taste SELECT-Taste Gemeinsamer Anschluß (COMMON) DIP-Schalter (Seite) LED für manuelle Anschluß für Anschluß für Umschaltung Port C Port D Netzanschluß...
- Page 66 Verbindung eines Computers mit dem AutoSwitch z.B. das in der Packung enthaltene IEEE DB25-Kabel (Stecker auf Stecker). Für den Anschluß eines Druckers an den AutoSwitch verwenden Sie ein IEEE-Druckerkabel (z.B. Belkin Artikel-Nr. F2A046gXX, wobei „XX" die Kabellänge in Fuß angibt).
- Page 67 Ihrem PC oder auf der Website des Computerherstellers nach, oder wenden Sie sich an den Kundendienst des Herstellers. Rufen Sie wegen dieser Frage bitte nicht den Technischen Support von Belkin an, denn die BIOS Setup Routine sieht bei jedem Computer anders aus. Anleitungen zu einigen Computertypen finden Sie im Anhang zu diesem Handbuch.
- Page 68 P73121/F1U126-KIT/g/EU/man.qxd 4/28/00 1:08 PM Page 64 Software-Installation In der Packung befinden sich zwei Treiberdisketten. Stellen Sie sicher, daß Sie die richtige Diskette für Ihr Betriebssystem in Ihren Computer einlegen. Wenn das „Setup"-Programm Sie nach dem Modell des Datenumschalters fragt, wählen Sie „F1U125g". •...
- Page 69 P73121/F1U126-KIT/g/EU/man.qxd 4/28/00 1:08 PM Page 65 File Transfer-Funktion Wenn zwei PCs mit dem AutoSwitch verbunden sind, können sie Dateien über Dateitransferprogramme wie Windows ® Direct Cable Connection, Interlink ™ oder LapLink ® austauschen. HINWEIS: Port A kann nur Dateien an Port B und Port C nur an Port D übertragen. Wenn der FileTransfer-Modus zwischen zwei Computern aktiviert ist (Beispiel: von A nach B), können die Computer C und D nach wie vor auf das gemeinsam verwendete Gerät zugreifen.
- Page 70 P73121/F1U126-KIT/g/EU/man.qxd 4/28/00 1:08 PM Page 66 Windows 95/98/NT ® B. Windows 3.x: ® • Klicken Sie auf „File Transfer". C. MS-DOS: • Geben Sie bei der Eingabeaufforderung „SWPORT f" ein. Die LED des entsprechenden Computeranschlusses am Bitronics AutoSwitch leuchtet daraufhin GRÜN. Diese LED zeigt an, daß der Computer, an dem Sie arbeiten, für den File Transfer-Modus eingestellt ist.
- Page 71 P73121/F1U126-KIT/g/EU/man.qxd 4/28/00 1:08 PM Page 67 Windows 95/98/NT ® (Fortsetzung) Konfigurieren der Bitronics Software für den 1:4 Modus Vor Installation der Bitronics Software ist sicherzustellen, daß die Treiber der beiden Geräte bereits auf dem Computer installiert sind und jedes Gerät ordnungsgemäß arbeitet. Wenn ein Computer vier Geräte abwechselnd nutzt, kommuniziert der AutoSwitch immer nur mit jeweils einem Gerät und erhält die Information, mit welchem Gerät eine Verbindung hergestellt werden soll, durch den...
- Page 72 P73121/F1U126-KIT/g/EU/man.qxd 4/28/00 1:08 PM Page 68 Windows 95/98/NT ® (Fortsetzung) Klicken Sie auf die Schaltfläche „SETTINGS" (Einstellungen), und konfigurieren Sie die Ports wie nachstehend gezeigt: Für DEVICE TYPE erscheint ein Pulldown-Menü, in dem die auf Ihrem Computer installierten Druckertypen und eventuell auch weitere parallele Geräte aufgeführt sind.
- Page 73 P73121/F1U126-KIT/g/EU/man.qxd 4/28/00 1:08 PM Page 69 Windows 95/98/NT ® (Fortsetzung) In diesem Beispiel befindet sich ein Zip -Laufwerk an Port A (Anschluß A); ® daher wird MASS STORAGE DEVICE (Massenspeichergerät) für Port A ausgewählt. An Port B wurde ein Epson-Drucker installiert; daher wird als Device Type (Gerätetyp) für Port B der betreffende Treiber ausgewählt.
- Page 74 P73121/F1U126-KIT/g/EU/man.qxd 4/28/00 1:08 PM Page 70 Windows 95/98/NT ® (Fortsetzung) Druckeranschluß von LPT1 in AutoSwitch Port ändern (nur Windows ® 95/98, für Windows ® ® siehe Seite 74): Ist eines der vier gemeinsam genutzten Geräte ein Drucker, folgen Sie den nachstehenden Anweisungen, um den für diesen Drucker eingestellten Port umzukonfigurieren.
- Page 75 P73121/F1U126-KIT/g/EU/man.qxd 4/28/00 1:08 PM Page 71 Windows 95/98/NT ® (Fortsetzung) Klicken Sie auf die Registerkarte DETAILS. Wählen Sie im Pulldown-Menü „Anschluß für die Druckerausgabe" den Anschluß, mit dem dieser Drucker am Bitronics-Datenumschalter verbunden ist: LPx1 – PA (auto switch) ¡ Wählen Sie diesen Anschluß aus, wenn der •...
- Page 76 P73121/F1U126-KIT/g/EU/man.qxd 4/28/00 1:08 PM Page 72 Windows 95/98/NT ® (Fortsetzung) Klicken Sie auf „Bidirektionale Unterstützung deaktivieren", falls diese Option NICHT ausgeblendet ist; andernfalls brauchen Sie diesen Punkt nicht zu beachten. Klicken Sie im Fenster „Spool-Einstellungen" auf OK und dann im Fenster „Eigenschaften"...
-
Page 77: Windows Nt
P73121/F1U126-KIT/g/EU/man.qxd 4/28/00 1:08 PM Page 73 Windows NT ® Druckeranschluß von LPT1 in AutoSwitch Port ändern (nur Windows ® NT): Bei den Druckereigenschaften unter Windows ® NT gibt es geringfügige Unterschiede. Rufen Sie nach Installation der Software und Neustart des Computers die Druckereigenschaften auf, und klicken Sie auf die Registerkarte „Anschlüsse"... - Page 78 P73121/F1U126-KIT/g/EU/man.qxd 4/28/00 1:08 PM Page 74 Windows NT ® (Fortsetzung) Zur Festlegung der Spool-Eigenschaften klicken Sie auf die Registerkarte „Zeitplanung der Druckaufträge" (SCHEDULING). Stellen Sie sicher, daß „Drucken beginnen, nachdem letzte Seite gespoolt wurde" ausgewählt ist. Außerdem muß die höchste Priorität eingestellt sein: Klicken Sie auf OK, wenn Sie fertig sind.
-
Page 79: Funktionsweise
P73121/F1U126-KIT/g/EU/man.qxd 4/28/00 1:08 PM Page 75 Verwendung der Bitronics Software Beispiel: Gemeinsame Nutzung von zwei Druckern durch einen Computer Die Bitronics Software wickelt Druckaufgaben automatisch ab, indem Druckaufträge an den Port des Bitronics-Datenumschalters geleitet werden, den Sie unter den Eigenschaften des Druckers und in den Einstellungen in den Schritten auf den letzten 6 Seiten festgelegt haben. - Page 80 P73121/F1U126-KIT/g/EU/man.qxd 4/28/00 1:08 PM Page 76 Verwendung der Bitronics Software (Fortsetzung) Wenn Sie anschließend den zweiten Drucker verwenden möchten, z.B. einen LaserJet ™ , so müssen Sie diesen nur im Dialogfeld DRUCKEN auswählen und auf OK klicken. Der Druckauftrag wird dann automatisch zum LaserJet ™...
- Page 81 P73121/F1U126-KIT/g/EU/man.qxd 4/28/00 1:08 PM Page 77 Verwendung der Bitronics Software (Fortsetzung) BEISPIEL: Gemeinsame Nutzung eines Druckers und eines Zip ® Laufwerks (oder anderen Massenspeichergeräts) Massenspeichergeräte sind Laufwerke, die dem System einen Laufwerkbuchstaben wie „E" hinzufügen. Beim Anschluß von Massenspeichergeräten wie z.B. einem Zip ®...
- Page 82 P73121/F1U126-KIT/g/EU/man.qxd 4/28/00 1:08 PM Page 78 Verwendung der Bitronics Software (Fortsetzung) Klicken Sie auf den Port, an dem das Massenspeichergerät angeschlossen ist. In diesem Fall befindet sich ein Zip ® -Laufwerk an Port A. Wie Sie sehen, erscheint als Name die oben als „Display Name"...
- Page 83 P73121/F1U126-KIT/g/EU/man.qxd 4/28/00 1:08 PM Page 79 Verwendung der Bitronics Software (Fortsetzung) Verwendung eines anderen parallelen Geräts (weder Drucker noch Massenspeichergerät) in Verbindung mit einem Drucker Andere parallele Geräte werden unter SETTINGS (siehe Seite 11) als SCANNERS (Scanner) eingestellt (dies können neben Scannern z.B. auch parallele Kameras oder Bandlaufwerke sein).
- Page 84 Eingabeaufforderung YES (JA). • Zum erneuten Laden des Symbols auf der Task-Leiste klicken Sie auf START, PROGRAMME, BELKIN BITRONICS SWITCH, „AutoSwitch- Multi PCs". Tip für Profis: Wenn Sie Geräte mit Anschlüssen für die direkte Datendurchleitung verwenden (z.B.
- Page 85 Sie bitte auf der Website des Herstellers nach oder wenden Sie sich an dessen Technischen Support. Bitte rufen Sie wegen dieser speziellen Frage nicht den Technischen Support von Belkin an. ACER Während der Computer hochfährt, erscheint am Bildschirm die Aufforderung „To enter Setup, press CTRL+ALT+ESC".
-
Page 86: Hewlett-Packard
P73121/F1U126-KIT/g/EU/man.qxd 4/28/00 1:08 PM Page 82 Anhang (Fortsetzung) Drücken Sie ENTER (Eingabetaste), um das Fenster mit den BIOS-Einstellungen zu schließen. Dell Während der Computer hochfährt, erscheint am Bildschirm die Aufforderung „To enter Setup, press DEL" (bei einem 486-Prozessor können Sie auch zum Drücken von F2 aufgefordert werden). - Page 87 P73121/F1U126-KIT/g/EU/man.qxd 4/28/00 1:08 PM Page 83 Anhang (Fortsetzung) HP Vectra 500 PCs Während der Computer hochfährt, erscheint unten im Bild „Hewlett Packard System Hardware Test" die Aufforderung „Press F2 to Enter Setup". Drücken Sie F2. Markieren Sie mit Hilfe der Pfeiltasten „Parallel Port Mode". Folgen Sie den Anleitungen zur Änderung der Optionen.
- Page 88 P73121/F1U126-KIT/g/EU/man.qxd 4/28/00 1:08 PM Page 84 Anhang (Fortsetzung) Micron Allgemeine Schritte Während der Computer hochfährt, erscheint am Bildschirm die Aufforderung „Press F2 to enter Setup". Drücken Sie F2. Wählen Sie „Advanced" aus der Menüleiste aus. Wählen Sie gemäß den vorgegebenen Anleitungen „Integrated Peripherals" aus. Markieren Sie mit Hilfe der Pfeil-nach-unten-Taste „LPT Mode".
- Page 89 P73121/F1U126-KIT/g/EU/man.qxd 4/28/00 1:08 PM Page 85 Anhang (Fortsetzung) Sony PCV-70/90/100/120: Starten Sie den Computer neu. Drücken Sie auf der ersten schwarzweißen Sony-Bildschirmanzeige F3, um die Start-Bildschirmanzeige („Boot Screen") aufzurufen. Drücken Sie F1, um das BIOS Setup aufzurufen. Gehen Sie mit der Pfeil-nach-rechts-Taste zum Menü „Advanced". Rollen Sie nach unten, markieren Sie „Peripheral Configuration", und drücken Sie ENTER (Eingabetaste).
- Page 90 P73121/F1U126-KIT/g/EU/man.qxd 4/28/00 1:08 PM Page 86 Anhang (Fortsetzung) Rollen Sie nach unten, und markieren Sie „Mode". Die vorgegebene Einstellung ist „ECP". Drücken Sie ENTER (Eingabetaste). Wählen Sie „ECP" aus, und drücken Sie ENTER (Eingabetaste). Rollen Sie zu „Parallel Port", und drücken Sie ENTER (Eingabetaste). Wählen Sie „Enabled"...
-
Page 91: Ce-Konformitätserklärung
Informationen FCC-Erklärung ERKLÄRUNG ZUR EINHALTUNG DER FCC-VORSCHRIFTEN BEZÜGLICH ELEKTROMAGNETISCHER UND HOCHFREQUENTER STÖRUNGEN Wir, Belkin Components, 501 West Walnut Street, USA - Compton CA 90220, erklären hiermit in alleiniger Verantwortung, daß unser Produkt: F1U126gKIT folgende Voraussetzungen erfüllt: Dieses Gerät entspricht Teil 15 der FCC-Vorschriften. Der Betrieb unterliegt den folgenden Bedingungen: (1) das Gerät darf keine nachteiligen Störungen verursachen und (2) muß... - Page 92 1:10 PM Page 89 Inleiding Belkin Components dankt u hartelijk voor de aankoop van de Bitronics AutoSwitch Kit! U kunt nu vanaf uw werkplek kiezen tussen vier verschillende parallelle apparaten of één apparaat met vier computers delen. Als gebruiker van Windows ®...
-
Page 93: Technische Specificaties
P73121/F1U126-KIT/n/EU/man.qxd 4/28/00 1:10 PM Page 90 Technische specificaties Industriestandaarden: Communicatiestandaard voor parallel geschakelde poorten IEEE 1284-1994 Elektrisch: Voeding: Ingangsstroom max.: 600 mA Opgenomen vermogen max.: 5,4 W Warmtedissipatie: 0,31 BTU/min Omgevingscondities: Opslagtemperatuur: -10°C tot 50°C Bedrijfstemperatuur: 0°C tot 40°C Relatieve vochtigheid: 0 tot 95% Niet-condenserend Afmetingen apparaat: Breedte:... - Page 94 P73121/F1U126-KIT/n/EU/man.qxd 4/28/00 1:10 PM Page 91 Producteigenschappen Led externe voeding Led-indicatoren voor poortactiviteit Aansluiting poort A Aansluiting poort B RESET knop KEUZE knop COMMON aansluiting Dipschakelaa rs (zijkant) Led-indicator voor Aansluiting poort C Aansluiting poort D Ingang gelijk- handomschakeling stroomvoeding (zijkant) Instelling dipschakelaars (aan de zijkant van de switch):...
- Page 95 AutoSwitch een IEEE DB25 M/M kabel, zoals de kabel in deze verpakking. Gebruik voor de verbinding van een printer met de AutoSwitch een IEEE printerkabel zoals Belkin type F2A046nXX (hierin is XX de lengte in voet).
- Page 96 Omdat de BIOS setuproutine voor elke computer verschillend is, heeft het geen zin hiervoor de Belkin helpdesk te bellen. Zie het aanhangsel aan het slot van deze handleiding voor informatie over verschillende typen computers.
-
Page 97: Software Installeren
1:10 PM Page 94 Software installeren De verpakking van uw Belkin AutoSwitch bevat vier disks met stuurprogramma’s. Plaats de juiste disk in uw computer, afhankelijk van uw besturingssysteem. Als het setup-programma u vraagt welk type switch(box) u bezit, kies dan ‘F1U125n’. - Page 98 P73121/F1U126-KIT/n/EU/man.qxd 4/28/00 1:10 PM Page 95 Functie Gegevensoverdracht Wanneer vier PC’s op de AutoSwitch aangesloten zijn, kunnen zij onderling gegevens uitwisselen via elk standaard programma voor gegevensoverdracht als Windows ® Direct Cable Connection, Interlink ™ of LapLink ® OPMERKING: Poort A kan uitsluitend naar poort B bestanden overdragen en poort C naar poort D.
- Page 99 P73121/F1U126-KIT/n/EU/man.qxd 4/28/00 1:10 PM Page 96 Windows 95/98/NT ® (vervolg) B. Windows 3.x: ® • Klik op ‘File Transfer’ (Gegevensoverdracht). C. MS-DOS: • Typ bij de opdrachtaanwijzing de volgende tekst: SWPORT f U ziet dat de led-indicator van de poort waarmee u op de Bitronics AutoSwitch verbonden bent, GROEN oplicht.
- Page 100 P73121/F1U126-KIT/n/EU/man.qxd 4/28/00 1:10 PM Page 97 Windows 95/98/NT ® (vervolg) Installeren van Bitronics Software voor één PC op vier apparaten Zorg eerst dat de stuurprogramma’s van de beide apparaten al op de computer geïnstalleerd zijn en dat elk apparaat afzonderlijk probleemloos functioneert.
- Page 101 P73121/F1U126-KIT/n/EU/man.qxd 4/28/00 1:10 PM Page 98 Windows 95/98/NT ® (vervolg) Klik op de knop ‘SETTINGS’ (Instellingen) en stel de poorten in zoals onderstaand. 'DEVICE TYPE’ geeft u een afrolmenu te zien met de printertypen – en eventueel andere parallelgeschakelde typen apparaten – die op uw computer geïnstalleerd zijn.
- Page 102 P73121/F1U126-KIT/n/EU/man.qxd 4/28/00 1:10 PM Page 99 Windows 95/98/NT (vervolg) ® In dit voorbeeld hebben wij een Zip Drive op poort A en daarom hebben ® we voor poort A ‘MASS STORAGE DEVICE’ (Massaopslagapparaat) gekozen. Op poort B hebben we de Epson printer geïnstalleerd en daarom hebben dat stuurprogramma in de DEVICE TYPE voor poort B gekozen.
- Page 103 P73121/F1U126-KIT/n/EU/man.qxd 4/28/00 1:10 PM Page 100 Windows 95/98/NT ® (vervolg) Printerpoort wijzigen van LPT1 naar AutoSwitch poort: (Alleen Windows ® 95/98; ga voor Windows ® NT door naar pagina 104) Indien één van de vier gedeelde apparaten een printer is, volg dan de onderstaande procedure om de met de printer verbonden poort opnieuw te configureren.
- Page 104 P73121/F1U126-KIT/n/EU/man.qxd 4/28/00 1:10 PM Page 101 Windows 95/98/NT ® (vervolg) Klik op het tabblad ‘DETAILS’. Selecteer in het afrolmenu ‘Print to the following port:’ de juiste poort waarop deze printer op de Bitronics switch is aangesloten. • LPx1 – PA (auto switch) – Kies dit als de printer verbonden is met poort A van de Bitronics switch.
- Page 105 P73121/F1U126-KIT/n/EU/man.qxd 4/28/00 1:10 PM Page 102 Windows 95/98/NT ® (vervolg) Klik op ‘SPOOL SETTINGS’ (Wachtrij instellingen) en klik vervolgens op ‘Start printing after last page is spooled’ (Met printen beginnen nadat de laatste pagina in wachtrij geplaatst is). Klik op ‘Disable bi-directional support for this printer’ (Bi-directionele ondersteuning voor deze printer uitschakelen) als het keuzevakje NIET grijs is.
-
Page 106: Windows Nt
P73121/F1U126-KIT/n/EU/man.qxd 4/28/00 1:10 PM Page 103 Windows NT ® Printerpoort wijzigen van LPT1 naar AutoSwitch poort: (Alleen Windows ® NT): Het menu ‘Printer Properties’ (Printereigenschappen) in Windows ® wijkt hiervan enigszins af. Ga na het installeren van de software en het herstarten van de computer naar het menu ‘Printer Properties’... - Page 107 P73121/F1U126-KIT/n/EU/man.qxd 4/28/00 1:10 PM Page 104 Windows NT ® (vervolg) Klik op het tabblad SCHEDULING (Planning) voor een correcte instelling van de wachtrij-instellingen. Kies ‘Start printing after last page is spooled’ (Met printen beginnen nadat de laatste pagina in wachtrij geplaatst is). Zet ‘Priority’ (Prioriteit) op ‘Highest’...
- Page 108 P73121/F1U126-KIT/n/EU/man.qxd 4/28/00 1:10 PM Page 105 Gebruik van de Bitronics software Voorbeeld: Vier printers gebruikt door één computer De Bitronics software zorgt dat uw afdrukopdrachten automatisch worden uitgevoerd. Afhankelijk van uw instellingen van het menu ‘Printer Properties’ en uw keuzes in de stappen op de laatste zes pagina’s worden uw afdruktaken naar de juiste poort op de Bitronics switch gedirigeerd.
- Page 109 P73121/F1U126-KIT/n/EU/man.qxd 4/28/00 1:10 PM Page 106 Gebruik van de Bitronics software (vervolg) Wilt u vervolgens naar de vierde printer afdrukken, bijvoorbeeld een LaserJet ™ , dan hoeft u alleen maar de bewuste printer in het dialoogvenster PRINT (Afdrukken) op te zoeken. Klik op OK en de afdruktaak wordt automatisch naar de LaserJet ™...
- Page 110 P73121/F1U126-KIT/n/EU/man.qxd 4/28/00 1:10 PM Page 107 Gebruik van de Bitronics software (vervolg) VOORBEELD: Gemeenschappelijk gebruik van een printer en een Zip ® Drive (of ander apparaat voor massaopslag) Wanneer u te maken hebt met een apparaat voor massaopslag zoals een ®...
- Page 111 P73121/F1U126-KIT/n/EU/man.qxd 4/28/00 1:10 PM Page 108 Gebruik van de Bitronics software (vervolg) Klik op de poort waarmee het ‘MASS STORAGE DEVICE’ verbonden is, in dit geval een Zip ® Drive op poort A. U ziet dat de ‘Display Name’ die u boven hebt ingevoerd, nu beneden verschijnt. Klik op OK.
- Page 112 P73121/F1U126-KIT/n/EU/man.qxd 4/28/00 1:10 PM Page 109 Gebruik van de Bitronics software (vervolg) Parallelle apparaten (geen printers of apparaten voor massaopslag) delen met een printers Hebt u te maken met andere parallel geschakelde apparaten, dan worden deze in het instelmenu als ‘SCANNERS’ gedefinieerd (zie pagina 99). Voorbeelden hiervan zijn scanners, parallelgeschakelde camera’s en bandstations.
- Page 113 Pictogram verwijderen: klik met de rechter muisknop op het pictogram en beantwoord de prompt met ‘YES’ (Ja). • Pictogram weer toevoegen: klik op ‘START’, ‘PROGRAMS’ (Programma’s), ‘BELKIN BITRONICS SWITCH’, ‘AutoSwitch-Multi PCs’. TIP VOOR ERVAREN GEBRUIKERS: Wanneer u apparaten met passthrough-poorten gebruikt (zoals Zip ®...
- Page 114 Geadviseerd wordt deze stappen te volgen voor alle computers die op de switch worden aangesloten. Raadpleeg de betreffende website of bel de helpdesk van de leverancier van uw computer(s). De Belkin Helpdesk kan u hierbij helaas niet van dienst zijn.
-
Page 115: Hewlett-Packard
P73121/F1U126-KIT/n/EU/man.qxd 4/28/00 1:10 PM Page 112 Bijlage (vervolg) Druk op ‘ALT+P’ en kies ‘Parallel Mode'. U moet nu een lijst met beschikbare modi te zien krijgen. Kies de modus met de hoogste snelheid (bijv. ‘ECP'). Volg de aanwijzingen in de legenda om de instelling op te slaan en verlaat het setup-programma. - Page 116 P73121/F1U126-KIT/n/EU/man.qxd 4/28/00 1:10 PM Page 113 Bijlage (vervolg) Stappen voor PC-serie HP OmniBook 5000 en 5500 Volg de aanwijzingen op het scherm terwijl de computer opstart. Druk op ‘F2’ om het setup-programma te activeren. Dit wordt weergegeven onder in het testscherm van de Hewlett Packard System Hardware.
- Page 117 P73121/F1U126-KIT/n/EU/man.qxd 4/28/00 1:10 PM Page 114 Bijlage (vervolg) Volg de aanwijzingen in de legenda om de instelling op te slaan en verlaat het setup-programma. Stappen voor de Millennium, Phoenix BIOS v 4.05 OPMERKING: De stappen voor deze computer zijn niet opgenomen in het document dat in de verpakking is meegeleverd.
- Page 118 P73121/F1U126-KIT/n/EU/man.qxd 4/28/00 1:10 PM Page 115 Bijlage (vervolg) Doorloop het afrolmenu naar beneden en markeer ‘Paralel Port Type'. De standaardinstelling is ‘Compatible’. Druk op ‘ENTER'. Kies ‘ECP’ en druk op ‘ENTER'. Druk tweemaal op ‘ESC’ om het ‘Exit’ scherm te bereiken. Druk tweemaal op ‘ENTER’...
- Page 119 P73121/F1U126-KIT/n/EU/man.qxd 4/28/00 1:10 PM Page 116 Bijlage (vervolg) Kies het tabblad ‘Printer/FDD'. Zorg dat ‘Use as printer connector’ gekozen is en kies de gewenste poortmodus die de printer vereist. In dit scherm zijn drie opties beschikbaar: 1. ‘Normal’ (alleen uitvoer) 2.
-
Page 120: Fcc* Verklaring
Belkin Components garandeert dit product gedurende zijn gehele gebruiksduur op materiaal- en fabricagefouten. In geval van een defect zal Belkin Components het product naar eigen inzicht repareren of gratis vervangen mits het binnen de garantieperiode en met vooruitbetaling van verzendkosten wordt geretourneerd aan de geautoriseerde Belkin leverancier waarvan u het product gekocht hebt. - Page 121 IEEE conformi. • Cavo dispositivo IEEE 1284, pezzo Belkin n. F2A046iXX. Questo cavo è necessario per collegare un computer all’autoswitch. Nota: "XX" sta ad indicare la lunghezza in piedi.
-
Page 122: Specifiche Tecniche
P73121/F1U126-KIT/i/EU/man.qxd 4/28/00 1:11 PM Page 120 Specifiche tecniche Standard compatibili: Standard di comunicazione IEEE 1284-1994 Porta Parallela Elettrico: Tensione di ingresso: 9VDC Corrente di ingresso max: 600 mA Consumo massimo tensione: 5.4 W Dissipazione massima calore: 0.31 BTU/min Ambiente: Temperatura di stoccaggio: da -10ºC a 50ºC Temperatura di esercizio: da 0ºC a 40ºC... - Page 123 P73121/F1U126-KIT/i/EU/man.qxd 4/28/00 1:11 PM Page 121 Dettagli sul prodotto LED alimentazione esterna LED attività porta Connettore porta A Connettore porta B Pulsante di RESET Pulsante di SELEZIONE Connettore COMUNE Switch DIP (laterali) LED commutazione Connettore porta D Connettore porta C Jack di alimen- manuale tazione CC...
-
Page 124: Installazione Hardware
Da un computer all’AutoSwitch utilizzare un cavo IEEE DB25 M/M come quello fornito nel pacchetto. Per collegare una stampante all’AutoSwitch, utilizzare un cavo per stampante IEEE, quale il pezzo Belkin F2A046iXX, dove XX indica la lunghezza in piedi. - Page 125 Web per maggiori informazioni. Si prega di non chiedere informazioni in merito all’Assistenza Tecnica Belkin, in quanto la procedura di "Setup" BIOS varia a seconda dei casi. Per maggiori informazioni sui diversi modelli di computer ai vedano le Appendici alla fine di questo manuale.
-
Page 126: Installazione Software
P73121/F1U126-KIT/i/EU/man.qxd 4/28/00 1:11 PM Page 124 Installazione Software Il pacchetto comprende due dischetti di driver. Accertarsi di inserire il dischetto corretto nel computer, in base al tipo di sistema operativo utilizzato. Quando il programma di "Setup" richiede quale tipo di switch avete, accertatevi di selezionare "F1U125i". - Page 127 P73121/F1U126-KIT/i/EU/man.qxd 4/28/00 1:11 PM Page 125 Funzione di trasferimento file Quando due PC sono collegati all’AutoSwitch, essi sono in grado di scambiare i file mediante qualsiasi programma standard di trasferimento file come la Connessione Cavo Diretta Windows ® , Interlink ™...
- Page 128 P73121/F1U126-KIT/i/EU/man.qxd 4/28/00 1:11 PM Page 126 Windows 95 / 98 e NT ® ® B. Windows 3.x: ® • Cliccare su "File Transfer". C. MS-DOS: • Al prompt di comando, digitare "SWPORT f" Il LED della porta alla quale siete collegati sull’AutoSwitch Bitronics diventa VERDE.
- Page 129 P73121/F1U126-KIT/i/EU/man.qxd 4/28/00 1:11 PM Page 127 Windows 95 / 98 e NT ® ® (continua) Impostazione del Software Bitronics da utilizzare con 1 PC a 4 Dispositivi Prima di tutto, accertarsi che i driver dei due dispositivi siano già installati nel computer e che ogni dispositivo sia stato testato e funzioni da solo.
- Page 130 P73121/F1U126-KIT/i/EU/man.qxd 4/28/00 1:11 PM Page 128 Windows 95 / 98 e NT ® ® (continua) Cliccare sul pulsante "SETTINGS" e configurare le porte come indicato: Tipo di dispositivo compare un menu a tendina che indica i tipi di stampanti installate sul vostro computer ed i possibili dispositivi paralleli. In questo caso è...
- Page 131 P73121/F1U126-KIT/i/EU/man.qxd 4/28/00 1:11 PM Page 129 Windows 95 / 98 e NT ® ® (continua) In questo esempio avete un drive Zip sulla Porta A, quindi scegliete ® "MEMORIA DI MASSA" per la Porta A. E nella Porta B avete installato la stampante Epson, quindi scegliete il rispettivo driver nel Tipo di Dispositivo per la Porta B.
- Page 132 P73121/F1U126-KIT/i/EU/man.qxd 4/28/00 1:11 PM Page 130 Windows 95 / 98 e NT ® ® (continua) Per cambiare la porta della stampante da LPT1 a AutoSwitch: (soltanto per Windows ® 95/98, per Windows ® NT si veda pagina 133) Se una di tutte le quattro periferiche condivise è rappresentata da una stampante, è...
- Page 133 P73121/F1U126-KIT/i/EU/man.qxd 4/28/00 1:11 PM Page 131 Windows 95 / 98 e NT ® ® (continua) Cliccare sulla linguetta “DETTAGLI”. Nel menu a tendina compare "Print to the following port:" selezionare la porta corretta alla quale la stampante è collegata sullo switch Bitronics: •...
- Page 134 P73121/F1U126-KIT/i/EU/man.qxd 4/28/00 1:11 PM Page 132 Windows 95 / 98 e NT ® ® (continua) Cliccare su SPOOL "SETTINGS" e quindi su "Start printing after last page is spooled". Se NON è di colore grigio, cliccare su "Disable bi-directional support for this printer".
-
Page 135: Windows Nt
P73121/F1U126-KIT/i/EU/man.qxd 4/28/00 1:11 PM Page 133 Windows NT ® Cambiare la porta della stampante da LPT1 a AutoSwitch (soltanto per Windows NT ® Le Proprietà stampante in Windows NT ® sono leggermente differenti. Dopo avere installato il software e riavviato il computer, andare nelle proprietà... - Page 136 P73121/F1U126-KIT/i/EU/man.qxd 4/28/00 1:11 PM Page 134 Windows NT ® (continua) Per impostare i dati di spool in modo corretto, cliccare sulla linguetta PROGRAMMAZIONE. Accertarsi che sia selezionato "Start printing after last page is spooled". Quindi, impostare "Priority" sul valore massimo: Infine cliccare su OK.
-
Page 137: Come Funziona
P73121/F1U126-KIT/i/EU/man.qxd 4/28/00 1:11 PM Page 135 Per utilizzare il Software Bitronics Esempio: Due Stampanti Utilizzate da Un Computer Il Software Bitronics gestisce automaticamente i comandi di stampa indirizzando i vostri lavori di stampa alla porta corretta dello switch Bitronics in base alle impostazioni dati nelle Proprietà... - Page 138 P73121/F1U126-KIT/i/EU/man.qxd 4/28/00 1:11 PM Page 136 Per utilizzare il Software Bitronics (continua) A questo punto, se desiderate stampare dalla seconda stampante, ad esempio da una LaserJet ™ , è sufficiente selezionare quella stampante specifica nella finestra di dialogo di STAMPA. Cliccando su OK il comando di stampa viene automaticamente inviato alla stampante LaserJet ™...
- Page 139 P73121/F1U126-KIT/i/EU/man.qxd 4/28/00 1:11 PM Page 137 Per utilizzare il Software Bitronics (continua) ESEMPIO: Condivisione di una Stampante e di un drive Zip ( o di una ® qualsiasi altra memoria di massa) Quando si utilizza una memoria di massa (dispostivi che aggiungono una lettera di drive al vostro sistema, come ad esempio "E:"), come può...
- Page 140 P73121/F1U126-KIT/i/EU/man.qxd 4/28/00 1:11 PM Page 138 Per utilizzare il Software Bitronics (continua) Cliccare sulla porta che ha la "MEMORIA DI MASSA" collegata. In questo caso si tratta di un drive Zip ® ‚ sulla Porta A. Come potete vedere, il "Display Name" digitato appare in basso una volta inserito. Cliccare su OK.
- Page 141 P73121/F1U126-KIT/i/EU/man.qxd 4/28/00 1:11 PM Page 139 Per utilizzare il Software Bitronics (continua) Impiego di qualsiasi altro dispositivo parallelo (che non sia né una stampante, né una memoria di massa), con una stampante. Quando utilizzate altri dispositivi impostati sulla porta parallela, essi vengono impostati come "SCANNERS"...
- Page 142 SI’ al prompt. • Per ricaricare l’icona nel system tray, cliccare su "START", "PROGRAMS", "BELKIN BITRONICS SWITCH", "AutoSwitch-Multi PC’s". SUGGERIMENTO PER GLI UTENTI PIÙ ESPERTI: Se state utilizzando questi dispositivi con le porte di accesso diretto (come i Drive Zip ®...
- Page 143 Se il vostro computer non compare tra quelli elencati, controllare nel rispettivo sito web o chiamare l’assistenza tecnica. Si prega di non chiamare l’Assistenza Tecnica Belkin per questa particolare problematica. ACER Mentre il computer sta caricando, seguire le istruzioni sullo schermo "To enter Setup, press CTRL + ALT + ESC".
- Page 144 P73121/F1U126-KIT/i/EU/man.qxd 4/28/00 1:11 PM Page 142 Appendice (continua) Gateway 2000 Durante il caricamento del computer seguire le istruzioni sullo schermo: "To enter setup press F1". Selezionare "Advanced" dalla barra menu. Selezionare "Integrated Peripherals". Seguendo le istruzioni in legenda, selezionare "ECP" come modalità di porta parallela. Seguire le istruzioni della legenda per salvare l’impostazione ed uscire dal "Setup".
- Page 145 P73121/F1U126-KIT/i/EU/man.qxd 4/28/00 1:11 PM Page 143 Appendice (continua) IBM Aptiva Passaggi generali Mentre il computer sta caricando, seguire le istruzioni sul video: "Premere F1 per accedere al Setup". Seguire la legenda su come scorrere attraverso le opzioni di "Setup" fino a raggiungere "Input / Output Ports".
- Page 146 P73121/F1U126-KIT/i/EU/man.qxd 4/28/00 1:11 PM Page 144 Appendice (continua) Seguire le istruzioni in legenda per selezionare "Integrated Peripherals" (o "Peripheral Configuration" su alcuni modelli). Selezionare la modalità della porta parallela con le migliori prestazioni (es. ECP). Seguire le istruzioni in legenda per salvare le impostazioni ed uscire. Passaggi per il Force 443 CD, AMBIOS BIOS v 1.00.12.1313oe Mentre il computer sta caricando, seguire le istruzioni sullo schermo: "Press F1 to "Enter"...
- Page 147 P73121/F1U126-KIT/i/EU/man.qxd 4/28/00 1:11 PM Page 145 Appendice (continua) Modelli PCV-200/210/220/230/240: Riavviare il computer Nel corso della prima videata in bianco e nero Sony premere F3 per accedere alla videata di caricamento del computer. Premere F1 per accedere al "BIOS Setup". Utilizzare il tasto cursore destro per raggiungere il menu "Advanced".
-
Page 148: Dichiarazione Fcc
Questa garanzia non viene applicata se il prodotto è stato danneggiato involontariamente o in seguito ad un utilizzo eccessivo, scorretto o errato; se il prodotto è stato modificato senza l’autorizzazione scritta della Belkin, o se un qualsiasi numero di serie Belkin sia stato rimosso o cancellato.