
Related Manuals for Neilsen CT2437


Summary of Contents for Neilsen CT2437
- Page 1 3” PETROL WATER PUMP CT2437 OWNER'S MANUAL BEFORE OPERATIGN THIS EQUIPMENT PLEASE READ THESE INSTRUCTIONS CAREFULLY Cannon Tools Limited Address:20 Station Road, Rowley Regis, West Midlands, B65 0JU.UNITED KINGDOM...
-
Page 2: Ec Declaration Of Conformity
In case of alteration of the machine, not agreed upon by us, this declaration will lose its validity. Product description: 3” PETROL WATER PUMP Model: CT2437 Appropriate EC directives: EC-Machinery directive 2006/42/EC EC-Directive on electromagnetic compatibility(EMC)2014/30/EU EU- Noise Directive 2000/14/EC &... -
Page 3: Safety Information
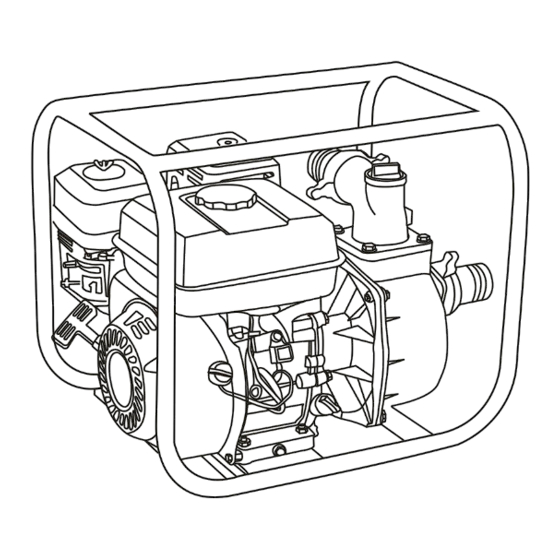
SAFETY INFORMATION Read and understand this owner's manual before operating your water pump. You can help prevent accidents by being familiar with your water pump’s controls, and by observing safe operating procedures. Operator Responsibility ● Know how to stop the engine quickly in case of emergency. ●... - Page 4 CONTROLS & FEATURES COMPONENT & CONTROL LOCATION...
- Page 5 CONTROLS Fuel Valve Lever The fuel valve opens and closes the passage between the fuel tank and the carburetor. The fuel valve lever must be in the ON position for the engine to run. When the engine is not in use, leave the fuel valve lever in the OFF position to prevent carburetor flooding and to reduce the possibility of fuel leakage.
- Page 6 Throttle Lever The throttle lever controls engine speed. Moving the throttle lever in the directions shown makes the engine run faster or slower. Recoil Starter Grip Pulling the starter grip operates the recoil starter to crank the engine. FEATURES Oil Alert System The Oil Alert system is designed to prevent engine damage caused by an insufficient amount of oil in the crankcase.
-
Page 7: Before Operation Checks
BEFORE OPERATION CHECKS Check the Suction and Discharge Hoses ● Remember that the suction hose must be reinforced construction to prevent hose collapse. ● Check that the sealing washer in the suction hose connector is in good condition. ●Check that the hose connectors and clamps are securely installed. ●... -
Page 8: Suction Hose Installation
SUCTION HOSE INSTALLATION Do not use a hose smaller than the pump's suction port size. Pump performance is best when the pump is near the water level, and the hoses are short. Minimum hose size: 80 mm Use a hose clamp to securely fasten the hose connector to the suction hose in order to prevent air leakage and loss of suction. -
Page 9: Discharge Hose Installation
DISCHARGE HOSE INSTALLATION It is best to use a short, large-diameter hose, because that will reduce fluid friction and improve pump output. Tighten the hose clamp securely to prevent the discharge hose from disconnecting under pressure. PRIMING THE PUMP Before starting the engine, remove the filler cap from the pump chamber, and completely fill the pump chamber with water. -
Page 10: Starting The Engine
STARTING THE ENGINE 1. Prime the pump. 2. Move the fuel valve lever to the ON position. 3. To start a cold engine, move the choke lever to the CLOSED position. To restart a warm engine, leave the choke lever in the OPEN position. 4. -
Page 11: Stopping The Engine
6. Operate the starter. Pull the starter grip lightly until you feel resistance, then pull briskly. Return the starter grip gently. 7. If the choke lever has been moved to the CLOSED position to start the engine, gradually move it to the OPEN position as the engine warms up. STOPPING THE ENGINE To stop the engine in an emergency, simply turn the engine switch to the OFF position. -
Page 12: Setting Engine Speed
SETTING ENGINE SPEED Position the throttle lever for the desired engine speed. For engine speed recommendations, refer to the instructions provided with the equipment powered by this engine. SERVICING YOUR PUMP If you operate your water pump under severe conditions, such as sustained high- load or high-temperature operation, or use in unusually wet or dusty conditions, consult your technician for recommendations applicable to your individual needs and use. -
Page 13: Maintenance Schedule
MAINTENANCE SCHEDULE ● Emission related items. (1) Service more frequently when used in dusty areas. (2) These items should be serviced by an technician. (3) For commercial use, log hours of operation to determine proper maintenance intervals. -
Page 14: Engine Oil Level Check
REFUELING Use unleaded gasoline with a pump octane rating of 86 or higher. Unleaded gasoline produces fewer engine and spark plug deposits and extends exhaust system life. WARNING ! Gasoline is highly flammable and explosive, and you can be burned or seriously injured when refueling. -
Page 15: Engine Oil Change
ENGINE OIL CHANGE Drain the used oil while the engine is warm. Warm oil drains quickly and completely. Warning! Pay attention that the engine oil may be very hot if it is drained off directly after the engine is shut off, or allow the engine to cool a few minutes before draining the oil. -
Page 16: Air Cleaner Service
AIR CLEANER SERVICE A dirty air filter will restrict air flow to the carburetor, reducing engine performance. If you operate the engine in very dusty areas, clean the air filter more often than specified in the MAINTENANCE SCHEDULE. NOTICE Operating the engine without an air filter, or with a damaged air filter, will allow dirt to enter the engine, causing rapid engine wear. -
Page 17: Sediment Cup Cleaning
SEDIMENT CUP CLEANING 1. Move the fuel valve to the OFF position, then remove the fuel sediment cup and O-ring. 2. Wash the sediment cup and O-ring in nonflammable solvent, and dry them thoroughly. 3. Place the O-ring in fuel valve, and install the sediment cup. Tighten the sediment securely. - Page 18 NOTICE A loose spark plug can overhand and damage the engine. Overtightening the spark plug can damage the threads in the cylinder head. 7. Attach the spark plug cap.
- Page 19 STORING YOUR WATER PUMP Storage Preparation Proper storage preparation is essential for keeping your water pump troublefree and looking good. Cleaning If the water pump has been running, allow it to cool for at least half an hour before cleaning. Clean all exterior surfaces, touch up any damaged paint, and coat other areas that may rust with a light film of oil.
-
Page 20: Engine Oil
DRAINING THE FUEL AND CARBURETOR 1. Place an approved gasoline container below the carburetor, and use a funnel to avoid spilling fuel. 2. Remove the carburetor drain bolt and sediment cup, then move the fuel valve lever to the ON position. ENGINE OIL 1. - Page 21 TAKING CARE OF UNEXPECTED PROBLEMS ENGINE WILL NOT START ENGINE WILL NOT Possible Cause Correction START 1. Check control Fuel valve OFF. Move lever to ON. positions. Choke OFF. Move the choke / throttle lever to CHOKE ON position unless engine is warm.
- Page 22 NO PUMP OUTPUT NO PUMP OUTPUT Possible Cause Correction 1. Check pump chamber. Pump not primed. Prime pump. 2. Check suction hose. Hose collapsed, cut or Replace suction hose. punctured. Strainer not completely Sink the strainer and the underwater. end of a suction hose completely underwater.
-
Page 23: Specifications
4.3kW/3600/min Lube oil capacity 0.6 L Ignition system Transistorized magneto PTO shaft rotation Counterclockwise Pump Model CT2437 Total Head Suction head Flow Suction Caliber 80mm Discharge Caliber 80mm DISPOSAL GUIDELINES At the end of the machine’s working life, or when it can no longer be repaired, ensure that it is disposed of according to national regulations. - Page 27 Cannon Tools Limited Address:20 Station Road, Rowley Regis, West Midlands, B65 0JU.UNITED KINGDOM Made in China...