Stanley J309 - 600 Peak Amp Jump Starter Manual
- Instruction manual (36 pages) ,
- Instruction manual (8 pages) ,
- Instruction manual (12 pages)
Advertisement
SAVE THIS INSTRUCTION MANUAL FOR FUTURE REFERENCE.
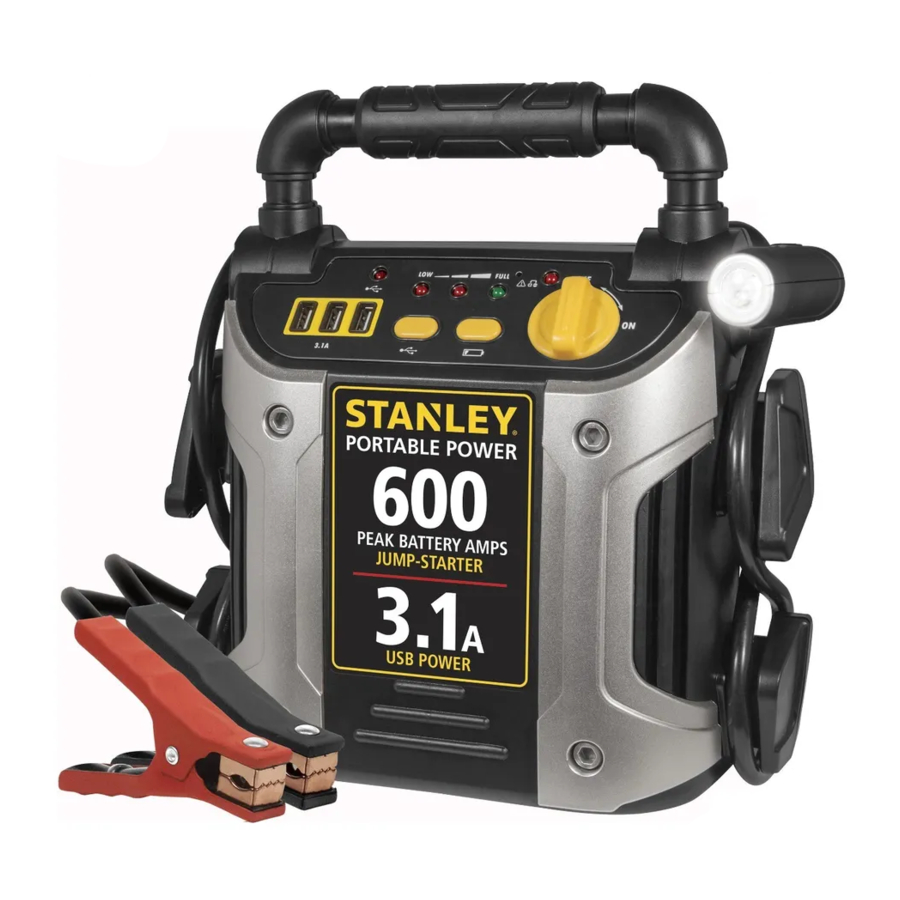
FEATURES

- USB Power Button
- USB Power Ports
- USB Power Indicator
- Battery Status LED Indicators
- Reverse Polarity Indicator
- Jump-Starter Power Switch
- Pivoting LED Light
- Battery Power Level Button
- Area Light Power Switch
- Built-in 120 Volt AC Charger
- Positive (+) Red Clamp
- Negative (–) Black Clamp
INTRODUCTION
Read this Instruction Manual and follow the instructions carefully before using this unit.
CHARGING/RECHARGING
Lead-acid batteries require routine maintenance to ensure a full charge and long battery life. All batteries lose energy from self-discharge over time and more rapidly at higher temperatures. Therefore, batteries need periodic charging to replace energy lost through self-discharge. When the unit is not in frequent use, manufacturer recommends the battery be recharged at least every 30 days.
Notes: This unit is delivered in a partially charged state – you must fully charge it upon purchase and before using it for the first time. Initial AC charge should be for 24 hours.
Recharging battery after each use will prolong battery life; frequent heavy discharges between recharges and/or overcharging will reduce battery life. The battery can be recharged using either the Built-In 120 Volt AC Charger.
Make sure all other unit functions are turned off during recharging, as this can slow the recharging process.

RISK OF PROPERTY DAMAGE: Failure to keep the battery charged will cause permanent damage and result in poor jump starting performance.
Charging/Recharging Using the 120V AC Charger and a Standard Household Extension Cord (not included)
- Lift the AC adapter cover located on the back of the unit and connect an extension cord to the unit. Plug the other end of the cord into a standard 120V AC wall outlet.
- Charge until two red and one green LED Battery Status Indicators light.
- Disconnect the extension cord and depress the battery status button. If all 3 status lights illuminate, the unit is fully charged.
Note: The unit cannot be overcharged using this method.
JUMP-STARTER
This Jump-Starter is equipped with an On/Off Power Switch. Once the connections are properly made, turn the switch on to jump-start the vehicle.
- Turn off vehicle ignition and all accessories (radio, A/C, lights, connected cell phone chargers, etc.). Place vehicle in "park" and set the emergency brake.
- Make sure the Jump-Starter Power Switch is turned to off.
- Remove jumper clamps from clamp tabs. Connect the red clamp first, then the black clamp.
- Procedure for jump-starting a NEGATIVE GROUNDED SYSTEM (negative battery terminal is connected to chassis) (MOST COMMON)
- Connect positive (+) red clamp to vehicle battery's positive terminal.
- Connect negative (–) black clamp to chassis or a solid, non-moving, metal vehicle component or body part. Never clamp directly to negative battery terminal or moving part. Refer to the automobile owner's manual.
- Procedure for jump-starting POSITIVE GROUND SYSTEMS
Note: In the rare event that the vehicle to be started has a Positive Grounded System (positive battery terminal is connected to chassis), replace steps 4a and 4b above with steps 5a and 5b, then proceed to step 6.- Connect negative (–) black clamp to vehicle battery's negative terminal.
- Connect positive (+) red clamp to vehicle chassis or a solid, non-moving, metal vehicle component or body part. Never clamp directly to positive battery terminal or moving part. Refer to the automobile owner's manual.
- When clamps are connected properly, turn the Jump-Starter Power Switch to ON.
- Turn ON the ignition and crank the engine in 5-6 second bursts until the engine starts.
- Turn the Jump-Starter Power Switch back to the OFF position.
- Disconnect the negative (–) engine or chassis clamp first, then disconnect the positive (+) battery clamp.

TO REDUCE THE RISK OF INJURY OR PROPERTY DAMAGE:
- FOLLOW ALL SAFETY INSTRUCTIONS FOUND IN THE "Specific Safety Instructions for Jump Starters" section of this instruction manual.
- This power system is to be used ONLY on vehicles with 12 volt DC battery systems.
- Never touch red and black clamps together — this can cause dangerous sparks, power arcing, and/or explosion.
- After use, turn the Jump-Starter Power Switch off.
TO REDUCE THE RISK OF PROPERTY DAMAGE:
- Vehicles that have on-board computerized systems may be damaged if vehicle battery is jump-started. Before jump-starting this type of vehicle, read the vehicle manual to confirm that external-starting assistance is advised.
- Excessive engine cranking can damage the vehicle's starter motor. If the engine fails to start after the recommended number of attempts, discontinue jump-start procedure and look for other problems that need to be corrected.
- If the connections to the battery's positive and negative terminals are incorrect, the reverse polarity indicator will light and the unit will sound a continuous alarm until the clamps are disconnected. Disconnect clamps and reconnect to battery with correct polarity.
- If vehicle fails to start, turn off the ignition, turn off the Jump-Starter Power Switch, disconnect the jump-start system's leads and contact a qualified technician to investigate why the engine did not start.
- Recharge this unit fully after each use.
USB POWER PORTS
- Push the USB Power Button to turn the USB Port on and the USB Power Indicator will light.
- Plug the USB-powered device into one of the USB Charging Ports and operate normally.
- Periodically press the battery charge level pushbutton to check battery status. (When all three battery status indicators light, it indicates a full battery. When only one red battery status indicator lights, it indicates that the unit needs to be recharged.)
Notes: This unit's USB Power Ports do not support data communication. They only provide 5V each to an external USB-powered device (a total of 3.1A).
Make sure the USB Power Button is in the off position when the unit is being recharged or stored. Some household USB-powered electronics will not operate with this unit.
EMERGENCY AREA LIGHT
The area light is controlled by the Area Light Power Switch on top of the light. Make sure the area light is turned off when the unit is being recharged or stored.
Periodically press the Battery Charge Level Button to check battery status. (When all three battery status indicators light, it indicates a full battery. When only one red battery status indicator lights, it indicates that the unit needs to be recharged.)
CARE AND MAINTENANCE
All batteries lose energy from self-discharge over time and more rapidly at higher temperatures. When the unit is not in use, we recommend that the battery is charged at least every 30 days.
From time to time wipe the outside of the appliance with a soft cloth. Do not immerse the appliance in water.
There are no user-replaceable parts. Periodically inspect the condition of adapters, connectors and wires. Contact manufacturer to replace any components that have become worn or broken.
Battery
Please be advised that the battery is designed to last the service life of the unit and is not replaceable, removable or serviceable. Service life is dependent on a number of factors including but not limited to the number of recharge cycles, and proper care and maintenance of the battery by the end user. Contact manufacturer for any information you may need.
SAFE BATTERY DISPOSAL

Contains a maintenance-free, sealed, non-spillable, lead acid battery, which must be disposed of properly. Recycling is required. Failure to comply with local, state and federal regulations can result in fines, or imprisonment.
Please recycle.
- Do not dispose of the battery in fire as this may result in an explosion.
- Before disposing of the battery, protect exposed terminals with heavy-duty electrical tape to prevent shorting (shorting can result in injury or fire).
- Do not expose battery to fire or intense heat as it may explode.
TROUBLESHOOTING
Unit will not charge
- Make sure all of the unit's functions are turned off.
- Make sure a suitable gauge extension cord is properly connected to both the unit and a functioning AC outlet.
Unit Fails to Jump-Start
- Make sure unit's power switch is in the on position.
- Check that jump-starter has a full charge. Recharge unit if necessary.
- Make sure a proper polarity cable connection has been established.
USB Power Port will not power appliance
- Make sure the USB Charging Port Power Button is in the on position.
- Make sure that the total draw of all USB devices plugged into the USB Ports does not exceed 3.1A.
- Some USB-powered household electronics will not operate with this USB charging/ power port. Check the manual of the corresponding electronic device to confirm that it can be used with this type of USB charging/power port.
- Check that jump-starter has a full charge. Recharge unit if necessary.
LED Area Light does not come on
- Make sure the LED Area Light On/Off Button is in the on position
- Check that jump-starter has a full charge. Recharge unit if necessary.
ACCESSORIES
Recommended accessories for use with your tool may be available from the manufacturer. If you need assistance regarding accessories, please contact the manufacturer at 1-877-571-2391.
 The use of any accessory not recommended for use with this appliance could be hazardous.
SERVICE INFORMATION
Whether you need technical advice, repair, or genuine factory replacement parts, contact the manufacturer at 1-877-571-2391.
SPECIFICATIONS
| Boost Ampere: | 12V DC, 600A peak battery, 300A instantaneous |
| Battery Type: | Maintenance-free, sealed lead acid, 12V DC |
| Area Light: | 1 long-life white LED |
| USB Power Ports: | 5V DC each, 3.1A total |
SAFETY GUIDELINES / DEFINITIONS

Indicates an imminently hazardous situation which, if not avoided, will result in death or serious injury.
Indicates a potentially hazardous situation which, if not avoided, may result in death or serious injury.
Indicates a potentially hazardous situation which, if not avoided, may result in minor or moderate injury.
Used without the word, indicates a safety related message.
NOTICE: Indicates a practice not related to personal injury which, if not avoided, may result in property damage.
RISK OF UNSAFE OPERATION. When using tools or equipment, basic safety precautions should always be followed to reduce the risk of personal injury. Improper operation, maintenance or modification of tools or equipment could result in serious injury and property damage. There are certain applications for which tools and equipment are designed. Manufacturer strongly recommends that this product NOT be modified and/or used for any application other than for which it was designed. Read and understand all warnings and operating instructions before using any tool or equipment.
READ ALL INSTRUCTIONS
Read and understand this instruction manual before using this unit.
IMPORTANT SAFETY INSTRUCTIONS
FAILURE TO FOLLOW THE FOLLOWING WARNINGS AND INSTRUCTIONS MAY RESULT IN ELECTRIC SHOCK, FIRE AND/OR SERIOUS INJURY.
GENERAL SAFETY WARNINGS AND INSTRUCTIONS
- This unit was designed for household use only.
- Avoid dangerous environments. Don't use appliances in damp or wet locations. Don't use appliances in the rain or snow.
- Keep children away. All visitors should be kept at a distance from work area.
- Dress properly. Do not wear loose clothing or jewelry. They can be caught in moving parts. Rubber gloves and substantial, non-skid footwear are recommended when working outdoors. Wear protective hair covering to contain long hair.
- Store idle appliance indoors. When not in use, appliances should be stored indoors in dry, and high or locked-up place – out of reach of children.
- Don't abuse cord. Never carry appliance by cord or yank it to disconnect from receptacle. Keep cord from heat, oil, and sharp edges.
- Disconnect appliances. Disconnect the appliance from the power supply when not in use, before servicing, and when changing accessories.
- Ground Fault Circuit Interrupter (GFCI) protection should be provided on the circuits or outlets to be used. Receptacles are available having built in GFCI protection and may be used for this measure of safety.
- Use of accessories and attachments. The use of any accessory or attachment not recommended for use with this appliance could be hazardous. Refer to the accessory section of this manual for further details.
- Stay alert. Use common sense. Do not operate this equipment when you are tired or impaired.
- Check for damaged parts. Any part that is damaged should be replaced by the manufacturer before further use. Do not use tool if switch does not turn it on and off. Contact the manufacturer at 1-877-571-2391 for more information.
- Do not operate this appliance near flammable liquids or in gaseous or explosive atmospheres. Motors in these tools normally spark, and the sparks might ignite fumes.
- Never submerge this unit in water; do not expose it to rain, snow or use when wet.
- To reduce risk of electric shock, disconnect the unit from any power source before attempting maintenance or cleaning. Turning off controls without disconnecting will not reduce this risk.
- This equipment employs parts (switches, relays, etc.) that produce arcs or sparks. Therefore, if used in a garage or enclosed area, the unit MUST be placed not less than 18 inches above the floor.
SPECIFIC SAFETY INSTRUCTIONS FOR CHARGING THIS UNIT
![]()
This unit is delivered in a partially charged state. Fully charge unit with a household extension cord for a full 24 hours or until the green LED lights before using for the first time. You cannot overcharge the unit using the AC charging method.- To recharge this unit, use only the built-in AC charger.
- All functions should be turned off when the unit is charging or not in use. Make sure all switches are in the OFF position before connection to a power source or load.

EXTENSION CORDS:
- Outdoor use extension cords. When appliance is used outdoors, use only extension cords intended for use outdoors and so marked.
![]()
Use of improper extension cord could result in a risk of fire and electric shock. When using an extension cord, make sure that the pins of the extension cord are the same number, size and shape as those in the charger; and be sure to use one heavy enough to carry the current your product will draw. An undersized cord will cause a drop in line voltage resulting in loss of power and overheating. The following table shows the correct size to use depending on cord length and nameplate ampere rating. If in doubt, use the next heavier gauge. The smaller the gauge number, the heavier the cord.

- When an extension cord is used, make sure that:
- the pins of extension cord are the same number, size and shape as those in the charger,
- the extension cord is properly wired and in good electrical condition,
- the wire size is large enough for the AC rating of the charger.

TO REDUCE THE RISK OF INJURY OR PROPERTY DAMAGE:
Pull the extension cord by the plug rather than the cord when disconnecting from the built-in 120V AC Charger or the AC outlet.
SPECIFIC SAFETY INSTRUCTIONS FOR JUMP-STARTERS
BURST HAZARD:
Do not use the unit for charging dry-cell batteries that are commonly used with home appliances. These batteries may burst and cause injury to persons and damage property. Use the unit for charging/boosting a lead-acid battery only. It is not intended to supply power to a low-voltage electrical system other than in a starter-motor application.
- Use of an attachment not supplied, recommended or sold by manufacturer specifically for use with this unit may result in a risk of electrical shock and injury to persons.
RISK OF EXPLOSIVE GASES:
- Working in the vicinity of a lead acid battery is dangerous. Batteries generate explosive gases during normal battery operation. For this reason, it is of the utmost importance that each time before using the jump-starter you read this manual and follow instructions exactly.
- To reduce the risk of battery explosion, follow these instructions and those published by the battery manufacturer and manufacturer of any equipment you intend to use in the vicinity of the battery. Review cautionary markings on these products and on the engine.
TO REDUCE THE RISK OF INJURY OR PROPERTY DAMAGE:
- NEVER ATTEMPT TO JUMP-START OR CHARGE A FROZEN BATTERY.
- Vehicles that have on-board computerized systems may be damaged if vehicle battery is jump-started. Before jump-starting, read the vehicle's owner's manual to confirm that external-starting assistance is suitable.
- Never smoke or allow a spark or flame in vicinity of vehicle battery, engine or portable power station
- Stay clear of fan blades, belts, pulleys, and other parts that can cause injury to persons.
- Remove personal metal items such as rings, bracelets, necklaces and watches when working with a lead acid battery. A lead acid battery can produce a short circuit current high enough to weld a ring, or similar metal object, to skin, causing a severe burn.
- Do not wear vinyl clothing when jump-starting a vehicle. Friction can cause dangerous static-electrical sparks.
- Be extra careful to avoid dropping a metal tool onto the battery. It might spark or short-circuit the battery or another electrical part and could cause an explosion.
- Jump-start procedures should only be performed in a safe, dry, well-ventilated area.
- Always store battery clamps when not in use. Never touch battery clamps together. This can cause dangerous sparks, power arcing and/or explosion.
- When using this unit close to the vehicle's battery and engine, stand the unit on a flat, stable surface, and be sure to keep all clamps, cords, clothing and body parts away from moving vehicle parts.
- Never allow red and black clamps to touch each other or another common metal conductor — this could cause damage to the unit and/or create a sparking/ explosion hazard.
- If the clamps are connected incorrectly with regard to polarity, the Reverse Polarity Indicator will light (red) and the unit will sound a continuous alarm until the clamps are disconnected. Disconnect the clamps and reconnect to battery with correct polarity.
- Always disconnect the negative (BLACK) jumper cable first, followed by the positive (RED) jumper cable, except for positive grounded systems.
- Do not expose battery to fire or intense heat since it may explode. Before disposing of the battery, protect exposed terminals with heavy-duty electrical tape to prevent shorting (shorting can result in injury or fire).
- Place this unit as far away from the battery as cables permit.
- Never allow battery acid to come in contact with this unit.
- Do not operate this unit in a closed area or restrict ventilation in any way.
- This system is designed to be used only on vehicles with a 12 volt DC battery system. Do not connect to a 6 volt or 24 volt battery system.
- This system is not designed to be used as a replacement for a vehicular battery. Do not attempt to operate a vehicle that does not have a battery installed.
- Excessive engine cranking can damage a vehicle's starter motor. If the engine fails to start after the recommended number of attempts, discontinue jump-start procedures and look for other problems that may need to be corrected.
- Do not use this Jump-Starter on a watercraft. It is not qualified for marine applications.
- Although this unit contains a non-spillable battery, it is recommended that unit be kept upright during storage, use and recharging. To avoid possible damage that may shorten the unit's working life, protect it from direct sunlight, direct heat and/or moisture.
SPECIFIC SAFETY INSTRUCTIONS FOR THE USB POWER PORTS
- Do not insert foreign objects into the USB Power Ports.
- Do not attach USB hubs or more than one personal electronic device to each USB Power Port.
- Do not use this unit to operate appliances that require more than 3.1 amps in total to operate from the USB power ports.
PERSONAL SAFETY
When working with lead acid batteries, always make sure immediate assistance is available in case of accident or emergency.
Always have protective eyewear when using this product: contact with battery acid may cause blindness and/or severe burns. Be aware of first aid procedures in case of accidental contact with battery acid.
Have plenty of fresh water and soap nearby in case battery acid contacts skin.
- SKIN: If battery acid comes in contact with skin, rinse immediately with water, then wash thoroughly with soap and water. If redness, pain, or irritation occurs, seek immediate medical attention.
- EYES: If battery acid comes in contact with eyes, flush eyes immediately, for a minimum of 15 minutes and seek immediate medical attention.
SAVE THESE INSTRUCTIONS
STANLEY® AND THE STANLEY® LOGO ARE REGISTERED TRADEMARKS OF STANLEY BLACK + DECKER INC. OR ONE OF ITS AFFILIATES, AND ARE USED UNDER LICENSE.
Imported by Baccus Global LLC,
621 NW 53rd St., Suite 450, Boca Raton, FL 33487
www.baccusglobal.com 1-877-571-2391

Documents / Resources
References
Download manual
Here you can download full pdf version of manual, it may contain additional safety instructions, warranty information, FCC rules, etc.
Advertisement
Thank you! Your question has been received!


Need Assistance?
Do you have a question about the J309 that isn't answered in the manual? Leave your question here.