Oregon Scientific RM313PNA - Projection Alarm Clock Manual
- User manual (2 pages) ,
- User manual (2 pages) ,
- User manual (2 pages)
Advertisement
FEATURES
- Time display with Hour, Minutes,
- Seconds, Day and Date
- Day of Week displayed in English,
- French or Spanish
- Blue
![]() backlight
backlight - Alarm with 8-minute snooze
- Crescendo Alarm increases in volume and intensity
- Adjustable U.S. time zone
- One-touch time projection onto the ceiling for continuous night-time display
- Low battery indicator
 backlight
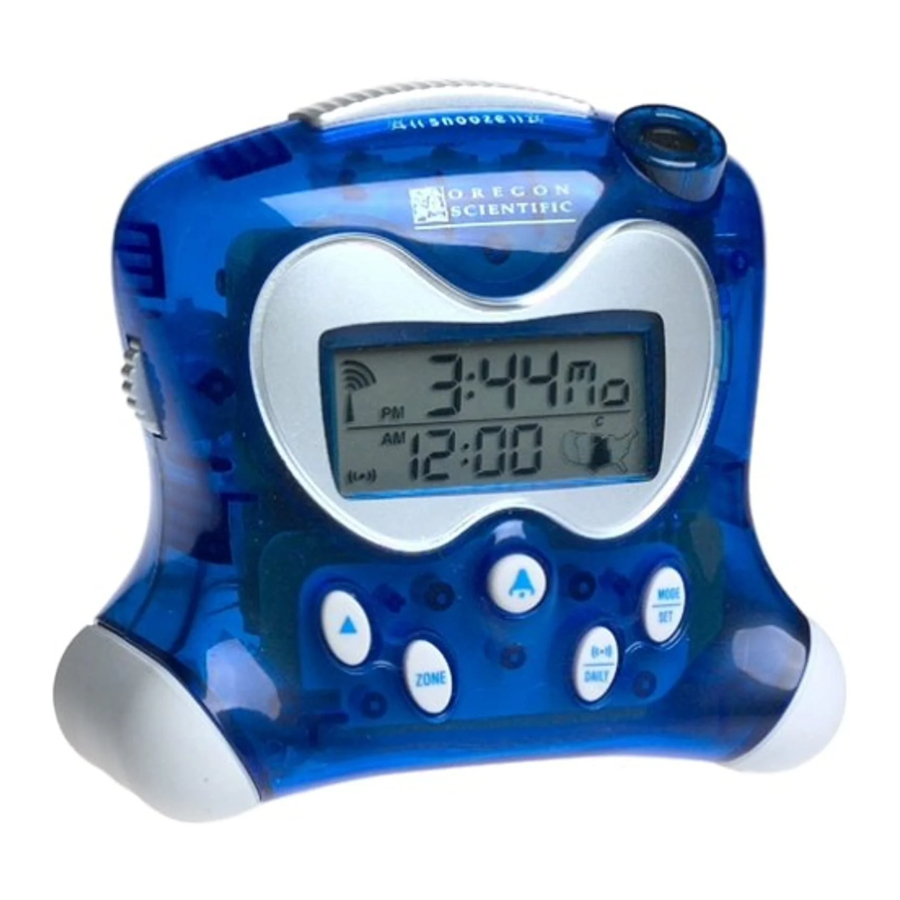
PRODUCT OVERVIEW
BUTTON DESCRIPTIONS

SNOOZE (A.1)
Press SNOOZE to illuminate the backlight for 5 seconds, view the projected time for 5 seconds, or snooze the alarm for 8 minutes.
NOTE
The backlight and projector work together. Both light up at the same time.
 ARROW (A.2)
Press to increase a value, or press and hold to turn on RF clock signal reception from the U.S. Atomic Clock in Boulder, Colorado. Refer to the Set Time and Date and Set Alarm sections for more instructions.
 ARROW (A.2)
Press to decrease a value.
ZONE (A.3)
Press to select the U.S. Time Zone. Once the desired zone is highlighted, the clock will automatically adjust the time.
Press and hold for 2 seconds to turn off the RF clock signal reception from the U.S. Atomic Clock in Boulder, Colorado.
 ALARM (A.4)
Press to turn the alarm on or off. Refer to the Set Alarm section for set-up instructions.
NOTE
The alarm is activated whenever the icon shows on the display.
MODE / SET (A.5)
Press to view day of week or seconds, or press and hold for 3 seconds to set the time, date, and display language. Refer to the Set Time and Date section for instructions.
PROJECTION ON (A.6)
Slide to enable or disable continuous time projection.
NOTE
The AC power adaptor must be plugged in for this feature to work.
LCD DESCRIPTIONS
TIME
The top line of the display shows the hours, minutes, and time zone.
 RADIO FREQUENCY SIGNAL
The RF signal indicates the strength of U.S. Atomic Clock signals reception. To disable the signal (for example, if you wish to manually set the time), press and hold ZONE for 2 seconds.
 ALARM ON
When is shown, the alarm is activated. Press to turn the alarm on or off.
(( • )) ALARM MODE
When (( • )) is shown, the clock is displaying the alarm time. Alarm time is displayed in hours and minutes (AM/PM)
MONTH / DATE
The second line of the display shows the month and date. Press MODE/SET to switch views.
US MAP
The U.S. Map indicates which Time Zone is selected. Press ZONE to switch between Pacific, Mountain, Central, or Eastern Time.
 LOW BATTERY
Replace the batteries whenever is shown.
TEMPERATURE
The indoor temperature is shown in the lower right corner of the LCD display. Temperature is measured in °F only.
CLOCK
This product has two displays: Clock with day of week in English, French or Spanish, and Calendar display with month and date. The time is automatically updated by the U.S. Atomic Clock in Boulder, Colorado unless you disable this feature. Signals are collected by the main unit when it is within 932 miles (1500 km) of a signal.
Initial reception takes 2 - 10 minutes, and is initiated when you first setup the unit, and whenever you press RESET. Once complete, the reception icon will stop blinking. The icon is shown in the Clock Area.
| Strong signal | Weak signal | No signal |
 |  |  |
To force a manual search for Atomic Clock signals, press and hold UP for 2 seconds. If no signal is found, check the batteries.
NOTE
If the Atomic Clock signal is received and the hour is incorrect, use the ZONE button to adjust to the correct timezone (refer to the U.S. map icon).
PROJECTOR / BACKLIGHT

Press SNOOZE to activate the projector and backlight for 5 seconds.
To use the continuous projection feature, connect the AC power adaptor to a wall outlet (Figure C), and slide the PROJECTION ON switch (A.6) to the "On" position. Then, press SNOOZE to activate continuous projection.
To deactivate continuous projection, slide the PROJECTION ON switch to the "Off" position.
BATTERIES

This product operates on 2 AA-size batteries. To activate the unit, open the battery compartment and replace the batteries whenever  shows on the display. Always match the correct polarity, as shown in the battery compartment.
SET TIME AND DATE
- Press and hold MODE for 3 seconds.
- Select the hour, minutes, year, month, date, and display language. Press
![]() or
or ![]() to change the setting. Press MODE to confirm.
to change the setting. Press MODE to confirm.
 or
or  to change the setting. Press MODE to confirm.
NOTE The language options are (E) English, (F) French, and (S) Spanish.
SET ALARM
- Press and hold
![]() for 3 seconds.
for 3 seconds. - Select the hour and minutes.
Press![]() or
or ![]() to change the setting.
to change the setting.
Press![]() to confirm.
to confirm.
 for 3 seconds.
 or
or  to change the setting.
NOTE
Alarm is automatically activated whenever you change the alarm time.
TURN ALARM ON OR OFF
When activated, the alarm starts quietly, then gradually becomes louder. If no action is taken, the alarm will automatically snooze for 8 minutes, then sound once more before it turns off completely for the day.
To turn the Alarm on or off, press  .
.
To snooze the alarm, press SNOOZE.
RESET SYSTEM
The RESET button is located in the battery compartment. Press the button with the point of a blunt object (such as a ball point pen) whenever the clock is not behaving as expected. This will return all settings to default value.
SAFETY AND CARE
Wash the unit with a slightly damp cloth and mild detergent. Avoid dropping the unit or placing it in a high-traffic location.

This product is designed to give you years of service if handled properly. Observe the following guidelines:
- Never immerse the unit in water. This can cause electrical shock and damage the unit.
- Do not subject the main unit to extreme force, shock, or fluctuations in temperature or humidity.
- Do not tamper with the internal components. Doing so will terminate the unit's warranty and may cause damage. The unit contains no userserviceable parts.
- Do not mix new and old batteries or batteries of different types.
- Do not use rechargeable batteries with this product.
- Remove the batteries if storing this product for a long period of time.
- Do not scratch the LCD display.
- Read this instruction manual thoroughly before operating the unit.
- The contents of this user manual are subject to change without further notice.
- Images not drawn to scale.
- Do not make any changes or modifications to this product. Unauthorized changes may void your right to use the product.
TROUBLESHOOTING
Check here before contacting our customer service department.
| Problem | Remedy |
| Alarm rings at same time every day | Press  to turn off the Daily Alarm. to turn off the Daily Alarm. |
| No power or dim display | Check the batteries. |
| No continuous projection | Check the AC power adaptor. It should be plugged in. |
| Check the PROJECTION ON switch. It should be in the "On" position. | |
| Strange date / time | Check the time zone and display language. |
SPECIFICATIONS
- Atomic Clock: Auto or Disabled (manual)
- Clock Display HH:MM:SS
- Operating temperature: 23°F to 122°F
- HiGlo TM backlight source: Electroluminescence
- Battery type: 2 AA
- Power Adapter: 3.0V AC/DC Adapter
ABOUT OREGON SCIENTIFIC
Visit our website (www.oregonscientific.com) to learn more about Oregon Scientific products such as digital cameras; MP3 players; children's electronic learning products and games; projection clocks; health and fitness gear; weather stations; and digital and conference phones. The website also includes contact information for our customer care department in case you need to reach us, as well as frequently asked questions and customer downloads.
We hope you will find all the information you need on our website, however if you'd like to contact the Oregon Scientific Customer Care department directly, please visit: www2.oregonscientific.com/service/support
OR
Call 949-608-2848 in the US.
For international enquiries, please visit: www2.oregonscientific.com/about/

Documents / ResourcesDownload manual
Here you can download full pdf version of manual, it may contain additional safety instructions, warranty information, FCC rules, etc.
Download Oregon Scientific RM313PNA - Projection Alarm Clock Manual
Advertisement
Thank you! Your question has been received!


Need Assistance?
Do you have a question about the RM313PNA that isn't answered in the manual? Leave your question here.