Table of Contents
Advertisement
Available languages
Available languages
Owner's Manual
CRAFTSMAN °
ROTARY LAWN MOWER
625 Series Briggs & Stratton Engine
21" Multi-Cut
Model No.
917.389011
• EspaSol, p. 18
CAUTION'.
Read and follow all
Safety Rules and Instructions
before operating this equipment
Sears, Roebuck and Co., Hoffman Estates, IL 60179
Visit our Craftsman website: www.sears.com/craftsman
U.S.A.
Advertisement
Table of Contents

Related Manuals for Craftsman 38901


Summary of Contents for Craftsman 38901
- Page 1 625 Series Briggs & Stratton Engine 21" Multi-Cut Model No. 917.389011 • EspaSol, p. 18 CAUTION'. Read and follow all Safety Rules and Instructions before operating this equipment Sears, Roebuck and Co., Hoffman Estates, IL 60179 Visit our Craftsman website: www.sears.com/craftsman U.S.A.
-
Page 2: Lawn Mower
Sears store, Parts & Repair Center or other Craftsman outlet for free repair (or replacement proves impossible). This warranty applies for only 90 days from the date of purchase if this Lawn Mower is ever used for commercial or rental purposes. -
Page 3: General Operation
I. GENERAL OPERATION • Read, understand, and follow all instructions on the machine and in the manual(s) before starting. Be thoroughly familiar with the controls and the proper use of the machine before starting. • Do not put hands or feet near or under rotating parts. -
Page 4: General Service
Spark Plug (Gap: .030") Blade Bolt Torque: • The model and serial numbers wil! be found on a decal on the rear of the lawn mower housing. Record both serial number and date of purchase in space provided above. • Keep nuts and bolts, especially blade attachment ment in good condition. -
Page 5: Maintenance
Repair Protection Congratulations on making a smart pur- chase. Your new Craftsman® designed and manufactured for years of dependable operation. But like all prod- ucts, it may require repair from time to time. That's when having a Repair Protec- tion Agreement can save you money and aggravation. - Page 6 3. Remove al! packing materials except padding between upper and lower handle and padding holding operator presence control bar to upper handle. 4. Roll lawn mower out of carton and check carton thoroughly for additional loose parts. NOW TO SET UP YOUR MOWER...
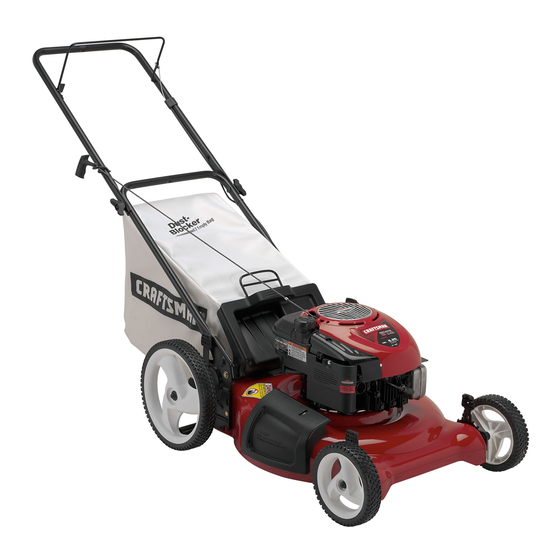
- Page 7 MOWER READ THIS OWNER'S MANUAL AND ALL SAFETY RULES BEFORE OPERATING YOUR LAWN MOWER. Compare the illustrations with your lawn mower to familiarize yourself with the location of various controls and adjustments. future reference. These symbols may appear on your product.
- Page 8 Your lawn mower was shipped ready to be used as a mulcher. or discharging: Always wear REAR BAGGING . Lift rear door of the lawn mower and place the grass catcher frame hooks onto the door pivot pins. • To convert to mulching or discharging operation, remove grass catcher and close rear door.
- Page 9 TO EMPTY GRASS CATCHER 1. Lift up on grass catcher using the frame handle. 2. Remove grass catcher with clippings from under lawn mower handle. 3. Empty clippings from bag. NOTE: Do not drag the bag when empty- ing; it will cause unnecessary...
-
Page 10: To Stop Engine
• For best results, adjust the lawn mower cutting height so that the lawn mower cuts off only the top one-third of the grass blades. -
Page 11: Maintenance Schedule
5 - And after each 5 hours of use. GENERAL RECOMMENDATIONS The warranty on this lawn mower does not cover items that have been subjected to operator abuse or negligence. full value from the warranty, operator must maintain unit as instructed in this manual. - Page 12 2. Turn lawn mower on its side. Make sure air filter and carburetor are up. 3. Use a wood block between blade and mower housing to prevent blade from turning when removing blade bolt.
- Page 13 2. Remove engine oil cap; lay aside on a clean surface. 3. Tip lawn mower on its side as shown and drain oil into a suitable container. Rock lawn mower back and forth to re- move any oil trapped inside of engine.
- Page 14 3. Disconnect spark plug wire from spark plug and place wire where it cannot come in contact with plug. LAWN MOWER TO ADJUST CUTTING HEIGHT See "TO ADJUST CUTTING HEIGHT" in the Operation section of this manual.
- Page 15 30 days or more. LAWN MOWER When lawn mower is to be stored for a period of time, clean it thoroughly, all dirt, grease, leaves, etc. Store in a clean, dry area.
-
Page 16: Troubleshooting
Replace control bar. 10. Turn fuel valve lever in OFF position. to the ON position. 11. Charge battery. battery 12. Connect battery to engine. (if equipped). Plastic cannot Never cover mower while Never store the lawn mower unless directed air filter. - Page 17 2. Contact a Sears or other qualified service center. 3. Replace blade adapter. 4. Move lawn mower to cut grass or to hard surface. 1. Raise cutting height. 2. Replace blade. 3. Clean grass catcher.
- Page 18 Sears, al Centro de Repuestos y Reparaci6n, vendan los equipos Craftsman, a efectos de que se la reparen sin costo (o bien se la reemplacen, en caso que no sea posible repararla).
- Page 19 I. OPERACION • Antes de empezar, debe familiarizarse completamente con los controles y el uso correcto de la maquina. Para esto, debe leer y comprender todas las instrucciones aparecen en la maquina yen los manuales de operaci6n. • No ponga las manos o los pies cerca o debajo de las partes rotatorias.
- Page 20 • Nunca repostar la maquina al interior de un local. • Nunca guardar la maquina o el contenedor de gasolina donde hay una llama abierta, chispa o luz piloto como una caldera u otros dispositivos. • Nunca Ilenar contenedores en un vehiculo, en un cami6n o caravana con un forro de plastico.
- Page 21 Acuerdos Congratulaciones por su buena compra. nuevo producto Craftsman® esta diseSado y fabricado para funcionar de modo liable pot muchos a_os. Pero como todos los productos, puede necesitar alguna reparacidn de tanto en tanto. En este caso tenet un Acuerdo de...
- Page 22 Lea estas instrucciones y este manual comple- tamente antes de tratar de montar u operar su segadora nueva. IMPORTANTE: Este cortacesped ACEITE O GASOLINA en el motor. Su segadora nueva ha sido montada en la fabrica con la excepci6n de aquellas partes que se dejaron sin montar pot razones de envio.
- Page 23 FAMILIARICESE CON SU SEGADORA LEA ESTE MANUAL DEL DUENO Y LAS REGLAS DE SEGURIDAD SEGADORA. Compare las ilustraciones los diversos controles y ajustes. Estos simbolos pueden apareser producto. Aprenda y comprenda ATTENCION MOTOR MOTOR ADVERTENCIA ENCENDIDO APAGADO Cord6n arrancador Recogedor de ces Tapa del deposito de la gasolina...
- Page 24 La operaci6n decualquier segadora puedehacerque SEGURIDAD saltenobjetos extrafios dentrode susojos,Ioquepuedeproducir dafiosgravesenestos.Siempre useanteojos deseguridad o protecci6n para losojosmientras operesu segadora o cuando hagaajusteso reparaciones. Recomendamos gafaso unamascara desegufidad devisi6n ampliadeseguridad usada sobrelasgafas. COMO USAR SU SEGADORA VELOCIDAD DEL MOTOR La velocidad del motor se estableci6 en la fa= brica para un rendimiento 6ptimo.
- Page 25 LA SEGADORA ESTA LISTA PARA LA OPERACION DE LA DESCARGA PASOS SIMPLES DE RECORDAR CUANDO CONVIERTA SU SEGADORA PARA ACOLCHAMIENTO La plancha acolchadora trasera instalada. La protecci6n contra la descarga cerrada. PARA ENSACAMIENTO TRASERO - La plancha acolchadora trasera removida. Recogedor del cesped instalado.
-
Page 26: Para Parar El Motor
por un periodo de 30 dias o mas. Vacie el estanque del combustible, haga arrancar el motor y hagalo funcionar hasta que las lineas del combustible y el carburador queden vacios. La pr6xima temporada use combustible Vea las Instrucciones Para El Almacenamiento para mas informaci6n. -
Page 27: Mantenimiento
PROGRAMA MANTENIMIENTO Revisar si hay Sujetadores Sueltos Limpiar/Inspeccionar el Recogedor de Cesped * Controlar los NeumAticos Controlar las Ruedas Motrices *** Limpiar la Segadora Limpiar debajo la Cubierta de la Transmisidn Revisar las Correas y las Poleas Impulsadas Revisar / Afilar / Cambiar la Cuchilla Lubricacion Limpiar / Recargar... - Page 28 SEGADORA Siempre observe las reglas de seguridad cu- ando haga el mantenimiento. LLANTAS • Mantenga las Ilantas sin gasolina, aceite o substancias quimicas para control de insec- tos que pueden dafiar la goma. • Evite los tocones, las piedras, las grietas pro- fundas, los objetos afilados y otros peligros que pueden daSar alas Ilantas.
- Page 29 PARA CAMBIAR EL ACEITE DEL MOTOR AVlSO: Antes de inclinar la segadora nar el aceite, drene el tanque de combustible haciendo correr el motor hasta que el tanque este vacio. Desconecte el alambre de la bujia y p6ngalo de modo que no pueda entrar en contacto con esta.
- Page 30 _I, ADVERTENClA: Para evitar lesi6nes serias, antes de dar calquier servico o de hacer ajustes: Suelte la barra de control y pare el motor. AsegQrese que la cuchilla y que todas las partes movibles se hayan detenido comple- tamente. Desconecte el alambre de la bujia y p6n- galo en donde no pueda entrar en contacto con esta.
- Page 31 Inmediatamente prepare su segadora para el almacenamiento al final de cada temporada o si la unidad no se va a usar pot 30 dias o mas. SEGADORA Cuando se va a guardar la segadora por cierto periodo de tiempo, limpiela cuidadosamente, remueva toda la mugre, la grasa, las hojas, etc.
- Page 32 ClLINDRO Remueva la bujia. Vacie una onza (29 ml) de aceite a traves del agujero de la bujia en el cilindro. Tire la manilla de arranque lentamente cuantas veces para distribuir el aceite. Vuelva a montar la nueva bujia. OTROS •...
- Page 33 SOLUCION DE PROBLEMAS est_ dirigido a un centro de servico Sears. PROBLEMA CAUSA Falta de Cuchilla desgastada, fuerza o suelta. Altura de las ruedas dispareja. Velocidad del motor lenta. Acumulaci6n basura debajo de la segadora. Demasiado aceite en motor. Velocidad de recorrido demasiado rapida.
- Page 34 CRAFTSMAN ROTARY LAWN MOWER - - MODEL NUMBER 917.389011 _,\ ,," 34 65 66 73 34...
- Page 35 3/8-24 x 1=318 850263 Helical Lockwasher NOTE: All component dimensions given in U.S. inches. 1 inch = 25.4 mm (O.E.M.) replacement parts. Failure to do so could be hazardous, damage your lawn mower and void your warranty. 917o389011 PART DESCRIPTION...
- Page 36 BRIGGS & STRATTON 4-CYCLE ENGINE MODEL NUMBER 505 _ i 615 ® 404 "_'p 22 _? 122T02-1308=BI 684 _ 11 c_ _._ 1177 :: Y...
-
Page 37: Briggs & Stratton
BRIGGS & STRATTON 4-CYCLE ENGINE MODEL NUMBER 122T02-1308=B1 365 _ 127 '_ >, lO_i 190_ 276 _ 2o9_J_ 2o2__ 968_iii_ _ _i_ 1386... - Page 38 BRIGGS & STRATTON 4-CYCLE s64_ 745 _.s ... 621 ENGINE MODEL NUMBER 1036 EMISSIONS LABEL 1211 1210 459_ 689 _ 597 _ 332 _ • J 635 <_y ,4=,--, _J \ p-4_ 'kX_ CJ'<-J 122T02-1308=BI 334 _...
- Page 39 BRIGGS & STRATTON 4-CYCLE 104 "<_ [127 Engine Power Rating Information The gross power rating for individual gas engine models is labeled in accordance with SAE (So- ciety of Automo-tive Engineers) code J11940 (Small Engine Power & Torque Rating Procedure), and rating performance has been obtained and corrected in accordance with SAE J1995 (Revision 2002-5).
- Page 40 BRIGGS & STRATTON 4-CYCLE PART DESCRiPTiON 697322 Cylinder Assembly 399269 Kit=Bushing/Seal (Magneto Side) 299819s • Seal-Oil (Magneto Side) 493279 Sump-Engine 691160 Head-Cylinder 692249 ,+ Gasket-Cylinder 695250 Breather Assembly 699472 + Gasket-Breather 691125 Screw (Breather Assembly) 691781 Tube-Breather 691923 Tube-Breather 692232 •...
- Page 41 BRIGGS & STRATTON 4-CYCLE PART DESCRIPTION 691688 Screw (Carburetor) 690272 Washer (Governor 690670 Screw (Air Cleaner Cover) 692523 Screw (Air Cleaner Primer Base) 491588s Filter-Air Cleaner Cartridge 791960 Cup-Flywheel 692299 Plate-Pawl Friction 281505s PawI-Ratchet 691251 (Governor Control Lever) 499621 Dipstick 692296 * Seal- Dipstick Tube 495265...
- Page 42 SERVICE NOTES...
- Page 43 SERVICE NOTES...
-
Page 44: Need More Help
NEED MORE HELP? YOu']_[ fiTld theanswer a;_id o Find this and at[ your other product manua[s online. o Get answers from our team of home experts. o Get a persona[ized maintenance o Find information and tools to help with home projects. brought to you by Sears For repair - in your home - of all major brand appliances,...