
Related Manuals for Star Micronics TUP592


Summary of Contents for Star Micronics TUP592
- Page 2 Thank you for choosing Star Micronics as your provider for printing solutions. Unpacking the Unit Assembly – Installing the Interface Place the interface sub-assembly into the interface slot as shown. Take care to be sure the interface cartridge is seated properly into its connector.
- Page 3 Note 1) The unit is assembled for 1 inch paper cores when shipped from the factory. Also, it is set for a paper width of 82.5 ±0.5 (take-up width of 83 +0.5/-1) when the printer is shipped from the factory. “The size of the core used is related to the thickness of the paper used.”...
- Page 4 3.0.2.2. A is a reference for the paper roll holder unit paper roll shaft position. Adjust or mount the paper roll holder unit for the core diameter and width of the paper you intend to use. 3-1 Handling 82.5 mm Paper Width See Fig.
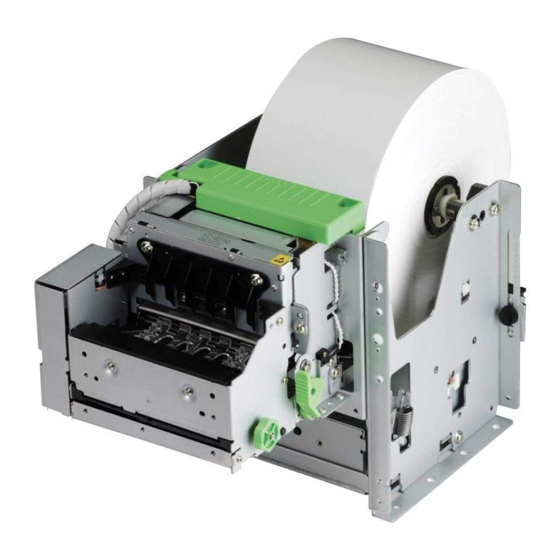
- Page 5 To aid in the installation of the paper roll, the TUP500’s mechanism is hinged to the base of the printer allowing the unit to fold open for easier access to the paper inlet path (see below) Lift handle and pull unit forward.
- Page 6 1. Star’s JavaPOS driver is platform independent and is compatible with any operating system that supports the Java Virtual Machine. Driver Software A Product CD is not supplied with the printer in the box. Request a CD from your reseller or download and install the latest version of the Star printer drivers at: www.starmicronics.com.
- Page 7 Once you download the TUP500 JavaPOS driver package from our website www.starmicronics.com, run the Star JavaPOS installer and follow the menu to proceed with the installation. Status Monitor Tool Status Monitor Ver1.0 package: Star_TUP500_StatusMonitor_Ver100_20090130.ZIP Includes TUP500 Status tool, (via Printer LM, StariO) including SDK. StariO: Ver1.2.0.0 OS: Win2K SP3, XP, Vista 32bit...
- Page 8 Installing the TUP500 Printer Driver For USB installations: Once the TUP500 Installer.exe is installed and you plug the printer in, the driver will Plug and Play and automatically install the driver and show up in Printers & Faxes. For Parallel installations: Click on Start Menu/All Programs/Star Micronics/TUP500/Utility/Add Printer Wizard (TUP500) Continue following the Wizard to install the driver.
- Page 9 Just click on the TUP500 Config tab and click on Launch Configuration Utility. The utility will allow you to: 1) Configure specific printer settings like print speed, print density, paper width, snout control (bezel) and fonts, etc.. 2) Load graphics into the internal printer memory...
-
Page 10: Configuring Ethernet
Then click on Search LAN for Printers and your printer should show up and display a temporary IP address. To configure the printer with a Static IP address, click on Change TCP/IP Setting and follow the instructions on the screen... - Page 11 Configuring OPOS For USB installations – put Dip Switch #5 OFF to put the printer in vendor class mode. Launch the configuration application through the driver properties and click on OPOS on the left side Click on Add New on the right side. Select your Port and click OK.
- Page 12 In the configuration utility on the left side, click on JavaPOS and click on Add New on the right side. Select your printer port and click OK. Click on Check Health and it will prompt you to save your .xml file. This is...
-
Page 13: Checking Status
Checking Status If you implement the language monitor method to determine status, you will need to enable the status monitor. Put a check mark next to Background status: Enable and click OK... - Page 14 Other Utilities available Status monitor tool...
- Page 15 Testing – Printing a Printer Self-Test Page The TUP500, like all Star printers, has a built-in diagnosis printout that can be manually printed to check the printer’s current configuration. This “Self-Test” page also allows the user to confirm that the printer is in fact operating properly.