KODAK SCANZA - Digital Film Scanner Manual
- User manual (33 pages) ,
- User manual (121 pages)
Advertisement
INTRODUCTION
Thank you for purchasing the KODAK SCANZA Digital Film Scanner. This User Guide is intended to provide you with guidelines to ensure that operation of this product is safe and does not pose risks to the user. Any use that does not conform to the guidelines described in this User Guide may void the limited warranty.
This product is intended for household use only.
This product is covered by a limited warranty and is subject to conditions and exclusions.
Easily convert your slides, negatives, and even Super 8 frames to digital images that you can store and preserve. Save your treasured memories on an SD™ card (not included), or to your computer. You can also directly connect to a TV or HDTV to view images.
FEATURES
- Converts 35mm, 126, 110 and Super 8 and 8mm film negatives and slides to JPEGS in seconds
- 14/22 megapixel resolution
- No computer or software required
- Adjustable scanning resolution, brightness and coloration
- Tilt-up 3.5" color TFT color LCD screen
- Saves images to SD memory card (not included) or computer
- Video-out for TV connection (TV and HDMI cables included)
- Convenient, easy-loading film and negative adapters and inserts
- MAC and PC compatible
BOX CONTENTS
Digital film scanner
3 Adapter trays
3 Inserts
Video cable
HDMI cable
USB cable
AC adapter
Cleaning brush
User guide
Warranty card
SAFETY PRECAUTIONS
![]()
Do not expose this product to liquids or high humidity.- Do not handle this product with wet hands. Risk of electric shock.
![]()
Do not attempt to disassemble or alter this unit. This device contains no user-serviceable parts.- Do not block any ventilation openings.
- Do not operate this device near heat sources such as radiators or stoves.
- When connecting the KODAK SCANZA Scanner directly to your computer, be careful to not over load the USB connections. If you have too many devices connected to your computer, such as a wireless mouse, media player, mobile phone or other USB powered devices, there may not be enough power for the product to function properly.
- Do not move or disconnect the device from the computer while the device is reading/writing data. This may cause damage to the data and/or the device.
- Slides and negatives MUST be placed in the proper adapter tray and insert before inserting them into the product. Failure to do so may result in losing media inside the unit and will void the warranty. Resultant media loss is NOT covered under warranty.
- Always turn off and unplug the device when it is not in use. Unplug the USB cable from your computer and unplug the AC adapter from the socket.


With the exception of Slideshow in Playback or file transfer in USB mode, this unit will automatically power off after 10 minutes of inactivity.
TIPS
- Place the scanner on a flat, stable surface with the LCD display facing you.
- Use the included cleaning brush to clean the backlight, adapter, or insert. Insert the brush — CLEANING PAD SIDE DOWN — into the adapter opening on the bottom of the unit. Gently wipe the inside bottom of the unit. Never use alcohol, detergents, or abrasive cleaning agents to clean this device.
- Always remember to save your scanned image before inserting another slide or negative into the scanner.
- For clear images, clean your film with a soft cloth or compressed air prior to inserting it into the scanner.
- Negatives and slides should be inserted with the shiny side up. Super 8 film should be inserted with the perforated holes facing up.
- Always handle films with care to avoid scratches or fingerprints.
- View your images on your TV. Simply connect the included video or HDMI cable to the scanner and your TV. Note that when using this mode, the screen on the film scanner will turn black. To reactivate the screen, the HDMI cable will need to be unplugged.
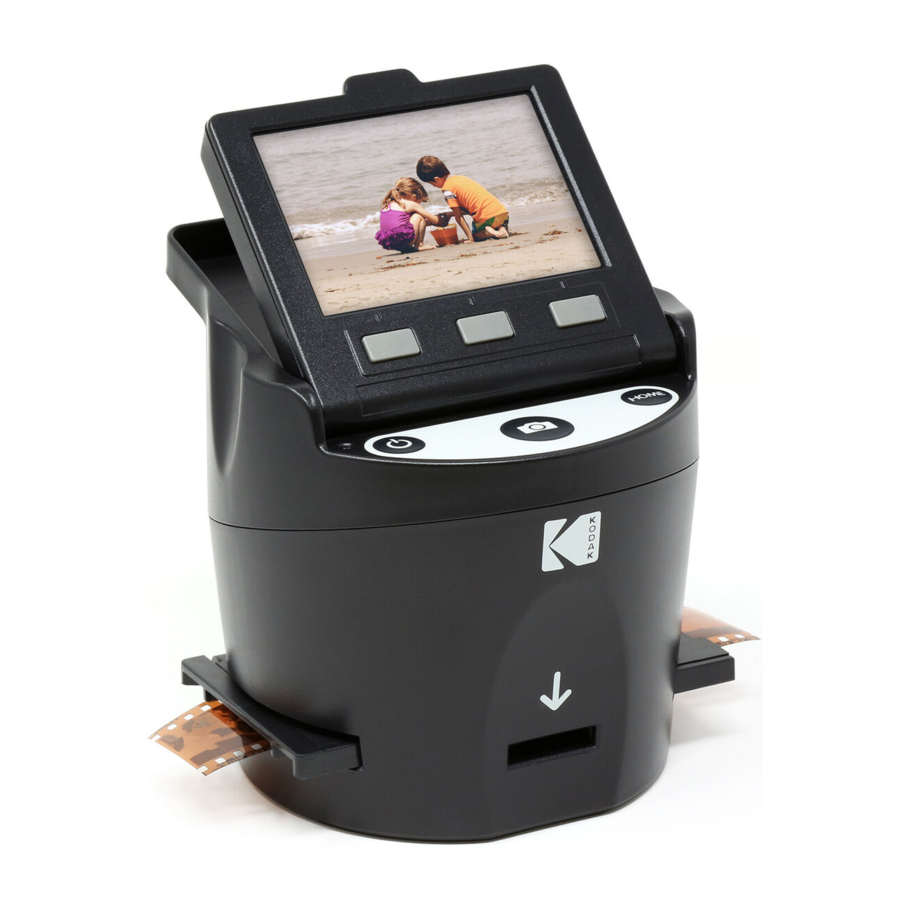
OPERATING INSTRUCTIONS

NOTE: Illustrations are for instructional purposes only, and may be different from the actual product.
- Function Keys
- Power On/Off Button
- Capture Button
- Tilt-up LCD Screen
- Home Button
CONTROLS
- Function keys (soft keys): The function is indicated by the text that will appear on the screen above the corresponding key.
- Power button: Press and hold to turn the device on and off.
- Capture button: Captures the image or brings up the capture view screen.
- Tilt-up LCD screen: Displays the image to be captured and scanned as well as functions and menus.
- Home button: Takes you to the Home screen.
PREPARING MEDIA TO SCAN
Before using your film scanner, you must insert an SDTM card (not included) or the unit will not operate. There is no built-in memory.
Load your film/slide into the appropriate adapter and insert according to the Tray Directory below. (Table can be found onscreen at Home>Settings>Film Tray).
Each adapter tray and insert is clearly marked and numbered.

TRAY DIRECTORY
| FILM TYPE | FILM TYPE | ADAPTER NEEDED | INSERT NEEDED |
| Negative | Color Negative 135 | No. 2 | None |
| Color Negative 126 | No. 1 | None | |
| Color Negative 110 | No. 2 | No. 5 | |
| Slide | Slide Positive 135 | No. 1* | None |
| Slide Positive 126KPK | No. 1* | None | |
| Slide Positive 110 | No. 1* | No. 6 | |
| Slide Positive Super 8 | None | No. 4 | |
| Slide Positive 8MM | None | No. 4 | |
| Black & White | Black & White 135 | No. 2 | None |
| Black & White 126KPK | No. 1 | None | |
| Black & White 110 | No. 2 | No. 5 |
*Note: Use adapter # 3 for slides with a thicker casing (plastic).
Use adapter # 1 for slides with a thin cardboard casing.
| Slides | 35mm | 110 | 110 | 126 | 127 |
| Mount | 2"x2" | 2"x2" | 1"x1" | 2"x2" | 2"x2" |
| Film Size | 24x36mm | 13x17mm | 13x17mm | 28x28mm | 40x40mm |

Flip up the top cover of the adapter. Place insert with your slide or film into adapter.

This film scanner features speed-load adapters to make scanning easy and straightforward. Simply push them into the device until you hear a click, and you can feed in slides or negatives one after the other without needing to remove and reload the adapters.

Note: When loading 8mm film, always ensure that the side ridges are facing to the right side of the adapter, towards where the number is written.

OPERATION
Upon powering on, and before displaying the HOME screen, the screen displays the currently selected film type, adapter, and insert information for 5 seconds and then brings up the capture mode screen.

HOME SCREEN
The Home screen will appear when the unit is powered on, whenever the Home button is pushed, and any time SAVE/EXIT is selected. Note: There is a difference between SAVE/EXIT and SAVE/BACK. SAVE/EXIT takes you back to the Home screen. SAVE/BACK takes you back to the submenu you are using.
The Home screen features 3 submenus: Gallery, Capture, and Settings.

Note: Anytime the capture button is pressed, the film scanner will automatically enter Capture mode.
CAPTURE MODE
- Press the soft function key under the Capture icon on the screen to go to the capture mode. Your loaded image will appear on the LCD screen. The status bar on the top, indicating the active mode and settings, will disappear after 15 seconds. Press any of the function keys to bring back the status bar.

- The underlined text indicates the highlighted setting. The highlighted setting can be accessed by pressing the Select button.
- By selecting color adjustment, you will be taken to the settings menu to adjust the color of the photo.
- By selecting Info, you will be taken to a screen that tells you which adapters are needed for the current mode. If you wish to change the film type, you will need to do so manually in the Film Type settings.
- Press the hard Capture button (camera icon) to capture and save an image. The screen will display "Saving." Note: An ERROR message will appear if the SD™ card (not included)
is full or if no memory card is inserted into the unit.
Note: Pressing the soft keys will activate the status bar, where you can select color adjustment or info. To return to capture mode, select the camera icon on the status bar.

- Press any function button to bring up the status bar at the top of the screen.
- The Color Adjustment screen will appear.

- Press the right function key ("Info") to review your film type, adapter and insert.
- Press the center function key ("Select") to adjust color and brightness.
- Press the left function key to return to the image and then press "Select" to go back to the capture mode.


COLOR AND BRIGHTNESS ADJUSTMENT

To adjust brightness and color, press the center soft function key ("Select").
"Brightness" will be highlighted in the status bar. Press the center key ("Adjust") to bring up the brightness scale. Use the keys under the left < and right > arrows to increase (>) or decrease (<) the brightness. Press the center key ("Save/Back").
Choose the right function key (down arrow) to scroll through brightness and color settings.
There are 4 color adjustment settings:
R = Red
G = Green
B = Blue
RESET = Default color and brightness setting
For each setting (R, G, B) a scale will appear at the bottom of the screen. Press the center function key ("Adjust") to adjust each color, then press the function keys under the decrease (–) and increase (+) symbols. Press the center key again ("Save/Back") to save your selection. Use the right key (down arrow) to navigate each color setting.

Note: The color adjustment resets to the default setting "0" after the film scanner has been restarted.
GALLERY MODE

Press the Home button and then select the function key under "Gallery" to view and edit your images.
Use the left < and right > function keys to scroll through images.
To edit or delete an image, choose the center function key ("Select") when that image appears on the screen.
Press the function keys under the right > symbol to navigate the choices in the top status bar: Rotate, Flip (>|<), Delete, and Slideshow. Press the function key under "Select" when you've made your choice.
ROTATE
You can rotate the image left or right.

To select an image to rotate:
- Enter gallery mode as described above.
- Use the left < and right > function keys to scroll through images.
- To rotate the image, press the center soft key (select). Then press the right soft key to cycle through the editing options listed at the top of the screen (Rotate, Flip (>|<), Delete, and Slideshow).
FLIP IMAGE

You can flip the image vertically or horizontally.
DELETE
To delete an image, navigate the top status bar to display the trash can icon. Press the center function key to "Select." You will be asked to confirm if you want to delete that image.

SLIDESHOW
View stored images in succession. In the slideshow mode you can pause (||) or play (>) by pressing the center function key.

SETTINGS MODE

From the Home screen, select Settings by pressing the soft function key under the Settings icon.
Press the corresponding soft function key under the left < and right > arrow symbols to scroll through the settings:
- Film Type
- Resolution
- LCD Brightness
- USB Upload
- Film Tray
- Memory
- Language
Press the soft function key under any of the icons that appear on the screen to enter that function's submenu.
FILM TYPE
Negative: 135, 110, 126
Slides: 135, 110, 126, SUPER8, 8MM
B&W: 135, 110, 126
- Choose one of the 3 film types by pressing the center function key ("Select"). Choose Back to return to the Settings menu.

- For each film type, select the film size.

- Once the film type and size are selected, a confirmation screen will appear with directions. Press Save/Exit to save and return to the Home screen.
- Repeat the process to change film types or sizes.


From the Settings menu, continue to select additional settings from the submenus. Press the function key under "Save/Exit" after each selection.
Note: Selecting "Save/Exit" will redirect you back to the Home screen.

RESOLUTION
- Select Resolution from the settings menu.

- You can choose between the standard 14-megapixel scan, or enable the built-in software interpolation, which, through a specialized algorithm, enhances the image quality to 22 megapixels. Cycle between these 2 options using the arrow keys.
- Select the desired setting by pressing the Save/Exit button. Note: This will then take you back to the Home screen.

- To go to the previous slide, press the Back button.


LCD BRIGHTNESS
- Select LCD Brightness from the settings menu.

- Use the + and – keys to adjust the brightness of the LCD screen.
- To confirm your selection, press the Save/Exit button. Note: This will then take you back to the Home screen.


USB UPLOAD
This mode will allow you to access your SD™ card (not included) from your computer. Note: While connected to a computer, you will be unable to use the film scanner.
- Use the included USB cable to connect the scanner directly to a computer.
- Select USB Upload from the settings menu.

- Wait for the scanner to connect to the computer. This may take a few seconds. When connecting, your computer will recognize the scanner as an external device.
- When finished, press the disconnect button and then unplug the USB cable.


FILM TRAY
- Select Film Tray from the settings menu.

- From the Tray Directory, you will be able to see which adapter you need for each compatible film or slide type.

Note: The film type cannot be actively changed from the Tray Directory. To change the film type, select Film Type from the Settings menu, as described in section 9A of this user manual.


MEMORY
- Select Memory from the settings menu.

- You will be able to see the currently used and available space on the inserted SD™ card (not included). The image count is approximate and may not be an exact reflection of available space. Note: This film scanner is not equipped with internal memory and an SD™ card (not included) must be inserted in order to save photos.


LANGUAGE
- Select Language from the settings menu.

- Cycle through the available languages using the arrow buttons. To confirm your selection, press the Save/Exit button.


Note: This will redirect you back to the Home screen.
Available languages include:
English
Italian
German
Spanish
French
SPECIFICATIONS
Power source: AC adapter, USB DC5V output
Sensor: 14MP CMOS sensor
File format: JPEG
Resolution: 14MP/22MP interpolation
Supported film/negative types: 135mm, 126, 110, Super 8, 8mm
LCD: 3.5" TFT LCD
External memory: SD™/SDHC™ memory card (not included)
vInterfaces: USB (2.0) port, SD™ card slot, TV-out (3.5mm phone jack), HDMI port
Dimensions: 4.7" x 4.7" x 5" (120 x 120 x 127mm)
Weight: 16.2 oz. (460g)
CUSTOMER SERVICE CONTACT INFORMATION
Should you experience any problems with your product, please contact us before returning the item to the place of purchase. We're here to help!
U.S. Support: kodak@camarketing.com, 844-516-1539
International Support: kodakintl@camarketing.com, 844-516-1540
WARRANTY
LIMITED WARRANTY TO ORIGINAL CONSUMER
This KODAK SCANZA Digital Film Scanner ("Product"), including any accessories included in the original packaging, as supplied and distributed new by an authorized retailer is warranted by C&A Marketing, Inc. (the "Company") to the original consumer purchaser only, against certain defects in material and workmanship ("Warranty") as follows:
To receive Warranty service, the original consumer purchaser must contact the Company or its authorized service provider for problem determination and service procedures. Proof of purchase in the form of a bill of sale or receipted invoice, evidencing that the Product is within the applicable Warranty period(s), MUST be presented to the Company or its authorized service provider in order to obtain the requested service.
Service options, parts availability, and response times may vary and may change at any time. In accordance with applicable law, the Company may require that you furnish additional documents and/or comply with registration requirements before receiving warranty service. Please contact our customer service for details on obtaining warranty service:
USA: kodak@camarketing.com, 844-516-1539
International: kodakintl@camarketing.com, +1-844-516-1540
Shipping expenses to the Company's Return Facility are not covered by this warranty, and must be paid by the consumer. The consumer likewise bears all risk of loss or further damage to the Product until delivery to said facility.

Documents / ResourcesDownload manual
Here you can download full pdf version of manual, it may contain additional safety instructions, warranty information, FCC rules, etc.
Advertisement
Thank you! Your question has been received!


Need Assistance?
Do you have a question about the SCANZA that isn't answered in the manual? Leave your question here.