
Related Manuals for Craftsman EDGER 536.7974


Summary of Contents for Craftsman EDGER 536.7974
- Page 1 CRR FTSMI:tW 4 Horsepower 9 Inch EDGER MODEL NO. 536.797400 Caution: Read and follow all Safety Rules and Operating Instructions before first use of this product. SEARS, ROEBUCK AND CO., Hoffman Estates, IL 60179 U.S.A. 711044 04/11/97...
- Page 2 BEFORE • Read the owner's manual carefully_ Be thoroughly familiar with the controls and the proper use of the Edger. Know how to stop the edger and disengage controls quickly. • I')n nnt nn_rAtA th_ Fdn_r without...
- Page 3 • Neverremovethe fueltank capor fuel to a running or hot engine. • Never store fuel or Edger with fuel in the tank inside a building where fumes reach an open flame. OPERATING SAFETY • Never allow children or young teenagers to operate the Edger.
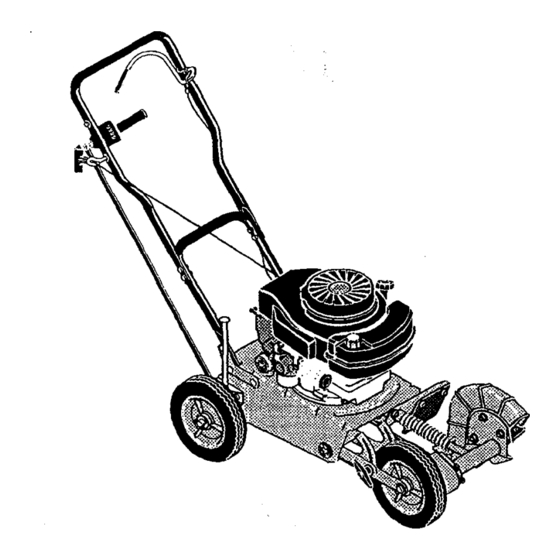
- Page 4 1 - Pair Pliers The figure to the right shows the Edger completely assembled. References to the right or lett hand side of the Edger are from the viSwpoint of the operator's position behind the unit. TO REMOVE EDGER FROM •...
- Page 5 • Thread starter rope through Lower • Tighten rope guide nut. Handle Rope Guide Nut (1/4-20 Rec. CHECKLIST Before you operate your new Edger, pull up on ensure that you receive the best perfor- mance and satisfaction product, please review the following checklist: All assembly completed.
- Page 6 YOUR EDGER READ THIS OWNER'S MANUAL AND SAFETY RULES BEFORE OPERATING YOUR EDGER. Comparethe illustrations with your EDGER to familiarize yourself with the location of various controls and adjustments. Save this manual for future reference. Fast Slow Stop Primer Button...
- Page 7 • Release the engine control the engine. NOTE: If engine continues to rg_after lever is released.Use on the throttle control to stop the engine and then see your Craftsman ter to correct the engine control lever prob- lem. (45 ° ) CAUTION:...
- Page 8 • As the fluted knob is loosened the rear wheel wilt slide down. • Hold the Edger so that the top of the main frame is level with the top of the curb and retighten the fluted knob. • Turn the Edger so that the front wheel will be on the same surface as the right rear wheel.
- Page 9 Prior to starting the engine, line the Edger up as if you were going to bevel cut and move the depth con- trol lever down to test the blade location.
- Page 10 WARNING: Gasoline is flammable and caution must be used when handling or storing it. Do not fill fuel tank while Edger is running, hot, or when Edger is in an enclosed area. Keep away from open flame, electrical spark, and do not smoke while filling the fuel tank.
- Page 11 Edger as instructed in this manual. The above chart is provided to assist the operator in properly maintaining the Edger. LUBRICATION • After each 25 hours of use of your Edger, apply light machine oil to all moving parts, particularly the wheels. • We recommend...
- Page 12 Oil Drain Plug AIR CLEANER Replace the filler once a year; more often under dusty or dirty conditions. DO NOT attempt to clean or oil the air filter. To install a new air filter, do the following: • Disconnect the spark plug wire from the spark plug.
- Page 13 CAUTION: Always stop the engine and disconnect the spark plug wire before making any repairs to the Edger. _BELT REPLACEMENT Your edger is equipped with a V-belt made of a special compound. If the belt becomes worn or breaks, replace it with an orignal...
- Page 14 Overspeeding the engine above the factory high speed setting can be dangerous. If you think the engine-governed high speed needs adjusting, contact your nearest Craftsman Service Center, which has the proper equipment and experience to make any necessary adjustments.
- Page 15 • If you do not want to remove gasoline, a fuel stabilizer (such as Craftsman fuel stabilizer No. 33500) may be added to any gasoline left in the tank to minimize gum deposits and acids.
- Page 16 Replace the bearings Replace blade Stop engine immediately; tighten all bolts, If vibration continues, " take the unit into the nearest • :.: Craftsman Service Center s:.h0t cutt ng into Tighten bolts until the head of th_ bolt cuts into the tubing...
- Page 17 For the repair or replacement parts you need delivered directly to your home Call 7 am-7 pm, 7 days a week 1-800-366-PART (1-800-366-7278) Para ordenar piezas con entrega a domicilio -1-800-659-7084 For in-house major brand repair service Call 24 hours a day, 7 days a week 1-800-4-REPAIR (1-800-473-7247) Para pedir servicio de reparacibn a...