Advertisement
WARNING
Thank you for purchasing the BUTURE VCIO cordless vacuum cleaner. Before using this machine, please read the following safety warning first and take safety protection measures to avoid malfunctions caused by improper operation,

- This BUTURE appliance is not intended for use by persons (including children) with reduced physical, sensory or mental capabilities, or lack of experience and knowledge, unless they have been given supervision or instruction by a responsible person concerning use of the appliance to ensure that they can use it safety.
- Suitable for dry locations only. Do not use or store outdoors with wet surfaces. Do not handle any part of the plug or appliance with wet hands. Store properly in a dry place indoors.
- Do not use a damaged cable or plug. If the device or charger does not work properly, dropped, damaged, missed or dropped into water, please contact tech-support@ibuture.com, BUTURE after-sales team for support.
- DO not vacuum flammable or combustible liquids, such as petrol, or use in areas where liquids may be present.
- Turn off the power switch before plug or unplug the adapter.
- Do not vacuum anything that is burning or smoking, such as cigarettes, matches or hot ashes
- DO not use without filters or dust cup to avoid damaging the motor and contaminating the air. Wash hands after using the vacuum cleaner.
![]()
FIRE WARNING-Do not place this product on or near a cooker or any other hot surface and do not incinerate this appliance even if it is severely damaged. The battery might catch fire or explode.- UnpIug the charger from the power outlet before performing routine cleaning or maintenance
- Battery leaks may occur under extreme conditions. If any liquid gets on your skin wash quickly with soap and water. f liquid gets into your eyes, rinse with water for at least 15 minutes immediately. Seek medical attention immediately.
- Charge the unit with the charger we provided.
- Avoid using this product to vacuum hard, sharp objects, as this may cause damage.
Note: The vacuum cleaner adopted thermal protection technology to prevent overheating, will stop working when the item is over-heated.
PACKAGE CONTENT
Please check and confirm the accessories and parts according to the following sheet before using.
| Part Name | Quantity |
| Main Body | 1 |
| Battery Pack | 1 |
| Adjustable Extension Tube | 1 |
| Motorized Brush Head | 1 |
| Soft Rolling Brush (Installed) | 1 |
| Carbon Fiber Rolling Brush | 1 |
| Long Crevice Nozzle | 1 |
| 2 in I Upholstery Brush | 1 |
| Mini Cleaning Brush | 1 |
| Wall-mount Plate | 1 |
| Charger | 1 |
| HEPA Filter Replacement | 1 |
| Screw | 1 |
| User Manual | 1 |
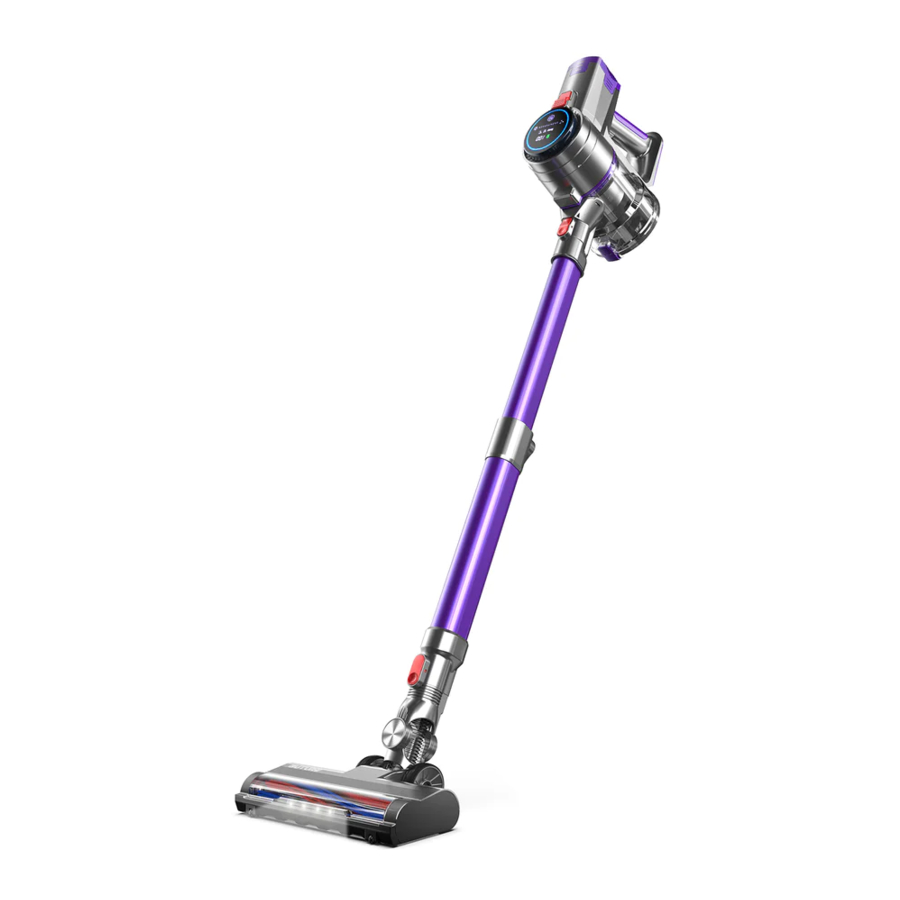
KNOW YOUR PRODUCT
Product Details

Digital Display Screen

Accessories Function Introduction
- 2 in 1 Upholstery Brush
Easy to snap-on design, can help you remove dust and hair on the carpet.
![]()
- Long crevice nozzle
Remove dust on the hard-to-reach areas like windows, bed feet, gaps between sofa, efc.
![]()
- Wall-mount plate
Hold the vacuum and accessories on the wall-mounted plate for easy storage and battery charging.
![]()
- Mini cleaning brush
Remove hair, rubbish, and micro dust on the accessories or filters.
![]()
- Soft rolling brush
Remove dust, debris, and hair from hard floors.
![]()
- Carbon Fiber Rolling Brush
Remove debris, dust, and hair in carpets, velvet.
![]()


PRODUCT ASSEMBLING DIAGRAM
Install desired cleaning accessory
You can choose to directly install the cleaning accessories or after connecting the extension tube according to the cleaning needs.
- Directly install the cleaning accessories

- Install the extension tube and cleaning accessories
Press and hold the extension tube length adjustment button, push forward or pull backward to select the appropriate length of the extension tube.


Wall-Mounted Plate Assembling Diagram

- Please make sure there is no gas, water, or electrical cables and wires behind the mounting area.
- To avoid the dock dropping down, please make sure i t must be installed firmly.
- Store appropriately indoors in a dry place. Do not expose the machine to sunlight o freezing temperature. Recommended temperature range: 39.2°F (4°C)-104°F(40°C).
HOW TO USE
Charging

- When using a new battery or using it for the first time after long-term storage, please fully charge the battery first.
- When storing and not using the vacuum cleaner for a long time, please ensure that it is charged and discharged at least once every three months.
Charging methods
- Connect the main body to charge

- Hang on the wall mount to charge
![]()


Battery Indicator
When charging and using the product, you can check the battery power status through the following two places.
- Digital display screen:
![]()
Status Battery level indicator Charging 0%~9%," ![]() " flash red
" flash red10%~99%," ![]() " flash green
" flash green100%," ![]() "stay on green (The screen will turn to sleep mode after 10mins of full charge to reduce power consumption)
"stay on green (The screen will turn to sleep mode after 10mins of full charge to reduce power consumption)Using 100%~10%" ![]() " stay on green
" stay on green9%~0%, " ![]() " flash red
" flash red - Battery power indicator:
![]()
Status Battery level indicator Charging 0%~99%, " ![]() " three blue lights flash in a cycle
" three blue lights flash in a cycle100%, " ![]() " three blue lights always on
" three blue lights always on
Using100%~67%." ![]() " Three blue lights always on
" Three blue lights always on66%-~34%," ![]() " Two blue lights always on
" Two blue lights always on0~33%," ![]() " One blue lights always on
" One blue lights always on

 " flash red
 " flash green
 "stay on green (The screen will turn to sleep mode after 10mins of full charge to reduce power consumption)
 " three blue lights flash in a cycle
 " three blue lights always on
 " Two blue lights always on
 " One blue lights always on
Operating
Before each use, make sure that
The battery is fully charged, and fixed in place.
The dust cup and filters are cleaned, and fixed in place.
- Start to Work
Press the switch button to turn it on and it will start MIN mode suction. Press again to turn it off.

- Select Cleaning Mode
The appliance has 3 suction modes for different cleaning needs, which can be cycled
(MIN![]() MAX) by a short press the suction adjustment button on the battery pack or the digital display screen.
MAX) by a short press the suction adjustment button on the battery pack or the digital display screen.
![]()
![]()
Note: Please keep your hands dry when using it, Oil and water stains on your finger may affect screen swiping.

 MAX) by a short press the suction adjustment button on the battery pack or the digital display screen.

Machine protection and error code indication
Motor in VCIO cordless vacuum cleaner has built-in Blocking protection, and battery has built-in over-temperature protection, overcurrent & overvoltage protection.
- Blocking protection
When the brush head, tube or dust cup is blocked, the blocking protection for motor will work. If the brush head is blocked, the Brush Blocking Indicator will light up. If the tube or dust cup is blocked, the Tube & Dust Cup Blocking Indicator will light up. At the same time the motor will temporarily stop working to prevent damage. After cleaning the brush head, tube or dust cup, the blocking indicator will go out and motor will work normally.

- Over-temperature protection
Battery temperature Will rise under continuous high suction power mode, If you charge the battery when its temperature is to high, the over-temperature protection will work. On the screen the over-temperature protection indicator will light up, and the battery will intelligently reduce the charging input power to prevent overheating. Wait 20-45mins for the battery to return to normal temperature, the temperature protection indicator will go out and the battery will return to normal charging power.

- Overcurrent & Overvoltage protection
While charging, if the input voltage or current is too high, the Overcurrent & Overvoltage protection will work. The three indicators on battery pack will flash at the same time and the battery will temporarily stop charging. After the input voltage and current return to normal, the battery indicator and charging progress will intelligently return to normal.
![]()


MAINTENANCE
Please clean it regularly to prolong the lifespan of your vacuum cleaner.
Main body (non-washable parts) cleaning
- Turn off the power before cleaning the body.
- Please use a neutral detergent, wipe the body with half-wet cloth.
- Please avoid exposure and Store in a COOI and dry place.
![]()

Dust cup & HEPA filter cleaning
Empty the Dust cup
- Press the dust empty release button to empty the dust
- When using, if the garbage in the dust cup exceeds MAX Line, please empty it in time.


Clean the dust cup and HEPA filter
- Press the dust cup release button to separate the dust cup and the main body.
- Hold the lower part of the dust cup with one hand and the upper part of the dust cup with the other hand, twisting in an anti-clockwise di recti on, then separate the upper part of the dust cup and the lower part-Take out the HEPA filter and the stainless steel filter in turn, clean or change it.


Install the filter and the dust cup
Install the filter and the dust cup in correct direction, make the buckles in right place and twist to fix it.

Brush Roller Cleaning
Note: After long periods Of the bristle may be jammed by hair or similar build-up, It'S recommended to clean the brush roller periodically to ensure efficient operation and maintain suction.
- Push the button to the "unclock" sign, remove the brush roller.

- Remove the debris wrapped around the roller with mini cleaning brush, then flush with water.


- Gently push the brush roller into the motored brush, until securely in place. (Please make sure the brush roller is completely dry before using.)


SPECIFICATION
| Model | VC10 |
| Rated voltage | DC22.2V |
| Battery type | Lithium |
| Suction mode | Min-Mid-Max |
| Charge time | 4-5H |
TROUBLESHOOTING
| ISSUE | CAUSE | SOLUTION |
| The vacuum cleaner not work |
|
|
| Weak suction |
|
|
| Charging indicator not light up or flash abnormally |
|
|
| Insufficient running time after charging |
|
|
| Motorized brush head not rotate |
|
|
If you have any questions, email to tech-support@ibuture.com

Documents / ResourcesDownload manual
Here you can download full pdf version of manual, it may contain additional safety instructions, warranty information, FCC rules, etc.
Advertisement
Thank you! Your question has been received!


Need Assistance?
Do you have a question about the VC10 that isn't answered in the manual? Leave your question here.