Table of Contents
Advertisement
Quick Links
Download this manual
See also:
Owner's Manual
Owner's Manual
Thank you, and congratulations on your choice of the BOSS
VF-1 24-BIT MULTIPLE EFFECTS PROCESSOR.
Before using this unit, carefully read the sections entitled:
• USING THE UNIT SAFELY (page 2–3)
• IMPORTANT NOTES (page 11)
These sections provide important information concerning
the proper operation of the unit.
Additionally, in order to feel assured that you have gained a
good grasp of every feature provided by your new unit,
Owner's manual should be read in its entirety. The manual
should be saved and kept on hand as a convenient reference.
Copyright © 1999 BOSS CORPORATION
All rights reserved. No part of this publication may be reproduced in any form
without the written permission of BOSS CORPORATION.
Advertisement
Table of Contents

Related Manuals for Boss VF-1


Summary of Contents for Boss VF-1
- Page 1 Owner’s Manual Thank you, and congratulations on your choice of the BOSS VF-1 24-BIT MULTIPLE EFFECTS PROCESSOR. Before using this unit, carefully read the sections entitled: • USING THE UNIT SAFELY (page 2–3) • IMPORTANT NOTES (page 11) These sections provide important information concerning the proper operation of the unit.
- Page 2 Roland. • When using the unit with a rack or stand recom- mended by Roland, the rack or stand must be carefully placed so it is level and sure to remain stable. If not using a rack or stand, you still need to...
- Page 3 012b • Immediately turn the power off, remove the AC adaptor from the outlet, and request servicing by your retailer, the nearest Roland Service Center, or an authorized Roland distributor, as listed on the “Information” page when: • The AC adaptor, the power-supply cord, or the plug has been damaged;...
-
Page 4: Table Of Contents
Contents Main Features...9 How to use this manual...10 Conventions used in this manual... 10 IMPORTANT NOTES ...11 Front and rear panels ...12 Front panel ... 12 Rear panel ... 13 Section 1. Producing Sound ...14 Making connections... 14 Connecting a guitar... 14 Connecting a keyboard ... - Page 5 Setting the output level ... 32 Controlling parameters in real time (Control Assign)... 33 Assigning the category ... 37 Editing the patch name ... 37 Canceling your edits ... 38 Saving the changes you make (the Write operation) ... 38 Ways to use control assign...
- Page 6 PB17 CHORUS RSS ... 71 PB18 REVERB RSS... 72 PB19 RSS PANNER... 73 PB20 DELAY... 74 PB21 MultiTAP DELAY (20 TAP) ... 75 PB22 TAPE ECHO201 ... 76 PB23 MIC SIMULATOR... 77 PB24 SPACE CHORUS... 78 PB25 StFLANGER DLY (Stereo Flanger Delay) ... 79 PB26 StPHASER DLY (Stereo Phaser Delay)...
- Page 7 Setting the Device ID ... 123 Program Change Map Settings ... 124 Making settings ... 124 Transmitting VF-1 data (Bulk Dump) ... 125 Connections... 125 Transmission Procedure... 125 Restoring data from a Sequencer to the VF-1 (Bulk Load)... 126 Connections... 126 Reception procedure... 126...
- Page 8 Controlling the VF-1 from the FC-50... 130 About MIDI ... 131 How MIDI messages are transmitted and received... 131 Main types of MIDI message used by the VF-1... 132 About the MIDI Implementation Chart... 132 Restoring the factory settings (Factory Reset)... 133 Troubleshooting ...
-
Page 9: Main Features
You can use the Category Search function to rapidly find the desired patch. (p.19) Graphic LCD The front panel of the VF-1 features a graphic LCD for easy and highly visual editing. Quick setting A preset setting is provided for each edit function. You can easily create the desired effect sound simply by selecting the preset setting for the function (effect) you wish to use. -
Page 10: How To Use This Manual
Section 3. Overall Settings (Utility) This section explains settings that affect the overall operation of the VF-1, such as how to use the tuner, and how to make system settings. Section 4. Effect Guide This section explains the effects and algorithms of the VF-1, and what they do. -
Page 11: Important Notes
300L+PCS-33 (Roland) or EV-5 (Roland); sold separately). By connecting any other expression pedals, you risk causing malfunction and/or damage to the unit. • Use a cable from Roland to make the connection. If using some other make of connection cable, please note the following precautions. -
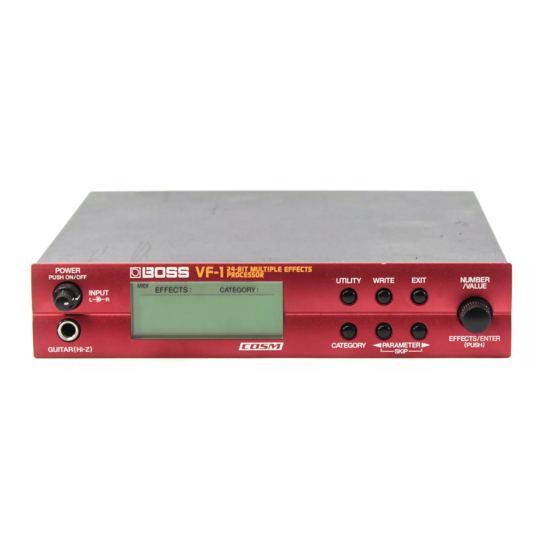
Page 12: Front And Rear Panels
(2) GUITAR (Hi-Z) Guitar jack This is an input jack for guitar (high impedance). (3) Display This is where the VF-1 displays various information, such as the current state of settings. (4) UTILITY Utility button Press this when you wish to make system settings, use the tuning function, or make MIDI-related settings. -
Page 13: Rear Panel
(RAD-50). * If you will be using the VF-1 by itself, without using the rack mount adapter (RAD-50; sold separately), attach the included rubber feet as shown in the diagram. -
Page 14: Section 1. Producing Sound
(MONO) jack to make connections. * Normally you should set the LEVEL switch to -20 dBm. fig.1-03 Guitar amplifiers You can set the VF-1 to obtain optimal sound with the amp that you use. For details refer to “GLOBAL SOUND SETTING” (p.45). -
Page 15: Connecting A Keyboard
OUTPUT R INPUT R Mixer Connecting a mic * Set the LEVEL switch to match the level of the mixer to which the VF-1 is connected. fig.1-42 Microphone OUTPUT L INPUT L Howling could be produced depending on the location of mics relative to speakers. -
Page 16: Connecting To The Send/Return Of A Mixer
* Set the LEVEL switch to match the level of the mixer to which the VF-1 is connected. * If the VF-1 is connected to a send/return loop, set EFFECTS OFF MD (Effect Off mode) to “MUTE” (p.43) and DIRECT MIX to “OFF”... -
Page 17: Turning On The Power, And Standby
Peak Level * If the input level is not set appropriately, the VF-1 will not perform to its full potential. * Even though [INPUT L/R] is turned all the way down, the input level may not be “0.”... -
Page 18: Selecting The Effect Sound
Rotate to the left: Preset A –> User B –> User A –> Preset B –> Preset A... * It is not possible to switch patches if the VF-1 is not in Play mode. * If the display indicates “CATEGORY On,” the Category Search function (see following item) is operating, so that not all patch numbers can be accessed in sequence by rotating [NUMBER]. -
Page 19: Quickly Finding The Desired Patch (Category Search)
The VF-1 classifies all patches by category (such as performance style or instrument). The VF-1 provides a Category Search function that lets you select a category so that only the patches in that category are displayed. By using this function, you can view only the patches of the currently selected category, and rapidly find the patch you want. -
Page 20: Selecting Patches With A Foot Switch
If you use a special cable (PCS-31; optional) to connect two foot switches, you can operate the foot switches to select patches in the same way as when rotating the [NUMBER] knob. fig.1-22 Cord: ROLAND PCS-31 (optional) white CONTROL 1 CONTROL 2... - Page 21 FC-200” (P.127). • Selecting Effect Sounds by MIDI Messages VF-1 Patches can be selected by Program Change messages from an external MIDI device. For details refer to “Using MIDI to Operate the VF-1” (p.122). Section 1. Producing Sound...
-
Page 22: Switching Effects On/Off
(Control Assign)” (p.33), and “Using MIDI to control the VF-1.” (p.122) Tuning your instrument The VF-1 has a built-in chromatic tuner. You can tune your instrument quickly without having to change connections. The built-in tuner can display the note names, and also allows you to adjust the standard pitch and the output level during tuning. -
Page 23: About The Tuner Display
If an FC-200 MIDI Foot Controller (optional) is connected, you can switch the tuner on/off by pedal operations on the controller. For details refer to “VF-1 operation using the FC-200” (p.127). MIDI Control Change messages can be used to switch the Tuner on/off. -
Page 24: Modifying The Tuner Settings (Standard Pitch/Volume)
“Standard pitch” is the frequency of the A4 note (middle A on a piano) that is used as a standard to which all other notes are tuned. The VF-1 allows you to set the standard pitch over the range of 435–455 Hz. -
Page 25: Section 2. Creating Sounds
Section 2. Creating Sounds On the VF-1, each of the different effect sounds are called “patches.” A patch consists of settings that specify the order in which the internal effects are connected, and the settings for each effect. The internal memory of the VF-1 contains 400 patches. -
Page 26: Rapidly Editing A Patch (Quick Setting)
Section 2. Creating Sounds Rapidly editing a patch (Quick Setting) Each effect of the VF-1 provides various preset settings (effect settings). You can easily create new effect sounds simply by selecting these settings and combining them. This is called the Quick Setting function. -
Page 27: Editing A Patch
Patch. If you want to save your new Patch, use “the Write operation” (P.38) to store it. * If you turn off the power while effect settings are being stored, the VF-1 may malfunction. Section 2. Creating Sounds Effect Master... -
Page 28: Copying A Patch
Never turn off the power while the display shows “KEEP POWER ON !” If the power is turned off while this display is shown, the VF-1 may malfunction or its data may be lost. * If you press [EXIT] in step 2, the copy operation will be cancelled and you will return to Play mode. -
Page 29: Editing The Settings Of Each Effect
Editing the settings of each effect Each effect consists of several different parameters. You can create new effect sounds by modifying the settings of these parameters. fig.2-13 1. In Play mode, press PARAMETER [ The following algorithm display screen will appear. fig.2-12 2. -
Page 30: Changing The Order Of The Effects
Section 2. Creating Sounds Changing the order of the effects For some algorithms, you can place SFX, MOD (modulation), and PREAMP/SP.SIM (speaker simulator) in different locations within the algorithm. The algorithms that allow SFX, MOD, and PREAMP/SP.SIM to be moved are noted in the “Algorithm list” (p. 49–90). fig.2-15 1. -
Page 31: Checking The Input/Output Levels Of Each Effect
Checking the input/output levels of each effect fig.2-21 e.x.: When you have made the DELAY parameter appear in the display fig.2-49 Input L Compressor/ Limiter Input R * If the input and/or output levels are excessive, the desired result will not be obtained. Check the input and output levels of each effect, and adjust the output level appropriately. -
Page 32: Copying Effect Settings (Effect Copy)
Section 2. Creating Sounds Copying effect settings (Effect Copy) You can copy the settings of an individual effect from another patch to an effect in the currently selected patch. This function is convenient when you wish to use effects with similar settings in two or more patches. -
Page 33: Controlling Parameters In Real Time (Control Assign)
(Control Assign) Here’s how you can make settings so that you can control parameters from a foot switch or pedal connected to the VF-1 or from an external MIDI device. The controller that will affect each parameter can be specified independently for each patch. - Page 34 An expression pedal connected to the expression pedal jack (optional: EV-5 (Roland), FV-300L + PCS-33 (Roland)) CONTROL 1,2: A foot switch (optional: FS-5U, FS-5L, FS-1 (Roland), DP-2 (Roland) etc.) connected to the CTL 1/2 jack MIDI-7: The expression pedal of an FC-200 MIDI Foot Controller...
- Page 35 If you want an effect to become stronger while you depress a foot switch, or for the effect to be on only while the foot switch is depressed fig.2-71a Momentary-type Use a momentary-type foot switch, and select “NORMAL.” In this case, the setting (on/off) will depend on whether the foot switch is depressed or not.
- Page 36 Section 2. Creating Sounds Set the Control Assign as shown below according to the connected controller. fig.2-35d SOURCE SOURCE TYPE MODE Expression pedal NORMAL PEDAL Foot switch CONTROL NORMAL (latch-type) Foot switch CONTROL TOGGLE, NORMAL (momentary-type) MIDI-1–31 TOGGLE, MIDI MIDI-64–95 NORMAL * When the expression pedal is connected, set the SOURCE MIN and MAX to your taste.
-
Page 37: Assigning The Category
Assigning the category You can assign a category for each patch. fig.2-26 1. In Play mode, press PARAMETER [ The following display will appear. fig.2-12 2. Press PARAMETER [ ] to select “CATEGORY.” fig.2-27 3. Rotate [VALUE] to assign the category. The change will occur more rapidly if you hold down [CATEGORY] while you rotate [VALUE]. -
Page 38: Canceling Your Edits
Never turn off the power while the display shows “Keep Power ON !” If the power is turned off while this display is shown, the VF-1 may malfunction or its data may be lost. While you are editing a patch, you can press [WRITE] at any... -
Page 39: Ways To Use Control Assign
Expression pedal Use only the specified expression pedal (BOSS FV-300 + PCS- 3 (Roland) or EV-5 (Roland); sold separately). By connecting any other expression pedals, you risk causing malfunction and/or damage to the unit. * Set the minimum volume on the expression pedal connected to the EXP PEDAL jack to the “MIN”... -
Page 40: Using Two Foot Switches
CONTROL 2 Foot switch FS-5U * Use two FS-5U (optional) foot switches. * In order to connect two foot switches to the VF-1, you will need a separately sold PCS-31 (Roland). * If connecting a footswitch (FS-5U; optional) to the CONTROL 1/2 jack, set the polarity switch as shown above. -
Page 41: Using An Expression Pedal (Example)
Minimum volume Expression pedal Use only the specified expression pedal (BOSS FV-300 + PCS- 33 (Roland) or EV-5 (Roland); sold separately). By connecting any other expression pedals, you risk causing malfunction and/or damage to the unit. Settings Use the following procedure to make settings. -
Page 42: Section 3. Overall Settings (Utility)
Section 3. Overall Settings (Utility) Here’s how you can access the various Utility screens to make settings that apply to the entire VF-1, such as tuner settings and system settings. Make these settings as appropriate for the situation or setup in which you are using the VF-1. -
Page 43: System Setting
SYSTEM SETTING fig.3-07 Here you can make basic system settings for the VF-1, such as the display contrast (p.24), output settings for when “EFFECTS OFF” (p. 22) is selected, settings for when foot switches (p.36) are connected to the CTL 1,2 jack, and user scale settings (p.101) for the Harmonist. - Page 44 Section 3. Overall Settings (Utility) fig.3-10 CONTROL 1, 2 EFFECTS ON/OFF, TUNER, NUMBER DOWN, NUMBER UP, ASSIGNABLE You can specify the foot switch functions when the foot switch is connected to CTL 1,2 jack. * For foot switch connections and settings, refer to “Connecting an expression pedal or foot switch”...
-
Page 45: Global Sound Settings
OUTPUT SELECT GUITAR AMP (COMBO), GUITAR AMP (STACK), POWER AMP (COMBO), POWER AMP (STACK), LINE Set the VF-1 to the optimal settings for the amp to which it is connected. * This setting is effective when a guitar is connected to the VF-1, and you are playing the sound through a guitar amp. -
Page 46: Factory Reset
DIRECT MIX: OFF, PATCH For algorithms that include a spatial-type effect, you can specify whether or not the direct sound will be output. This is useful when the VF-1 is connected to the AUX SEND / RETURN of a mixer. OFF: The direct sound will not be output. -
Page 47: Section 4. Effect Guide
Section 4. Effect guide Section 4 explains the contents of the algorithms on which effect sounds are based, the effects that make up each algorithm, and the parameters of each effect. About the algorithm list How an algorithm is organized The algorithm determines the type of effects and the structure of the parameters that create the effect sound. -
Page 48: About Sfx
Section 4. Effect guide SELECT (select effect) Selects one of the following effects to use. If you modify the effect by “SELECT,” parameter used before modifying is initialized. (Harmonist) (p.101) (Flanger) (p.98) (Phaser) (p.108) SEQ (Sub 4band equalizer) (p.116) (Chorus) (p.93) 2CE (2x2 chorus) (p.91) SDD (Short delay) (p.114) (Humanizer) (p.103) -
Page 49: Algorithm List
Algorithm list 1 GUITAR MULTI 1 fig.4-231 Input L COMPRESSOR/ LIMITER Input R This is a multi-effect for guitar that contains a preamp / speaker simulator. The MOD (Modulation) settings allow you to use guitar synth, slicer, or harmonist etc. MOD: MODULATION lets you select one of the following effects. - Page 50 Algorithm list 4BAND EQ (Equalizer) EFFECT OFF, ON LOW EQ -20–+20 (dB) HIGH EQ -20–+20 (dB) LEVEL -20–+20 (dB) LO-MD F 100–10.0 k (Hz) LOW-MID Q 0.5–16.0 LOW-MID EQ -20–+20 (dB) HI-MD F 100–10.0 k (Hz) HI-MID Q 0.5–16.0 HI-MID EQ -20–+20 (dB) NS.
- Page 51 <HU: HUMANIZER> MODE PICK, AUTO, RANDOM VOWEL [1] a, e, i, o, u VOWEL [2] a, e, i, o, u SENS 0–100 RATE 0–100, BPM: DEPTH 0–100 MANUAL 0–100 LEVEL 0–100 POSITION Can be moved to the ( in the diagram. <VB: VIBRATO>...
-
Page 52: Pb2 Guitar Multi 2
Algorithm list 2 GUITAR MULTI 2 fig.4-232 Input L COMPRESSOR/ LIMITER Input R This is a multi-effect for guitar that contains a preamp/speaker simulator. The SFX (special effects) settings allow you to use an acoustic simulator, bass guitar simulator, or pickup simulator etc. SFX lets you select one of the following effects. - Page 53 EFFECT OFF, ON SELECT WAH, AW <WAH: PEDAL WAH> PEDAL 0–100 LEVEL 0–100 <AW: AUTO WAH> MODE LPF, BPF POLARITY DOWN, UP SENS 0–100 FREQ 0–100 PEAK 0–100 RATE 0–100, BPM: DEPTH 0–100 LEVEL 0–100 PREAMP/SP.SIM (Speaker Simulator) EFFECT OFF, ON PREAMP TYPE JC-120, CLEAN TWIN, CRUNCH, MATCH DRIVE, VO DRIVE, BLUES,...
-
Page 54: Pb3 Bass Multi
Algorithm list 3 BASS MULTI fig.4-233 Input L COMPRESSOR/ DEFRETTER Input R This is a multi-effect for bass guitar. You can use overdrive/distortion, octave, or defretter etc. to create the sound you want. MOD: MODULATION lets you select one of the following effects. - Page 55 DISTORTION EFFECT OFF, ON TYPE TURBO OD, BASS OD, HARD DS, FUZZ 1, FUZZ 2 DRIVE 0–100 BASS -50–+50 TREBLE -50–+50 FX LEVEL 0–100 DIR LEVEL 0–100 4BAND EQ (Equalizer)/T-WAH EFFECT OFF, ON SELECT 4BAND EQ, T-WAH <4BAND EQ> LOW EQ -20–+20 (dB) HIGH EQ -20–+20 (dB)
-
Page 56: Pb4 Acoustic Multi
Algorithm list 4 ACOUSTIC MULTI fig.4-234 Input L ACOUSTIC COMPRESSOR/ PROCESSOR LIMITER Input R PREAMP/ SP.SIM This is a multi-effect for acoustic guitar. You can use effects such as acoustic and anti-feedback to create a fully-produced acoustic sound. ACOUSTIC EFFECT OFF, ON BODY 0–100... -
Page 57: Pb5 Keyboard Multi
5 KEYBOARD MULTI fig.4-211 Input L RING MODULATOR Input R This is a multi-effect suitable for keyboard. It provides a wide variety of effects ranging from basic sounds, to special effects using a ring modulator or pitch shifter. MOD: MODULATION lets you select one of the following effects. MOD: FL (Flanger) PH (Phaser) RING MODULATOR... - Page 58 Algorithm list TREMOLO/PAN EFFECT OFF, ON MODE TREMOLO, PAN WAVE SHAPE 0–100 RATE 0–100, BPM: DEPTH 0–100 REVERB EFFECT OFF, ON TYPE ROOM1, ROOM2, HALL1, HALL 2, PLATE REVERB TIME 0.1–10.0 (sec) PRE DELAY 0–100 (msec) LOW CUT 55–800 (Hz) HIGH CUT 700–11 k (Hz), FLAT DENSITY...
-
Page 59: Pb6 Rotary Multi
6 ROTARY MULTI fig.4-212 Input L 4BAND EQ Input R This simulates a rotary speaker that produces a modulating sound by rotating the speaker. It also simulates the distortion (Overdrive) produced by the vacuum tube amp of a rotary speaker 4BAND EQ (Equalizer) EFFECT OFF, ON... -
Page 60: Pb7 Vocal Multi
Algorithm list 7 VOCAL MULTI fig.4-210 Input L COMPRESSOR/ LIMITER Input R This is a multi-effect for vocals. It allows you to use flanger, phaser, and pitch shifter etc. to produce special effects. MOD: MODULATION lets you select one of the following effects. - Page 61 <PH: PHASER> TYPE 4STAGE, 8STAGE, 12STAGE, BI-PHASE RATE 0–100, BPM: DEPTH 0–100 MANUAL 0–100 RESONANCE 0–100 STEP OFF, 1–100 LEVEL 0–100 <PS: PITCH SHIFTER> MODE FAST, MEDIUM, SLOW, INV1, INV2 PITCH -24–+24 FINE -50–+50 BALANCE DIR:FX 100:0–0:100 LEVEL 0–100 DELAY EFFECT OFF, ON TYPE...
-
Page 62: Pb8 Vocoder
Algorithm list 8 VOCODER fig.4-227 Input L (Instrument) VOCODER Input R (Mic) SUPPRESSOR Vocoder is an effect that allows you to produce the impression that an instrument is speaking or singing with a human voice. When using the vocoder, input an instrumental sound to the L channel, and a human voice to the R channel. The instrumental sound will be divided into 10 frequency bands, and will be processed according to the frequency components of the voice. -
Page 63: Pb9 Voicetransform (Voice Transformer)
9 VoiceTRANSFORM (Voice Transformer) fig.4-226 Input L TRANSFORM Input R By separately controlling the basic pitch and the formants, this effect lets you create a variety of vocal characters. VoiceTRANSFORM (Voice Transformer) EFFECT OFF, ON ROBOT OFF,ON CRMTC PITCH -12–+12 FINE PITCH -100–+100 CRMTC FRMT... -
Page 64: Pb10 Isolator
Algorithm list 10 ISOLATOR fig.4-229 Input L Input R A three-band isolator divides the input signal into three frequency bands (low / middle / high), and allows you to extract or delete each frequency band. An effect such as chorus or slicer can be applied to the extracted sound. MOD: MODULATION lets you select one of the following effects. -
Page 65: Pb11 Lofi Processor
11 LOFI PROCESSOR fig.4-216a Input L Input R This effect allows you to simulate various levels of audio quality, such as the sound that is heard from an AM radio, the sound of an old record played on a gramophone, and even extreme changes in tonality produced by the lo-fi processor. 4BAND EQ (Equalizer) EFFECT OFF, ON... -
Page 66: Pb12 Reverb 1
Algorithm list 12 REVERB 1 fig.4-236 Input L Input R This simulates the reverberation of a room or hall. A delay can also be used simultaneously. In this Algorithm, what you have set with the DIRECT MIX (p.46) will have effect. 4BAND EQ (Equalizer) EFFECT OFF, ON... -
Page 67: Pb13 Reverb 2
13 REVERB 2 fig.4-202 Input L 4BAND EQ Input R This connects an equalizer, chorus, and reverb in series. After using the equalizer to adjust the input sound, you can use chorus and reverb to create spacious reverb. In this Algorithm, what you have set with the DIRECT MIX (p.46) will have effect. 4BAND EQ (Equalizer) EFFECT OFF, ON... -
Page 68: Pb14 Gate Reverb
Algorithm list 14 GATE REVERB fig.4-201 Input L Input R This is a gated reverb. You can specify how the reverb depth will be affected by the input level. It can also be used as a conventional reverb. In this Algorithm, what you have set with the DIRECT MIX (p.46) will have effect. 4BAND EQ (Equalizer) EFFECT OFF, ON... -
Page 69: Pb15 2Ch Rss (2 Channel Rss)
15 2CH RSS (2 channel RSS) fig.4-206 Input L Input R This allows the sounds that are input from each channel to be positioned in three-dimensional space. The position can be specified by the RSS (2CH) Azimuth and Elevation. 4BAND EQ (Equalizer) EFFECT OFF, ON LOW EQ... -
Page 70: Pb16 Delay Rss
Algorithm list 16 DELAY RSS fig.4-208 Input L 4BAND EQ Input R This is a delay that allows three delay sounds to be adjusted independently. The left and right outputs are connected to RSS; the left-channel sound is positioned at 90 degrees left, and the right-channel sound is positioned at 90 degrees right. A four-band equalizer is provided on the input. -
Page 71: Pb17 Chorus Rss
17 CHORUS RSS fig.4-209 Input L 4BAND EQ Input R The output of the chorus is connected to RSS. The left-channel sound is positioned at 90 degrees left, and the right-channel sound is positioned at 90 degrees right. A four-band equalizer is provided on the input. In this Algorithm, what you have set with the DIRECT MIX (p.46) will have effect. -
Page 72: Pb18 Reverb Rss
Algorithm list 18 REVERB RSS fig.4-235 Input L Input R The output of the reverb is connected to RSS. The left-channel sound is positioned at 90 degrees left, and the right-channel sound is positioned at 90 degrees right. A four-band equalizer is provided on the input. In this Algorithm, what you have set with the DIRECT MIX (p.46) will have effect. -
Page 73: Pb19 Rss Panner
19 RSS PANNER fig.4-207 Input L Input R This produces the impression of a sound that rotates around the listener. You can use a flanger to add an even more distinctive effect. 4BAND EQ (Equalizer) EFFECT OFF, ON LOW EQ -20–+20 (dB) HIGH EQ -20–+20 (dB) -
Page 74: Pb20 Delay
Algorithm list 20 DELAY fig.4-203 Input L Input R You can choose one of two types of delay; single, or three-tap. By using the three-tap delay, you can make independent settings for each of the three delay sounds. A four-band equalizer is provided on the input. In this Algorithm, what you have set with the DIRECT MIX (p.46) will have effect. -
Page 75: Pb21 Multitap Delay (20 Tap)
21 MultiTAP DELAY (20 TAP) fig.4-223 Input L 4BAND EQ Input R This delay lets you make independent settings for twenty separate delay sounds. A four-band equalizer is provided on the input. In this Algorithm, what you have set with the DIRECT MIX (p.46) will have effect. 4BAND EQ (Equalizer) EFFECT OFF, ON... -
Page 76: Pb22 Tape Echo201
Algorithm list 22 TAPE ECHO201 fig.4-230 This is a simulation of a Roland RE-201 tape echo. In this Algorithm, what you have set with the DIRECT MIX (p.46) will have effect. TAPE ECHO201 EFFECT OFF, ON MODE 1–7 REPEAT RATE 0–100... -
Page 77: Pb23 Mic Simulator
23 MIC SIMULATOR fig.4-228 Input L MIC CONV MIC CONV Input R With this effect, sounds that were picked up by a standard dynamic mic, pin mic, or direct line, can be converted to produce the impression that the sounds were recorded on an expensive condenser mic or a special studio mic. A proximity effect or a sense of distance from the mic can also be added. -
Page 78: Pb24 Space Chorus
Algorithm list 24 SPACE CHORUS fig.4-217 Input L Input R This is a chorus that simulates a Roland SDD-320 (Dimension D). In this Algorithm, what you have set with the DIRECT MIX (p.46) will have effect. SPACE CHORUS EFFECT OFF, ON INPUT MONO, ST. -
Page 79: Pb25 Stflanger Dly (Stereo Flanger Delay)
25 StFLANGER DLY (Stereo Flanger Delay) fig.4-214 Input L Input R This algorithm combines a stereo flanger, stereo delay, and equalizer in series. It allows you to add modulation to the sound while preserving the positioning of the stereo input. In this Algorithm, what you have set with the DIRECT MIX (p.46) will have effect. -
Page 80: Pb26 Stphaser Dly (Stereo Phaser Delay)
Algorithm list 26 StPHASER DLY (Stereo Phaser Delay) fig.4-213 Input L Input R This algorithm combines a stereo phaser, stereo delay, and equalizer in series. It allows you to add modulation to the sound while preserving the positioning of the stereo input. In this Algorithm, what you have set with the DIRECT MIX (p.46) will have effect. -
Page 81: Pb27 Stchorus Dly (Stereo Chorus Delay)
27 StCHORUS DLY (Stereo Chorus Delay) fig.4-204 Input L DELAY L DELAY R Input R This algorithm combines a stereo chorus, stereo delay, and equalizer in series. It allows you to add depth and spaciousness to the sound while preserving the positioning of the stereo input. In this Algorithm, what you have set with the DIRECT MIX (p.46) will have effect. -
Page 82: Pb28 Stereo Ps Dly (Stereo Pitch Shifter Delay)
Algorithm list 28 STEREO PS DLY (Stereo Pitch Shifter Delay) fig.4-205 Input L Input R This allows you to apply delay which is fed back to the pitch-shifted sound. You can use this to create special pitch-shift effects in which the pitch continues to change in steps. Of course it can also be used as a conventional stereo pitch shifter. In this Algorithm, what you have set with the DIRECT MIX (p.46) will have effect. -
Page 83: Pb29 Stereo Multi
29 STEREO MULTI fig.4-215 Input L COMPRESSOR/ LIMITER L COMPRESSOR/ LIMITER R Input R This algorithm is a series connection of five basic effects, each completely in stereo. It allows you to add depth and spaciousness to the sound while preserving the positioning of the stereo input. COMPRESSOR/LIMITER EFFECT OFF, ON... -
Page 84: Pb30 10Graphic Eq (10-Band Graphic Equalizer)
Algorithm list 30 10GRAPHIC EQ (10-Band Graphic Equalizer) fig.4-222 Input L COMPRESSOR/ LIMITER L COMPRESSOR/ LIMITER R Input R This is a completely stereo ten-band graphic equalizer. It allows detailed adjustments to be made in the frequency response. COMPRESSOR/LIMITER EFFECT OFF, ON SELECT COMP, LIMIT... -
Page 85: Pb31 Hum Canceler
31 HUM CANCELER fig.4-224 Input L Input R This removes unwanted hum (“buzz” noise). A noise suppressor is provided on the output. HUM CANCELER EFFECT OFF, ON FREQUENCY 20.0–800.0 (Hz) WIDTH 10–40 (%) DEPTH 0–100 THRESHOLD 0–100 RANGE LOW 20–2000 (Hz) RANGE HIGH 1.0 k–20.0 k (Hz) NS. -
Page 86: Pb32 Vocal Canceler
Algorithm list 32 VOCAL CANCELER fig.4-225 Input L CANCELER Input R When a stereo source such as CD or DAT is input to this effect, sounds that are located in the center (such as vocals or bass) will be removed. A four-band equalizer is provided on the output. * Depending on the musical source, desired sounds may be removed, or there may be other ways in which the result is not as you wish. -
Page 87: Pb33 Reverb+Reverb
33 REVERB+REVERB fig.4-218 Input L Input R This allows you to simultaneously and independently use two different types of reverb on the L and R channels. A four-band equalizer is provided on the input. In this Algorithm, what you have set with the DIRECT MIX (p.46) will have effect. Lch &... -
Page 88: Pb34 Chorus+Reverb
Algorithm list 34 CHORUS+REVERB fig.4-220 Input L Input R This allows you to simultaneously and independently use chorus and reverb on the L and R channels. A four-band equalizer is provided on the input. In this Algorithm, what you have set with the DIRECT MIX (p.46) will have effect. Lch &... -
Page 89: Pb35 Delay+Reverb
35 DELAY+REVERB fig.4-219 Input L Input R This allows you to simultaneously and independently use delay and reverb on the L and R channels. A four-band equalizer is provided on the input. In this Algorithm, what you have set with the DIRECT MIX (p.46) will have effect. Lch &... -
Page 90: Pb36 Delay+Chorus
Algorithm list 36 DELAY+CHORUS fig.4-221 Input L Input R This allows you to simultaneously and independently use delay and chorus on the L and R channels. A four-band equalizer is provided on the input. In this Algorithm, what you have set with the DIRECT MIX (p.46) will have effect. Lch &... -
Page 91: The Function Of Each Parameter
The function of each parameter 2x2 CHORUS This adds a pitch-shifted sound to the original sound, producing an effect of greater depth and spaciousness. Two separate stereo chorus units are used for the low-frequency and high-frequency ranges in order to create a more natural chorus sound. -
Page 92: Acoustic
The function of each parameter ACOUSTIC With this feature, you can change the sound from a pickup on an electric-acoustic guitar into a richer sound, similar to that obtained by a microphone placed near a guitar. EFFECT This parameter turns the acoustic effect on/off. BODY This adjusts the resonance of the sound caused by the body. -
Page 93: Chourus
CHOURUS A sound with a subtly shifted pitch is added to the direct sound, making the final output sound thicker and broader. EFFECT This parameter turns the chorus effect on/off. POLARITY This parameter is for the Stereo Chorus. It lets you choose the difference in LFO phase for the left and right channels. -
Page 94: De-Esser
The function of each parameter THRESHOLD This adjusts the level at which the effect will be made apparent. RATIO This parameter is for both “STEREO MULTI,” “10 GRAPHIC EQ” and “VOCAL MULTI.” Selects the extent to which the signal will be compressed (compression ratio) while the Limiter is working. -
Page 95: Defretter
DEFRETTER This simulates a fretless bass. The defretter can be selected in the “BASS MULTI” algorithm as an alternate for the compressor. SENS (sensitivity) This controls the input sensitivity of the Defretter. It should be adjusted for the bass guitar you have until you get the harmonic changes to sound natural. -
Page 96: Distance
The function of each parameter FEEDBK [L] (feedback L) FEEDBK [R] (feedback R) These parameters are for a stereo-input delay, and adjust the amount of feedback for left and right channels independently. Adjusting the amount of feedback will change the number of times that the delay sound is repeated. LEVEL [C] LEVEL [L] LEVEL [R]... -
Page 97: Enhancer
ENHANCER By adding sounds which are out-of-phase with the direct sound, this effect enhances the definition of the sound, and pushes it to the forefront. EFFECT This parameter turns the enhancer effect on/off. DETECT (detector in) This is the parameters for both “STEREO MULTI” and “10 GRAPHIC EQ.”... -
Page 98: Flanger
FEEDBACK TONE Adjust the frequency range at which you wish to create feedback. FEEDBACKER ON/OFF To switch the feedbacker on/off using the Footswitch (FS-5U, DP-2 (Roland), etc.), set “Control Assign” (p. 33) as follows. < ASSIGN1: ON > TARGET: SFX: ON/OFF... -
Page 99: Guitar Synth (Guitar Synthesizer)
GUITAR SYNTH (guitar synthesizer) This detects the pitch of an electric guitar and outputs a synthesizer sound. This effect can be used in the “GUITAR MULTI 1” algorithm when the MOD “SELECT” parameter is set to “SYN.” * For details on MOD (Modulation) settings, refer to “About MOD ”... - Page 100 DIR LEVEL (direct level) This determines the volume of the direct sound. HOLD ON/OFF To switch hold on/off using the foot switch (FS-5U, DP-2 (Roland), etc.), set “Control Assign” (p. 33) as follows. < ASSIGN1: ON > TARGET: MOD (Guitar SYNTH): HOLD...
-
Page 101: Harmonist
HARMONIST This effect changes the pitch of the original sound. It is variable up and down 2 octaves. This effect can be used in the “GUITAR MULTI 1” algorithm when the MOD “SELECT” parameter is set to “HR.” * For details on MOD (Modulation) settings, refer to “About MOD ”... -
Page 102: Hum Canceler (Hum Canceller)
6. Use PARAMETER [ ] to move the cursor to the “INPUT” setting. When you play a single note on your guitar, the VF-1 will detect the note name and display it as the note name of the input sound. -
Page 103: Humanizer
VF-1’s Isolator cuts it completely. You may find turning the Isolator on and off or adjusting the level in real time to be a very effective technique. -
Page 104: Lofi Box
The function of each parameter LOFI BOX This allows you to create a “lo-fi” sound. EFFECT This parameter turns the lo-fi box effect on/off. SELECT Select the mode of the lo-fi box. * If you edit an effect with “SELECT,” the effect parameter that you have set before editing will be initialized. -
Page 105: Master
R channel will have no effect, turning it to exactly the same setting as the L channel. LEVEL (master level) This adjusts the output volume of the VF-1. When making Master settings, the level meter (p.18, 31) will show the initial input of the patch (the signal before it passes through any effect) and the final output (the signal after it has passed through all effects of the algorithm). -
Page 106: Mic Conv (Mic Converter)
(Line –> Microphone conversion). EFFECT This parameter turns the mic converter effect on/off. INPUT Select the type of mic that was actually used to record. DR-20: Roland DR-20 SML.DY: Small Dynamic Microphone HED.DY: Head-worn Dynamic Microphone MIN.CN: Miniature Condenser Microphone... -
Page 107: Multi Tap Delay
MULTI TAP DELAY This is an effect in the “Multi tap delay (20 tap)” algorithm. This parameter creates a distinctive effect (such as a thicker sound) by applying a delayed sound to the direct sound. Multi tap delay lets you make independent settings for each of 20 tap delays. -
Page 108: Octave
The function of each parameter THRESHOLD Adjust this parameter as appropriate for the volume of the noise. If the noise level is high, a higher setting is appropriate. If the noise level is low, a lower setting is appropriate. Adjust this value until the decay of the sound is as natural as possible. -
Page 109: Pickup Sim (Pickup Simulator)
STEP This can be used to cause the sound to change in a stepped manner. Increasing the value will make the change finer. If this is “OFF,” step will have no effect. LEVEL This adjusts the volume of the phaser. PICKUP SIM (Pickup Simulator) This produces the sound of different types of pickup. -
Page 110: Preamp/Sp.sim (Preamp/Speaker Simulator)
This sets the type of the guitar preamp. The distortion and tone characteristics of each amp are as shown below: JC-120: The sound of the Roland “JC-120” (Jazz Chorus 120), a favorite of pro musicians around the world. CLEAN TWIN: The sound of a conventional built-in tube amp. -
Page 111: Reverb
TREBLE Adjusts the tone for the high frequency range. PRESENCE Adjusts the tone for the ultra high frequency range. * If you have selected “MATCH DRIVE” or “VO DRIVE” as the type, raising presence will cut the high range (the value will change from “0”... -
Page 112: Gate
The function of each parameter BALANCE DIR:FX (direct: effect) This adjusts the volume balance of the direct and effect sounds. DIR:FX 100:0 Only the direct sound will be output. DIR:FX 0:100 Only the effect sound will be output. FX (EFFECT) LEVEL This parameter adjusts the effect level. -
Page 113: Rotary
FREQ (frequency) This adjusts the frequency of the internal oscillator. FX LEVEL (effect level) This adjusts the volume of the effect sound. DIR LEVEL (direct level) This adjusts the volume of the direct sound. ROTARY This parameter simulates an old-fashioned rotary speaker, which added undulations to the sound by rotating the speaker as it played. -
Page 114: Rss Panner
Rotates the sound counterclockwise, looking down from above. RSS (2ch) RSS (Roland Sound Space) is an effector that creates a three- dimensional sonic field. RSS can let you orient the sonic image at a position above, below, before, behind, or to one side or the other of the listener. -
Page 115: Slow Gear
This adjusts the time needed for the volume to reach its maximum from the moment you begin picking. SPACE CHORUS This chorus effect simulates the sound from Roland’s well- known SDD-320 Dimension D. EFFECT This parameter turns the space chorus effect on/off. -
Page 116: Sub 4Band Eq (Sub 4 Band Equalizer)
The function of each parameter * If this is set to BPM, the MASTER BPM (p.105) value that is set for each patch will determine the delay time, so that the effect will match the tempo of the song. However if the BPM value is low, the effect will synchronize to twice or four times the BPM. -
Page 117: Tape Echo201
DIR LEVEL (direct level) This adjusts the volume of the direct sound when the effect is tured on. TAPE ECHO201 This echo effect simulates the sound from Roland’s well- known RE-201. EFFECT This parameter turns tape echo201 effect on/off. MODE (mode selector) This is used to select the different delay times (short, middle, and long) combination of three playback heads. -
Page 118: Vibrato
This sets the time passing from the moment the trigger is turned on until the set vibrato is obtained. TRIGGER ON/OFF To switch the trigger on/off of the vibrato using the foot switch (FS-5U, DP-2 (Roland), etc.), set “Control Assign” (p. 33) as follows. < ASSIGN1: ON > TARGET:... -
Page 119: Voicetransform (Voice Transformer)
Mic input (R channel input) will begin to function. The function of each parameter HOLD ON/OFF To switch hold on/off using the foot switch (FS-5U,DP-2 (Roland),etc.), set “Control Assign” (p. 33) as follows. < ASSIGN1: ON > TARGET: VOCODER: HOLD... -
Page 120: Wah
The function of each parameter The wah effect creates a unique tone by changing the frequency response characteristics of a filter. Pedal wah lets you use an Expression pedal or the like to obtain real-time control of the wah effect. Auto wah creates an automatic wah by cyclically changing the filter, or by changing the filter in response to the volume of the input. -
Page 121: Before Using Rss
Azimus Down < Cautions when using RSS > RSS (Roland Sound Space) is an effect that controls three- dimensional placement of the sound. In order for RSS to be as effective as possible, note the following points. • Acoustically “dead” rooms are most suitable. -
Page 122: Section 5. Using Midi To Operate The Vf-1
(p.33) determine the VF-1 parameter that is controlled by each MIDI message. Transmit data VF-1 settings such as effect sounds etc. can be transmitted as exclusive messages to other MIDI devices. This allows another VF-1 to be given the same settings, or effect sound settings to be stored in a sequencer or other data storage device. -
Page 123: Setting The Midi Channel
Select the same channel as used by the device connected to the VF-1. * At the factory settings, the MIDI channel will be channel 1. Section 5. Using MIDI to Operate the VF-1 Setting the Omni mode OMNI MODE: OFF, ON fig.5-09... -
Page 124: Program Change Map Settings
Program Change Map Settings When using Program Change messages sent from an external MIDI device to select VF-1 Patches, you can freely specify the correspondence between the Program Change number that was received and the VF-1 Patch that will be selected. -
Page 125: Transmitting Vf-1 Data (Bulk Dump)
Transmitting VF-1 data (Bulk Dump) The VF-1 can use exclusive messages to set another VF-1 to the same settings, or to transmit its settings to a device such as a sequencer for storage. The process of transmitting such data is called Bulk Dump. -
Page 126: Restoring Data From A Sequencer To The Vf-1 (Bulk Load)
Make connections as shown. * If you are re-transmitting data from a sequencer back to the VF- 1, set the Device ID of the VF-1 to the same number that was used when the data was transmitted to the sequencer. -
Page 127: Section 6. Appendices
Use a video cable (75 unbalanced) to make connections. Turn off the power of the VF-1 before connecting a digital audio device to it. If the power is on when a digital audio device is connected to the VF-1, malfunctions can occur. -
Page 128: Selecting Patches From The Fc-200
* Set the MIDI channel of the VF-1 and FC-200 to the same setting. At the factory defaults, the MIDI channel are set at “1.” * If the VF-1 is not in Play mode (p. 17), press [EXIT] several times (once or twice) to return to Play mode. -
Page 129: Control Assign Operations Using The Fc-200
When the FC-200’s CTL pedal is pressed, Control Change messages (controller number 80) will be transmitted from the FC-200. The VF-1 can receive these Control Change messages as one of the “control assign sources” specified in each Patch, and control the specified target parameters. -
Page 130: Operation Using The Fc-50
Expression pedal etc. EV-5 etc. MIDI OUT * The VF-1 and FC-50 are connected in the same way as the VF-1 and FC-200 are connected. For details refer to “VF-1 and FC- 200 connections” (p.127). Controlling the VF-1 from the... -
Page 131: About Midi
If you connect an FS-5U (sold separately) to the bank shift jack (UP/DOWN) of the FC-50, you will be able to select a patch in the program change map of the VF-1. For details refer to the FC-50 owner’s manual. -
Page 132: Main Types Of Midi Message Used By The Vf-1
System messages include exclusive messages, messages used for synchronization, and messages used to keep a MIDI system running correctly. Exclusive messages are the main type of message in this category used by the VF-1. Exclusive Messages Select the channel of the Exclusive messages handle information related to a unit’s... -
Page 133: Restoring The Factory Settings (Factory Reset)
The following types of factory reset are available. ALL: All data of the VF-1 will be restored to the factory settings. UTILITY: All of the Utility data will be restored to the factory settings. -
Page 134: Troubleshooting
Troubleshooting In there is no sound or other operational problema occur, first check through the following solutions. If this does not resolve the problem, then contact your dealer or a nearby Roland service station. No Sound/Volume Too Low Are the connection cables broken? Try using a different set of connection cables. -
Page 135: Error Messages
Make sure that the MIDI channels of both devices match. (p.124) Did you set the device IDs to match? If you wish to transfer data between two VF-1 units, the transmitting VF-1 and receiving VF-1 must be set to the same device ID. (p.123) Section 6. -
Page 136: Midi Implementation Chart
Section 6. Appendices MIDI Implementation Chart 24-BIT MULTIPLE EFFECTS PROCESSOR Model VF-1 Function... Basic Default Channel Changed Default Mode Messages Altered Note True Voice Number : Note ON Velocity Note OFF After Key's Ch's Touch Pitch Bend 0, 32 1–31 64–95... -
Page 137: Specifications
Specifications VF-1 : 24-Bit Multiple Effects Processor AD Conversion 24 bit 64 times Oversampling Modulation DA Conversion 24 bit 128 times Oversampling Modulation Sampling Frequency 44.1 kHz Program Memories 400: 200 (User) + 200 (Preset) Nominal Input Level GUITAR INPUT Jack:... -
Page 138: Index
Index Numerics 10-Band Graphic Equalizer ...84 10GRAPHIC EQ ...84 2 channel RSS ...69 2CH ...69 AC Adapter jack ...13 ACOUSTIC MULTI ...56 Algorithm ...25 ASSIGN HOLD ...43 Assign on/off ...33 ASSIGNABLE ...44 Bank ...18 Bank Select message ...128 BASS MULTI ...54 BPM ...105 Bulk Dump ...125 Bulk Load ...126... - Page 139 MIDI connector ...13, 131 MIDI Implementation Chart ...132 MIDI IN/OUT ...13 MIDI indicator ...18 MOD ...47 momentary-type ...34 MultiTAP DELAY ...75 MUTE ...43 Mute function ...22 NORMAL ...34 Number knob ...12 NUMBER/VALUE ...12 Omni mode ...123 Output jacks ...13 OUTPUT L (MONO) /R ...13 output level ...31–32 OUTPUT SELECT ...45 PARAMETER ...12...
-
Page 140: Preset Patch List
Preset Patch List Bank / Name Algorithm MS DRIVE GUITAR MULTI 1 W DLY CLEAN GUITAR MULTI 1 TWIN BACKING GUITAR MULTI 1 HUM4Cuttin’ GUITAR MULTI 1 TOUCH <oi> GUITAR MULTI 1 HYPER METAL GUITAR MULTI 1 BRIGHT CLEAN GUITAR MULTI 1 VO CRUNCH GUITAR MULTI 1 JET FLANGER... - Page 141 Bank / Name Algorithm CHORUS GTR GUITAR MULTI 1 JUMBO AC GUITAR MULTI 2 OD FRETLESS BASS MULTI REAL ACOUSTIC ACOUSTIC MULTI EXP:Foot Volume Level ECHO BACK KEYBOARD MULTI CTL:DELAY ON/OFF TREMOLO ROTAR ROTARY MULTI Std. VOCAL VOCAL MULTI VOCODER St. VOCODER ROBOT VOICE VoiceTRANSFORM CTL:ROBOT ON/OFF...
- Page 142 Preset Patch List MEMO...
- Page 143 This product complies with the requirements of European Directive 89/336/EEC. FEDERAL COMMUNICATIONS COMMISSION RADIO FREQUENCY INTERFERENCE STATEMENT This equipment has been tested and found to comply with the limits for a Class B digital device, pursuant to Part 15 of the FCC Rules.
- Page 144 01903667 ‘00-11-D3-31N...