Table of Contents
Advertisement
Owner's Manual
Thank you, and congratulations on your choice of the BOSS
DR-770 Dr. Rhythm.
Before using this unit, carefully read the sections entitled:
• USING THE UNIT SAFELY (page 2–3)
• IMPORTANT NOTES (page 9)
These sections provide important information concerning
the proper operation of the unit.
Additionally, in order to feel assured that you have gained a
good grasp of every feature provided by your new unit,
Owner's manual should be read in its entirety. The manual
should be saved and kept on hand as a convenient reference.
Copyright © 1999 BOSS CORPORATION
All rights reserved. No part of this publication may be reproduced in any form
without the written permission of BOSS CORPORATION.
MODE
FUNC
PAD BANK
Advertisement
Table of Contents

Related Manuals for Boss Dr. Rhythm DR-770


Summary of Contents for Boss Dr. Rhythm DR-770
- Page 1 Owner’s Manual Thank you, and congratulations on your choice of the BOSS DR-770 Dr. Rhythm. Before using this unit, carefully read the sections entitled: • USING THE UNIT SAFELY (page 2–3) • IMPORTANT NOTES (page 9) These sections provide important information concerning the proper operation of the unit.
- Page 2 Refer all servicing to your retailer, the nearest Roland S e r v i c e C e n t e r , o r a n a u t h o r i z e d R o l a n d distributor, as listed on the "Information"...
- Page 3 • Immediately turn the power off, remove the AC adaptor from the outlet, and request servicing by your retailer, the nearest Roland Service Center, or an authorized Roland distributor, as listed on the "Information" page when: • The AC adaptor, the power-supply cord, or the plug has been damaged;...
-
Page 4: Table Of Contents
Contents Main Features...8 IMPORTANT NOTES ...9 Panel Descriptions...10 Quick Start Making Connections...12 Turning On the Power ...14 Turning Off the Power ... 14 Restoring the Factory Settings (Factory Reset) ...15 Listening to the Demo Song ...17 Using the Pads to Play Sounds ...19 Playing Different Sounds (Switching the Pad Bank)... - Page 5 Drum kits... 41 Pad Bank... 41 Creating Rhythms... 42 Create a Pattern ... 42 Create a Song ... 43 Operating Modes of the DR-770... 44 Song Mode ... 44 Pattern Mode ... 44 Pad Mode ... 44 Effect Mode ... 44 Utility Mode...
- Page 6 Adjusting the Volume of an Individual Note ... 57 Replacing an Instrument... 58 Replacing a Drum Kit... 59 Adding a “Swing” Feel to a Pattern (Swing)... 59 Shifting the Timing at Which an Instrument Sounds (Timing Shift) ... 60 Specifying the Original/Fill-in/Variation Patterns ... 61 Naming a Pattern ...
- Page 7 MIDI Channels ... 85 MIDI Messages Used by the DR-770... 85 About the MIDI Implementation Chart... 86 Using an External MIDI Device to Play the DR-770 / Using the DR-770 to Play an External MIDI Device... 86 MIDI Channel Setting... 86 Settings for Playing the DR-770 Instruments...
-
Page 8: Main Features
128 Different Drum Kits A drum kit consists of 55 sounds selected from the 255 available sounds. The DR-770 provides 64 preset drum kits, and allows you to create 64 user drum kits. By editing each sound of a user drum kit, you can create a total of 3,520 original sounds (55 sounds x 64 drum kits). -
Page 9: Important Notes
• Unfortunately, it may be impossible to restore the contents of data that was stored in another MIDI device (e.g., a sequencer) once it has been lost. Roland Corpo- ration assumes no liability concerning such loss of data. • Use a reasonable amount of care when using the unit’s buttons, sliders, or other controls;... -
Page 10: Panel Descriptions
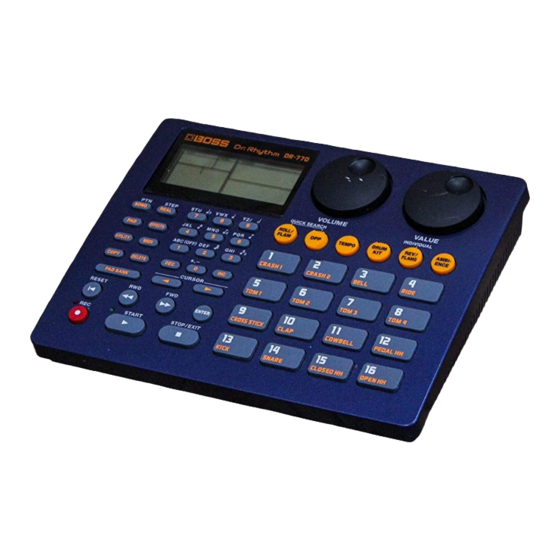
Panel Descriptions Front Panel ( 1 ) ( 5 ) ( 4 ) (6) ( 7 ) ( 10 ) ( 12 ) ( 13 ) ( 15 ) ( 14 ) Display Volume dial Value dial Mode Select button Song/Pattern Effects Utility... - Page 11 fig.00-03a Printing Conventions in This Manual In order to present information as clearly as possible, the following conventions are used in this Manual Text, numerals or symbol enclosed in square brackets [ ] indicate bottons or dials. [TEMPO] Tempo button Cursor buttons CURSOR] Cursor...
-
Page 12: Making Connections
Making Connections The DR-770 does not contain an amp or speakers. In order to produce sound, you must provide an amp or audio system, or use stereo headphones. Audio cables, MIDI cables, stereo headphones, and foot switches are not included. They can be NOTE purchased separately from your dealer. - Page 13 Connect your amp or audio system as shown in the diagram. Alternately, you could connect a set of stereo headphones. In order to take full advantage of the DR-770’s capabilities, we recommend that you play it in NOTE stereo.
-
Page 14: Turning On The Power
Before turning on the power, check the following points. - Have connections with external devices been made correctly? - Has the volume of the DR-770 and the connected amp system been turned to the minimum position? Turn on the POWER switch located on the rear panel of the DR-770. -
Page 15: Restoring The Factory Settings (Factory Reset)
Restoring the Factory Settings (Factory Reset) If you have modified the settings of the DR-770 after purchasing it, it may not function exactly as described in this Quick Start manual. Should this be the case, please use the following Factory Reset procedure to restore the factory settings before you read the Quick Start manual. - Page 16 Restoring the Factory Settings (Factory Reset) Press [ENTER]. The display will ask “Sure?,” asking you to confirm that you want to execute the Factory Reset operation. fig.01-07a MODE SONG REAL PATTERN STEP EFFECTS UTILITY MIDI QUANTIZE BEAT NEXT PTN LENGTH PART PATTERN If you decide not to execute Factory Reset, press [STOP/EXIT].
-
Page 17: Listening To The Demo Song
Listening to the Demo Song The DR-770 contains a demo song that takes advantage of its functionality. Here’s how to listen to the demo song. fig.01-08a Press [SONG/PTN] so the display indicates “SONG.” fig.01-09a MODE SONG REAL PATTERN STEP EFFECTS UTILITY Use [DEC] [INC] or [VALUE] to cuase the display to show “–... - Page 18 All rights reserved. Unauthorized use of this material for purposes other than private, personal NOTE enjoyment is a violation of applicable laws. No data for the music that is played will be output from MIDI OUT. NOTE Music by Naoki Matsuura Copyright ©1999, Roland Corporation...
-
Page 19: Using The Pads To Play Sounds
Using the Pads to Play Sounds Here’s how to use the pads to play the rhythm instrument sounds of the DR-770. fig.01-11a When you strike a pad, the instrumental sound (instrument) assigned to that pad will play. Since the pads are velocity-sensitive, the volume and tone will change depending on how strongly a pad is struck. - Page 20 Using the Pads to Play Sounds Press [SONG/PTN] so the display indicates “PATTERN.” fig.01-17a MODE SONG PATTERN EFFECTS UTILITY Use [DEC] [INC] or [VALUE] so the display indicates “1.” Select the pattern number 1. ig.01-13b MODE SONG REAL PATTERN STEP EFFECTS UTILITY MIDI...
-
Page 21: Playing A Roll
Playing a Roll A “roll” is a performance technique by which an instrument is played repeatedly at regular intervals. fig.01-15a While holding down [ROLL/FLAM], continue pressing a pad. You can adjust the spacing of the roll. MEMO Refer to “Changing the roll settings” (p. 47). You can make settings so that a Flam is played when you press [ROLL/FLAM]. -
Page 22: Playing Patterns
The DR-770 contains 400 preset patterns and 400 user patterns. Use the following procedure to play back and listen to patterns. On the DR-770, a Pattern is a section of rhythm data that can be 1, 2, or 3 measures MEMO long. -
Page 23: Adjusting The Tempo
Press [START] to play back the selected pattern. The tempo indicator will blink on each beat, and the beat counter will change as the pattern plays. While a pattern is playing, you can use [DEC] [INC] or [VALUE] to get the display to show “NEXT PTN.”... -
Page 24: Playing A Previously Selected Pattern (Dpp)
DPP lets you play back patterns simply by pressing the pads. Here’s how you can try out the DPP function to listen to the patterns that were assigned to the pads when the DR-770 was shipped from the factory. fig.01-22a Press [DPP] so the display indicates “DPP.”... -
Page 25: Selecting Patterns Quickly (Quick Search)
fig.01-23b MODE FUNC SONG REAL INSERT PATTERN STEP COPY EFFECTS DELETE UTILITY MIDI QUANTIZE BEAT NEXT PTN LENGTH PATTERN PART Pattern name If you press a different pad during playback, the currently playing pattern will continue playing to the end, and then the pattern assigned to the pad you pressed will begin playing. - Page 26 Playing Patterns The following display will appear. fig.01-25a MODE SONG REAL PATTERN STEP EFFECTS UTILITY MIDI QUANTIZE BEAT LENGTH NEXT PTN PART PATTERN Category Use [DEC] [INC] or [VALUE] to select the desired category. HD ROCK... Hard Rock, Heavy Metal ROCK ...
-
Page 27: Playing Other Sounds (Switching The Drum Kit)
A “drum kit” is a set of 55 instruments selected from the total of 255 instruments that MEMO the DR-770 has onboard. The unit provides 64 preset drum kits. Additionally, another 64 user drum kits, which can be modified anyway you like, are provided. - Page 28 Playing Patterns fig.01-27a TEMPO DPP DRUM KIT REVERB IND FLANGER Use [DEC] [INC] or [VALUE] to select a drum kit number. Select various drum kits and hear how the sound changes. fig.01-28a MODE SONG REAL PATTERN STEP EFFECTS UTILITY MIDI QUANTIZE BEAT NEXT PTN...
-
Page 29: Applying Effects To Get The Sound You Want (Ambience)
Applying Effects to Get the Sound You Want (Ambience) Here’s how you can create the desired atmosphere by using Ambience to apply an effect to the pattern playback. Ambience is a function that comprehensively controls the three internal effects MEMO (reverb/flanger/equalizer) to quickly and easily create an effect sound. - Page 30 Playing Patterns fig.01-30a MODE SONG REAL PATTERN STEP EFFECTS UTILITY MIDI QUANTIZE BEAT NEXT PTN LENGTH PART PATTERN Ambience type Use [DEC] [INC] or [VALUE] to select the type of ambience. LoBoost Flang’n Bright Hi-Fi Dark Lo-Fi Room Studio Garage Club Hall Stadium...
-
Page 31: Recording A Pattern (Realtime Recording)
Recording a Pattern (Realtime Recording) The DR-770 allows you to create 400 of your own original patterns. Here’s how to use realtime recording to actually record a simple pattern. Realtime recording is a method of recording in which you strike the pads in time with MEMO the metronome to record a pattern just as you play it. - Page 32 Recording a Pattern (Realtime Recording) Use [DEC] [INC] or [VALUE] to select pattern number “401.” Press [REC]. The REC indicator will light, and the display will indicate “QUANTIZE.” fig.01-34a MODE SONG REAL PATTERN STEP EFFECTS UTILITY MIDI QUANTIZE BEAT NEXT PTN LENGTH PATTERN PART...
- Page 33 Press [START]. The metronome will begin sounding, and the tempo indicator will light in synchronization with the count. Press [REC] to make the REC indicator go dark. The metronome will continue sounding, but striking the pads will not cause notes to be recorded.
-
Page 34: To Re-Do Your Recording
Recording a Pattern (Realtime Recording) Strike pad 15 to record the closed hi-hat. Strike the pad at the following timing. fig.01-36a Metronome sound All the sounds you recorded will continue playing back repeatedly. Press [STOP/EXIT] to stop recording. To Re-Do Your Recording Listen to the pattern that you recorded. -
Page 35: Re-Recording From The Beginning
Hold down [DELETE], and press the pad to which the instrument that you want to re-record is assigned. The notes of that instrument will be erased for as long as you continue pressing [DELETE] and that pad. fig.01-39a hold down Strike the pad to re-record. - Page 36 Recording a Pattern (Realtime Recording) fig.01-40a MODE SONG REAL PATTERN STEP EFFECTS UTILITY MIDI QUANTIZE BEAT LENGTH NEXT PTN PART PATTERN Press [ENTER]. The pattern will be erased, and the display will indicate “Done.” You can assign a name of up to seven characters to a pattern that you record. “Naming a pattern”...
-
Page 37: Recording A Song (Step Recording)
Recording a Song (Step Recording) On the DR-770, you can create a song by placing patterns in a desired playback order. Here’s how you can use step recording to record a simple song. Step recording is a method in which you use the numeric or other keys to specify the MEMO order of the patterns that will be played back. - Page 38 Recording a Song (Step Recording) fig.01-45a MODE SONG REAL PATTERN STEP EFFECTS UTILITY MIDI QUANTIZE BEAT LENGTH NEXT PTN PART PATTERN Press [REAL/STEP] so the display indicates “STEP.” This selects Step Recording. fig.01-44a MODE SONG PATTERN EFFECTS UTILITY Press [REC] to make the REC indicator light. Press [START].
-
Page 39: To Re-Do The Recording
fig.01-47a MODE FUNC SONG REAL INSERT PATTERN STEP COPY EFFECTS DELETE UTILITY MIDI QUANTIZE BEAT NEXT PTN LENGTH PATTERN PART Press [ENTER]. Repeat steps 8–9 to select all the desired patterns. Press [STOP/EXIT] when you are finished recording. To Re-Do the Recording If you specify the wrong pattern while recording, use the following procedure to re- record the pattern correctly. - Page 40 Recording a Song (Step Recording) fig.01-49a Part to be newly record MODE SONG REAL PATTERN STEP EFFECTS UTILITY MIDI QUANTIZE BEAT NEXT PTN LENGTH PART PATTERN Select the pattern that you want to newly record. Use the numeric keys to select the number, and then press [ENTER]. Alternatively, you can use [DEC] [INC] [VALUE] to select the number.
-
Page 41: Chapter 1. Before You Create Rhythms
- On the DR-770, only one drum kit can be used when creating a pattern. It is not possible to use multiple drum kits in a single pattern. -
Page 42: Creating Rhythms
Creating Rhythms Broadly speaking, the following two steps are necessary in order to create rhythm patterns for one song on the DR-770. Create a Pattern Create (record) a musical pattern for a portion of the song. Up to 400 user patterns can be created. -
Page 43: Create A Song
Number of notes that can be recorded simultaneously Up to nine notes can be recorded at the same step. It is not possible to record any more notes than this. Create a Song Arrange user patterns you’ve created, or any of the 400 preset patterns into a desired playback order to create (record) a song. -
Page 44: Operating Modes Of The Dr-770
When this mode is selected, the display will indicate “UTILITY.” MIDI Mode In this mode you can make settings for when using the DR-770 as a MIDI sound module, or when transmitting DR-770 data to an external sequencer. When this mode is selected, the display will indicate “MIDI.”... -
Page 45: Using [Value]/[Dec] [Inc]/Numeric Keys
Using [VALUE]/[DEC] [INC]/Numeric Keys You can use [VALUE]/[DEC] [INC]/numeric keys to modify or set various values while operating the DR-770, for example to select patterns or songs, to adjust the tempo, or to modify effect settings. fig.101-05a MODE ( 2 ) (1) [VALUE] Use this knob to make large changes in a value. -
Page 46: Chapter 2. Playing Rhythms
Chapter 2. Playing Rhythms Playing Sounds from the Pads 1. When you strike a pad, the instrument that has been assigned to that pad will sound. The volume, tone, etc., will change in response to the force with which you strike the pad. Selecting a Drum Kit From the 64 preset drum kits and 64 user drum kits, select the drum kit that you want to use. -
Page 47: Using A Pad To Play A Roll
(snare, etc.) with a slight difference in timing and force. 1. Press [UTILITY] to get the display to read “UTILITY.” The DR-770 is now in Utility mode. 2. Use [ ] to select “1 ROLL TYPE.”... -
Page 48: An Easy Way To Apply Effects (Ambience)
Here’s how to select and play a pattern from the 400 preset patterns or 400 user patterns. 1. Press [SONG/PTN] so the display indicates “PATTERN.” The DR-770 is now in Pattern mode. 2. Use [VALUE*] to select the desired pattern. fig.102-08a MODE... -
Page 49: Assigning A Pattern To A Pad
Here’s how to assign a pattern (1–16) to a pad so that you can use the Direct Pattern Play function. 1. Press [DPP] so the display indicates “DPP.” The DR-770 is now in DPP mode. 2. Use [VALUE*] to select the pattern that you want to assign to a pad. -
Page 50: Adding A Fill-In (Realtime Pattern Change)
Preset patterns consist of the above four patterns as a set. Refer to “Preset Pattern List” (p. 106). 1. Press [SONG/PTN] so the display indicates “PATTERN.” The DR-770 is now in Pattern mode. 2. Use [VALUE*] to select the original pattern that you wish to play. fig.102-09a... -
Page 51: Playing A Song
User Pattern, refer to “Specifying the original/ fill-in/variation patterns” (p.61). Chapter 2. Playing Rhythms Playing a Song 1. Press [SONG/PTN] so the display indicates “SONG.” The DR-770 is now in Song mode. 2. Use [VALUE*] to select the song you wish to play. fig.102-17a MODE FUNC... -
Page 52: Playing From The Middle Of A Song
Use the following procedure to create a song chain. 1. Press [SONG/PTN] so the display indicates “SONG.” The DR-770 is now in Song mode. 2. Use [VALUE*] to select the song for which you wish to make song chain settings. -
Page 53: Chapter 3. Recording A Pattern
Realtime Recording a Pattern 1. Press [SONG/PTN] so the display indicates “PATTERN.” The DR-770 is now in Pattern mode. 2. Press [REAL/STEP] so the display indicates “REAL.” This selects realtime recording. 3. Use [VALUE*] to select the pattern (user pattern) that you wish to record. -
Page 54: Step Recording A Pattern
15. When you finish recording, press [STOP/EXIT]. Step Recording a Pattern 1. Press [SONG/PTN] so the display indicates “PATTERN.” The DR-770 is now in Pattern mode. 2. Press [REAL/STEP] so the display indicates “STEP.” This selects step recording. fig.103-03a MODE... - Page 55 8. Press [TEMPO] to make “TEMPO” blink. 9. Use [VALUE*] to adjust the tempo. 10. When you are satisfied with the tempo, press [TEMPO] once again. 11. Press [DRUM KIT] to make “DRUM KIT” blink. 12. Use [VALUE*] to select the desired drum kit. You can choose from preset drum kits 1–64 and user drum kits 65–128.
-
Page 56: Changing The Metronome Settings
You can change the volume and time signature (count interval) of the metronome. 1. Press [UTILITY] so the display indicates “UTILITY.” The DR-770 is now in Utility mode. 2. Using [ ], select “6 CLICK LEVEL” if you want to adjust the volume, or “7 CLICK SEL” if you want to change the time signature. -
Page 57: Chapter 4. Editing A Pattern
Perform the steps below to delete only a single note from a pattern. 1. Press [SONG/PTN] so the display indicates “PATTERN.” The DR-770 is now in Pattern mode. 2. Press [REAL/STEP] so the display indicates “STEP.” This selects Step Recording. 3. Use [VALUE*] to select the desired pattern (user pattern). -
Page 58: Replacing An Instrument
1. Press [SONG/PTN] so the display indicates “PATTERN.” The DR-770 is now in Pattern mode. 2. Press [REAL/STEP] so the display indicates “STEP.” Step Recording has been selected. 3. Use [VALUE*] to select the desired pattern (user pattern). -
Page 59: Replacing A Drum Kit
1. Press [SONG/PTN] so the display indicates “PATTERN.” The DR-770 is now in Pattern mode. 2. Press [REAL/STEP] so the display indicates “STEP.” Step Recording has been selected. 3. Use [VALUE*] to select the desired pattern (user pattern). -
Page 60: Shifting The Timing At Which An Instrument Sounds (Timing Shift)
(p. 62) to another pattern before executing the Timing Shift operation. 1. Press [SONG/PTN] so the display indicates “PATTERN.” The DR-770 is now in Pattern mode. 2. Use [VALUE*] to select the pattern (user pattern) for which you want to set Timing Shift. -
Page 61: Specifying The Original/Fill-In/Variation Patterns
Realtime Pattern Change (p. 50). 1. Press [SONG/PTN] so the display indicates “PATTERN.” The DR-770 is now in Pattern mode. 2. Use [VALUE*] to select the user pattern that will be the Original pattern. 3. Press [REC]. -
Page 62: Deleting A Pattern
It is not possible to delete a preset pattern (1–400). 1. Press [SONG/PTN] so the display indicates “PATTERN.” The DR-770 is now in Pattern mode. 2. Use [VALUE*] to select the user pattern that you want to delete. 3. With playback stopped, press [DELETE]. (The display will indicate “DELETE.”) -
Page 63: Chapter 5. Recording A Song
2. Use [VALUE*] to select the pattern that you want to record first. 3. Press [SONG/PTN] so the display indicates “SONG.” The DR-770 is now in Song mode. 4. Press [REAL/STEP] so the display indicates “REAL.” Realtime Recording will be selected. -
Page 64: Step Recording
In this method of recording, you specify individual patterns in the desired order (part) for playback. 1. Press [SONG/PTN] so the display indicates “SONG.” The DR-770 is now in Song mode. 2. Use [VALUE*] to select the song that you want to record. -
Page 65: Chapter 6. Editing A Song
1. Press [SONG/PTN] so the display indicates “SONG.” The DR-770 is now in Song mode. 2. Use [VALUE*] to select the song whose Drum Kit Change setting you want to modify. -
Page 66: Specifying The Song Tempo (Initial Tempo)
1. Press [SONG/PTN] so the display indicates “SONG.” The DR-770 is now in Song mode. 2. Use [VALUE*] to select the song for which you want to specify the Initial Tempo. -
Page 67: Inserting A Pattern Within A Song
Pattern Pattern 1. Press [SONG/PTN] so the display indicates “SONG.” The DR-770 is now in Song mode. 2. Use [VALUE*] to select the song into which you want to insert a pattern. 3. Press [REAL/STEP] so the display indicates “STEP.”... -
Page 68: Copying A Song
It is not possible to copy a demo song. 1. Press [SONG/PTN] so the display indicates “SONG.” The DR-770 is now in Song mode. 2. Use [VALUE*] to select the copy source song. 3. With playback stopped, press [COPY]. (The display will indicate “COPY.”) -
Page 69: Chapter 7. Performing With A Foot Switch
The foot switch connected to the plug with the white line will be dedicated to starting/stopping playback. Assigning a Function to the Foot Switch 1. Press [UTILITY] so the display indicates “UTILITY.” The DR-770 is now in Utility mode. 2. Use [ fig.107-03a MODE... - Page 70 PAD 1–16: Pressing the foot switch will have the same result as striking the pad of the corresponding number. If the DR-770 is in DPP mode, a pattern will play back. Start/stop playback of the song/pattern. RST_S/S: The difference from Foot Switch 1 is that if you...
-
Page 71: Chapter 8. Creating An Original Drum Kit
For a list of the 255 built-in instruments, refer to “Instrument List” (p. 96). 1. After selecting a drum kit, press [PAD] so the display indicates “PAD.” The DR-770 is now in Pad mode. 2. Use [ ] to select “1 ASSIGN.” fig.108-01a... -
Page 72: Adjusting The Volume (Level)
The velocity at which you strike the pad will change the volume inside the level you specify here. 1. After selecting a drum kit, press [PAD] so the display indicates “PAD.” The DR-770 is now in Pad mode. 2. Use [ ] to select “2 LEVEL.” fig.108-03a... -
Page 73: Lengthening Or Tightening The Decay (Decay)
You can specify the time over which the sound of each instrument decays to silence. 1. After selecting a drum kit, press [PAD] so the display indicates “PAD.” The DR-770 is now in Pad mode. 2. Use [ ] to select “4 DECAY.” fig.108-05a... -
Page 74: Setting The Stereo Location (Pan)
(pan) from among 15 available positions. 1. After selecting a drum kit, press [PAD] so the display indicates “PAD.” The DR-770 is now in Pad mode. 2. Use [ ] to select “6 PAN.” fig.108-10a... -
Page 75: Preventing/Allowing Simultaneous Instruments (Assign Type)
(Assign Type) when multiple notes are played on that instrument or on other instruments. 1. After selecting a drum kit, press [PAD] so the display indicates “PAD.” The DR-770 is now in Pad mode. 2. Use [ ] to select “7 A.TYPE.” fig.108-12a... -
Page 76: Selecting How Pad Striking Force Will Affect The Sound (Sensitivity Curve)
It is not possible to set the Sensitivity Curve independently for each pad. 1. After selecting a drum kit, press [PAD] so the display Time indicates “PAD.” The DR-770 is now in Pad mode. 2. Use [ fig.108-17a MODE SONG... -
Page 77: Naming A Drum Kit (Drum Kit Name)
(drum kit name) of up to seven characters. 1. After selecting a drum kit, press [PAD] so the display indicates “PAD.” The DR-770 is now in Pad mode. 2. Use [ ] to select “9 KITNAM.” fig.108-19a... -
Page 78: Adjusting The Reverb Settings
Here’s how you can select and modify settings (parameters) for reverb. 1. After selecting a drum kit, press [EFFECTS] so the display indicates “EFFECTS.” The DR-770 is now in Effects mode. 2. Use [ ] to select the parameter that you want to modify. -
Page 79: Adjusting The Flanger Settings
Here’s how you can select and modify settings (parameters) for the flanger. 1. After selecting a drum kit, press [EFFECTS] so the display indicates “EFFECTS.” The DR-770 is now in Effects mode. 2. Use [ ] to select the parameter that you want to adjust. -
Page 80: Adjusting The Equalizer Settings
Here’s how you can select and modify settings (parameters) for the equalizer. 1. After selecting a drum kit, press [EFFECTS] so the display indicates “EFFECTS.” The DR-770 is now in Effects mode. 2. Use [ ] to select the parameter that you want to modify. -
Page 81: Adjusting The Reverb Depth
Adjusting the Reverb Depth NOTE If the output destination has been set to the individual output, reverb cannot be used. 1. After selecting a drum kit, press [REV/FLANG] several times to make “REVERB” blink. 2. Use [VALUE*] to set the Reverb Level (the overall reverb depth for the entire drum kit). -
Page 82: Routing Sound To The Individual Output
Chapter 8. Creating an Original Drum Kit If you wish to set the Flanger Send Level for the instruments of pad numbers 33 (-01)–55 (-23), use the following procedure to select the pad number. 1) Press [ENTER]. 2) Use [ ]] to select the pad number. -
Page 83: Adjusting The Output Level
1. After selecting a drum kit, press [PAD] so the display indicates “PAD.” The DR-770 is now in Pad mode. 2. Use [ ] to select “6 PAN.” fig.108-10a MODE FUNC PAD BANK SONG REAL INSERT TEMPO DPP PATTERN STEP... -
Page 84: Copying A Drum Kit
Chapter 8. Creating an Original Drum Kit Copying a Drum Kit You can copy a drum kit to another user drum kit (numbers 65–128). The following settings will be copied. Reverb/Flanger Reverb Level, Flanger Level Reverb Send Level, Flanger Send Level Instrument settings Instrument Assign, Level, Pitch, Decay, Nuance, Pan, Assign Type, Sensitivity Curve... -
Page 85: Chapter 9. Connecting External Midi Devices
The force with which the pad was struck The note number is a value from 0 through 127, and middle C (C4) is 60. On the DR-770, a different note number is assigned to each instrument of a drum kit. -
Page 86: About The Midi Implementation Chart
PAD BANK DR-770 MIDI Channel Setting You must set the MIDI channel of the DR-770 so that it will be able to transmit and receive MIDI messages to and from the external MIDI device. 1. Press [MIDI] so the display indicates “MIDI.”... -
Page 87: Settings For Playing The Dr-770 Instruments
NOTE When the pads of the DR-770 are struck, the note numbers you specify here will be transmitted. However, it is not possible to transmit note numbers for the instruments of pad numbers 33 (-01)–55 (-23). -
Page 88: Synchronized Playback
If this is turned ON, an incoming program change message will switch the drum kit, and when a drum kit is selected on the DR-770, a program change message will be transmitted. Program numbers 1–128 correspond to drum kit numbers 1–... -
Page 89: Transmitting Dr-770 Data (Bulk Dump)
Chapter 9. Connecting External MIDI Devices Transmitting DR-770 Data (Bulk Dump) DR-770 data can be transmitted to a sequencer or to another DR-770. This process is called Bulk Dump. The data is transmitted in the form of exclusive messages. Connections fig.109-18a... -
Page 90: Restoring The Transmitted Data Back To The Dr-770
Restoring the Transmitted Data Back to the DR-770 Here’s how data that was previously saved on a sequencer can be transmitted back to the DR-770, or how data transmitted from one DR-770 can be received by another DR- 770. Connections fig.109-21a... -
Page 91: Chapter 10. Restoring The Factory Settings (Factory Reset)
Chapter 10. Restoring the Factory Settings (Factory Reset) The DR-770 can be returned to the factory settings. This operation is called Factory Reset. “ 1. Press [UTILITY] so the display indicates “UTILITY.” The DR-770 is now in Utility mode. 2. Use [ ] to select “9 F.RST.”... -
Page 92: Error Messages
Press [STOP/EXIT], then select a different song. fig.111-06a An excessive amount of MIDI data was received all at once, and the DR-770 was unable to process it. Press [STOP/EXIT], If this message appears while receiving data, reduce the amount of MIDI data that is being transmitted to the DR- 770. -
Page 93: Troubleshooting
Is the Pan parameter set to “INDIV”? (p. 74) Notes are interrupted Are you attempting to play more than 14 notes simultaneously? The DR-770 is able to play up to 14 notes (voices) simultaneously. Is the Assign Type setting correct? (p.75) Can’t play a roll or flam Is the roll type set to “FL”? (p. -
Page 94: Parameter List
Parameter List [SONG/PTN] (Pattern) Pattern Name Realtime Pattern Change [SONG/PTN] (Song) Song Name CHAIN Song Chain Initial Tempo Drum Kit Change [PAD] KITNAM Drum Kit Name ASSIGN Instrument Assign LEVEL Instrument Level PITCH Instrument Pitch DECAY Instrument Decay NUANCE Instrument Nuance Instrument Pan A.TYPE Instrument Assign Type... - Page 95 SWING Swing SHIFT Timing Shift CLICK LEVEL Metronome Click Level CLICK SEL Metronome Click select FOOT 2 Foot Switch 2 Assign F.RST Factory Reset [MIDI] NOTE # Note Number Assign MIDIch MIDI Channel SYNC Synchro Mode Program Change Switch RxVOL Volume Receive Switch RxEXPR Expression Receive Switch...
-
Page 96: Instrument List
Instrument List Display Instrument Name 1 AttckK attack kick 2 RlDryK real dry kick 3 Dry K dry kick 4 DryMdK dry medium kick 5 DryHdK dry hard kick 6 HeavyK heavy kick 7 PillwK pillow kick 8 VntgK1 vintage kick 1 9 VntgK2 vintage kick 2 * 10 JazzK1... - Page 97 Display Instrument Name * 142 RingT1 ring tom1 * 143 RingT2 ring tom2 * 144 RoomT1 room tom 1 * 145 RoomT2 room tom 2 * 146 RockT1 rock tom 1 * 147 RockT2 rock tom 2 * 148 ElecT1 electronic tom 1 * 149 ElecT2 electronic tom 2...
-
Page 98: Preset Drum Kit List
Preset Drum Kit List No. 1 No. 2 No. 3 Standrd Room 1 Note Note Note Pad No. Instrument Instrument 1 (A01) 49 171 CrshC1 49 171 CrshC1 49 171 CrshC1 2 (A02) 57 172 CrshC2 57 173 CrshC3 57 172 CrshC2 3 (A03) 53 182 RdBlC2 53 182 RdBlC2... - Page 99 No. 9 No. 10 No. 11 Exprsn Note Note Note Pad No. Instrument Instrument 1 (A01) 49 171 CrshC1 49 171 CrshC1 49 171 CrshC1 2 (A02) 57 172 CrshC2 57 172 CrshC2 57 172 CrshC2 3 (A03) 53 181 RdBlC1 53 181 RdBlC1 53 182 RdBlC2 4 (A04)
- Page 100 Preset Drum Kit List No. 17 No. 18 Dance 1 Rock Note Note Pad No. Instrument Instrument 1 (A01) 49 173 CrshC3 49 171 CrshC1 2 (A02) 57 173 CrshC3 57 174 SftCrC 3 (A03) 53 182 RdBlC2 53 182 RdBlC2 4 (A04) 51 179 RideC2 51 178 RideC1...
- Page 101 No. 25 No. 26 No. 27 Brazil India Note Note Note Pad No. Instrument Instrument 1 (A01) 49 171 CrshC1 49 171 CrshC1 49 171 CrshC1 2 (A02) 57 172 CrshC2 57 172 CrshC2 57 172 CrshC2 3 (A03) 53 182 RdBlC2 53 182 RdBlC2 53 182 RdBlC2 4 (A04)
- Page 102 Preset Drum Kit List No. 33 No. 34 Boom Jazz 2 Note Note Pad No. Instrument Instrument 1 (A01) 49 187 TR606C 49 174 SftCrC 2 (A02) 57 187 TR606C 57 172 CrshC2 3 (A03) 53 181 RdBlC1 53 181 RdBlC1 4 (A04) 51 179 RideC2 51 180 SzlRdC...
- Page 103 No. 41 No. 42 No. 43 Jazz 3 BigFunk Note Note Note Pad No. Instrument Instrument 1 (A01) 49 171 CrshC1 49 171 CrshC1 49 171 CrshC1 2 (A02) 57 172 CrshC2 57 177 ChinaC 57 172 CrshC2 3 (A03) 53 182 RdBlC2 53 182 RdBlC2 53 182 RdBlC2...
- Page 104 Preset Drum Kit List No. 49 No. 50 Ring Light Note Note Pad No. Instrument Instrument 1 (A01) 49 174 SftCrC 49 174 SftCrC 2 (A02) 57 171 CrshC1 57 171 CrshC1 3 (A03) 53 181 RdBlC1 53 181 RdBlC1 4 (A04) 51 178 RideC1 51 179 RideC2...
- Page 105 No. 57 No. 58 No. 59 CtryBas SmbaBas Note Note Note Pad No. Instrument Instrument 1 (A01) 49 171 CrshC1 69 209 Cabasa 64 253 FingBs 2 (A02) 57 172 CrshC2 75 203 Claves 65 253 FingBs 3 (A03) 53 182 RdBlC2 70 207 Marcas 66 253 FingBs 4 (A04)
-
Page 106: Preset Pattern List
Preset Pattern List This consists of only the Original Patterns. The other Patterns are shown as follows; Original Pattern’s number +1 Original Pattern’s number +2 Original Pattern’s number +3 (Recommend) No. Display Tempo Pattern Name 1 HdRck1O 136 Hard Rock 1 5 HdRck2O 120 Hard Rock 2 9 HdRck3O 120... -
Page 107: Midi Implementation
Data Set (DT1) Byte * Device ID is smaller the MIDIch number by 1 in MIDI mode. * The DR-770 receives Data Set message only when MIDI Bulk dump is not performed and it is in stop. Universal Non-Realtime System Exclusive Message... - Page 108 MIDI Implementation System Common Messages Recognized only when the DR-770 is in stop and "SYNC" of the MIDI mode is set at MIDI. Song Position Pointer Status Second Third mm,ll = Value: 00H,00H - 7FH,7FH (0 - 16383) * Only in Song Play mode, the DR-770 receives Song Position Pointer, and locates the position in the song.
- Page 109 * Indicates correspondence between Song and Song number as follows. Song Song number System Realtime Message Not transmitted when “SYNC” of the MIDI mode is set at MIDI. When RESET is pressed with the DR-770 in playing, Stop and Start messages are transmitted continuosly. Timing Clock Status Start...
- Page 110 | 7 bit hex.| +———————————+———————————+———————————+———————————+———————————+ Parameter base address With the DR-770, the parameters can be transferred either by bulk dump or by individual parameter control. By individual address, each parameter can be received and transmitted individually. By bulk address, the plural parameters as one group are received and transmitted.
- Page 111 All User Drum kits (Bulk) This area is the data of the all user Drum kits(Drum kit 65-128). If you want to send Data Request to the DR-770 in this area, set the address to 02 00 00 00. A size is ignored.
- Page 112 Examples of exclusive messages and calculating the checksum Roland exclusive messages (RQ1, DT1) are transmitted with a checksum at the end of the data (before F7) to check that the data was received correctly. The value of the checksum is...
- Page 113 This means that the message transmitted will be F0 41 09 00 1C 11 00 00 10 00 00 00 00 0C 64 F7 . ASCII code table On the DR-770, the following ASCII code set is used for processing data such as the Pattern Name , Song Name, etc. +————+—————++————+—————++————+—————++————+—————+ |Char| Hex.||Char| Hex.||Char| Hex.||Char| Hex.|...
-
Page 114: Midi Implementation Chart
MIDI Implementation Chart MIDI Implementation Chart Dr. Rhythm Model DR-770 Function... Basic Default Channel Changed Default Mode Messages Altered Note True Voice Number : Note ON Velocity Note OFF After Key's Touch Ch's Pitch Bend Control Change Prog : True #... -
Page 115: Specifications
Specifications DR-770: Dr. Rhythm Maximum Polyphony 14 voices Instruments Rhythm Patterns User Patterns: 400 Preset Patterns: 400 Songs Songs: 100 Song Length: Maximum 250 parts for a song Total Parts for songs: 10,000 Resolution Per quater note: 96 Tempo Quater note: 20–260... -
Page 116: Index
Index A ...20, 46 A.TYPE ...75 AB ...20, 46 Adding a Fill-in ...50, 69 Adjusting the Tempo ...23, 48, 66 ALL ...15, 81 Ambience ...29, 48, 77 Applying Effects ...29, 48 ASSIGN ...71 Assign Type ...75 B ...20, 46 BEAT LENGTH ...32 Beat Length ...32, 53 BULK ...89 Bulk Dump ...89... - Page 117 Initial Tempo ...66 INSERT ...67 Instrument ...19, 41, 46 Instrument Assign ...71 INT ...66, 89 KIT ...65 KITNAM ...77 LEVEL ...72 Level ...72 Master ...88 Metronome ...33, 53, 56 MIDI ...44, 85, 89 MIDI Channel ...85 MIDI channel ...86 MIDI Connector ...85 MIDI Implementation Chart ...86 MIDI In ...85 MIDI Mode ...44...
- Page 118 Slave ...88 SONG ...37, 44, 51, 63–64 Song ...43, 51 Song Chain ...52 Song Mode ...44, 51, 63–64 Song Name ...65 STEP ...38, 54, 64 Step ...55 Step Recording ...31, 37, 42–43, 54 SWING ...59 Swing ...59 Switching the Drum Kit ...27, 46, 59 SYNC ...89 Sync Mode ...89 System Exclusive Message ...86...
- Page 119 MEMO...
-
Page 120: Blank Chart
Blank Chart Pattern Drum Kit Name Name O • FTV • VAR • FTO O • FTV • VAR • FTO O • FTV • VAR • FTO O • FTV • VAR • FTO O • FTV • VAR • FTO O •... - Page 121 Blank Chart Song Song No. Title Part Pattern Part Pattern Part Pattern Part Pattern Part Pattern...
- Page 122 Blank Chart Drum Kit Pad No. Note # Instrument ( A01 ) ( A02 ) ( A03 ) ( A04 ) ( A05 ) ( A06 ) ( A07 ) ( A08 ) ( A09 ) ( A10 ) ( A11 ) ( A12 ) ( A13 ) ( A14 )
- Page 123 IMPORTANT: THE WIRES IN THIS MAINS LEAD ARE COLOURED IN ACCORDANCE WITH THE FOLLOWING CODE. BLUE: NEUTRAL BROWN: LIVE As the colours of the wires in the mains lead of this apparatus may not correspond with the coloured markings identifying the terminals in your plug, proceed as follows: The wire which is coloured BLUE must be connected to the terminal which is marked with the letter N or coloured BLACK.
- Page 124 01788545 ‘00-2-E3-31N...