Table of Contents
Advertisement
Quick Links
Download this manual
See also:
Service Notes
Owner's Manual
Thank you, and congratulations on your choice of the BOSS DR-3 Dr. Rhythm.
Before using this unit, carefully read the sections entitled:
• USING THE UNIT SAFELY (page 2–4)
• IMPORTANT NOTES (page 5)
These sections provide important information concerning the proper operation of the unit.
Additionally, in order to feel assured that you have gained a good grasp of every feature provided by
your new unit, Owner's manual should be read in its entirety. The manual should be saved and kept
on hand as a convenient reference.
■ Printing Conventions in This Manual
• Text or numerals enclosed in square brackets [ ] indicate buttons.
[SONG]
SONG button
START [
] START button
• Reference such as (p. **) indicate pages in this manual to which you can refer.
Copyright © 2003 BOSS CORPORATION
All rights reserved. No part of this publication may be reproduced in any form without the written permission of BOSS
CORPORATION.
Advertisement
Table of Contents

Related Manuals for Boss Dr. Rhythm DR-3


Summary of Contents for Boss Dr. Rhythm DR-3
-
Page 1: Printing Conventions In This Manual
Owner’s Manual Thank you, and congratulations on your choice of the BOSS DR-3 Dr. Rhythm. Before using this unit, carefully read the sections entitled: • USING THE UNIT SAFELY (page 2–4) • IMPORTANT NOTES (page 5) These sections provide important information concerning the proper operation of the unit. -
Page 2: Using The Unit Safely
Refer all servicing to your retailer, the nearest Roland Service Center, or an autho- rized Roland distributor, as listed on the “Information” page. • Never use or store the unit in places that are: •... - Page 3 • Before using the unit in a foreign country, consult with your retailer, the nearest Roland Service Center, or an authorized Roland distributor, as listed on the “Information” sheet. • Batteries must never be recharged, heated, taken apart, or thrown into fire or water.
- Page 4 101b • The unit and the AC adaptor should be located so their location or position does not interfere with their proper ventilation. 102d • Always grasp only the output plug or the body of the AC adaptor when plugging into, or unplugging from, this unit or an outlet.
-
Page 5: Important Notes
• Unfortunately, it may be impossible to restore the contents of data that was stored in another MIDI device (e.g., a sequencer) once it has been lost. Roland Corporation assumes no liability concerning such loss of data. • Use a reasonable amount of care when using the unit’s buttons, sliders, or other controls;... -
Page 6: Main Features
■ Control the DR-3 with a Foot Switch The DR-3 allows you to connect up to two (optional) foot switches. You can use your foot to control the DR-3 as you perform, making this perfect for jam sessions and live performances. - Page 7 Series) and sequencers, or start and stop the DR-3 using a GT-6. ■ Equipped with Both Phono Jacks and Phone Jacks In addition to 1/4” phone jacks, the DR-3 also features RCA phono jacks, which let you connect a variety of other devices, such as mixers, amps, and audio systems.
-
Page 8: Table Of Contents
Let’s Perform with the Patterns Switched Automatically ([AUTO]) ... 31 Let’s Change the Overall Tone of the Sound and Acoustics (TSC) ... 32 Chapter 1 Overview of the DR-3... 34 The DR-3’s Performance Modes ... 34 Style Play Mode ... 34 Makeup of a Style ... - Page 9 Chapter 3 Playing Styles (Auto Mode [AUTO]) ... 46 Selecting a Style... 46 Performing in Auto Mode ... 46 Changing the Pattern Progression in Auto Mode... 47 Chapter 4 Controlling the Styles with a Foot Switch ... 48 Starting and Stopping Performances ... 48 Switching Verses...
- Page 10 <4> Confirming the Created Style... 70 Performing the Created Style... 70 Editing the Settings... 70 Naming, Copying, and Deleting Styles ... 71 Naming the Style ... 71 Copying the Style... 71 Clearing the Style... 72 Copying and Deleting Patterns ... 72 Copying Patterns ...
- Page 11 Setting the MIDI Channels ... 94 Setting Sync Mode ... 95 Using An External MIDI Device to Play the DR-3... 95 Using the DR-3 to Record Performances Played by External MIDI Devices ... 96 Appendices...98 Troubleshooting ... 99 Message List ... 100 Parameter List...
-
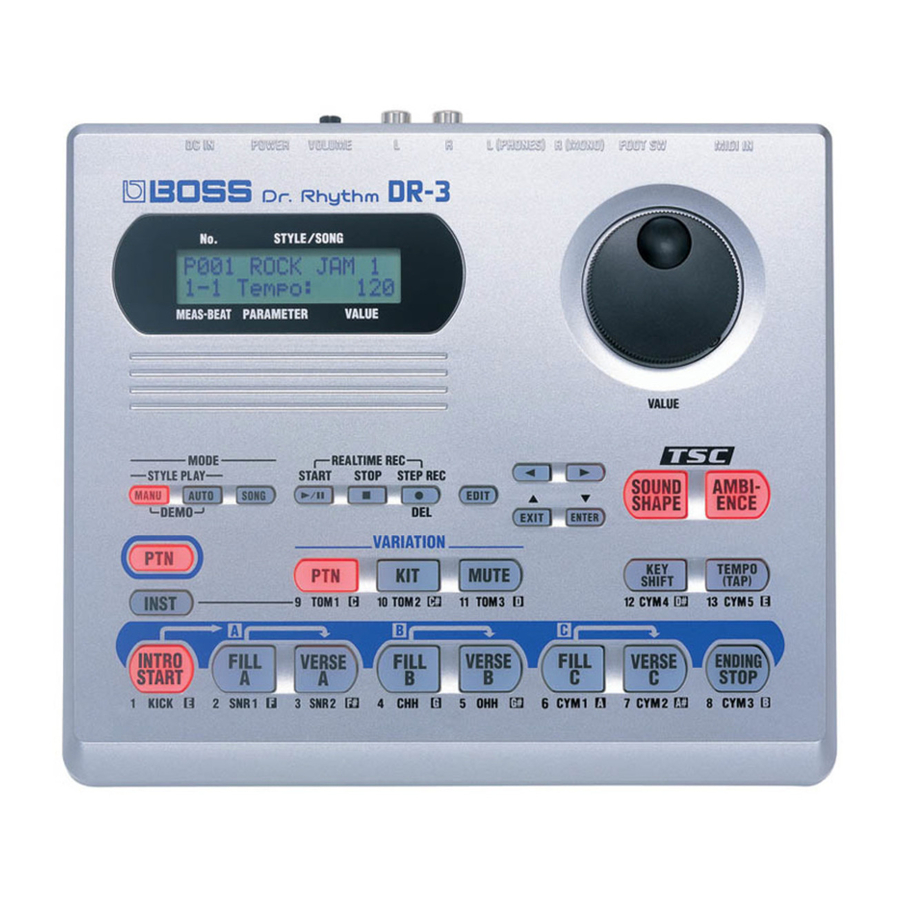
Page 12: Panel Descriptions
Panel Descriptions Front Panel fig.Panel Display The explanations in this manual include illustrations that depict what should typically be shown by the display. Note, however, that your unit may incorporate a newer, enhanced version of the system (e.g., includes newer sounds), so what you actually see in the display may not always match what appears in the manual. -
Page 13: Edit Button
Pressing START button during Step Recording then starts Realtime Recording. EDIT button Uses this when making settings related to the performance and the usage environment for the DR-3. /EXIT / /ENTER buttons The four buttons, are called the cursor buttons. -
Page 14: Rear Panel
Rear Panel fig.jack MIDI IN connector External MIDI device can be connected to this connector. FOOT SW (Switch) jack By connecting a foot switch, you can obtain pedal control over the start and stop of performances, switching the patterns, or other actions. OUTPUT jack R (MONO) / L (PHONES) Provides output of the audio signals. -
Page 15: Before You Play
Before You Play Install Batteries Make sure that the power is turned off. fig.00-01 Remove the battery cover on the unit’s underside. Insert six AA batteries in the battery case, taking care to ensure that the positive (+) and negative (-) terminals are not reversed. -
Page 16: Making Connections
Please purchase these items from your dealer. Before you begin making connections, confirm the following. • Is the volume level of the DR-3 or connected amp turned all the way down? • Is the power to the DR-3 or connected amp turned off? fig.00-03... -
Page 17: Turning On/Off The Power
Before you turn the power on, make sure of the following points. • Are external devices connected correctly? • Is the volume level of the DR-3 or connected amp turned all the way down? Turn on the POWER switch located on the rear panel of the DR-3. -
Page 18: Reset To Default Factory Settings (Factory Reset)
Before You Play Reset to Default Factory Settings (Factory Reset) This returns all settings on the DR-3 to the values they had when the unit shipped from the factory. This is called Factory Reset. fig.00-06p With the performance stopped, press [EDIT]. - Page 19 Press [ ] to select a <FACTORY RESET>. fig.00-10d Press [ENTER]. A message confirming that you want to proceed with Factory Reset is displayed. fig.00-11d To cancel, press [EXIT]. To execute Factory Reset, press [ENTER]. Factory Reset is executed. When Factory Reset is done, the previous screen is displayed. All of the settings are restored to their original factory status.
-
Page 20: Quick Start
Quick Start This Quick Start manual describes how to enjoy performing the rhythm used in the DR-3’s Styles. Pre-programmed Styles are provided in Rock, Jazz, and a variety of other musical genres. Once you select a Style in the desired genre, you can put together backing that matches your own performances by switching Patterns. -
Page 21: Let's Listen To The Demo
Let’s Listen to the Demo Now listen to the demo performance, which brings the DR-3’s “Styles” to life. The “Patterns” in the demo performance are switched automatically. The pattern pads light when the corresponding Patterns are playing. fig.QS-01p Hold down [MANU] and press [AUTO]. -
Page 22: Let's Play A Style
In Manual mode, you play switching Patterns yourself. fig.QS-03p Pattern Pad With the performance stopped, press [MANU] so the button lights up. This puts the DR-3 in Manual mode. The Style screen appears in the display. fig.QS-04d Style No. Measure... - Page 23 When you press [FILL], the fill-in is played, and then the verse corresponding to that fill-in is automatically played. For example, if you press [FILL A], the DR-3 automatically switches to [VERSE A] after the fill-in. When you press [ENDING/STOP], the ending is played and then the performance stops.
-
Page 24: Performing Variations On Styles (Variation)
VARIATION Button With the performance stopped, press [MANU] so the button lights up. This puts the DR-3 in Manual mode. When you press [INTRO/START], the performance starts from the intro. Press VARIATION [PTN]. VARIATION [PTN] lights up, and the variation for the Pattern currently being performed is played. - Page 25 Press VARIATION [KIT]. VARIATION [KIT] lights up, and the drum set and bass sounds changes. When you press VARIATION [KIT] once again, the button’s light goes out, and the original Pattern is played. Press VARIATION [MUTE]. VARIATION [MUTE] lights up, and a part of sounds are muted. When you press VARIATION [MUTE] once again, the button’s light goes out, and the muted sounds play again.
-
Page 26: Selecting Styles
Let’s Play a Style Selecting Styles The DR-3 comes with 100 pre-programmed Styles already built Now try listening to some of the different Styles. fig.QS-06p With the performance stopped, press [MANU] so the button lights up. The Style screen appears in the display. -
Page 27: Changing The Tempo ([Tempo])
Changing the Tempo ([TEMPO]) Now let’s try changing the performance tempo. fig.QS-08p Press [TEMPO (TAP)]. The Tempo screen appears. fig.QS-09d Adjust the tempo with the VALUE dial. The tempo can be set to any value from 20 to 260. Press [EXIT] to return you to the previous screen. ■... -
Page 28: Changing The Key ([Key Shift])
Let’s Play a Style Changing the Key ([KEY SHIFT]) You can perform Styles in different keys (transposed). This function is called “Key Shift.” fig.QS-10p Press [KEY SHIFT]. The Key Shift screen appears. fig.QS-11d Set the key with the VALUE dial. You can set the value in semitone units within the range from -12 to +12, or one octave lower to one octave higher. -
Page 29: Let's Use A Foot Switch
Let’s Use a Foot Switch You can use a foot switch (such as the optional FS-5U) to start and stop performances and switch verses (p. 23). This is convenient, as it allows you to switch the Patterns with your foot. You can connect up to two foot switches. -
Page 30: Using The Foot Switch
Let’s Use a Foot Switch Using the Foot Switch The example here describes use of the DR-3 with two foot switches connected. When you have only one foot switch connected, you can only use it to start and stop the performance. -
Page 31: Let's Perform With The Patterns Switched Automatically ([Auto])
Let’s Perform with the Patterns Switched Automatically ([AUTO]) When you perform Styles in Auto mode, the DR-3 switches the Patterns automatically, even without the pattern pads being pressed. This lets you enjoy session-like performances without having to take your hands off the guitar or other instrument you are playing. -
Page 32: Let's Change The Overall Tone Of The Sound And Acoustics (Tsc)
Let’s Change the Overall Tone of the Sound and Acoustics (TSC) “TSC,” short for “Total Sound Control,” is a function that lets you change the acoustic effects for the overall performance just by pressing a few buttons. TSC includes two types of effect, “Sound Shape,” which changes the overall tone of the sound, and “Ambience,”... - Page 33 Press [SOUND SHAPE] so the button lights up. Sound Shape is applied to the performance. Each time you press [SOUND SHAPE], it alternately turns the button on (lit) and off (unlit). Press [EXIT] to return you to the previous screen. Press TSC [AMBIENCE].
-
Page 34: Chapter 1 Overview Of The Dr-3
Chapter 1 Overview of the DR-3 The DR-3’s Performance Modes The DR-3 features two performance modes, Style Play mode, in which the rhythm patterns are switched as you play, and Song mode, in which you create data by arranging the patterns beforehand, and then perform. -
Page 35: Makeup Of A Style
Select Fill-In A, B, or C according to the verse you want to have played after the fill-in. This is the performance Pattern used to finish the song. Pattern Pad Chapter 1 Overview of the DR-3 Variation Verse B Verse C... - Page 36 Kits The drum, percussion, and bass sounds used in performing patterns are referred to as “kits.” The Styles have predetermined kits assigned to them, so you can change kits by changing Styles, and thus change the sounds played with the pads. Variation Variation is a function that alters performances, for example building up the performance or toning it down.
-
Page 37: Song Mode
Also, when [INST] is lit, you can use the VALUE dial or [INST] to switch the sound groups (drums, percussion, bass) for the pads. ] is Lit) Pattern Pads ], you can then switch the patterns with the pattern pads. Pads Chapter 1 Overview of the DR-3 Pad No. Bass Pitch Instrument Name... -
Page 38: Main Screens And Functions
With the performance stopped, pressing [MANU] or [AUTO] causes the button to light up, switches the DR-3 to Style Play mode, and calls up the Style screen. When the DR-3 is in Style Play mode, pressing the [EXIT] button returns the Style screen to the display. - Page 39 ], recording stops and you're returned to the Song screen. Item Item Value Chapter 1 Overview of the DR-3 ] in Style Play mode ([MANU] or ] lit), the Velocity Edit ] to start Step Recording and call up ] lit) in Song mode ([SONG] lit),...
-
Page 40: Starting And Stopping Performances And Recording
■ Starting and Stopping Performances and Recording Use these buttons to start, pause, stop, and record performances of Styles and songs. fig.01-plystp START [ Press START [ ] when the performance is stopped to start the performance of the Style or song. -
Page 41: Adjusting The Tempo ([Tempo])
Adjust the tempo with the VALUE dial. The tempo can be set to any value from 20 to 260. Press [EXIT] to return to the previous screen. Chapter 1 Overview of the DR-3 You can tap [TEMPO (TAP)] at least four times to set the tempo to the interval between the taps. -
Page 42: Changing The Key Of The Performance ([Key Shift])
To return to the original key, press [KEY SHIFT], then set the key to “0” using the VALUE dial. If notes whose pitches are changed using the Key Shift function are in registers that are unplayable for the DR-3, the notes in the expressible range above or below that octave are sounded. -
Page 43: Chapter 2 Playing Styles (Manual Mode [Manu])
Patterns in “Manual mode.” ■ How the Pads Work When Performing Styles fig.02-01p Pattern Pad The DR-3’s pads can be switched between two modes of operation, [ ] and [INST] (p. 37). Patterns are switched with the pads when [... -
Page 44: Selecting The Patterns To Be Played
Selecting the Patterns to be Played fig.02-03p A single Style is divided into eight performance units called “Patterns,” which are assigned to the pattern pads. Pattern INTRO/ FILL A START After the After Fill-In intro is A is played, Descrip- played, the the Style tion... -
Page 45: Selecting Variations (Variation)
Selecting Variations (VARIATION) fig.02-04p VARIATION Buttons Each Style includes three different variations, which you can use to add variety to the performance, even with the same Style. The functions of the three VARIATION buttons are described below. Button Name Descrip- This alternates the tion Patterns. -
Page 46: Chapter 3 Playing Styles (Auto Mode [Auto])
Chapter 3 Playing Styles (Auto Mode [AUTO]) When you perform Styles in Auto mode, the DR-3 switches the Patterns automatically, even without the pattern pads being pressed. This lets you enjoy session-like performances without having to take your hands off the guitar or other instrument you are playing. -
Page 47: Changing The Pattern Progression In Auto Mode
■ Changing the Pattern Progression in Auto Mode You can change the pattern progression when performing in Auto mode. 1. With the performance stopped, press [EDIT]. The Edit Menu screen appears. fig.09-01d 2. Press [ ], select a <SYSTEM>, then press [ENTER]. -
Page 48: Chapter 4 Controlling The Styles With A Foot Switch
For example, if you press the foot switch while Verse A is playing, the DR-3 inserts a fill-in B and switches to Verse B. Press the foot switch while the performance is in progress. -
Page 49: Assigning Functions To The Foot Switch
Assigning Functions to the Foot Switch You can assign functions other than starting and stopping performances and switching verses to the foot switch. fig.04-01p Press the [EDIT] button. Press [ ] to select a <SYSTEM>. fig.04-02d Press [ENTER]. Press [ ] to select a <FS1>... - Page 50 Style. STYLE * If the current Style number is “P100,” the DR-3 switches to “U001”; if the current Style number is “U100,” the DR-3 switches to “P001.” This switches from the Style currently being played to the Style one number lower.
-
Page 51: Chapter 5 Changing The Overall Tone Of The Sound And Acoustics (Tsc)
Chapter 5 Changing the Overall Tone of the Sound and Acoustics (TSC) “TSC,” short for “Total Sound Control,” is a function that lets you change the overall tone of the sound and acoustics. TSC includes two types of effect, “Sound Shape,” which changes the overall tone of the sound, and “Ambience,”... -
Page 52: Altering The Acoustic Characteristics Of The Overall Sound ([Ambience])
Altering the Acoustic Characteristics of the Overall Sound ([AMBIENCE]) “Ambience” adjusts the breadth of the sound by altering the acoustic characteristics of the sound. Press [AMBIENCE]. The TSC screen appears. fig.05-03d Each time you press [AMBIENCE], it alternately turns the button on (lit) and off (unlit). -
Page 53: Changing The Sound Shape Parameters
Changing the Sound Shape Parameters You can store up to eight edited Sound Shape parameters. Unable to change the settings for the Preset Sound Shape, with a “P” appended to their number. When the unit left the factory, the User settings (U1–U8) contained the same settings as the Preset (P1–P8). -
Page 54: Changing The Compressor Parameters
■ Changing the Compressor Parameters This changes the parameters of the Sound Shape compressor. The Compressor compresses the overall output signal when the input volume level exceeds a set value. The values that can be set for each of the parameters are shown below. -
Page 55: Naming The Settings
■ Naming the Settings Select a <NAME> on step 4 in p. 53, then press [ENTER]. You can edit the name of the currently selected Sound Shape setting, using up to six characters for the name. fig.09-27d Press [ ] to move to the point where you want to enter the character(s). -
Page 56: Changing The Ambience Parameters
Changing the Ambience Parameters You can store up to eight edited Ambience parameters. Unable to change the settings for the Preset Ambience, with a “P” appended to their number. When the unit left the factory, the User settings (U1–U8) contained the same settings as the Preset (P1–P8). If the parameters below are changed during the performance of a style or song, the changes are nullified when you press [EDIT], restoring the settings for the... -
Page 57: Naming The Settings
Parameter Value Description This parameter adjusts the standard frequency at which Hi Damp / 400 Hz– the high-frequencies are Freq 16 kHz damped. The reverb sound in the band above the standard frequency is damped. This parameter adjusts the Low Cut / 20 Hz–... -
Page 58: Chapter 6 Performing With The Pads
Chapter 6 Performing with the Pads When you press [INST], the button lights up, and you can then play drum set and bass sounds by pressing the pads. You can also turn [INST] on while Styles and songs are in progress to play sounds with the pads. -
Page 59: Playing Drum Sounds
Playing Drum Sounds Press [INST] a number of times until “DRUM” appears in the display. fig.06-02d Tap the pads to perform. The instrument sounds assigned to the pads are played. The names of the assigned instruments are printed under the pads. Playing Percussion Sounds Press [INST] a number of times until “PERC”... -
Page 60: Selecting A Different Sound (Variation [Kit])
Selecting a Different Sound (VARIATION [KIT]) When [INST] is on, the set of three groups of sounds played with the pads (DRUM, PERC, BASS) is called the “drum kit.” A single Style has two drum kits included with it, and you can switch between these two drum kits by turning VARIATION [KIT] on and off. -
Page 61: Chapter 7 Creating Styles
“User styles.” User styles have a “U” at the beginning of the style number, for example “U001.” You can create and store up to 100 User styles in the DR-3. Procedure for Creating Styles Here are the steps you need to take to create a new style: fig.07-01... -
Page 62: 1> Selecting A Number For The Style
<1> Selecting a Number for the Style 1. With the performance stopped, press [MANU]. The Style screen appears. fig.07-02d 2. Turn the VALUE dial to select the number (U001–U100) for the style you are creating. You cannot record to the Preset styles (P001– P100). -
Page 63: Setting Up The Kit
■ Setting Up the Kit Changing the kit changes the sounds used in the style being created. When setting kit’s variation (p. 36), select <Kit2> in Step 3 below. You can also create kits using the instruments you prefer (User kits). For more details, refer to “Chapter 10 Creating Your Own Kits”... -
Page 64: Making The Tsc Settings For The Style
■ Making the TSC Settings for the Style Make the TSC (Sound Shape and Ambience) settings for the style you are creating. 1. Select the style to be set, then press [EDIT]. The Edit Menu screen appears. 2. Select a <STYLE>, then press [ENTER]. 3. -
Page 65: 3> Recording The Patterns
<3> Recording the Patterns ■ Using Realtime Recording The following explains the Realtime Recording procedure, in which you record by pressing the pads in time with the tempo provided by the metronome. When you record to a pattern which has already been recorded, the sounds are layered without the previously recorded sounds being erased. -
Page 66: Recording The Bass Part
• Recording the Bass Part Bass parts are monophonic. Even if multiple notes are layered in a recording, only one sound is played. Steps 1–3 are identical to those in “Recording the Drum Part” above. 4. Press [INST] to select “BASS,” “ or “... -
Page 67: Using Step Recording
■ Using Step Recording What is Step Recording? This is a recording method whereby measures are divided into units called “steps,” and the timing of each sound to be played is specified. The step length is set in “Quantize.” For example, if the value in Quantize is set to the eighth note, then when the time signature (beat) is set to 4/4, eight notes can be input in one measure. -
Page 68: Recording The Bass Part
] goes out. Note that pressing START [ Recording (while STEP REC [ DR-3 to Realtime Recording (p. 65). • Recording the Bass Part Bass parts are monophonic. Even if multiple notes are layered in a recording, only one sound is played. -
Page 69: Adding Dynamics To The Sounds (Velocity Edit)
The STEP REC [ ] goes out. Note that pressing START [ Recording (while STEP REC [ DR-3 to Realtime Recording (p. 65). ■ Adding Dynamics to the Sounds (Velocity Edit) You can change the dynamics (velocity) of specific notes in patterns that have already been recorded. -
Page 70: Transposing The Pattern's Bass Part
If notes whose pitches are changed using the Key Transpose function are in registers that are unplayable for the DR-3, the notes in the expressible range above or below that octave are sounded. 1. Press [EDIT]. The Edit Menu screen appears. -
Page 71: Naming, Copying, And Deleting Styles
Naming, Copying, and Deleting Styles ■ Naming the Style You can edit the name of the currently selected style, using up to ten characters for the name. 1. Select the style to be set, then press [EDIT]. The Edit Menu screen appears. 2. -
Page 72: Clearing The Style
■ Clearing the Style 1. Press [EDIT]. The Edit Menu screen appears. 2. Select a <STYLE>, then press [ENTER]. 3. Press [ ], select a <CLEAR>, then press [ENTER]. fig.07-22d 4. Turn the VALUE dial to select the number for the Style to be cleared, then press fig.07-23d If you press [ ], you’re taken back to the... -
Page 73: Clearing Patterns
8. Turn the VALUE dial to select the copy- destination pattern, then press [ fig.07-29d If you press [ ], you’re taken back to the screen you were in immediately before that. 9. Press [ENTER] to execute the copy. You can press [EXIT] to cancel the procedure, and go back to the previous screen. -
Page 74: Chapter 8 Creating And Performing Songs ([Song])
You can create and save up to 100 songs on the DR-3. You can record up to a maximum of 250 patterns in one song. The DR-3 contains no song data when shipped from the factory. For more on performing songs, refer to “Performing Songs” (p. 85). -
Page 75: 1> Selecting A Number For The Song
Using a Foot Switch to Specify Switching of Song Patterns By using a foot switch while playing back songs, you can set the DR-3 so that a single pattern plays back repeatedly until you press the foot switch, at which point the song advances to the next pattern. -
Page 76: Making The Tsc Settings For The Song
■ Making the TSC Settings for the Song Make the TSC (Sound Shape and Ambience) settings for the song you are creating. 1. Select the song to be set, then press [EDIT]. The Edit Menu screen appears. 2. Select a <SONG>, then press [ENTER]. 3. -
Page 77: When Using Realtime Recording
The STEP REC [ ] goes out. Note that pressing START [ Recording (while STEP REC [ DR-3 to Realtime Recording. Erasing Previously Recorded Sounds As You Continue Recording You can use the following procedure to delete the displayed pattern. -
Page 78: Editing Notes To Drum Parts And Bass Parts In The Song
Substituting Recorded Patterns When you record using Realtime Recording into a song that already has material recorded in it, the patterns in the segment in which you record are overwritten, allowing you to replace them with the new patterns. 1. With the performance stopped, press ] to select a measure slightly ahead of where you want to record. - Page 79 5. Turn the VALUE dial to set the quantization. This corrects mistakes in the rhythm played to the closest selected note value. Display Description Off. Sounds are recorded without quantization, with – – the same timing used in tapping the pads. 16th note triplets 8th note triplets 6.
-
Page 80: 4> Editing Songs
<4> Editing Songs You can copy and delete specified segments of recorded songs. ■ Adding Patterns In the Song (INSERT) This operation inserts a pattern at a point within the song. fig.08-ins Verse B Insert Verse A Fill B Intro Verse B 1 2 3 4 5 6 7 8 9 10 11 12 measure... -
Page 81: Deleting Specified Segments (Delete)
■ Deleting Specified Segments (DELETE) This deletes unneeded patterns from songs. fig.08-del Delete Verse A Fill B Intro Verse B 5 6 7 8 9 10 11 12 13 14 15 16 1 2 3 4 measure Measure to be specified Verse A Fill B Intro Verse B... -
Page 82: Copying Specified Segments (Copy)
■ Copying Specified Segments (COPY) You can copy a specified segment of a song, and then insert the segment elsewhere in the same song. fig.08-copy Copy Verse A Fill B Intro Verse B 1 2 3 4 5 6 7 8 9 10 11 12 13 14 15 16 measure Verse A Fill B Intro... -
Page 83: Changing The Tempo Part Way Through A Song (Tempo)
■ Changing the Tempo Part Way Through a Song (TEMPO) You can have the tempo change at a specified measure within the song. This changes the tempo setting in all measures following the specified measure. 1. Press [SONG] so that the button lights up, then press STEP REC [ The Song Recording screen is displayed. -
Page 84: Naming, Copying, And Deleting Songs
Naming, Copying, and Deleting Songs ■ Naming the Song You can edit the name of the currently selected song, using up to ten characters for the name. 1. Select the song to be set, then press [EDIT]. The Edit Menu screen appears. 2. -
Page 85: Clearing The Song
• Play multiple songs in succession (Song Chain) ■ Performing Songs 1. With the performance stopped, press [SONG] so the button lights up. This puts the DR-3 in Song mode. fig.08-30d Song No. Song Name Measure Style No. 2. Turn the VALUE dial to select a song. -
Page 86: Switching Patterns With A Foot Switch
However, you can set the DR-3 so that a single pattern plays back repeatedly until you press the foot switch, at which point the song advances to the next pattern with “Loop Type”... -
Page 87: Playing Multiple Songs Continuously (Song Chain)
Setting a Specified Segment for Playing Repeatedly This sets the specified segment for playing repeatedly (Loop Play). 1. Select the song to play, then press [EDIT]. The Edit Menu screen appears. 2. Select a <SONG>, then press [ENTER]. 3. Press [ ] to select a <LoopStart>... -
Page 88: Chapter 9 Changing The Operating Environment (System)
Chapter 9 Changing the Operating Environment (System) These settings include those for the DR-3’s pad sensitivity, Master Tuning, and other global settings. ■ How to Make the Settings 1. With the performance stopped, press [EDIT]. The Edit Menu screen appears. -
Page 89: Setting The Parts To Be Output From The Output Jacks
Setting the Parts To Be Output from the OUTPUT Jacks You can set the parts that are to be heard from the external audio device connected to the OUTPUT jacks. fig.09-03d Parame- Value The sounds from all parts are played. Only the drum part DRUM sounds are played. -
Page 90: Chapter 10 Creating Your Own Kits
Chapter 10 Creating Your Own Kits You can change (edit) the settings for the User style kits, including those for the kit instruments and the way the sounds are played. You can store up to 50 kits with edited settings as “User kits.”... -
Page 91: Selecting The Sounds Assigned To The Pads
Selecting the Sounds Assigned to the Pads This selects the instruments to be assigned to the pads. fig.09-14d Parameter Value Refer to the “Instrument/Bass Tone Inst List” (p. 104). You cannot select bass tones for the drum parts, and cannot select drum instruments for the bass part. Setting the Volume This sets the volume (the level) for each instrument. -
Page 92: Copying The Kit
Copying the Kit This copies the kit to the User kit (U01–U50). fig.09-19d Press [ENTER]. fig.09-20d Turn the VALUE dial to select the number for the kit to be copied, then press [ fig.09-21d Turn the VALUE dial to select the copy- destination kit number, then press [ fig.09-22d Press [ENTER] to execute the copy. -
Page 93: Chapter 11 Connecting And Using External Midi Devices
Receives data from an external MIDI device. Connect to the MIDI OUT connector on the external MIDI device. With the DR-3, you can use MIDI data to do the following. • Use an external MIDI device to play the DR-3 •... -
Page 94: Setting The Midi Channels
When synchronizing a drum machine connected to the DR-3, you should set things up so that sounds are not played by the DR-3’s internal sound generator in response to Note messages received from the connected drum machine. -
Page 95: Setting Sync Mode
5. Press [EXIT] a number of times until you exit Edit mode. When the DR-3 is functioning as a slave device, the tempo cannot be controlled from the DR-3. Chapter 11 Connecting and Using External MIDI Devices Using An External MIDI... -
Page 96: Using The Dr-3 To Record Performances Played By External Midi Devices
Using the DR-3 to Record Performances Played by External MIDI Devices The DR-3 can be used to record, in real time, what is being played on a MIDI keyboard or MIDI pads. You can also use the DR-3 to record performance data from sequencers and rhythm machines. - Page 97 MIDI OUT MIDI IN MIDI Sequencer DR-3 etc. Press [MANU] on the DR-3 so that the button lights up, then press STEP REC [ ]. The DR-3 begins recording at the same time the performance from the connected sequencer or rhythm machine is played back.
-
Page 98: Appendices
Appendices... -
Page 99: Troubleshooting
Troubleshooting If you find the DR-3 is not operating correctly, check the items listed below. If the DR-3 still does not work properly after you check these points, consult your local Roland Service or your dealer. Problem No sound Sounds drop out... -
Page 100: Message List
Check the device or cable connected to MIDI IN. Message MIDI Full! Cause Too many MIDI messages were received all at once, and the DR-3 was unable to process all of them. Action Reduce the volume of the MIDI messages being sent by the transmitting device. -
Page 101: Parameter List
Parameter List Parameter Temporary (These parameters are not saved. These are reset each time the DR-3’s power is turned on.) Sound Shape Ambience Tempo Key Shift Style (This is selectable in Style Play Mode) Tempo Beat Kit Variation Mute Variation... - Page 102 Instrument Level Kit Name Kit Copy Sound Shape Sound Shape Equalizer Switch Equalizer Input Equalizer Low Type Equalizer Low Gain Equalizer Low Frequency Equalizer Low Q Equalizer Middle Gain Equalizer Middle Frequency Equalizer Middle Q Equalizer High TYPE Equalizer High Gain Equalizer High Frequency Equalizer High Q Equalizer Out Level...
- Page 103 Ambience Ambience Reverb Size Reverb Time Reverb Level Pre Delay Density Early Reflection Level Release Density Low Damp Gain Low Damp Frequency High Damp Gain High Damp Frequency Low Cut Frequency High Cut Frequency Ambience Name Ambience Copy System Output Auto Repeat Type Foot Switch 1 Foot Switch 2...
-
Page 104: Instrument/Bass Tone List
Instrument/Bass Tone List Instrument Inst. No. v Display Instrument Maple Maple Kick Rnd1 Round Kick 1 Rnd2 Round Kick 2 Dry Hard Kick Comp Comp Kick Rev1 Reverb Kick 1 Rev2 Reverb Kick 2 Stdio Studio Kick 26"dp 26" Deep Kick Jazz Jazz Kick Elec... - Page 105 Inst. No. v Display Instrument Ride1 Ride Cymbal 1 Ride2 Ride Cymbal 2 Bell1 Ride Bell Cymbal 1 Bell2 Ride Bell Cymbal 2 BrshC Brush Crash Cymbal BrshR Brush Ride Cymbal Gong Large Gong Cowbl Cowbell Tmbrn Tambourine BngoH Bongo High BngoL Bongo Low CngHM Conga High Mute CngHO Conga High Open...
-
Page 106: Preset Kit List
Preset Kit List Kit No. No. P01 Kit Name Power1 Inst. Instrument Rnd2 DRUM KICK S01 v Wet DRUM SNR1 Stck1 DRUM SNR2 16"C DRUM CHH H08 v 16"O DRUM OHH Bell2 DRUM CYM1 Ride2 DRUM CYM2 Crsh1 DRUM CYM3 DblH DRUM TOM1 DblM... - Page 107 Kit No. No. P06 Kit Name Loud Inst. Instrument Rev1 DRUM KICK Warm DRUM SNR1 Stck1 DRUM SNR2 16"C DRUM CHH H08 v 16"O DRUM OHH China DRUM CYM1 Ride2 DRUM CYM2 Crsh1 DRUM CYM3 RockH DRUM TOM1 RockM DRUM TOM2 RockL DRUM TOM3 Crsh2...
- Page 108 Kit No. No. P11 Kit Name Gospel Inst. Instrument Maple DRUM KICK S14 v Natrl DRUM SNR1 Stck2 DRUM SNR2 16"C DRUM CHH H08 v 16"O DRUM OHH Bell2 DRUM CYM1 Ride2 DRUM CYM2 Crsh1 DRUM CYM3 DblH DRUM TOM1 DblM DRUM TOM2 DblL...
- Page 109 Kit No. No. P16 Kit Name Standrd1 Inst. Instrument DRUM KICK S11 v Dry DRUM SNR1 Stck2 DRUM SNR2 PureC DRUM CHH H04 v PureO DRUM OHH Bell2 DRUM CYM1 Ride2 DRUM CYM2 Crsh1 DRUM CYM3 DblH DRUM TOM1 DblM DRUM TOM2 DblL DRUM TOM3...
- Page 110 Kit No. No. P21 Kit Name Electro Inst. Instrument Elec DRUM KICK Elec DRUM SNR1 Stck3 DRUM SNR2 BrshC DRUM CHH BrshO DRUM OHH Bell1 DRUM CYM1 Ride2 DRUM CYM2 Crsh1 DRUM CYM3 ElecH DRUM TOM1 ElecM DRUM TOM2 ElecL DRUM TOM3 Splsh DRUM CYM4...
- Page 111 Kit No. No. P26 Kit Name House Inst. Instrument TR909 DRUM KICK TR808 DRUM SNR1 Stck3 DRUM SNR2 BrshC DRUM CHH BrshO DRUM OHH Bell2 DRUM CYM1 Ride2 DRUM CYM2 Crsh2 DRUM CYM3 TR H DRUM TOM1 TR M DRUM TOM2 TR L DRUM TOM3 Crsh3...
- Page 112 Kit No. No. P31 Kit Name Ballad 1 Inst. Instrument 26"dp DRUM KICK MdSft DRUM SNR1 Stck2 DRUM SNR2 16"C DRUM CHH H08 v 16"O DRUM OHH Bell1 DRUM CYM1 Ride1 DRUM CYM2 Crsh1 DRUM CYM3 AmbiH DRUM TOM1 AmbiM DRUM TOM2 AmbiL DRUM TOM3...
- Page 113 Kit No. No. P36 Kit Name Punk Inst. Instrument DRUM KICK S15 v Rock DRUM SNR1 Doubl DRUM SNR2 RealC DRUM CHH H11 v RealO DRUM OHH Bell2 DRUM CYM1 Ride2 DRUM CYM2 Crsh1 DRUM CYM3 AmbiH DRUM TOM1 AmbiM DRUM TOM2 AmbiL DRUM TOM3...
- Page 114 Kit No. No. P41 Kit Name Power 3 Inst. Instrument Rnd1 DRUM KICK S01 v Wet DRUM SNR1 Doubl DRUM SNR2 RealC DRUM CHH H11 v RealO DRUM OHH Bell2 DRUM CYM1 Ride2 DRUM CYM2 Crsh1 DRUM CYM3 AmbiH DRUM TOM1 AmbiM DRUM TOM2 AmbiL...
- Page 115 Kit No. No. P46 Kit Name Salsa Inst. Instrument Jazz DRUM KICK Picco DRUM SNR1 Stck2 DRUM SNR2 BrshC DRUM CHH BrshO DRUM OHH Bell2 DRUM CYM1 Ride2 DRUM CYM2 Crsh3 DRUM CYM3 TmblH DRUM TOM1 TmblL DRUM TOM2 DblL DRUM TOM3 Shakr DRUM CYM4...
-
Page 116: Preset Style List
Preset Style List Style Name P001 ROCK JAM 1 P002 ROCK JAM 2 P003 SHFFL JAM P004 ROCK HOP P005 STREET HOP P006 MIAMI P007 FUNK ROCK P008 HARD ROCK1 P009 HARD ROCK2 P010 HARD ROCK3 P011 HARD ROCK4 P012 HARD ROCK5 P013 HARD ROCK6... -
Page 117: Midi Implementation
Dr. Rhythm MIDI Implementation Model: DR-3 1. RECOGNIZED RECEIVE DATA ■Channel Voice Message ●Note Off Status Second n = MIDI Channel Number: 0H–FH (ch.1–ch.16) kk = Note Number: 00H–7FH (0–127) vv = Velocity: 00H–7FH (0–127) * Velocity value is not recognized. -
Page 118: Program Change
* MIDI Channel Number is same as drum part channel. * Not recognized in case that drum part channel is “OFF”. * Recognizing Program Change message, DR-3 switches Drum Kit of the same number as Program Number. Consequently, bass tone changes as the Drum kit including. -
Page 119: Channel Voice Message
Status ●Active Sensing Status * Once receiving Active Sensing message, DR-3 begins checking intervals of receiving messages. If an interval is over 500msec, DR-3 will stop sounding tones temporarily and not check intervals after this. 2. Messages stored in patterns ■Channel Voice Message... -
Page 120: Midi Implementation Chart
MIDI Implementation Chart... -
Page 122: Specifications
Roland Service (Information Sheet) Options AC Adaptor: PSA Series Foot Switch: FS-5U Foot Switch Cable: PCS-31 (Roland) (1/4inch Phone Plug (stereo)–1/4inch Phone Plug (mono) x 2) * In the interest of product improvement, the specifications and/or appearance of this unit are... -
Page 123: Index
Index Buttons [AMBIENCE] ... 52 [AUTO] ... 46 [INST] ... 58 [KEY SHIFT] ... 42 [MANU] ... 43 [SONG] ... 74 [SOUND SHAPE] ... 51 [TEMPO] ... 41 AMBIENCE ... 36 Ambience ... 33 Copying ... 57 Naming ... 57 Parameters ... - Page 124 Naming Kit ... 91 Song ... 84 Style ... 71 Note Messages ... 96 OUTPUT Jack ... 89 Pad ... 58 Pad Functions ... 37 Pad Sensitivity ... 89 Pan ... 91 Pattern ... 44 Clearing ... 73 Copying ... 72 Measures ...
- Page 125 Tempo ... 27, 36, 41 Song ... 75 Style ... 62 TSC ... 32, 36, 51 Song ... 76 Style ... 64 User kits ... 90 VARIATION ... 24, 45 Variation ... 36 VARIATION [KIT] ... 45, 60 VARIATION [MUTE] ... 45 VARIATION [PTN] ...
- Page 126 Memo ...
- Page 127 This product complies with the requirements of European Directive 89/336/EEC. FEDERAL COMMUNICATIONS COMMISSION RADIO FREQUENCY INTERFERENCE STATEMENT This equipment has been tested and found to comply with the limits for a Class B digital device, pursuant to Part 15 of the FCC Rules.
- Page 128 03236845 1*SX...