Advertisement
Parts and features
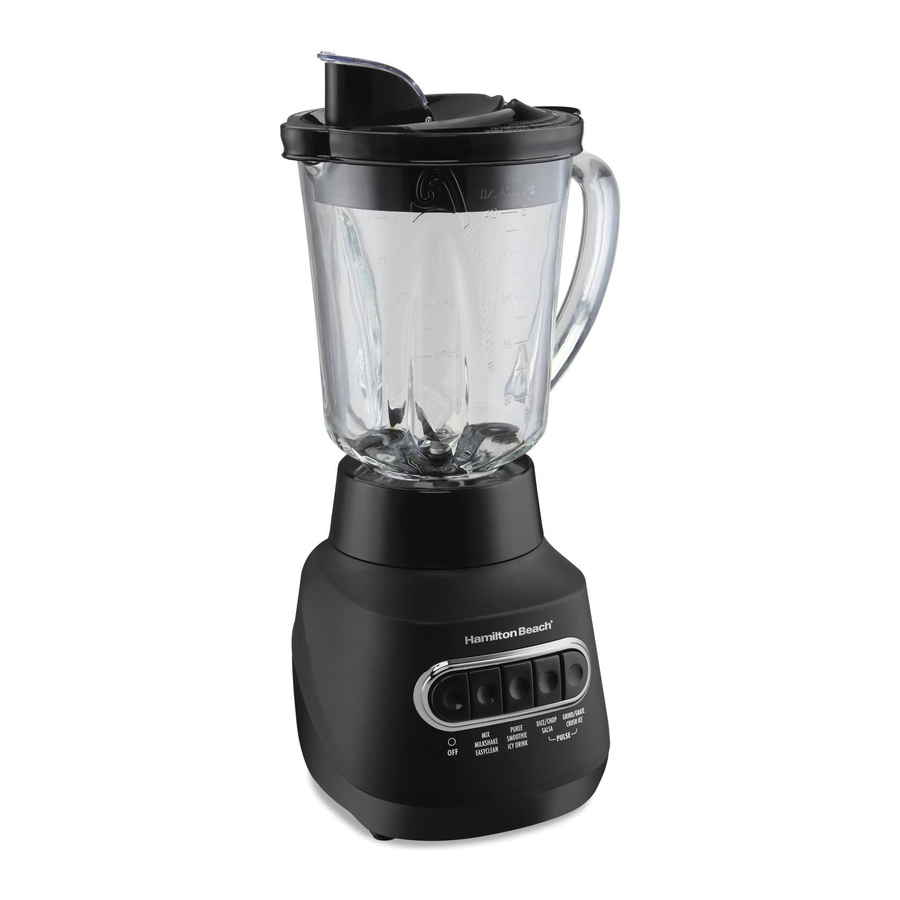
This Use and Care Guide covers a variety of blender models. See below for the parts and features that correspond to your particular model.

- Ingredient Measuring Cap (58180 only)
- Lid
- Blender Jar
- Cutting Blade Assembly
- Collar (same for all models)
- Base
NOT SHOWN:
Cord Storage (back of Base)
CONTROL PANELS


BEFORE FIRST USE: After unpacking Blender, wash everything except Base in hot, soapy water. Rinse and dry. Wipe Base with a soft damp cloth or sponge. Do not immerse Base in water or other liquid. Care should be taken when handling Cutting Blade Assembly as it is very sharp.
How to use

Your Blender Jar and Cutting Blade Assembly are subject to wear during normal use. Always inspect Blender Jar for nicks, chips, or cracks. Always inspect Cutting Blade Assembly for broken, cracked, or loose blades. If Blender Jar or Cutting Blade Assembly is damaged, do not use. Call our customer service number to obtain replacement parts.
- Make sure Blender is unplugged. Place Base on a clean, dry surface to keep foreign particles from being pulled up into motor during operation.
- Place Cutting Blade Assembly, blade side up, through opening in Blender Jar before twisting collar onto bottom of jar. Place Blender Jar on Base.
- Add ingredients to Jar. Plug into outlet.
- Place Lid onto Blender Jar. Push desired function button. Blender speed increases as buttons are pushed left to right. When using PULSE button, Blender will operate as long as button is pressed. Remaining speed buttons will run Blender until OFF (
![]() ) is pressed.
) is pressed.
![]()
Do not operate your Blender continuously for long periods exceeding 3 minutes. If you start to smell a burning odor, stop immediately and remove the Blender Jar. Start and run the Blender— Base ONLY with NO Blender Jar—on the highest speed for 2 minutes. When trying similar recipes in the future, reduce the total amount of ingredients.
- Always place one hand on Lid during operation.
![]()
Burn Hazard. When blending hot liquids, remove filler-cap of two-piece Lid or open vent opening of Lid with messfree spout, and close any Lid openings along the edge intended for pouring. Hot liquids may push Lid off Blender Jar during blending. To prevent possible burns: Do not fill Blender Jar beyond the 3-cup (710-ml) level. With the protection of an oven mitt or thick towel, place one hand on top of Lid. Keep exposed skin away from Lid. Start blending at lowest speed. - ALWAYS turn Blender OFF (
![]() ) and wait until blades have stopped rotating before removing jar.
) and wait until blades have stopped rotating before removing jar. - To remove Blender Jar after blending is complete, lift Blender Jar straight up.
- NEVER replace Blender Jar onto unit while motor is running.


Using Personal Jar
- Carefully place Cutting Blade Assembly and Collar onto Personal Jar. Add ingredients to Personal Jar.
- Turn Personal Jar upside down, shake to mix ingredients, and place onto Base.
- Plug in unit. Hold Personal Jar in place while blending. Press ON (I) and PULSE to blend 15 to 30 seconds or until smooth. Always operate on a countertop or other supporting surface.
- Unplug from electrical outlet. Hold Personal Jar and lift straight up to remove.
- Turn bottom up; remove Collar and Cutting Blade Assembly from Personal Jar. Hand-tighten Drinking Lid onto Personal Jar.
Blending tips for the 20-oz. (591 ml) Personal Jar
- If blending action does not start, stops during blending, or ingredients stick to sides of the Personal Jar, turn Blender OFF (
![]() ). Remove Personal Jar, shake contents, and return to blending.
). Remove Personal Jar, shake contents, and return to blending. - For best performance in the 20-oz. (591 ml) Personal Jar, the minimum amount of liquid needed per recipe is 3/4 cup (6 ounces [177 ml]).
- When filling the Personal Jar, place frozen ingredients or ice into the Personal Jar first.
- When turned upside down to blend, the frozen items will be on the top.
- Do not chop or process hard foods such as cheese, crackers, or meat.
- Avoid bumping or dropping the Blender.
- Do not blend hot liquids in Personal Jar.
- Do not fill Personal Jar above MAX fill line.
Care and cleaning

Electrical Shock Hazard. To protect against risk of electrical shock, do not put cord, plug, Base, or motor in water or other liquid.
- Unplug Blender from electrical outlet.
- Wipe Base, Control Panel, and cord with a damp cloth or sponge. To remove stubborn spots, use a mild, nonabrasive cleanser.
- Blender Jar, Lid, Cutting Blade Assembly, and Collar are dishwasher-safe. Lid should be placed in the top rack only. DO NOT use the "SANI" setting when washing in the dishwasher. "SANI" cycle temperatures could damage your product. Parts may also be washed with hot, soapy water. Care should be taken when handling the Cutting Blade Assembly as it is very sharp. Rinse and dry thoroughly. Do not soak.
- Store Blender with Lid ajar to prevent container odor.
How to use Easy Clean function
To Easy Clean, pour 2 cups (473 ml) warm water in jar and add one drop liquid dishwashing detergent. Run the Blender on EASY CLEAN for 10 seconds. Discard soapy water. Rinse with clean water. This function is not a substitute for regular cleaning as instructed in "Care and cleaning."
For Questions: 1.800.851.8900
For recipes, tips, product information and registration: www.hamiltonbeach.com
Questions: 1.800.267.2826

Documents / Resources
References
Download manual
Here you can download full pdf version of manual, it may contain additional safety instructions, warranty information, FCC rules, etc.
Download Hamilton Beach 58175, 58180, 58181, 58185 - Blender Manual
Advertisement
Thank you! Your question has been received!


Need Assistance?
Do you have a question about the 58175 that isn't answered in the manual? Leave your question here.