
Related Manuals for IBM Aptiva 2158


Summary of Contents for IBM Aptiva 2158
- Page 1 Hardware Maintenance Service for Service Level A Machine Types 2158, 2163 and 2164 and IBM Monitors 2235, 2236 and 2237 2158/2163/2164 2235/2236/2237...
- Page 2 IBM may make improvements and/or changes in the product(s) and/ or the program(s) at any time. Address comments about this publication to IBM Corporation, Dept. E23/962-2, 455 Park Place, Lexington, KY 40511-1856, USA.
-
Page 3: Table Of Contents
Contents Contents ......................I Notices ......................IIX Safety Information ..................IIIX Laser Compliance Statement ..............XXIVIX Trademarks ..................... XXVIX Preface ....................XXVIIX General Information ..................1 Introduction ......................2 Product Overview .....................2 Processors (Machine Type 2158) ..............2 Processors (Machine Type 2163) ..............2 Processors (Machine Type 2164) ..............3 Memory ......................3 External Ports.....................4 Diskette Drive.....................4... - Page 4 Specifications ....................24 Dimension (width x depth x height) ............24 Weight ......................24 Environment .....................24 Power consumption..................25 Electrical input..................25 Operating Requirements ................25 Special Tools ....................25 Check Procedures ..................27 Introduction ....................28 Start .......................29 Index of Symptoms, Messages, Error Codes, or Beeps ........33 Troubleshooting .....................49 Factory-Installed Storage Devices ............49 Factory-Installed Modem Card ...............52 Audio (Not Supported by Diagnostics Program) ..........
- Page 5 Adapter Cards ..................84 Memory(DIMM) ..................85 AMD-K6 Processor (for 2158)..............86 Pentium II Processor Module (for 2163 ) ..........88 Celeron Processor Module (for 2163) ............93 System Backup Battery................99 Indicator LED and Cable ................100 System Board..................101 Removals and Replacements (Machine Type 2164) ........103 Identifying the Parts of the System Unit ..........104 Cover.....................106 Bay Panels ....................108...
- Page 6 System Board Connector Pin Signals ............151 Monitor Port Signals................151 Serial Port Signals..................151 Parallel Port Signals................151 Mouse Port Signals ................152 Keyboard Port Signals ................152 Diskette Drive Cable Connector Signals ..........152 IDE Cable Connector Signals ..............153 Safety Inspection Guide ................155 General Guidelines ..................156 Parts Catalog ....................157 Abbreviations ....................158...
-
Page 7: Notices
Notices References in this publication to IBM products, programs, or services do not imply that IBM intends to make these available in all countries in which IBM operates. Any reference to an IBM product, program, or service is not intended to state or imply that only IBM's product, program, or service may be used. -
Page 8: Safety Information
4. Remove all cables from devices. 5. Turn device ON CAUTION: When replacing the battery, use only IBM Part Number 33F8354 or an equivalent type battery recommended by the manufacturer. If your system has a module containing a lithium battery, replace it only with the same module type made by the same manufacturer. - Page 9 • Repair or disassemble Dispose of the battery as required by local ordinances or regulations. CAUTION: When a CD-ROM drive is installed, note the following. Use of controls or adjustments or performance of procedures other than those specified herein might result in hazardous radiation exposure. Removing the covers of the CD-ROM drive could result in exposure to hazardous laser radiation.
- Page 10 5.LIGUE o dispositivo CUIDADO: Ao substituir a bateria, utilize apenas o Número de Peça IBM 33F8354 ou um tipo de bateria equivalente recomendado pelo fabricante. Se seu sistema possuir um módulo com uma bateria de lítio, substitua-o apenas pelo mesmo tipo de módulo, produzido pelo mesmo fabricante.
- Page 11 Descarte a bateria conforme requerido pelas disposições e regulamentações locais. CUIDADO: Quando uma unidade de CD-ROM estiver instalada, observe o seguinte. A utilização de controles ou ajustes ou a execução de procedimentos diferentes daqueles especificados nesta publicação pode resultar em exposição perigosa à...
- Page 13 Notices...
- Page 14 VIII...
- Page 15 Notices...
- Page 17 4. Débranchez tous les câbles des 5. Mettez les unités sous tension. unités. ATTENTION: Remplacez la pile usagée par une pile de référence identique exclusivement - voir la référence IBM - ou par une pile équivalente recommandée par le Notices...
- Page 18 fabricant. Si votre système est doté d'un module contenant une pile au lithium, vous devez le remplacer uniquement par un module identique, produit par le même fabricant. La pile contient du lithium et présente donc un risque d'explosion en cas de mauvaise manipulation ou utilisation. •...
- Page 19 modems (sauf instruction contraire mentionnée dans les procédures d'installation et de configuration) VORSICHT: Aus Sicherheitsgründen bei Gewitter an diesem Gerät keine Kabel anschließen oder lösen. Ferner keine Installations-, Wartungs- oder Rekonfigurationsarbeiten durchführen. Aus Sicherheitsgründen: • Gerät nur an eine Schutzkontaktsteckdose mit ordnungsgemäß geerdetem Schutzkontakt anschließen.
- Page 20 Eine verbrauchte Batterie nur durch eine Batterie mit der IBM Teilenummer 33F8354 oder durch eine vom Hersteller empfohlene Batterie ersetzen. Wenn Ihr System ein Modul mit einer Lithium-Batterie enthält, ersetzen Sie es immer mit dem selben Modultyp vom selben Hersteller. Die Batterie enthält Lithium und kann bei unsachgemäßer Verwendung, Handhabung oder Entsorgung...
- Page 21 ACHTUNG: An Netz-, Telefon- und Datenleitungen können gefährliche elektrische Spannungen anliegen. Um eine Gefährdung des Benutzers oder Beschädigung des Geräts zu vermeiden, ist der Server auszuschalten. Die Verbindung zu den angeschlossenen Netzkabeln, Telekommunikationssystemen, Netzwerken und Modems ist vor dem Öffnen des Servergehäuses zu unterbrechen (sofern in Installations- und Konfigurationsanweisungen nicht anders angegeben) PERICOLO:...
- Page 22 5.ACCENDERE le unità. ATTENZIONE: Quando si sostituisce la batteria, utilizzare solo una batteria IBM o batterie dello stesso tipo o di tipo equivalente consigliate dal produttore. Se il sistema di cui si dispone è provvisto di un modulo contenente una batteria al litio, sostituire tale batteria solo con un tipo di modulo uguale a quello fornito dal produttore.
- Page 23 ATTENZIONE: Quando è installata un'unità CD-ROM, notare quanto segue: L'utilizzo di controlli, regolazioni o l'esecuzione di procedure non descritti nel presente manuale possono provocare l'esposizione a radiazioni pericolose. L'apertura di un'unità CD-ROM può determinare l'esposizione a radiazioni laser pericolose. All'interno dell'unità CD-ROM non vi sono parti su cui effettuare l'assistenza tecnica.
- Page 24 XVIII...
- Page 25 Notices...
- Page 27 PELIGRO: Para evitar una posible descarga eléctrica, no conecte ni desconecte los cables ni lleve a cabo ninguna operación de instalación, de mantenimiento o de reconfiguración de este producto durante una tormenta eléctrica. Para evitar una posible descarga: • El cable de alimentación debe conectarse a un receptáculo con una instalación eléctrica correcta y con toma de tierra.
- Page 28 CAUTION: Al cambiar la batería, utilice únicamente la batería IBM Número de pieza 33F8354 o un tipo de batería equivalente recomendado por el fabricante. Si el sistema tiene un módulo que contiene una batería de litio, sustitúyalo únicamente por el mismo tipo de módulo del mismo fabricante. La batería contiene litio y puede explotar si no se utiliza, manipula o desecha correctamente.
- Page 29 CAUTION: La corriente eléctrica de los cables de comunicaciones, de teléfono y de alimentación puede resultar peligrosa. Para evitar posibles lesiones o daños del aparato, desconecte los cables de alimentación, los sistemas de telecomunicaciones, las redes y los módems antes de abrir las cubiertas del servidor, salvo que se indique lo contrario en las instrucciones de las operaciones de instalación y configuración.
-
Page 30: Laser Compliance Statement
Laser Compliance Statement The CD/DVD-ROM drive in the computer is a laser product. The CD/DVD- ROM drive's classification label (sample shown below) is located on the drive. CLASS 1 LASER PRODUCT APPAREIL A LASER CLASSE 1 LASER KLASSE 1 LUOKAN 1 LASERLAITE PRODUIT LASER CATEGORIE 1 The CD/DVD-ROM drive is certified in the U.S. -
Page 31: Trademarks
Trademarks The following are trademarks of the IBM Corporation in the United States or other countries or both: Aptiva HelpCenter Operating System/2 OS/2 Personal System/2 PS/1 PS/2 Intel, Pentium, MMX, EtherExpress, and LANDesk are trademarks or registered trademarks of Intel Corporation. -
Page 32: Preface
Preface This manual contains service information for the 2158/2163 Service Level A (SL-A) model of the IBM Aptiva Personal Computer, worldwide. This manual is intended to be used as a stand-alone document to service Aptiva machine type 2158/2163 products. It is divided into the following chapters: Notices contains important safety information and notices required to service this computer. -
Page 33: General Information
Disk Drives ....................15 Input/Output Ports ..................17 Power Management .................18 Startup Options ..................19 Advanced Options..................20 Specifications ....................24 Dimension (width x depth x height) ............24 Weight ......................24 Environment .....................24 Power consumption..................24 Electrical input..................25 Operating Requirements ................25 Special Tools ....................25 Copyright IBM Corp. 1998... -
Page 34: Introduction
Introduction This chapter gives a general overview of the Aptiva Machine Type 2158/2163/ 2164, describes the standard and optional features, and details functional and environmental specifications. Product Overview Machine Types 2158, 2163 and 2164 have two PCI slots and one PCI/ISA shared slot. -
Page 35: Processors (Machine Type 2164)
Celeron • Includes Intel MMX™ media enhancement technology. • Offers Dynamic Execution technology. • Processor is provided in the Single Edge Processor Package (S.E.P.P.) with out L2 cache and fits into the slot 1. • One of the following processors can be installed: - Celeron - 366MHz internal, 66MHz external - Celeron - 400MHz internal, 66MHz external Processors (Machine Type 2164) -
Page 36: External Ports
- 2 memory sockets for 2158, 3 sockets for 2163 and 2164. - 16-MB, 32-MB, 64-MB or 128-MB DIMM. - PC-100 (64-bit, non-ECC, 100MHz, 3.3volt) DIMMs with gold contacts - Maximum memory is 256 MB for 2158, 384 MB for 2163 and 2164. External Ports •... -
Page 37: Power Management
• Noise canceling microphone (available on certain models) Power Management • Compliant to ACPI and supports Display Power Management Signaling (DPMS) monitor. • Software shutdown by Windows 98. • System enters standby mode if any of following conditions are met: - Execute standby from Windows 98 Start menu - Press system power button if it sets to act as standby function. -
Page 38: Keyboard
• 15" (13.7" viewable image size) monitor - 0.28-mm dot pitch - Automatic scanning horizontal frequencies from 30 KHz to 54 KHz or 30 KHz to 69 KHz (for Japan) - Vertical frequencies between 50 Hz and 120 Hz. - DDC2A/B or DDC1/2B+ support (for Japan) - OSD (On-Screen Display) menu (for Japan) •... -
Page 39: Hardware Interfaces
Three PCI (Peripheral Component Interconnect) v2.1 compatible expansion slots that operates at 33 MHz bus speed. One IBM AT-ISA Plug and Play compatible expansion slot that operates at 8 MHz bus speed. Note: There is 1 PCI/ISA shared slot Hard disk drives Two PCI local bus Enhanced IDE v1.0 compatible hard disk... -
Page 40: Cmos Reset
Item- Interface Parallel port Supports SPP (IBM PC/XT, PC/AT, PS/2) compatible, EPP (IEEE 1284 compliance), ECP (IEEE 1284 compliance) interface. IEEE 1284 compliant Game port Game port interface for joystick. It also supports MIDI. Supports Universal HCI Specification for USB 1.0 CMOS Reset This system does not deny access to BIOS Setup Utility. -
Page 41: Power-On Password
Power-On Password A power-on password denies access to the system by an unauthorized user when the system is powered on. When a power-on password is active, the password prompt appears on the screen each time the system is powered on. The system starts after the proper password is entered. -
Page 42: Flash (Bios) Update Procedure
Flash (BIOS) Update Procedure NOTE: The flash update procedure does not change the model number and serial number information in BIOS. 1. Prepare a bootable DOS diskette disk with AFLASH.EXE, MSG.DAT, VXXYYZZ.RN and VXXYYZZ.BIN files NOTE: The AFLASH.EXE and MSG.DAT are flash utility programs. The VXXYYZZ.RN file has the BIOS checksum information. -
Page 43: Bios-Contained Model Number And Serial Number
BIOS-contained Model Number and Serial Number The model number and serial number information is stored in BIOS ROM and displayed in the “Model Information” of BIOS Setup main menu. If a service repair is completed by replacing a new system board or a new BIOS ROM, then you are required to input the original system's model number and serial number into the new BIOS ROM. -
Page 44: Bios Setup Utility
1. Turn on your monitor. 2. Turn on the system unit. 3. When you see the IBM Aptiva logo, press F1 to enter Setup and display the Main Menu. If you have previously set a power-on password, you are prompted to type in the password after you press the F1 key. - Page 45 The following table lists specific keys on the keyboard that will help you move through the Setup menus: Keys Function Down- or up-arrow key Use these arrow keys to highlight an option on the menu. (Press the Enter key to choose the option.) Left- or right-arrow key Use these arrow keys to make a selection and change an option's setting.
-
Page 46: Viewing System Information, Video Information And Model Information
If you have made changes in Setup but would like to restore the default settings, follow these steps: 1. Press F5 to load default settings. A dialog box appears confirming if you want to load the default settings. 2. Use the left-arrow key to select Yes, then press Enter. 3. -
Page 47: Disk Drives
To view the video information such as the video controller and video memory, select the video information option from the setup menu. Select primary display adapter to initialize onboard VGA as the boot display device. Select Auto to initialize PCI add-on VGA card as the boot display device if a PCI add-on card is found;... - Page 48 The IDE drive items are identified as follows: • IDE Primary Channel Master is attached to IDE connector 1 on the system board and is set as the master device. This is the hard disk that comes preinstalled with your computer. •...
-
Page 49: Input/Output Ports
To prevent data loss, set this parameter to Auto if you are using a hard disk with more than 528 MB capacity that was previously configured through the LBA mode. If you use a hard disk configured through the user-specific cylinder- head-sector (CHS) mode, set this parameter to Disabled. -
Page 50: Power Management
Onboard Audio Chip This parameter enables or disables the onboard audio controller chipset. This item does not appear in the menu if there is no physical audio chipset on the system board. The default setting is Enabled. Power Management The system power management features allow you to reduce power consumption. -
Page 51: Startup Options
Silent Boot This parameter enables or disables the silent boot function. When set to Enabled, which is the default, BIOS is in graphical mode and displays the IBM logo while booting. If an error occurs while booting, the system automatically switches to text mode. -
Page 52: Advanced Options
Advanced Options From the Setup main menu, select the Advanced Options option to view or change a variety of configuration settings. The Advanced Options menu appears, with the following options: • Security Options • Memory/Cache Options • PnP/PCI Options Each of these options opens an additional menu. Security Options Power-on Password Select this parameter and press the left- or right arrow key to display the... - Page 53 The next time you turn on the system, you will be prompted to enter your power-on password. If you press F1 during POST to enter Setup, you must key in the password as well. If you were not able to set a password after performing the above procedure, or should you encounter any error message when setting a password, refer to “Power-On Password”...
- Page 54 Write Protect Boot Sector Disables the write function only on the boot sector of the diskette or hard disk drive. Normal Allows the diskette or hard disk drive to function normally. This is the default setting. Onboard Floppy Disk Controller This parameter allows you to enable or disable to onboard floppy disk controller chipset.
- Page 55 PnP/PCI Options The parameters in the PnP/PCI Options menu allow you to set the IRQ assignments for your PCI devices. PCI IRQ Setting This parameter allows for automatic or manual configuration of PCI devices. If you use Plug and Play devices, you can keep the default setting Auto.
-
Page 56: Specifications
Specifications Dimension (width x depth x height) • For Machine Type 2158/2163: System unit: 190 mm (7.48 in.) x 370 mm (14.57 in.) x 384 mm (15.12 in.) For Machine Type 2164: System unit: 195 mm (7.68 in.) x 455 mm (17.9 in.) x 428 mm (16.85 in.) •... -
Page 57: Power Consumption
Power consumption • System unit: Maximum 95 Watts • 15" monitor: Maximum 80 Watts • 17" monitor: Maximum 130 Watts Electrical input • Input voltage for system unit (Sine-wave input is required) - Low Range: 90 Vac to 132 Vac - High Range: 180 Vac to 264 Vac •... -
Page 59: Check Procedures
Troubleshooting .....................49 Factory-Installed Storage Devices ............49 Factory-Installed Modem Card ...............52 Audio (Not Supported by Diagnostics Program) ..........54 CD/DVD-ROM Drive ..................56 Memory ......................57 Keyboard ......................58 Mouse ......................59 Power Supply ....................61 Monitor ......................63 Undetermined Problems ................65 Copyright IBM Corp. 1998... -
Page 60: Introduction
Introduction This chapter contains the check procedures used to diagnose the causes of product failures. The diagnostic information consists of: Start: This is the starting point for any diagnostic action. Based on high-level symptoms, the check procedure directs you to more detailed procedures to help resolve machine failures. -
Page 61: Start
Computers. Do not use this diskette on other models. POST error codes and error messages are displayed on the screen after the IBM logo. Meanwhile, error beeps could be issued to help diagnose system problem. Please refer to “Index of Symptoms, Messages, Error Codes, or Beeps”... - Page 62 • Disconnect all drives except: - 3.5-in. diskette drive - Hard disk drive - IBM Aptiva factory-installed devices (such as a CD-ROM drive) • Ensure that all power cords and cables are connected properly. • Ensure that the monitor brightness and contrast controls are not turned...
- Page 63 Note any symptoms, messages, error codes, or beeps. • Make sure that there are no diskette or CD in the drives. 002 - DOES AN IBM LOGO SCREEN APPEAR? (YES, READ AHEAD. NO, GO TO STEP 004.) • Insert diagnostics diskette in the diskette drive.
- Page 64 NO, GO TO STEP 007.) • Select Diagnostics from the diagnostics program menu. • Select and execute All Tests. - Go to step 008. 007 - • The system configuration report shows only those devices supported by the diagnostics diskette. •...
-
Page 65: Index Of Symptoms, Messages, Error Codes, Or Beeps
Index of Symptoms, Messages, Error Codes, or Beeps How to Use Error Messages: Use the messages, error codes, and beeps combinations that occur to diagnose failures. If more than one failure occurs, begin the diagnosis from the first failure that appeared. The cause of the first failure can result in false messages, error codes, or beeps. - Page 66 beeps, use “Table 2-2 BIOS Error Beeps List” on page 38 to diagnose system problems. 4. If you did not receive any error message, look for a description of your error symptoms in “Table 2-3 Error Symptoms List” on page 41. IMPORTANT: Check all power supply voltages, switch, and jumper settings before you replace the system board.
- Page 67 (Continued) Table 2-1 POST Error Codes and Messages List NOTE: To diagnose a problem, first find the BIOS error messages or codes in left column. If directed to a check procedure, replace the FRU indicated in the check procedure. If no check procedure is indicated, the first Action/FRU listed in right column is the most likely cause.
- Page 68 (Continued) Table 2-1 POST Error Codes and Messages List NOTE: To diagnose a problem, first find the BIOS error messages or codes in left column. If directed to a check procedure, replace the FRU indicated in the check procedure. If no check procedure is indicated, the first Action/FRU listed in right column is the most likely cause.
- Page 69 (Continued) Table 2-1 POST Error Codes and Messages List NOTE: To diagnose a problem, first find the BIOS error messages or codes in left column. If directed to a check procedure, replace the FRU indicated in the check procedure. If no check procedure is indicated, the first Action/FRU listed in right column is the most likely cause.
- Page 70 (Continued) Table 2-1 POST Error Codes and Messages List NOTE: To diagnose a problem, first find the BIOS error messages or codes in left column. If directed to a check procedure, replace the FRU indicated in the check procedure. If no check procedure is indicated, the first Action/FRU listed in right column is the most likely cause.
- Page 71 Table 2-2 BIOS Error Beeps List NOTE: To diagnose a problem, first find the BIOS error beeps in left column. If directed to a check procedure, replace the FRU indicated in the check procedure. If no check procedure is indicated, the first Action/FRU listed in right column is the most likely cause.
- Page 72 (Continued) Table 2-2 BIOS Error Beeps List NOTE: To diagnose a problem, first find the BIOS error beeps in left column. If directed to a check procedure, replace the FRU indicated in the check procedure. If no check procedure is indicated, the first Action/FRU listed in right column is the most likely cause.
- Page 73 Table 2-3 Error Symptoms List NOTE: To diagnose a problem, first find the error symptom in the left column. If directed to a check procedure, replace the FRU indicated in the check procedure. If no check procedure is indicated, the first Action/FRU listed in right column is the most likely cause.
- Page 74 (Continued) Table 2-3 Error Symptoms List NOTE: To diagnose a problem, first find the error symptom in the left column. If directed to a check procedure, replace the FRU indicated in the check procedure. If no check procedure is indicated, the first Action/FRU listed in right column is the most likely cause.
- Page 75 (Continued) Table 2-3 Error Symptoms List NOTE: To diagnose a problem, first find the error symptom in the left column. If directed to a check procedure, replace the FRU indicated in the check procedure. If no check procedure is indicated, the first Action/FRU listed in right column is the most likely cause.
- Page 76 (Continued) Table 2-3 Error Symptoms List NOTE: To diagnose a problem, first find the error symptom in the left column. If directed to a check procedure, replace the FRU indicated in the check procedure. If no check procedure is indicated, the first Action/FRU listed in right column is the most likely cause.
- Page 77 (Continued) Table 2-3 Error Symptoms List NOTE: To diagnose a problem, first find the error symptom in the left column. If directed to a check procedure, replace the FRU indicated in the check procedure. If no check procedure is indicated, the first Action/FRU listed in right column is the most likely cause.
- Page 78 (Continued) Table 2-3 Error Symptoms List NOTE: To diagnose a problem, first find the error symptom in the left column. If directed to a check procedure, replace the FRU indicated in the check procedure. If no check procedure is indicated, the first Action/FRU listed in right column is the most likely cause.
- Page 79 (Continued) Table 2-3 Error Symptoms List NOTE: To diagnose a problem, first find the error symptom in the left column. If directed to a check procedure, replace the FRU indicated in the check procedure. If no check procedure is indicated, the first Action/FRU listed in right column is the most likely cause.
- Page 80 (Continued) Table 2-3 Error Symptoms List NOTE: To diagnose a problem, first find the error symptom in the left column. If directed to a check procedure, replace the FRU indicated in the check procedure. If no check procedure is indicated, the first Action/FRU listed in right column is the most likely cause.
-
Page 81: Troubleshooting
Troubleshooting Failing Parts or Assemblies: The check procedures generally help you trace a problem to one part or assembly. The last step of the specific check procedure you are using indicates that a part or assembly is failing. You should inspect the part or assembly before you decide to replace it. - Page 82 • End. 003 - • Select Utility from the menu. • Select and execute Tech Support Form from the menu to generate a system configuration report. • Compare the system configuration list with the actual devices installed in system. NOTE: If necessary, remove the cover and visually compare the devices installed in the system unit to those shown in the Tech Support Form.
- Page 83 - In the BIOS Setup, check that the correct drive size is set for the flagged drive shown in the System Information. See “Viewing System Information, Video Information and Model Information” on page 13. • Enter BIOS Setup and load default settings. If the problem remains, check the continuity on the drive and the cable and replace it if necessary.
-
Page 84: Factory-Installed Modem Card
Factory-Installed Modem Card NOTE: The factory-installed modem is a 56.6 Kbps modem with a cable of microphone-in and speaker-out from system board. 001 - START • In Windows 98 Device Manager, ensure that the modem is not configured with a conflicting COM port and IRQ setting. •... - Page 85 004 - CAN THE MODEM DIAL OUT AND CONNECT TO ANY BBS SUCCESSFULLY? (YES, READ AHEAD. NO, GO TO STEP 005.) • The modem adapter functions normally. • End. 005 - • Ensure that Windows 98 is properly installed, then power off the system unit.
-
Page 86: Audio (Not Supported By Diagnostics Program)
Audio (Not Supported by Diagnostics Program) IMPORTANT: Audio tests for the sound card cannot be carried out in the PC- Doctor DOS diagnostics program. It is, however, possible to carry out a dial tone test for the modem. While performing this check, you may need to enter and exit Microsoft Windows 98 several times. - Page 87 3. Select Settings , then select Control Panel. 4. Select the Sound icon. 5. In the Sound window, select chimes from the Names field. (To test other adapter card software, select an action from a menu in that software.) 005 - IS THE PREVIEW BUTTON, OR ACTION IN OTHER SOFTWARE, SELECTABLE ON THE SCREEN (SHOWN IN BLACK AND NOT GRAY)? (YES, GO TO STEP 006.
-
Page 88: Cd/Dvd-Rom Drive
CD/DVD-ROM Drive 001 - START • Insert the diagnostics diskette into the diskette drive and ensure that there is no CD/DVD in the CD/DVD-ROM drive. • Select Interactive Tests menu, then select and execute CD/DVD-ROM Test. 002 - DO YOU SEE A MESSAGE “NO CD/DVD-ROM DRIVE OR MSCDEX DEVICE DRIVER INSTALLED.”? (YES, READ AHEAD. -
Page 89: Memory
Memory 001 - START • Power off the system unit. • Insert the diagnostics diskette into the diskette drive. • Ensure that all DIMMs are installed correctly. • Power on the system unit. • Take note of any messages, error codes, or symptoms. 002 - DO YOU RECEIVE POST MEMORY ERROR MESSAGE? (YES, READ AHEAD. -
Page 90: Keyboard
Keyboard 001 - START • Power off system unit and ensure the keyboard plug is connected properly. 002 - • Insert the diagnostics diskette into the diskette drive and power on the system unit. • Select Interactive Tests menu, then execute Keyboard test. 003 - DOES THE KEYBOARD FUNCTION CORRECTLY? (YES, READ AHEAD. -
Page 91: Mouse
Mouse NOTE: A sticking key button can cause the mouse to operate incorrectly. If you suspect this, go to “Keyboard” on page 58. 001 - START • Make sure that the mouse ball turns freely. • Make sure that the mouse plug connects properly. 002 - •... - Page 92 • Check the mouse plug. 008 - ARE THERE ANY BROKEN PINS IN THE MOUSE PLUG? (YES, GO TO STEP 010. NO, READ AHEAD.) • Try with a known good mouse. 009 - DO THE ERROR SYMPTOMS STILL REMAIN? (YES, READ AHEAD. NO, GO TO STEP 010.) •...
-
Page 93: Power Supply
Power Supply 001 - START ATTENTION: Check the Power Override switch, situated at the back of the machine, just above the connector for the power cable. If this switch is activated (switched to on), no power will be supplied to the system. •... - Page 94 Pin-hole side view Cable side view 006 - ARE THE VOLTAGES CORRECT AND DOES THE FAN RUN? (YES, READ AHEAD. NO, GO TO STEP 009.) • The power supply is working normally. • If you suspect the on/off switch cable assembly, see Step 003. •...
-
Page 95: Monitor
Monitor First, set the system to VGA mode. To do this in Windows 98, depress the F8 function key during startup. Safe mode (VGA) will be set for Windows 98. Use the operating system's video setup to change the monitor resolution. The monitors that come with the system are DDC2A/B or DDC1/2B+ (Display Data Channel) compliant. - Page 96 • Select Interactive Tests from the Main Menu. • Select and execute Video test from the menu. • Follow the prompts and perform the video test. • Go to“Index of Symptoms, Messages, Error Codes, or Beeps” on page 33. • You might have to adjust the monitor controls to obtain the best image.
-
Page 97: Undetermined Problems
4. If the jumpers, switch, and voltage settings are correct, continue with the following steps: • Remove or disconnect the following, one at a time: - Non-IBM devices - External devices - Any adapter card (modem card or video card, if installed) - CD-ROM drive... - Page 98 tested. Replace the last item tested if the system operates normally after removing the last item.
-
Page 99: Diagnostic Aids
Diagnostic Aids Introduction ....................66 Power-On Self Test ..................66 Diagnostic Diskette ..................67 Using the Diagnostic Diskette ..............67 Using Diagnostic Program from Recovery CD......... 67 Diagnostics Program Features..............69 Copyright IBM Corp. 1998... -
Page 100: Introduction
BIOS version and system memory tested. For Aptiva, the F9 key will only work after exiting BIOS Setup. 3. If an error is detected during POST, the IBM logo screen will automatically switch to the text-based screen and display the error message or code with a beep. -
Page 101: Diagnostic Diskette
The diagnostics program comes on a diskette along with this book. This version of PC-Doctor diagnostics program, developed by Watergate for IBM, is the primary method of testing the computer. You can use it to test the IBM components of the system and some external devices. The amount of time required to test components depends on the number of components installed and selected. - Page 102 BIOS Setup. 3. When screen displays IBM Recovery Program menu, choose “Run Diagnostics” to execute diagnostic program. 4. Follow the instructions on the screen to operate the diagnostics program.
-
Page 103: Diagnostics Program Features
Diagnostics Program Features Diagnostics program (PC-Doctor) includes the following features: Table 3- 1 Diagnostic Program Main Menu Selections Main Menu Selections Submenu Selections Diagnostics • System Test • Memory Test • Hard Disk Test • Floppy Disk Test • All Tests Interactive Tests •... - Page 104 (Continued) Table 3- 1 Diagnostic Program Main Menu Selections Main Menu Selections Submenu Selections Hardware Info • System Configuration • Memory Contents • IRQ and DMA Use • Device Drivers • COM and LPT Ports • Physical Disk Drives • Logical Disk Drives •...
-
Page 105: Repair Information
Memory(DIMM) ..................117 Pentium II and Pentium III Processor Module........118 Installing the Processor Heat Sink and Fan .......... 120 System Backup Battery................123 Indicator LED and Cable ................124 System Board..................125 Handling ESD-Sensitive Parts ..............126 Software Recovery Procedure ..............127 Copyright IBM Corp. 1998... -
Page 106: Removals And Replacements ( Machine Type 2158 And 2163)
Removals and Replacements ( Machine Type 2158 and 2163) BEFORE REMOVING ANY FRU, POWER-OFF THE COMPUTER, UNPLUG ALL POWER CORDS FROM ELECTRICAL OUTLETS, THEN DISCONNECT ANY INTERCONNECTING CABLES. ATTENTION: The system board, processors, adapter cards, DIMMs, and upgrade processors can be damaged by electrostatic discharge. Use an electrostatic discharge (ESD) strap to establish personal grounding. -
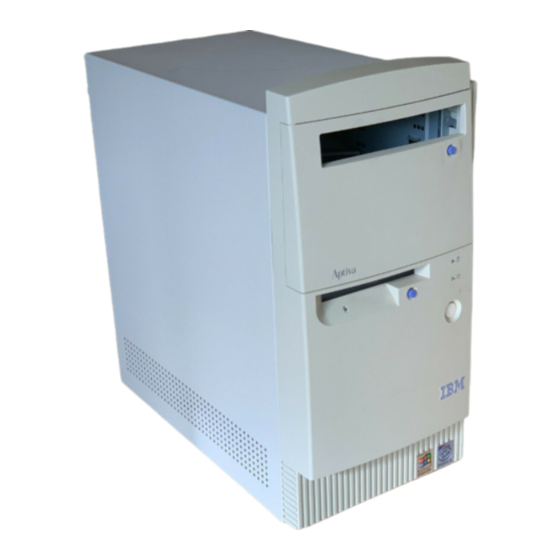
Page 107: Identifying The Parts Of The System Unit
Identifying the Parts of the System Unit This computer system has four bays that can hold 5.25-inch and 3.5-inch drives. Additional devices can be installed in the empty bays. Diskette drives in this unit use the standard diskette advanced technology (AT) interface. - Page 108 5. Adapter card connectors. Adapter card connectors are sockets on the system board into which adapter cards are installed. Your system board has four adapter card connectors (for the 2163 machine, there is an additional AGP video connector). One of these connectors is for an ISA card and three are for PCI cards.
-
Page 109: Cover
Cover • Disconnect the system unit power cord. • Remove the screws at the back of the tower. • Insert a screwdriver under one of the tabs on the back of the cover and gently pry the tower cover so that it separates from the tower. •... - Page 110 NOTE: Replacing the Cover • To replace the tower cover, lower the cover down over the tower, pressing in on the sides so the hooks inside the cover fit over the bottom ledge of the tower. Slide the cover forward into place. Secure the tower cover by replacing the screws you removed.
-
Page 111: Bay Panels
Bay Panels If you remove a drive from a bay and you do not intend to install a new drive immediately, reinstall the bay panel on the empty exposed drive bay. Follow these steps to remove the plastic bay panel from the front of the system unit cover. -
Page 112: Bay 1- 5.25-In. Bay (Internal Or External Access)
Bay 1- 5.25-In. Bay (Internal or External Access) • Disconnect any cable on the drive (note location and orientation of cables). • Remove the screws. • Pull out the drive. -
Page 113: Bay 3 - 3.5-In. Bay (Internal Or External Access)
Bay 3 - 3.5-In. Bay (Internal or External Access) Bay 4 - 3.5-In. Bay (External Access for Diskette Drive) • Disconnect the cables (note location of cables). • Press the lever and rotate outward. • Pull carefully and slowly as soon as the warning arrow appears. •... - Page 114 NOTE: Reinstall The 3.5-in Drive Frame • Before reinstalling the drive frame into the main unit, make sure the upper and lower drive frames are properly reattached. • Align the front notch of the drive frame with the system chassis •...
-
Page 115: Power Supply
Power Supply • Disconnect all cables necessary before removal (note location of cables). • Remove the four screws from the chassis. • Push the power supply forward towards the CD/DVD-ROM drive. • Once it is sufficiently forward, place your hand underneath the power supply and push upwards to detach it from the chassis. -
Page 116: Adapter Cards
Adapter Cards NOTE: 1. Before removing an adapter card, note the location of the adapter card and any cables. When removing an adapter card, install the replacement card in the same slot as the one you removed. 2. If necessary, remove cards from the adjacent slots of the failed card. •... -
Page 117: Memory(Dimm)
Memory(DIMM) CAUTION: Memory modules are sensitive to static discharge. • Press the levers on both sides of the socket down and outwards. • Lift the DIMM to remove. ATTENTION: Place your forefingers on the top of the DIMM before you press the holding clips to gently disengage the DIMM from the socket. -
Page 118: Amd-K6 Processor (For 2158)
AMD-K6 Processor (for 2158) NOTE: Determine the type of processor you are installing and make sure the jumpers are set correctly. Run the Setup Utility after correctly installing a processor. CAUTION: Processors are sensitive to static discharge. • Remove adapter cards if applicable. •... - Page 119 • Place the processor heat sink fan over the processor. • Insert one side of fan brace onto the ZIF socket • Secure by latching the other side to the ZIF socket. • Reconnect the processor fan sink cable to the connector FN1 on the system board.
-
Page 120: Pentium Ii Processor Module (For 2163 )
Pentium II Processor Module (for 2163 ) The Pentium II Processor Module comes in two packages, SECC1 and SECC2. SECC stands for Single Edge Cartridge CPU. Either of the two packages can be installed to the 2163 system board. Removing the Pentium II CPU Module Follow these steps to remove the Pentium II CPU module from the slot. - Page 121 Pentium II Processor Installation Follow these steps to install the Pentium II processor module with heat sink and fan to the socket on the system board. • Locate the retention mechanism around the processor socket. Fold out the retainers. • With the processor module electrical contacts pointing downward, align the processor to the posts of the retention mechanism, then lower it down.
- Page 122 • Lock the latches to secure the processor module. Installing the Processor Heat Sink and Fan The Pentium II processor module with holes on one side to hold the clips of the heat sink and fan. The upper set of holes (near the latches) on the processor are wider and should match the wider ends of the clips on the heat sink.
- Page 123 • Using your fingers, push down the metal bracket until it clicks into the CPU cartridge and then push the metal bracket levers down, to lock the metal bracket into place. SECC2 Package Installation Follow these steps when installing the heat sink and fan to the Pentium II processor module: •...
- Page 124 To remove the SECC2 type fan sink, use a screw driver to slide the fastener nodes outward to unlock the fan sink from the processor, then carefully remove the fan sink from the processor.
-
Page 125: Celeron Processor Module (For 2163)
Celeron Processor Module (for 2163) Removing the Celeron CPU Follow these steps to remove the Celeron CPU module from the slot. NOTE: Determine the type of processor you are installing and make sure the jumpers are set correctly. Run the Setup Utility after correctly installing a processor. - Page 126 • Use a screw driver to push the four fastener tabs outward to unlock the heat sink from the processor, then carefully detach the heat sink from the processor.
- Page 127 Installing the Universal Retention Mechanism (URM) Follow these steps to install the universal retention mechanism: 1. Pull out the sides. 2. Place the universal retention mechanism over the CPU connector on the system board and press it until it clicks into place. 3.
- Page 128 Installing a Celeron CPU NOTE: Observe the ESD precautions when installing or removing a system component. The system board supports a Celeron processor that comes in the SEPP (Single-Edge Processor Package) type packaging. The SEPP is similar to SECC and is compatible with Slot 1 connectors. NOTE: Before you proceed, make sure that there is no processor installed in the CPU connector.
- Page 129 Repair Information...
- Page 130 8. With the processor card golden fingers pointing downward, align the processor to the posts of the URM. 9. Lower the processor into to the CPU connector on the system board until the golden fingers touch the connector. 10. Press down the processor until the golden fingers completely fit into the connector and the latches on the sides lock the processor into place.
-
Page 131: System Backup Battery
System Backup Battery CAUTION: All BIOS configuration settings will be lost when the backup battery is removed! ATTENTION: Attention: Be careful when removing the backup battery. If the metal lever is damaged or broken, the system board must be replaced. •... -
Page 132: Indicator Led And Cable
Indicator LED and Cable • Push in on the indicator LED and remove from the rear. • Disconnect the LED and cable from the system board. -
Page 133: System Board
System Board • Remove all adapter cards. • Disconnect all cables connected to the system board. Note the location and orientation of all cables. • Remove the screws securing the system board to the chassis. • Lift the system board to remove from chassis. •... - Page 134 • Reinstall other components into the machine i.e. drives, power supply, cables, etc. • Upgrade the BIOS version on the new system board using the BIOS upgrade utility. • Change the Machine Type and Serial Number in the BIOS to match the original planar BIOS settings.
-
Page 135: Removals And Replacements (Machine Type 2164)
Removals and Replacements (Machine Type 2164) See Safety Notice following Translation on page VII BEFORE REMOVING ANY FRU, POWER-OFF THE COMPUTER, UNPLUG ALL POWER CORDS FROM ELECTRICAL OUTLETS, THEN DISCONNECT ANY INTERCONNECTING CABLES. The arrows in the removals and replacements procedures show the direction of movement to remove a field-replaceable unit (FRU), to turn a screw, or the direction to press a tab to release the FRU. -
Page 136: Identifying The Parts Of The System Unit
Identifying the Parts of the System Unit This computer system has five bays that can hold up to three 5.25-inch and two 3.5-inch drives. Additional devices can be installed in the empty bays. Diskette drives in this unit use the standard diskette advanced technology (ATX) interface. - Page 137 10. Switching Power Supply . The system comes with a 145-watt switching power supply. 11. Expansion slots. On the rear panel of the system chassis are seven slot openings for installation of adapter cards. When installing an adapter, remove the cover of the slot that you intend to use.
-
Page 138: Cover
Cover • Disconnect the system unit power cord. • Release the lock that secures the cover at the back of the unit by pressing it toward the unlocked icon. • Slip your hand into the underside of the front panel and pull the release handle forward to release the cover. - Page 139 NOTE: Replacing the Cover • Align the end corners of the cover with the front corners of the chassis. Ensure that the rails of the cover slide along the grooves on the sides of the chassis. • · Slide back the cover until it fits into place. If the cover does not slide all the way to the rear, hold the upper rear corners of the cover and slightly press it inward while pushing it toward the rear end of the unit.
-
Page 140: Bay Panels
• Slide the lock on the back of the unit to the "locked" icon to secure the cover to the chassis. Bay Panels If you remove a drive from an external bay and you do not intend to install a new drive immediately, reinstall the bay panel on the empty exposed drive bay. - Page 141 NOTE: Removing the system cover, exposes metal plates in front of each unpopulated drive bay. Push back and break-off these metal plates before installing additional drives. Use a screwdriver to push back the metal bay plate. After pushing the metal cover for about an inch, you may use your hand to push it all the way to a 90- degree angle.
-
Page 142: Bays 1, 2, 3 (3.5-In. And 5.25-In. Internal/External Bays)
Bays 1, 2, 3 (3.5-In. and 5.25-In. Internal/External Bays) • Disconnect all cables on the drive (note location of cables). • Remove the screws. WARNING: For 5.25-In. hard disk drive installation, it uses different screws from 3.5-In. hard disk drive . IMPORTANT: Install the 3.5-in. -
Page 143: Removing The 3.25-In Hard Disk Drive From The Adapter Tray
Removing the 3.25-in hard disk drive from the adapter tray • To remove the hard disk drive from the adapter tray, remove the four shoulder screws on the underside of the tray. • Four cushion rings are used to minimize the acoustic interference. To remove the cushion rings, slide and lift. -
Page 144: Bay 4, 5 (3.5-In. Diskette Drives)
Bay 4, 5 (3.5-In. Diskette Drives) • Disconnect the cables (note location of cables). • Press the lever and rotate outward. • Pull carefully and slowly as soon as the warning arrow appears. • The drive frame becomes free after the line behind the arrow appears. Remove the frame from the chassis. - Page 145 NOTE: Reinstall The 3.5-in Drive Frame • Align the front notch of the drive frame with the system chassis • Align the top rail of the drive frame with the system chassis and swing inward until it "clicks" to lock. •...
-
Page 146: Power Supply
Power Supply • Disconnect all necessary cables before removal (note location of cables). • Remove the two screws from the chassis. • Press the tab located on top of the housing frame just above the power supply. • Push the power supply forward towards the CD-ROM drive to detach it from the chassis. - Page 147 NOTE: Replacing the Power Supply • Insert the power supply frame into its corresponding cut-away openings on the chassis. • Align the top rails and slide in to lock. • Secure the power supply with it's two original screws Repair Information...
-
Page 148: Adapter Cards
Adapter Cards NOTE: 1. Before removing an adapter card, note the location of the adapter card and any cables. When removing an adapter card, install the replacement card in the same slot as the one you removed. 2. If necessary, remove cards from the adjacent slots of the failed card. •... -
Page 149: Memory(Dimm)
Memory(DIMM) ATTENTION: Memory modules are sensitive to static discharge. • Press the levers on both sides of the socket down and outwards. • Lift the DIMM to remove. CAUTION: Place your forefingers on the top of the DIMM before you press the holding clips to gently disengage the DIMM from the socket. -
Page 150: Pentium Ii And Pentium Iii Processor Module
Pentium II and Pentium III Processor Module Follow these steps to remove the Pentium II and Pentium III CPU module from the slot. NOTE: Determine the type of processor you are installing and make sure the jumpers are set correctly. Run the Setup Utility after correctly installing a processor. - Page 151 NOTE: Pentium II Processor Installation Follow these steps to install the Pentium II processor module with heat sink and fan to the socket on the system board • Place the retention mechanism over the processor socket on the CPU board. Secure it with the screws that came with the package. •...
-
Page 152: Installing The Processor Heat Sink And Fan
Installing the Processor Heat Sink and Fan The Pentium II processor module comes with holes on one side to hold the clips of the heat sink and fan. The upper set of holes (near the latches) on the processor are wider and should match the wider ends of the clips on the heat sink. - Page 153 • Use a screwdriver to press and lock in the wide end of a clip first. Then without lifting the screwdriver, point it downward to press and lock the narrow end of the clip. Repair Information...
- Page 154 • Repeat to lock clip on the other side.
-
Page 155: System Backup Battery
System Backup Battery CAUTION: All BIOS configuration settings will be lost when the backup battery is removed! ATTENTION: Be careful when removing the backup battery. If the metal lever is damaged or broken, the system board must be replaced. • Gently pull the metal lever away from the backup battery. -
Page 156: Indicator Led And Cable
Indicator LED and Cable • Push in on the indicator LED and remove from the rear. • Disconnect the LED and cable from the system board. -
Page 157: System Board
System Board • Remove all adapter cards. • Disconnect all cables connected to the system board. • Remove the screws securing the system board to the chassis. • Lift the system board to remove from chasis. • Remove memory (DIMM) if applicable. •... -
Page 158: Handling Esd-Sensitive Parts
Handling ESD-Sensitive Parts Many electronic parts are sensitive to electrostatic discharge (ESD). To prevent damage when working with ESD-sensitive parts, observe the following instructions. Do these in addition to taking all the usual precautions, such as switching off the power and unplugging the power cord. •... -
Page 159: Software Recovery Procedure
“Startup Options”, set the first priority of boot sequence to CD-ROM. Save and exit from BIOS Setup. 3. After system boots from recovery CD, you will be prompted with an “IBM Product Recovery Program” menu, follow the instructions on the screen to operate the software recovery procedure. -
Page 161: Parts/Test Point Locations
DIMM Configurations ...................150 System Board Connector Pin Signals ............151 Monitor Port Signals................151 Serial Port Signals..................151 Parallel Port Signals................151 Mouse Port Signals ................152 Keyboard Port Signals ................152 Diskette Drive Cable Connector Signals ..........152 IDE Cable Connector Signals ..............153 Copyright IBM Corp. 1998... -
Page 162: Introduction
Introduction This chapter contains system board layouts and jumper settings. It is useful when you are asked to measure voltages. Use this information to help you locate parts such as electronic boards, connectors, pin numbers, and test points. This chapter also contains jumper settings for the hard disk drive, CD/ DVD-ROM (compact disc-read-only memory) drive, and the connector information for modem adapter card. -
Page 163: Machine Type 2158 System Board Jumpers And Connectors
Machine Type 2158 System Board Jumpers and Connectors The blackened pin of a jumper represents pin 1. 2158 System Board Jumper Settings Jumper/Settings Function VGA interrupt 1-2* Disabled Enabled Wake-on LAN signal trigger level Active low 2-3* Active high Diskette drive LED Enabled 2-3* Disabled... - Page 164 2158 System Board Jumper Settings (Continued) Jumper/Settings Function SW1(switch 1) Reserved SW1(switch 2, 3, 4) Bus frequency(MHz) Host AGP Off, On, On On, On, Off On, Off, Off Off, Off, Off* 100 66 SW2(switch 1) Reserved SW2(switch 3, 4) Bus frequency(MHz) Host Off, Off On, Off...
- Page 165 Machine Type 2158 Processor Type Jumper Settings NOTE: You must verify the exact processor type before setting the processor type jumpers. The wrong processor type jumper setting may damage the CPU. The system only supports dual-voltage CPU Switch K6-2 333MHz (Host=95MHz) K6-2 350MHz (Host=100MHz)
- Page 166 2158 System Board Connector Functions Connector Function Connect to... Universal Serial Bus (USB) connector USB device Power LED (pins 1-3) Power LED HDD LED (pins 4-7) Hard disk LED Reset button (pins 8-9) Reset button Power button (pins 10, 20) Power button IrDA connector (pins 14-19) Reserved...
-
Page 167: Machine Type 2163 And 2164 System Board Jumpers And Connectors
Machine Type 2163 and 2164 System Board Jumpers and Connectors NOTE: The blackened pin of a jumper represents pin 1. 2163 and 2164 System Board Jumper Settings Jumper/Settings Function Reserved Reserved Line-out signal type 1-3 & 2-4 Audio line-out 3-5 & 4-6* Amplified audio line-out Parts/Test Point Locations... - Page 168 2163 and 2164 System Board Jumper Settings (Continued) Jumper/Settings Function SW 1 (switch 1, 2, 3, 4) Bus Clock Ratio Off, Off, On, Off On, On, On, On On, Off, On, On On, On, Off, On On, Off, Off, On On, On, On, Off On, Off, On, Off On, On, Off, Off...
- Page 169 2163 and 2164 System Board Connector Functions Connector Function Connect to Universal Serial Bus (USB) USB device connector ATX Power Supply Connector Power supply Upper: PS/2 mouse connector PS/2 pointing device Lower: PS/2 keyboard connector PS/2 keyboard Upper: Printer port Printer or parallel device Lower-left: COM1 Serial device...
-
Page 170: Power Supply Connectors And Voltages
Power Supply Connectors and Voltages Refer to the following figures when checking for voltages on power supply cable connectors. When checking voltages, the power supply fan must be running. To power-on the power supply without using the on/off switch, use a screwdriver or other tool to short the connector CN2(pin10-20) for 2158 or CN9 for 2163 and 2164 (with the switch cable disconnected from the connector on the system board), or use a connection (jumper) to short the black and green wires of the 20-pin... - Page 171 (Continued) Power Supply Output Pin Assignment Voltage Cable Color Ground Black Ground Black +5Vdc +5Vdc Parts/Test Point Locations...
-
Page 172: Factory-Installed Modem Card Layout
Factory-Installed Modem Card Layout Factory-Installed Modem Card Connector Functions Item Function Connect to... Telephone line-out Telephone set Some modem adapters may come without this jack. Telephone line-in Telephone line Voice-in/speaker-out connector System board Machine Type 2158: CN13 Machine Type 2163 and 2164: CN12 NOTE: Care should be taken while connecting the voice-in/speaker-out connector. -
Page 173: 3.5-In. Hard Disk Drive Jumper Settings
3.5-In. Hard Disk Drive Jumper Settings 3.5-In Quantum Fireball TM Series 3.5-In Quantum Fireball ST Series Hard Disk Hard Disk 3.5-In Quantum Fireball TM and ST Series Hard Disk Drives Jumper Settings Description Drive configured as a Master, or Drive configured as a Master, with an attached Slave Drive configured as a Slave. - Page 174 3.5-In Seagate Hard Disk 3.5-In Seagate Hard Disk Drives Jumper Settings CS/SP Description Drive configured as a Master. Drive configured as a Slave. Drive configured as a Master, with an attached Slave The configuration of the following jumpers controls the drive's mode of operation: •...
- Page 175 3.5-In Maxtor Hard Disk 3.5-In Maxtor Hard Disk Drive Jumper Settings Description Drive configured as a Master or Drive configured as a Master, with an attached Slave Drive configured as a Slave. Parts/Test Point Locations...
-
Page 176: 5.25-In. Hard Disk Drive Jumper Settings
5.25-In. Hard Disk Drive Jumper Settings 5.25-In. Hard Disk Drive Jumper Settings CS/SP Description Drive is configured as a Master. Drive is configured as a Slave. Drive is configured as a Master, with an attached Slave that supports DASP The configuration of the following four jumpers controls the drive's mode of operation: •... -
Page 177: Cd-Rom Drive
CD-ROM Drive Front Panel and Emergency-Exit ATTENTION: Either <option 1> or <option 2> CD-ROM drive may come with your Aptiva machine. Their front panel buttons, indicators and emergency eject method may be different. CD-ROM Front Panel Introduction <option 1> Item Description Load / eject button Headphone jack... - Page 178 operation. CD-ROM Front Panel Introduction <option 2> Item Description Headphone jack Headphone volume control Busy indicator, lights up and flashes in amber color during data read or seek operation. Audio Play / Skip track control button Load / eject button Disc tray and emergency eject See CD-ROM Emergency-exit <option 2>...
-
Page 179: Cd-Rom Drive Rear Panel Connectors And Jumpers
CD-ROM Drive Rear Panel Connectors and Jumpers CABLE SELECT DIGITAL SLAVE IDE INTERFACE DC INPUT AUDIO MASTER AUDIO C S M R G G L S L A NOTE: CD-ROM drives may come with no item 5 and 6 (digital audio output and testing jumper) connectors. -
Page 180: Dvd-Rom Drive
DVD-ROM Drive Front Panel and Emergency-Exit DVD-ROM Front Panel Introduction Item Description Disc Tray Open/Close Button Loading/Unloading/Busy Indicator Loading/Unloading Headphone Volume Control Headphone Jack Disc Indicator NOTE: Make sure to turn off the power before manual disc eject operation. DVD-ROM Emergency-exit If for any reason the tray does not eject automatically, insert and press an eject-bar inside the emergency eject hole to manually eject the tray. -
Page 181: Dvd-Rom Drive Rear Panel Connectors And Jumpers
DVD-ROM Drive Rear Panel Connectors and Jumpers Analog DVD-ROM Drive Rear Panel Connectors and Jumpers Item Function Connect to... Power connector Power supply IDE Interface connector System board 2158: CN10 2163/2164: CN10 Configuration jumper. Description Master(default). Slave. Cable select Analog Audio connector System board 2158: CN15 2163/2164: CN8... -
Page 182: Dimm Configurations
DIMM Configurations The 2158 system board has two DIMM sockets. A maximum of 256KB memory may be installed. The 2163 and 2164 system board has three DIMM sockets. A maximum of 384KB memory may be installed. You can install 16MB, 32MB, 64MB, or 128MB PC-100 DIMM in any sockets and with any combinations. -
Page 183: System Board Connector Pin Signals
System Board Connector Pin Signals Monitor Port Signals Signal Name Signal Name Red Video +5 V dc Green Video Synch Ground Blue Video Monitor ID Bit 0 Monitor ID Bit 2 Synch Ground Horizontal Synch Red Ground Vertical Synch Green Ground Blue Ground Serial Port Signals Signal Name... -
Page 184: Mouse Port Signals
Signal Name Signal Name Busy Ground Power Paper Empty Ground Power Select Mouse Port Signals Signal Name Signal Name Mouse Data +5 V dc Power Mouse Clock Connection Ground Power No Connection Keyboard Port Signals Signal Name Signal Name Data +5 V dc Power Mouse Data... -
Page 185: Ide Cable Connector Signals
Signal Name Signal Name Ground Select Head 1 Motor Enable 1 Ground Ground Diskette Change IDE Cable Connector Signals Signal Name Signal Name Host Reset No Connection Ground Ground Host Data 7 Host IOW Host Data 8 Ground Power Host Data 6 Host IOR Host Data 9 Ground... -
Page 187: Safety Inspection Guide
Safety Inspection Guide General Guidelines ..................156 Copyright IBM Corp. 1998... -
Page 188: General Guidelines
If any unsafe conditions are present, you must find out how serious the hazard is and if you can continue before you correct the hazard. All current IBM Aptiva service supplements outlining feature/model changes, along with the machine history, should be reviewed. -
Page 189: Parts Catalog
Assembly 1b: Machine Type 2164 System Unit - Exterior ..... 171 Assembly 2: Machine Type 2164 Diskette, Hard Drive......173 Assembly 3: Machine Type 2164 CD/DVD-ROM Drive ......174 Assembly 4: Machine Type 2164 Keyboard and Mouse......176 Copyright IBM Corp. 1998... -
Page 190: Abbreviations
Abbreviations In this chapter, the following abbreviations are used to identify country and language version: Country Language Version Austria Australia Belgium - Dutch Belgium - French Canada Canada - English Canada - French China Denmark - Danish Finland - Finish France Germany Hong Kong... -
Page 191: Section A: Assembly For Machine Type 2158 And 2163
Section A: Assembly for Machine Type 2158 and 2163 Assembly 1: Machine Type 2158 and 2163 System Unit Parts Catalog... - Page 192 Asm- Model Model Description Index Number 2158 2163 20L2196 Front Panel 20L2197 Hard Drive Holder 36L9138 HDD Tray 20L2193 Top Cover 20L2194 Door Cover 1-NS 02K2329 Screws for Front Panel 20L2195 Drive Bay Panel 20L2198 Assembly Lower Case (without SPS) 1-NS 02K2334 Screw for Power Supply, Bracket plate and...
- Page 193 Asm- Model Model Description Index Number 2158 2163 1-11 28L3842 Pentium II-350 W/ECC, 512K, 100 MHz 1-11 20L2162 Pentium II-400 W/ECC, 512K, 100 MHz 1-11 00K8476 Pentium II-450 W/ECC, 512K, 100 MHz 1-11 36L9099 Pentium II-500 W/ECC, 512K, 100 MHz 1-12 20L2187 2 Pin Power Connector, Fan Sink...
-
Page 194: Assembly 2: Machine Type 2158/2163 Diskette, Hard Drive
Assembly 2: Machine Type 2158/2163 Diskette, Hard Drive Asm- Model Model Description Index Number 2158 2163 02K2299 3.5-in., 3 mode MKE (JU256A276P) 02K2603 FDD Cable 00N4337 3.5-in., 4 GB Maxtor/Quasar 36L9105 3.5-in., 6GB Maxtor/Quasar 36L9106 3.5-in., 8GB Maxtor/Quasar 36L9107 3.5-in., 10GB Maxtor/Quasar 36L9108 3.5-in., 12GB Maxtor/Quasar 36L9101... -
Page 195: Assembly 3: Machine Type 2158/2163 Cd/Dvd-Rom Drive
Assembly 3: Machine Type 2158/2163 CD/DVD-ROM Drive Asm- Model Model Description Index Number 2158 2163 36L9087 CD-ROM 32X, Sony/LG 00N8328 CD-ROM 40X, Sony/LG 01K4224 IDE Cable (w/I 3Conn) 20L2289 Audio Cable, CD-ROM 00N4265 56K GVC Non-Voice Rockwell PCI NA/SA/Asia 00N4266 56K GVC Non-Voice Rockwell PCI EMEA/Australia/New Zealand 00N4267... - Page 196 Asm- Model Model Description Index Number 2158 2163 00N4270 56K GVC Voice Rockwell PCI (Asia) Taiwan/China/HK/ Singapore 00N4271 56K GVC Voice Roockwell PCI Japan 37L1968 56K CIS Voice Rockwell PCI NA/Taiwan/China 37L1969 56K CIS Voice Rockwell PCI EMEA/LA 37L1973 56K CIS Voice Rockwell PCI Japan 37L1974 56K CIS Non-Voice Rockwell PCI...
-
Page 197: Assembly 4: Machine Type 2158/2163 Monitor And Power Cord
Assembly 4: Machine Type 2158/2163 Monitor and Power Cord Asm- Model Model Description Index Number 2158 2163 4-NS 06J7900 CSA/UL 10A/125V Cordset US/CE/CF/ LA/AP 4-NS 01K4196 CE-10A/250V Volex Euro 4-NS 01K4198 UK-10A/250V Volex UK/HK 4-NS 02K2648 T-Mark 10A/125V w/i adapter Japan 4-NS 13F9997 Volex 10A/250A DK... -
Page 198: Assembly 5: Machine Type 2158/2163 Keyboard And Mouse
Rapid Access - Belgium French, 105 keys 12J5596 Rapid Access - Japan,109 keys 12J5597 Rapid Access - Traditional Chinese 12J5566 Rapid Access - Brazilian/Portuguese 02K0814 PC Next A - Brazilian/Portuguese 76H5080 2 button Sleek Logitech M-S34 5-NS 12J4546 IBM ScrollPoint... -
Page 199: Assembly 6: Machine Type 2158/2163 Zip Drive And Network Adapter
Assembly 6: Machine Type 2158/2163 Zip Drive and Network Adapter Asm- Model Model Description Index Number 2158 2163 28L1605 Iomega Zip Drive, Z100ATAPI 08L2550 IBM Ethernet Adapter Lake Clark 1.6 34L0409 3COM 10/100 6-NS 36L9069 Graphics Card Parts Catalog... -
Page 200: Assembly 7: Machine Type 2158/2163 Software
Description Index Number 2158 2163 Aptiva owners and servicers will need to call their local IBM HelpCenter to order the above software Application CD Pack, Voice Type 3.0 Kit, Lotus SmartSuite 97, MS Windows 98 Pack and Aptiva Customized I.E. 4.0... -
Page 201: Section B: Assembly For Machine Type 2164
Section B: Assembly for Machine Type 2164 Assembly 1a: Machine Type 2164 System Unit - Interior Parts Catalog... - Page 202 Asm- FRU Number Description Index 1a-1 02K2605 Assembly Lower Case 1a-3 01K4200 Bracket Port 1a-4 02K2334 Screw for Bracket Port, Sys. Bd. & P.S. Frame 1a-5 02K2335 Assembly Wire LED 1a-6 01K4192 EMI Core 1a-7 00K8483 Housing Stand (Foot), Black 1a-7 02K2337 Housing Stand (Foot), White...
-
Page 203: Assembly 1B: Machine Type 2164 System Unit - Exterior
Assembly 1b: Machine Type 2164 System Unit - Exterior Asm- FRU Number Description Index 1b-1 00K8479 Top/Side Panel w/ handle, BLACK 1b-1 02K2324 Top/Side Panel w/ handle, White 1b-2 00K8480 Front Panel, BLACK 1b-2 02K2325 Front Panel, White 1b-3 00K8478 Top Cover, BLACK 1b-3 02K2326... - Page 204 Asm- FRU Number Description Index 1b-7 36L9092 Zip Frame w/ Bezel 3.5" to 5.25", White 1b-7 36L9096 Zip Frame w/ Bezel 3.5" to 5.25", Black 1b-8 00K8482 Drive Bay Panel (First 5.25" Drive) BLACK 1b-8 02K2331 Drive Bay Panel (First 5.25" drive), White...
-
Page 205: Assembly 2: Machine Type 2164 Diskette, Hard Drive
FDD Cable 36L9108 3.5”, 12GB Maxtor/Quasar 37L2007 3.5", 13GB Maxtor (Quasar) 37L2008 3.5", 17.2GB Maxtor (Quasar) 37L2006 3.5", 20.4GB IBM SSD 36L9071 3.5", 25.5GB IBM (Janus) 2-NS 01K4260 Mounting Screws for Hard Disk Drive, 3.5" 2-NS 02K2607 3.5" Driver Frame... -
Page 206: Assembly 3: Machine Type 2164 Cd/Dvd-Rom Drive
Assembly 3: Machine Type 2164 CD/DVD-ROM Drive Asm- FRU Number Description Index 01K4224 Hard Disk and CD-ROM Drive IDE Cable 20L2289 CD/DVD-ROM Drive Audio Cable 36L9017 Modem Card Audio Cable 00N4266 56K GVC Non-Voice Rockwell PCI Emea/Australia/New Zealand 36L9119 56K CIS Non-Voice Rockwell PCI Emea/Australia 00N4268 56K GVC Voice Rockwell PCI Emea/Australia/New Zealand... - Page 207 Asm- FRU Number Description Index 37L1969 56K CIS Voice Rockwell PCI Emea/Australia 3-NS 00K8183 7FT Phone Cord 3-NS 00K8474 Tier 1, (Zylux) BLACK 3-NS 10L6656 Microphone, noise cancelling Andrea NC-8 3-NS 20L2168 Speaker Tier 1 Zylux White 3-NS 20L2169 Adapter US/CE/CF/LA/TAIWAN 3-NS 20L2170 Adapter JAPAN...
-
Page 208: Assembly 4: Machine Type 2164 Keyboard And Mouse
Rapid Access - Traditional Chinese Taiwan/HK, ID 467 BLACK 10L6137 Rapid Access - U.S. English, 104 US/China/Australia BLACK 10L6138 Rapid Access - LA Spanish, ID 171 BLACK 37L2589 Rapid Access - Japan, ID 194 BLACK 12J4549 IBM ScrollPoint BLACK 12J4546 IBM ScrollPoint... -
Page 209: Appendix A. Fru Number List
02K2337 1a-7 00N4340 1a-9 02K2603 00N4341 1a-9 02K2603 00N8328 02K2604 1a-NS 01K4192 1a-6 02K2605 1a-1 01K4196 1a-NS 02K2607 2-NS 01K4196 4-NS 02K2636 1a-NS 01K4198 1a-NS 02K2648 1a-NS 01K4198 4-NS 02K2648 4-NS 01K4200 1a-3 06J7900 1a-NS 01K4224 Copyright IBM Corp. 1998... - Page 210 Asm- Asm- Page Page Number Index Number Index 06J7900 4-NS 12J6877 1a-14 08L2550 13F9997 1a-NS 10L6137 13F9997 4-NS 10L6138 14F0051 4-NS 10L6140 14F0069 4-NS 10L6656 3-NS 20L2162 1-11 10L6656 3-NS 20L2163 1-13 12J4546 20L2163 1a-10 12J4546 5-NS 20L2166 1a-13 12J4549 20L2168 3-NS 12J5558...
- Page 211 Asm- Asm- Page Page Number Index Number Index 20L2201 1a-12 36L9102 20L2202 1-14 36L9103 20L2202 1a-12 36L9104 20L2206 1-NS 36L9105 20L2207 1-NS 36L9106 20L2289 36L9107 20L2289 36L9108 28L1605 36L9108 28L3842 1-11 36L9109 34L0409 36L9118 36L9017 36L9119 36L9017 36L9119 36L9056 36L9122 1-10 36L9059 36L9123...
-
Page 213: Appendix B. Online Support Information
Aptiva technical support is offered through the IBM Online HelpCenters on the America Online. IBM online support areas on all of the services can assist with your technical questions. These areas offer message boards monitored by IBM technicians, databases of computer-related solutions, and file libraries. - Page 214 Here are useful IBM Internet addresses for Aptiva information: http://www.pc.ibm.com PC Company Home Page http://www.pc.ibm.com/us/aptiva Aptiva Home Page http://www.pc.ibm.com/support Aptiva Product Specifications and Support http://www.pc.ibm.com/us/searchfiles.html IBM PC Company Searchable File Library...
-
Page 215: Appendix C. Model/Monitor Configurations And Fru Part Numbers
Appendix C. Model/Monitor Configurations and FRU Part Numbers For FRU replacement part numbers, please see Parts Catalog on page 127. Copyright IBM Corp. 1998... -
Page 217: Index
BIOS Setup Utility, 12 Error Codes, 28 Block Mode, 16 Error Messages, 33 Error Symptoms List 41 Error Symptoms, 33 Cache, enable or disable, 22 ESD 126 CD/DVD-ROM Drive External Ports, 4 BIOS Setup Utility, 15 Check Procedure, 56 Copyright IBM Corp. 1998... - Page 218 System Board 125 Machine Type 2164 System Unit 169 Hard Disk 32-bit Access, 17 Machine Type 2164 System Unit - Hard Disk Drive Exterior 171 3.5-In. Jumper Settings, 141 Memory 5.25-In. Jumper Settings, 144 Check Procedure, 57 Cable Connector Signals, 153 DIMM Configurations, 150 Hard Disk Drive, 4 Memory, 3...
- Page 219 Zip Drive and Network Adapter, Removals and Replacements 74 Password Adapter Card, 84 Changing, 21 AMD-K6 Processor, 86 Removing, 21 Backup Battery, 99 Setting, 20 Bay 1, 5.25-In. Bay, 80 Password, 9 Bay 2, 5.25-In. Bay, 110 PBSRAM 3 Bay 3, 3.5-In. Bay, 81 Pentium II 2 Bay 4, 3.5-In.
- Page 220 Undetermined Problems Voltage Supply Check Procedure, 65 Switch Settings, IIX URM 95 Legacy Mode, 17 Weight, 24 USB, 17...
- Page 221 Printed in U.S.A. International Business Machines Corporation Old Orchard Road, Armonk, New York 10504 Part Number: 00N4020 Pub Number: S37L-2040-01 02/99...