Holmes HM1895 - Cool Mist Humidifier Manual
- Owner's manual (2 pages) ,
- Owner's manual (2 pages)
Advertisement
FEATURES - OPERATIONS
HOW COOL MIST WORKS
Your Holmes® Cool Mist humidifier draws dry air through the rear air intake grill area. This air is then passed through a moisture – laden wick filter, which retains the minerals and deposits in the water. The resulting moist air is directed back into the room from the top air grill.
NOTE: This humidification system provides a cool, invisible moisture output. It is normal not to see the mist.
NOTE: A humidity level below 20% can be unhealthy and uncomfortable. The recommended humidity level is between 40%-50%.
PRE-OPERATING INSTRUCTIONS
- Be sure the humidifier is switched to OFF and the unit is disconnected from the electrical outlet.
- Select a location for your humidifier, on a flat surface, about 4 inches (10 cm) away from the wall. DO NOT place the humidifier on a finished floor or near furniture, which can be damaged by moisture or water. Place on a moisture-resistant surface.
FILLING THE WATER TANK
- Remove the tank from the base of the humidifier and bring to the faucet. Turn the tank upside down and twist off the tank cap by turning counter clockwise. Fill tank with cool, fresh tap water. DO NOT fill with warm water as this may cause leaking. Replace the cap on tank FIRMLY.
- When full, carry tank to the humidifier and place onto the base. The tank holds 2.25 gallons of water and the base holds 1/4 gallon of water. The tank will immediately begin to empty into base.
- Plug the power cord into a 120V AC electrical outlet.
OPERATING INSTRUCTIONS
Your humidifier is equipped with a technologically advanced Accuset Plus™ digital Humidistat. You can set the humidifier to run continuously in manual mode or set the Accuset Plus™ digital Humidistat to your desired humidity setting. The Accuset Plus™ digital Humidistat will automatically turn the humidifier ON or OFF, depending on the preset comfort level. The comfort level ranges between 30% and 65% relative humidity.
Manual Mode Instructions:
- Plug the humidifier into a 120V AC electrical outlet.
- The display will show the current room humidity.
NOTE: The display range is 21% - 90%. If your room humidity level falls below 21%, the unit will display 21. If your room humidity level rises above 90%, the unit will display 90. - To start the unit, push the MODE/OFF button (Mode /
![]() ) twice within 3 seconds for the HIGH (3) manual setting.
) twice within 3 seconds for the HIGH (3) manual setting. - Press the button again for the MEDIUM (2) manual setting and again for LOW (1). After the selection is made, the display will return to show the current room humidity.
- To stop the unit, press and hold the button for two seconds, or keep pressing the button until the display reads OFF (OF).
AccuSet Plus™ HUMIDISTAT INSTRUCTIONS
To take advantage of the AccuSet Plus™ Digital Humidistat, press the MODE/OFF button (Mode /![]() ) until the speed is set in either the auto HIGH (A3), auto MEDIUM (A2) or auto LOW (A1) setting. Then adjust the set humidity by using the up and down buttons. Humidity will increase or decrease in increments of 5%. When the humidity level is set, the display will return to show the current room humidity. When the room humidity level rises above the set humidity, the humidifier will stop. When the humidity level drops below the set humidity, the humidifier will turn on automatically.
) until the speed is set in either the auto HIGH (A3), auto MEDIUM (A2) or auto LOW (A1) setting. Then adjust the set humidity by using the up and down buttons. Humidity will increase or decrease in increments of 5%. When the humidity level is set, the display will return to show the current room humidity. When the room humidity level rises above the set humidity, the humidifier will stop. When the humidity level drops below the set humidity, the humidifier will turn on automatically.
NOTE: Allow up to 30 minutes for the filter to fully absorb water and for the unit to produce moisture.
NOTE: The AccuSet Plus™ Humidifier has memory. This means that when you turn the unit back on, it will be at the last setting the humidifier was set at.
If you do not plan to use the humidifier for two or more days, make sure any residual water is drained from the water tank, base and wick filter to prevent algae or bacteria growth.

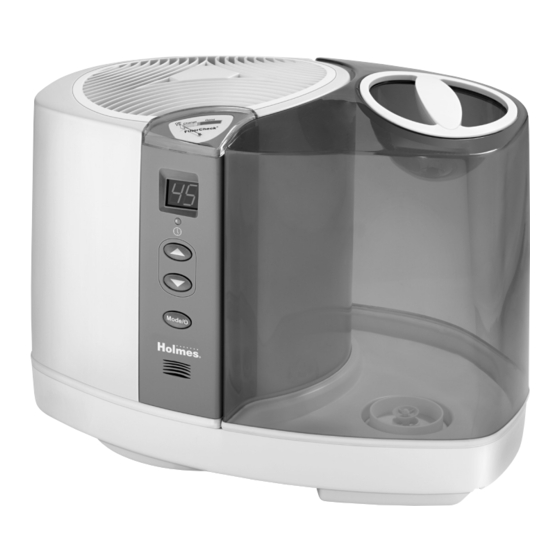
- WATER TANK
- CARRY HANDLE
- FILTERCHECK® INDICATOR
- HUMIDIFIER HOUSING
- CONTROL PANEL
- HUMIDIFIER BASE
Extended Run Time Setting:
By setting you humidifier to a specific humidity level, you are actually also extending the run time. Since the unit will turn on and off to maintain the set humidity level, less water will be used than on manual setting, so you will need to fill the unit less than you would on manual setting.
16 HOUR AUTO ON/OFF TIMER INSTRUCTIONS
The Auto On/Off timer will allow the user two options, to set a time to turn the unit off or to set a time to turn the unit on.
Auto Off Timer
While the unit is running, the off timer can be activated by holding down the up and down buttons simultaneously for 2 seconds, the screen will flash 00 and the up and down arrows can be pushed to adjust the timer up to 16 hours in increments of one, once 16 hours is reached, the next push of the timer button will cycle back to 00 hours. The Timer Light (![]() ) will illuminate when the Timer is set. The unit will then shut off after the timer expires (in its current setting). While the unit is running, the timer will shut off if other modes are being changed. The timer should only be deactivated if the unit is turned off.
) will illuminate when the Timer is set. The unit will then shut off after the timer expires (in its current setting). While the unit is running, the timer will shut off if other modes are being changed. The timer should only be deactivated if the unit is turned off.
Auto On Timer
While the unit is off, the up and down buttons are pressed simultaneously for 2 seconds and the display will flash 00 the up button may then be pushed again to increase the hours to turn on (in its last setting) from 1-16 in increments of 1 hour. The unit will then come on after the timer expires, if the unit is then turned on, the timer will be deactivated. The Timer Light (![]() ) will illuminate when the Timer is set. Once 16 hours is reached, the next push of the timer button will cycle back to 00 hours.
) will illuminate when the Timer is set. Once 16 hours is reached, the next push of the timer button will cycle back to 00 hours.
NOTE: The Auto On Timer will only activate when the room humidity is below 30%.
REPLACING THE FILTERS
Through normal use, waterborne minerals and sediment become trapped in the wick filter. The harder your water, the greater the amount of minerals in the water, and the more often you will need to change your filter.
You will be able to monitor the life of the filter in your humidifier by checking the FilterCheck® Indicator. The FilterCheck® Indicator will only read the filter condition when the humidifier is in operation.
NOTE: It may take up to 60 minutes of operation for the FilterCheck® Indicator to reflect the filter condition.
A brand new filter will register in the section reading GOOD filter. After frequent use of your humidifier, the FilterCheck® Indicator will let you know when the filters need to be changed, see Figure 2.

When the needle is in the CHANGE section, this means the proper amount of moisture is not getting into your air due to the excessive minerals and sediment that have become trapped on your filters. At this point, you should replace your filter. It is important to change your filter as indicated to obtain stated performance level.
To replace the filter, follow the steps below:
- Turn the unit off and disconnect from the electrical outlet.
- Remove the tank and main housing to access the base tray.
- Remove wick and discard.
- Follow the weekly cleaning instructions.
- Insert new filter.
- Repeat Operating Instructions steps.
It will take about 30 minutes for the humidifier to reach maximum output.
You can purchase replacement filters (model HWF65/ HF206) at a local retailer, by calling 1-800-546-5637, or by visiting www.holmesproducts.com. It is recommended that a replacement filter is purchased for uninterrupted use.
CLEANING/MAINTENANCE
CLEANING AND MAINTENANCE INSTRUCTIONS
Humidifiers provide comfort by adding moisture to dry, heated indoor air. To benefit most from the humidifier and avoid product misuse, follow all instructions carefully. Please note that this is an electrical appliance and requires attention when in use.
In addition, if you do not follow the recommended care and maintenance guidelines, micro-organisms may be able to grow in the water within the water tank. You must routinely follow the cleaning procedures that follow in order to ensure proper, efficient operation of your humidifier. Proper maintenance and cleaning is essential to the continued performance of your unit and the avoidance of algae or bacteria build-up.
DAILY MAINTENANCE
- Be sure the unit is OFF and is disconnected from the electrical outlet.
- Remove the housing and the tank from the humidifier and place in sink or tub.
- Carry the base of the unit to the sink, remove the wick, place in sink, drain any remaining water and rinse thoroughly to remove any sediment or dirt. Wipe clean, and dry with a clean cloth or paper towel.
- Drain the water from the tank into the sink and rinse tank thoroughly. Wipe clean, and dry with a clean cloth or paper towel.
- Put filter back in, replace the housing, then refill tank with cool tap water as instructed earlier in the Filling Instructions. Do not overfill.
- Follow Operating Instructions.
WEEKLY MAINTENANCE
To Remove Scale:
- Repeat steps 1-4 above.
- Clean the base by partially filling the base with one 8oz cups of undiluted white vinegar, or by using Cleanse Clean® Solution (Model S1710) by the manufacturer. Leave this solution in the base for 20 minutes, while cleaning all the interior surfaces with a soft brush. Remove base scale by wiping the base with a cloth dampened with undiluted white vinegar.
- Rinse with clean warm water to remove the cleaning solution before disinfecting the tank.
To Disinfect Humidifier Base and Tank:
- Fill humidifier base with 1/4 gallon of water and 1/2 teaspoon of chlorine bleach.
- Fill the tank 1/2 full with water and 1/2 teaspoon of chlorine bleach.
- Let the solution stand for 20 minutes, swishing every few minutes. Wet all surfaces.
- Carefully empty the base and tank after 20 minutes, and rinse with water until you cannot detect any bleach smell. Dry with a clean cloth or paper towel.
- Check the FilterCheck® Indicator to see if it is time to replace the filter. Depending on water hardness in your area, it may be necessary to change the filter every 1-2 months. Reinsert the wick filter into the base.
- Refill the water tank as directed with cool tap water, replace the humidifier housing, and turn the unit on.
TROUBLESHOOTING
| TROUBLE | PROBABLE CAUSE | SOLUTION |
Unit does not turn on | Not plugged in. Humidistat is set too low | Plug in unit. Set humidistat to high |
Mist output minimal to none | Mist is invisible. Filter has not absorbed water | Wait 30 minutes for filter to absorb water |
Filter turns brown | The filter has absorbed minerals | Replace your filter (HWF65CS/HF206) by calling 1-800-546-5637, or visiting www.holmesproducts.com |
FilterCheck® is not working | Takes 60 minutes to register | Allow the humidifier to run continuously for 60 minutes for the FilterCheck® Indicator to reflect the filter condition |
Humidifier continuously displays 21% | Humidity at the humidifier is at or below 21% | Continue to operate humidifier to raise the room humidity |
Humidifier continuously displays 90% | Humidity at the humidifier is at or above 90% | Stop operating the humidifier if the humidity level is too high |
FREQUENTLY ASKED QUESTIONS
| QUESTIONS | ANSWER |
What are the variables that affect run time? | The estimated run time for this humidifier is based on average room conditions. The actual run time of your humidifier is dependent on numerous variables such as:
|
How do I remove film on water tank? | See Daily Maintenance instructions. Regular cleaning is recommended. |
How can I extend the run time? |
|
STORAGE INSTRUCTIONS
When not using your humidifier for an extended period of time:
- Dispose of the filters. DO NOT leave in unit.
- Clean, rinse and thoroughly dry the humidifier as directed in weekly maintenance. DO NOT leave any water in the unit when storing. Leaving water in the unit may render the unit inoperable for the following season.
- Place the humidifier in the original carton and store in a cool, dry place.
- Order your replacement filter for next year' s use.
REPLACEMENT ACCESSORIES
To order the replacement accessories you can do any of the following:
- Visit your local retailer
- Go to www.holmesproducts.com
- Call consumer service at 1-800-546-5637
If you have any questions regarding your product or would like to learn more about other Holmes® products, please contact our Consumer Service Department at 1-800-546-5637 or visit our website at www.holmesproducts.com.
© 2010 Sunbeam Products, Inc. doing business as Jarden Consumer Solutions. All Rights Reserved. Distributed by Sunbeam Products, Inc. doing business as Jarden Consumer Solutions, Boca Raton, Florida 33431.

Documents / ResourcesDownload manual
Here you can download full pdf version of manual, it may contain additional safety instructions, warranty information, FCC rules, etc.
Advertisement
Thank you! Your question has been received!


Need Assistance?
Do you have a question about the HM1895 that isn't answered in the manual? Leave your question here.