Table of Contents
Advertisement
Available languages
Available languages
Quick Links
Advertisement
Chapters
Table of Contents
Troubleshooting

Related Manuals for Singer Futura 200


Summary of Contents for Singer Futura 200
- Page 1 MANUEL D’INSTRUCTION INSTRUCTION MANUAL...
-
Page 2: Introduction
® Bienvenue dans la famille SINGER et FÉLICITATIONS d’avoir fait l’achat d’une ® toute nouvelle machine à coudre SINGER ® La marque SINGER est synonyme de qualité en couture depuis plus de 160 ans. Nous concevons nos machines pour les couturières de tous les niveaux de compétence pour offrir le plaisir de coudre, la création, le faire soi-même,... -
Page 3: Importantes Consignes De Sécurité
INTRODUCTION Importantes Consignes de Sécurité Cette machine à coudre à usage domestique est conçue pour répondre aux normes IEC/EN 60335-2-28 et UL1594. CONSIGNES DE SÉCURITÉ IMPORTANTES Lors de l’utilisation d’un appareil électrique, les précautions de sécurité essentielles doivent toujours être respectées, y compris les suivantes : Lisez attentivement toutes les instructions avant d’utiliser cette machine à... - Page 4 INTRODUCTION Importantes Consignes de Sécurité - Portez des lunettes de sécurité. - Éteignez la machine (interrupteur sur “O”) lors des réglages au niveau de l’aiguille, par exemple : enfilage de l’aiguille, changement d’aiguille, bobinage de la canette, changement de pied presseur, etc. - Ne faites jamais tomber, ni glisser un objet dans les ouvertures.
- Page 5 INTRODUCTION Importantes Consignes de Sécurité La machine ne doit être utilisée qu’avec une pédale du type C-8000 fabriquée par ZENG HSING TAIWAN, LTD. ENTRETIEN DES PRODUITS ÉQUIPÉS D’UNE DOUBLE ISOLATION Une machine à double isolation est équipée de deux systèmes d’isolation au lieu d’une mise à...
-
Page 6: Table Of Contents
à coudre lorsque considéré nécessaire. SINGER & Singer vous facilite la couture est une marque enregistré de The SINGER Company Limited ou de ses sociétés affiliées. © 2017 The Singer Company Limited ou ses sociétés affiliées. Tous droits réservés. -
Page 7: À Propos De Votre Machine
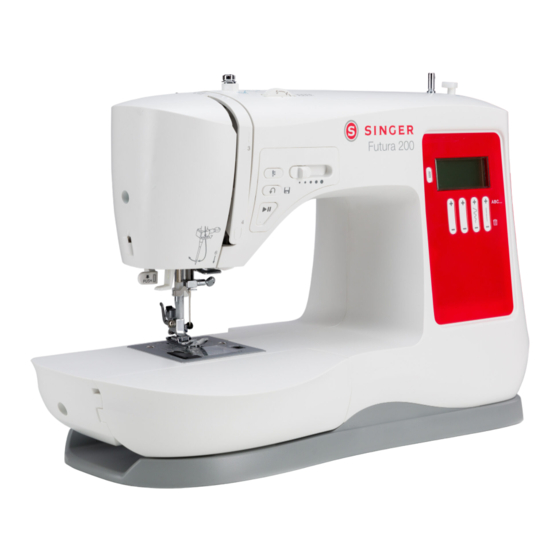
À PROPOS DE VOTRE MACHINE Parties Avant Principales de la Machine LE CADRAN DE LA TENSION DU FIL vous permet de sélectionner la tension appropriée pour le point, le fil et le tissu utiliser. (Voir Page 19) LE RELEVEUR DE FIL contrôle le débit du fil supérieur pendant la couture. (Voir Page 15) LES BOUTONS D’OPÉRATION contrôle la position haut/bas de l’aiguille, les fonctions Démarrer/ Arrêter et, ainsi que la fonction inverse. -
Page 8: Parties Arrière Principales De La Machine
À PROPOS DE VOTRE MACHINE Parties Arrière Principales de la Machine LE PORTE-BOBINE HORIZONTAL supporte le fil ainsi que le chapeau de bobine pour le fil supérieur. L’AXE DU BOBINEUR supporte la canette lorsqu’elle se rempli. (Voir Page 13) LE TROU POUR LE DEUXIÈME PORTE-BOBINE est utilisé pour introduire un porte-bobine additionnel (en option), pour utiliser une bobine de fil placer en position vertical ou pour coudre avec deux bobines de fil en même temps pour la couture à... -
Page 9: La Surface De L'aiguille Et Du Pied Presseur
À PROPOS DE VOTRE MACHINE La Surface de l’Aiguille et du Pied presseur LE LEVIER DE BOUTONNIÈRE UNE ÉTAPE détermine la longueur de la boutonnière quand il est abaissé. (Voir page 26) LE LEVIER DE L’ENFILEUR DE CHAS D’AIGUILLE est utilisez pour engager l’enfileur de chas d’aiguille. -
Page 10: Le Compartiment De Rangement Amovible
À PROPOS DE VOTRE MACHINE Le Compartiment de Rangement Amovible Tenez le compartiment de rangement amovible horizontalement, tirez ensuite vers la gauche pour le retirer de la machine. En ce faisant, vous aurez accès au bras libre, qui facilite la couture des projets cylindriques comme les ourlets de pantalon ou des manches. - Page 11 À PROPOS DE VOTRE MACHINE Accessoires La machine est fournie avec des pieds presseurs et des accessoires standards. La plupart des accessoires se trouvent dans le compartiment de rangement. Le Pied D’Entrainement Synchronisé se trouve dans la mousse de polystyrène qui détient la Table de Rallonge. Les Accessoires Standards Inclus: a.
-
Page 12: Mettre En Marche Votre Machine
électricien qualifié afin qu’il installe la prise murale appropriée. Ne modifiez la fiche en aucun cas. ⚠ Votre machine à coudre SINGER est réglée pour vous donner le meilleur fini de point à une ®... -
Page 13: Remplissage De La Canette
À PROPOS DE VOTRE MACHINE Remplissage de la Canette Cette machine utilise des canettes SINGER de Classe 15 transparente. ® Utilisez seulement ce type de canette, pour votre machine, lorsque vous désirez en achetés de surplus. Ne jamais utilisé des canettes en métal. -
Page 14: Mise En Place De La Canette
PRÉPARATIFS DE LA COUTURE Mise en Place de la Canette ⚠ Placez l’interrupteur de la machine en position (“O”) avant de retirer la canette. 1. Lors de l’insertion ou le retrait de la canette, l’aiguille et le pied-presseur doivent être complètement relevées. 2. - Page 15 PRÉPARATIFS DE LA COUTURE ������������� ⚠ Par mesure de sécurité, placez l’interrupteur de la machine en position (“O”) avant d’enfiler la machine. 1. Pour débuter, faites tourner le volant vers vous (A) jusqu’à ce que l’aiguille soit dans sa position la plus haute (B) ainsi que le releveur de fil (C).
-
Page 16: Enfileur De Chas D'aiguille
PRÉPARATIFS DE LA COUTURE ������������� ⚠ Par mesure de sécurité, placez l’interrupteur de la machine en position (“O”) avant d’utiliser l’enfileur de chas d’aiguille. 1. Abaissez le pied presseur. Amenez l’aiguille en position haute en tournant le volant vers vous. Si vous tournez le volant dans le sens contraire, la machine pourrait ce coincé... -
Page 17: Rappel Du Fil Inférieur
PRÉPARATIFS DE LA COUTURE Rappel du Fil Inférieur ⚠ Par mesure de sécurité, placez l’interrupteur de la machine en position (“O”) avant d’enfiler la machine. 1. Retenez le bout du fil supérieur avec votre main gauche (A). Faites tourner le volant vers vous (B), l’aiguille doit descendre en premier lieu (C) et continuer de tourner jus jusqu’à... -
Page 18: Débuter La Couture
DÉBUTER LA COUTURE Avant de Débuter la Couture Maintenant que votre machine est enfilée, nous expliquerons comment faire les réglages de la machine pour les techniques de couture de base telle: la couture au point droit, la couture de point décoratif, la couture de point extensible, la confection de boutonnière et la couture de bouton. -
Page 19: Réglage Du Point
DÉBUTER LA COUTURE Réglage du Point Endroit Comment les Points ce Forme Les Points sont formés quand le fil supérieur et le fil de canette se nouent entre les couches de Envers tissu. La couture est bien équilibrée quand le fil de l’aiguille apparaît sur l’endroit du tissu le que le fil de la canette apparaît sur l’envers. -
Page 20: Bouton D'opération Et Bouton De Fonction
DÉBUTER LA COUTURE Bouton D’opération et Bouton de Fonction A. Bouton D’Opération Bouton de Marche/Arrêt Appuyer sur ce bouton pour faire démarrer ou arrêter la machine. Bouton de Marche-Arrière Appuyer sans relâcher sur ce bouton pour coudre des points de renverse ou pour coudre des points de renforcements à... -
Page 21: Combinaison De Caractères Dans La Mémoire
à partir du mode ABC peuvent être combinés. La combinaison de points: Example – “SINGER” – Combiner les points 19, 09, 14, 07, 05, 18 1. Pour sélectionner chaque lettre appuyer le + ou le – des deux boutons du côté... -
Page 22: Sélection De Points
DÉBUTER LA COUTURE Sélection de Points A. Points Utilitaires B. Points Décoratifs Pour des exemples de motifs et plus d’information, referez-vous au Guide de Reference de Point au www.singerco.com. Choisir les Points Utilitaires et les Points Décoratifs: Lorsque vous allumez la machine, elle affichera automatiquement le mode de point ainsi que le point droit. -
Page 23: La Couture Au Point Droit
DÉBUTER LA COUTURE La Couture au Point Droit Bouton de Sélection du Mode et de Fonction Le point droit est utilisé pour la couture et la surpiqûre. COMMENT: 1. Régler la machine au point droit. Lorsque l’on allume la machine elle affiche automatiquement le point droit. -
Page 24: Couture D'un Point Décoratif
DÉBUTER LA COUTURE Couture D’un Point Décoratif Bouton de Sélection du Mode et de Fonction Un point décoratif est utilisé pour embellir des coutures et ajouter du style à vos projets de couture. (Voir www.singerco.com pour plus de points décoratifs qui peuvent être utilisés.) COMMENT: 1. -
Page 25: Couture D'un Point Extensible
DÉBUTER LA COUTURE Couture d’un point extensible Bouton de Sélection du Mode et de Fonction Le point extensible est utilisé pour les tricots. Ce type de couture s’étirera avec le tissu. (Voir www.singerco.com pour plus de points extensible qui peuvent être utilisés.) COMMENT: 1. -
Page 26: Couture D'une Boutonnière En 1-Étape
DÉBUTER LA COUTURE Couture d’une Boutonnière en 1-étape Bouton de Sélection du Mode et de Fonction Cette machine comporte un mécanisme incorporé pour confectionner des boutonnières, vous permettant de coudre des boutonnières en 1 étape facile. Les points boutonnières sont numérotés 24 à... -
Page 27: Couture D'un Bouton
DÉBUTER LA COUTURE Couture d’un Bouton Bouton de Sélection du Mode et de Fonction Cette machine inclut un pied pour bouton, vous permettant de fixer des boutons à vos projets facilement et rapidement. COMMENT: 1. Réglez la machine sur le point droit en choisissant le point numéro 35. (Voir page 22) 2. -
Page 28: Insérez Et Remplacez Une Aiguille
Il est aussi important d’utiliser la bonne aiguille pour le tissu à coudre. (Visiter www.singerco.com pour voir le Guide de Reference des Points) Pour de meilleurs résultats, utilisez des aiguilles de marque SINGER dans votre machine à coudre SINGER ® ®... -
Page 29: Remplacement Du Pied Presseur
DÉBUTER LA COUTURE Remplacement du Pied Presseur ⚠ Placez l’interrupteur de la machine en position (“O”) avant de remplacer le pied. Soulevez le levier du pied presseur, avant de remplacer le pied presseur. Le support du pied presseur (b) est fixé à la barre du pied (a). Le pied presseur (f) a une tige (d) qui s’insère dans le support du pied presseur (b). - Page 30 DÉBUTER LA COUTURE Pied Couture Facile Votre machine peut comprendre un pied Couture Facile. Le Pied Couture Facile dispose d’un guide pour vous aider à réaliser les coutures les plus précises à chaque fois. Le pied a une extension marquée avec les surplus de couture les plus populaires et un guide de tissu mobile, qui peut être réglé...
- Page 31 DÉBUTER LA COUTURE Pied D’entraînement Synchronisé Le pied pour entraînement synchronisé harmonise l’entraînement de l’épaisseur supérieure et inférieure de l’ouvrage et améliore ainsi la superposition des carreaux, des rayures et des motifs. Ce pied aide à éviter l’entraînement irrégulier des matières difficiles. 1.
-
Page 32: Pied Presseur
DÉPANNAGE & ENTRETIEN Dépannage Le Fil fait des Boucles en Dessous. Le Fil de la Canette Apparait sur le Dessus du Tissu. Le Fil Supérieur Casse Le Fil s’Effiloche Le Fil s’Emmêle au début Points Sautés Difficulté à Bobiner une Canette Le Fil de la Canette se Brise Les Aiguilles se Cassent 10. -
Page 33: Dépannage
DÉPANNAGE & ENTRETIEN Dépannage 3. LE FIL SUPÉRIEUR CASSE Cause Possible: le chemin du fil est obstrué. Solution: vérifiez si le fil supérieur n’est pas coincé dans la bobine (une partie rugueuse sur la bobine elle-même), en arrière de la bobine ou du chapeau de bobine (si le fil est tombé en arrière du chapeau de bobine et ainsi ne peut alimenter la machine librement). - Page 34 Solution: nettoyez le boîtier de la canette. (Voir page 37) Cause Possible: pas le bon type de canette. Solution: utilisez des canettes SINGER du même type que celle fourni avec la machine – ® n’utilisez pas de substitue. Votre machine est livrée avec des canettes transparente de type Classe 15.
- Page 35 DÉPANNAGE & ENTRETIEN Dépannage 10. LES POINTS SONT DÉFORMÉS Cause Possible: Cause Possible: “poussez” ou “tirez” le tissu. Solution: ne poussez / ne tirez pas sur le tissu lorsque vous cousez, laissez plutôt les griffes d’entraînement de la machine déplacer le tissu en dessous du pied presseur tout en le guidant simplement.
- Page 36 Solution: assurez-vous que le cordon d’alimentation et/ou le rhéostat est brancher correctement. (Voir page 12) Cause Possible: la canette utilisée n’est pas la bonne. Solution: utilisez seulement des canettes de marque SINGER qui sont identique à celle fourni ® avec votre machine. (Voir page 11)
-
Page 37: Entretient
DÉPANNAGE & ENTRETIEN Entretient Nettoyage des Griffes & Autour de la Navette ⚠ Avant de nettoyer la machine, débrancher la machine de la prise électrique murale. Élevez l’aiguille le plus haut possible en tournant le volant vers vous. Soulevez le levier du pied presseur. Pour vous assurer du bon fonctionnement de votre machine, il est essentiel de garder toutes les pièces principales propres. -
Page 38: Annexe - Glossaire
ANNEXE - GLOSSAIRE Lexique des Termes de Machine à coudre Point Arrière Le Point Arrière est généralement utilisé au début et à la fin d’une couture pour empêcher qu’elle ne se défasse. Commencez à coudre le début de la couture environ 3-4 points, coudre ensuite en marche-arrière 3-4 points. - Page 39 Veuillez noter qu’en cas de mise au rebut, ce produit doit bénéficier d’un recyclage sécurisé, conforme à la législation nationale applicable aux produits électriques/ électroniques. Ne jetez pas les appareils électriques avec les ordures municipales générales, utilisez des centres de collecte prévus à cette fin. Contactez votre gouvernement local pour obtenir des informations au sujet des systèmes de collecte disponibles.
- Page 41 INSTRUCTION MANUAL...
- Page 42 It is important to us that you have the easiest and most successful sewing experience. We have provided an instruction manual with easy-to-understand graphics and step-by-step instructions. Additional assistance, by region, may be found on the web at www.singer.com. ® We’re ready to help and hope that you enjoy your SINGER sewing machine.
- Page 43 INTRODUCTION Important Safety Instructions This household sewing machine is designed to comply with IEC/EN 60335-2-28 and UL1594. IMPORTANT SAFETY INSTRUCTIONS When using an electrical appliance, basic safety precautions should always be followed, including the following: Read all instructions before using this household sewing machine. Keep the instructions in a suitable place close to the machine.
- Page 44 INTRODUCTION Important Safety Instructions - To disconnect, turn all controls to the off (“O”) position, then remove plug from outlet. - Do not unplug by pulling on cord. To unplug, grasp the plug, not the cord. - The foot control is used to operate the machine. Avoid placing other objects on the foot control.
- Page 45 INTRODUCTION Important Safety Instructions For Europe only : This appliance can be used by children aged from 8 years and above and persons with reduced physical, sensory or mental capabilities or lack of experience and knowledge if they have been given supervision or instruction concerning use of the appliance in a safe way and understand the hazards involved.
- Page 46 SINGER and SINGER IS SEWING MADE EASY is a registered trademark of The SINGER Company Limited or its affiliates. © 2017 The SINGER Company Limited or its affiliates. All rights reserved.
-
Page 47: About Your Machine
ABOUT YOUR MACHINE Main Parts of the Machine Front THREAD TENSION DIAL allows you to select just the right tension for your stitch, thread and fabric. (See Page 19) THREAD TAKE-UP LEVER controls the flow of the upper thread while sewing. (See Page 15) OPERATION BUTTONS control the needle up/down and Start/Stop functions, as well as the reverse function. -
Page 48: Main Parts Of The Machine Back
ABOUT YOUR MACHINE Main Parts of the Machine Back HORIZONTAL SPOOL PIN holds the thread spool and spool cap for the upper thread. BOBBIN WINDING SPINDLE holds bobbin as it winds. (See Page 13) HOLE FOR SECOND SPOOL PIN is used to hold an additional spool pin, for thread spools to be used in upright position or for using two spools at once for twin needle sewing. -
Page 49: Needle And Presser Foot Area
ABOUT YOUR MACHINE Needle and Presser Foot Area ONE STEP BUTTONHOLE LEVER automatically determines the length of the buttonhole when lowered. (See Page 26) NEEDLE THREADER LEVER is used to engage the automatic needle threader mechanism. NEEDLE THREADER GUIDE holds thread securely before placing it in hook pin. PRESSER BAR accommodates the presser foot holder. -
Page 50: Removable Storage Compartment And Accessories
ABOUT YOUR MACHINE Removable Storage Compartment and Accessories Hold the Removable Storage Compartment horizontally, then pull toward the left to remove it from the machine. Doing this, you will have access to the free arm, which makes it easy to sew tubular projects like pant hems or sleeves. - Page 51 ABOUT YOUR MACHINE Accessories This machine comes with a standard assortment of presser feet and accessories. Most accessories are located in the storage compartment. The Even Feed Foot can be found in the Styrofoam that holds the Extension Table. Standard Accessories Included: a.
-
Page 52: Getting Ready To Sew
If it still does not fit, contact a qualified electrician to install the proper outlet. Do not modify the plug in any way. Your SINGER machine is adjusted to provide the best stitch results at normal room temperature. -
Page 53: Winding The Bobbin
GETTING READY TO SEW Winding the Bobbin This machine uses Class 15 transparent bobbins. Use only this style of bobbin when purchasing additional bobbins for your machine. Do not substitute with metal bobbins. 1. Place thread spool and corresponding size spool holder onto spool pin. -
Page 54: Inserting The Bobbin
GETTING READY TO SEW Inserting the Bobbin Turn power switch off before inserting or removing the bobbin. 1. When inserting or removing the bobbin, the needle and presser foot must be fully raised. 2. Push the bobbin cover release button to remove the bobbin cover plate. -
Page 55: Threading The Upper Thread
GETTING READY TO SEW Threading the Upper Thread For safety, turn off the power before threading the machine. 1. Start by turning the handwheel (A) toward you to raise the needle (B) and the thread take up lever (C). You should be able to see the take up lever. -
Page 56: Automatic Needle Threader
GETTING READY TO SEW Automatic Needle Threader For safety, turn off the power before using the automatic needle threader. 1. Lower the presser foot lifter. Raise the needle to its highest position by turning the handwheel toward you. If you turn the handwheel backward, the machine will jam when you start to sew. -
Page 57: Drawing Up The Bobbin Thread
GETTING READY TO SEW Drawing Up the Bobbin Thread For safety, turn off the power before threading the machine. 1. Hold the upper thread tail with the left hand (A). Turn the handwheel toward you (B), first lowering (C) and then raising the needle (D). 2. -
Page 58: Start Sewing
START SEWING Before You Start Sewing Now that your machine is threaded, we will show how to set up the machine for basic sewing techniques such as: sewing a straight stitch, sewing a decorative stitch, sewing a stretch stitch, sewing a buttonhole and sewing a button. With each technique, you have the opportunity to sew along. -
Page 59: Stitch Formation
START SEWING Stitch Formation 1. How Stitches Form Surface Stitches are formed when the upper thread and the bobbin thread interlock between the fabric layers. Stitching is well balanced when the needle Reverse thread appears on the top and the bobbin thread side appears on the bottom. -
Page 60: Operation Buttons And Function Buttons
START SEWING Operation Buttons and Function Buttons A. Operation Buttons Start/Stop Button Press this button to start or to stop the machine when the foot control is not being used. Reverse Button Hold down this button to sew stitches in reverse at the start and at the end of a seam, as well as most stitch patterns. -
Page 61: Combining Characters Into Memory
2. After all letters are selected, save the letter sequence by pressing the Reverse Button. 3. You are now ready to sew out the word “SINGER”. It will stitch the letter sequence that was saved and will stop when the sequence is completed. -
Page 62: Stitch Selection
START SEWING Stitch Selection A. Utility Stitch Patterns B. Decorative Stitch Patterns For examples of other stitch patterns and further instruction, see the Stitch Reference Guide at www.singerco.com. Choosing Utility and Decorative Stitch Patterns: The machine will automatically default to the Pattern Mode and Straight Stitch when turned on. -
Page 63: Sewing A Straight Stitch
START SEWING Sewing a Straight Stitch Mode Button and Function Buttons A straight stitch is used for sewing seams and topstitching. HOW TO: Set the machine to Straight stitch. The machine will automatically default to straight stitch when it is turned on. (See Page 22) The Stitch Length can be set at the stitch length that you desire. -
Page 64: Sewing A Decorative Stitch
START SEWING Sewing a Decorative Stitch Mode Button and Function Buttons A decorative stitch is used for embellishing and adding flair to your sewing projects. (Go to www.singerco.com to view other decorative stitches that can be used). HOW TO: Set the machine to the desired stitch by entering the number of the desired stitch. (See Page 22) Set the Stitch Length between 0.4 and 1.0. -
Page 65: Sewing A Stretch Stitch
START SEWING Sewing a Stretch Stitch Mode Button and Function Buttons A stretch stitch is used for stretch knit fabrics. This type of seam will stretch with the fabric. (Go to www.singerco.com to view other stretch stitches that can be used). HOW TO: Set the machine to the desired stitch by entering the number of the desired stitch. -
Page 66: Sewing A 1-Step Buttonhole
START SEWING Sewing a 1-Step Buttonhole Mode Button and Function Buttons This machine has built-in buttonholes, allowing you to sew buttonholes in one easy step. The buttonhole stitches are numbered 24 to 31. HOW TO: Set the machine to the desired stitch by entering the number of the desired buttonhole stitch. (See Page 22) The Stitch Length is automatically selected by the machine for optimum results. -
Page 67: Sewing A Button
START SEWING Sewing a Button Mode Button and Function Buttons This machine includes a Button Sewing Foot, allowing you to attach buttons to your projects easily and quickly. HOW TO: 1. Set the machine to Straight Stitch by entering the stitch number 35. (See Page 22) 2. -
Page 68: Inserting And Changing Needles
Generally, the needle should be replaced after every 4 projects or approximately every 16 hours of sewing time. It is also important to use the right needle for the fabric you are sewing. (Go to www.singerco.com to view the Stitch Reference Guide) For best results, use SINGER branded needles in your SINGER ®... -
Page 69: Two-Step Extra Presser Foot Lift
START SEWING Changing the Presser Foot For safety, turn off the power before changing the presser foot. Before changing the presser foot, raise the presser foot lifter. The presser foot holder (b) is attached to the presser bar (a). The presser foot (f) has a presser foot pin (d) that connects to the presser foot holder, sometimes called a shank (b). - Page 70 START SEWING Sew Easy Foot Your machine may include the Sew Easy Foot. The Sew Easy Foot has a guide to help you sew the most accurate seams every time. The foot has an extension marked with the most popular seam allowances and a movable fabric guide that can be set wherever you want for the project you are making.
- Page 71 START SEWING Even Feed Foot Your machine may include an Even Feed Foot. Use this foot for sewing plaids, stripes and other napped fabrics such as velvet and corduroy. The Even Feed Foot equalizes the feeding of the fabric layers. 1.
-
Page 72: Troubleshooting And Maintenance
TROUBLESHOOTING AND MAINTENANCE Troubleshooting Thread Loops on Underside of Fabric Bobbin Thread Showing on Top of Fabric Upper Thread Breaking Thread is Shredding Thread Bunching at Beginning Skipping Stitches Bobbin Winding Dif� culties Bobbin Thread Breaking Needles Breaking 10. Stitches Distorted 11. -
Page 73: Troubleshooting
TROUBLESHOOTING AND MAINTENANCE Troubleshooting 3. UPPER THREAD BREAKING Possible Cause: Thread path obstructed. Solution: Check if thread is caught on thread spool (rough spots on the spool itself) or behind spool pin or spool cap (if the thread has fallen behind the spool cap and therefore cannot feed freely through the machine path). - Page 74 Possible Cause: Dirt or lint in bobbin case. Solution: Clean bobbin case. (See Page 37) Possible Cause: Wrong bobbins being used. Solution: Use SINGER bobbins that are the same style as those that come with the machine – ® don’t substitute. Your machine comes with Class 15 transparent bobbins.
- Page 75 TROUBLESHOOTING AND MAINTENANCE Troubleshooting 10. STITCHES DISTORTED Possible Cause: “Pushing” or “pulling” the fabric. Solution: Don’t manually push/pull fabric in order to sew, but allow the machine’s feed teeth to draw fabric under presser foot as you guide it. Possible Cause: Incorrect stitch length setting. Solution: Check for correct stitch length setting.
- Page 76 Solution: Needle all the way up in needle clamp (See Page 28) Possible Cause: Needle is bent. Solution: Remove bent needle, insert new needle. (See Page 28) Possible Cause: Hook pin damaged. Solution: Needle Threader needs replacement; contact authorized SINGER service center: Visit ® www.singerco.com.
-
Page 77: Maintenance
TROUBLESHOOTING AND MAINTENANCE Maintenance Cleaning the Feed Teeth and Hook Area Before cleaning the machine, disconnect the power supply by removing the plug from the electrical outlet. Turn the hand wheel to raise the needle to its highest position. Raise the presser foot lifter. -
Page 78: Appendix - Glossary
APPENDIX – GLOSSARY Glossary of Key Sewing Terms Backstitch Backstitching is most commonly used at the beginning and ending of seams to lock the stitching so it does not come undone. Start sewing the beginning of the seam about 3-4 stitches, then sew in reverse for 3-4 stitches. - Page 79 Please note that on disposal, this product must be safely recycled in accordance with relevant National legislation relating to electrical/electronic products. Do not dispose of electrical appliances as unsorted municipal waste, use separate collection facilities. Contact your local government for information regarding the collection systems available. When replacing old appliances with new ones, the retailer may be legally obligated to take back your old appliance for disposal free of charge.
- Page 80 4710269-25A • French/English ©2017 Singer Company Limited or its affiliates. All rights reserved. 021H7C0302(FR.EN)