Table of Contents
Advertisement
Advertisement
Table of Contents

Related Manuals for One for All URC-9910


Summary of Contents for One for All URC-9910
-
Page 1: Manufacturer's Codes
IR/RF LCD 8-DEVICE WITH LEARNING UNIVERSAL REMOTE CONTROL (URC-9910) User’s Guide... -
Page 2: Table Of Contents
TABLE OF CONTENTS Introduction ..............3 Installing Batteries . -
Page 3: Introduction
INTRODUCTION The One For All IR/RF LCD 8-Device With Learning Universal Remote Control (URC-9910) is our latest high-performance universal remote control. It is designed to operate up to eight home entertainment devices, including TV, video, and audio components. Moreover, this remote control contains sophisticated technology that will allow you to conveniently consolidate the clutter of all of the original remote controls used in your home entertainment system. -
Page 4: Installing Batteries
NOTE: When a battery icon appears in the display (see page 7, Key Charts , LCD), the batteries are low. Simply replace them and the URC-9910 remote control will be restored to full functionality, complete with your favorite settings. -
Page 5: Setting The Clock
SETTING THE CLOCK On the URC-9910 remote control, press and hold SET until you see the display change from the default device and time to [CODE SET]. NOTE: Default values for device, its code, and time are shown above.Your remote control settings may be different. -
Page 6: Features And Functions
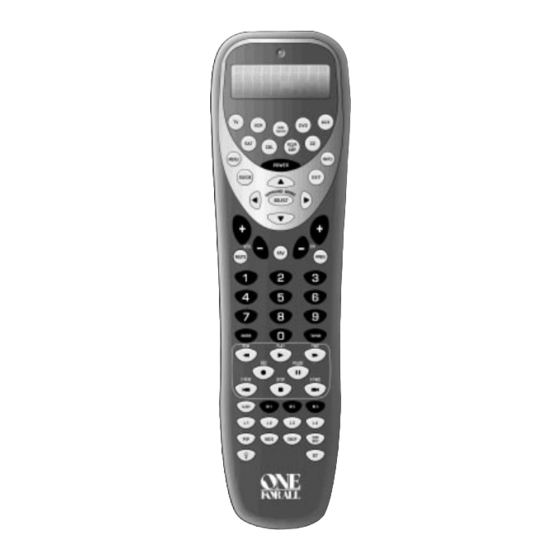
FEATURES AND FUNCTIONS Use the illustration below to locate features on the URC-9910 remote control and then study the Key Charts (on the next three pages) to learn how they function. SELECT... -
Page 7: Key Charts
Key Charts SELECT The LED (red light) blinks to show that the remote control is working and sending signals. The LCD (Liquid Crystal Display) provides 15 alphanumeric charac- ters that display status messages during remote control operation and programming.Also, one or... -
Page 8: Setup Codes For Cable Converters
FEATURES AND FUNCTIONS Key Charts (continued) Use EXIT to exit from your selected device’s guide or menu. Use INFO to display the current channel and program information. Use VOL+ (or VOL-) to raise (or lower) the audio volume. Press MUTE once to turn the audio off or on. -
Page 9: Setup Codes For Satellite Receivers
Use the transport keys to control your VCR,DVD or CD player,or VOD (Video On Demand) if available on your cable or satellite service. To record a VCR program, press REC twice. Use SLEEP to activate your device’s sleep timer (not available for all devices). After programming, press M1 ~ M3 once to run a desired macro (see Using Macros on page 34). -
Page 10: Setting Up Your Componenets
SETTING UP YOUR COMPONENTS The URC-9910 remote control is preprogrammed at the factory to operate an RCA TV and VCR, a Motorola (GI) cable converter, an RCA satellite receiver, a Pioneer CD player, a Toshiba DVD player, a Pioneer audio receiver/ amplifier, and a One For All home automation device. -
Page 11: Setup Codes For Audio Cassette Decks
[EXIT SETUP] message as the URC-9910 remote control returns to normal operation. To verify the code works, aim the URC-9910 remote control at the desired device, press its device key once and then press POWER once. The device should turn off. -
Page 12: Programming Tv/Vcr Combo Control
Highlight or write down the codes and device you wish to program before starting step 2. On the URC-9910 remote control, press and hold SET until you see the display change from the cur- rent device and time to [CODE SET]. -
Page 13: Setup Codes For Video Accessories
Press EXIT to exit the programming mode.You will see [EXIT SETUP] as the URC-9910 remote control returns to normal operation. To verify the code works, aim the URC-9910 remote control at the desired device, press VCR once and then press POWER once. The TV/VCR Combo should turn off. -
Page 14: Searching For Your Code
SEARCHING FOR YOUR CODE If your device does not respond to the URC-9910 remote control after trying all codes listed for your brand, or if your brand is not listed at all, try manually searching for your code. For example, to manually search for a code for your TV: Turn on the TV. -
Page 15: Normal Operation
If the device (e.g., TV) turned off, skip to the next step. If it did not turn off, aim the URC-9910 remote control at the device (e.g., TV) and press the once to advance the manual search to the next code (e.g., TV and 0054).Again you will see the LED (red... -
Page 16: Using Learning
NOTE: Please have your original remote controls handy before programming learning. Be sure to press each key within 5 seconds of the previous entry. If not, the URC-9910 remote control will exit the programming mode. Programming A Learning Key On the URC-9910 remote control, press and hold SET until you see the display change from the cur- rent device and time to [CODE SET]. - Page 17 [EXIT SETUP] message as the remote control returns to normal operation. To test a learned feature, aim the URC-9910 remote control at the desired device and press its device key once (e.g., TV, where the learning mode was assigned).
-
Page 18: Deleting A Function From A Learning Key
1 (on page 29). Deleting A Function From A Learning Key On the URC-9910 remote control, press and hold SET until you see the display change from the cur- rent device and time to [CODE SET]. -
Page 19: Using Volume Lock
USING VOLUME LOCK In its default (unlocked) state, the URC-9910 remote control allows each device to control its own volume only in its own mode (e.g., TV volume in the TV mode, VCR volume in VCR mode, etc.). However, using our Volume Lock feature, you can lock the volume controls for each device to all modes (e.g., RCVR/AMP volume in all modes). -
Page 20: Programming Volume Unlock
Programming Volume Unlock On the URC-9910 remote control, press and hold SET until you see the display change from the current device and time to [CODE SET]. Press the change to [VOL UNLOCK]. (x 5) NOTE: If you go past [VOL UNLOCK] , press the key one or more times to return to it. -
Page 21: Using Macros
USING MACROS With programming, the M1 through M3 keys on your URC-9910 remote control can be setup to perform repetitive, time-consuming operations for easy, convenient access through the press of a single key. Macro keys are ideal for home theater operations, setting a favorite channel, guide steps, or other multiple functions you would like to control with one key press. -
Page 22: Programming A Master Power Key With Instant Channel Selection
To end the macro sequence, press and hold SELECT SELECT until you see [SUCCESS] appear in the display, followed by [EXIT SETUP]. The URC-9910 remote control will automatically exit the programming mode and return to normal operation. Now when you press M1, you will instantly see cable channel 71 on your TV set. -
Page 23: Clearing A Macro
SELECT to end the sequence (see next step). Continue pressing SELECT until you see [SUCCESS] SELECT appear in the display, followed by [EXIT SETUP]. The URC-9910 remote control will automatically exit the programming mode and return to normal operation. -
Page 24: Re-Assigning Device Keys
RE-ASSIGNING DEVICE KEYS The URC-9910 remote control can control a second TV,VCR, DVD player, or other device by using the Mode Map feature. For example, to control a TV, a cable converter, and two VCRs, you will need to re-... -
Page 25: Using Keymover
For example, to re-assign an unused SAT key as a second CD key, perform SET*- USING KEYMOVER The URC-9910 remote control includes a Keymover feature that allows you to map (or copy) keys from one mode (i.e., source mode) to another mode (i.e., destination mode). -
Page 26: Restoring Keymover
5 and 7. Upon completion of the above procedure, you can now use your URC-9910 remote control to control the TV’s volume and mute in the VCR mode, as well as in the TV mode. Restoring Keymoved Keys to Default Settings... - Page 27 Press SELECT once to clear the keymoved key.You SELECT will see [DELETED] appear in the display, followed by [EXIT SETUP]. The URC-9910 remote control will automatically exit the programming mode and return to normal operation. Restoring All Keymoved Keys In A Single Mode Perform steps 1 through 4 of the earlier section, Programming Keymover on page 38.
-
Page 28: Using Channel Scan
Programming Favorite Channel Scan below) and/or all channels for the selected mode. If Favorite Channel Scan has been set up, skip to step 2. Otherwise, on the URC-9910 remote control press TV, VCR, DVD, SAT, or CBL once. Press FAV once. - Page 29 (Optional) To exit programming, press and hold SELECT SELECT until you see [SUCCESS] appear in the display, followed by [EXIT SETUP]. The URC-9910 remote control will automatically exit the program- ming mode and return to normal operation. key four times until you see the display...
-
Page 30: Using The Home Theater Mode
USING THE HOME THEATER MODE The URC-9910 remote control includes a custom Home Theater mode.After the HOME THEATER key is programmed, it will allow you to access five groups of remote control keys without having to change device modes. However, there are some considerations. -
Page 31: Programming The Home Theater Mode
Home Theater mode so that selected controls are assigned to these devices as follows: On the URC-9910 remote control, press and hold SET until you see the display change from the cur- rent device and time to [CODE SET]. - Page 32 a. Press SELECT once to enter Playback Control SELECT b. Select a device for Playback Control Group assign- c. Press SELECT once to accept the assignment in SELECT Press SELECT once to enter Audio Control Group SELECT assignment.You will see the display change to the last-selected device (e.g., [VCR]).
- Page 33 USING THE HOME THEATER MODE Programming The Home Theater Mode 5. (continued) a. Select a device for Channel Control Group assign- b. Press SELECT once to accept the assignment in SELECT Press SELECT once to enter Menu Control Group SELECT assignment.You will see the display change to the last-selected device (e.g., [CBL]).
-
Page 34: Operating The Home Theater Mode
After programming the Home Theater mode (see the previous section), you simply activate it by pressing HOME THEATER once. Instantly, groups of URC-9910 remote control keys will be assigned to their programmed devices. For the above example (in the previous section), pressing HOME... -
Page 35: Using Commercial Skip
USING COMMERCIAL SKIP The URC-9910 remote control includes a unique Commercial Skip feature, once programmed, that will allow you to skip viewing com- mercials by pressing the COM SKIP key. Then, as you change chan- nels (to view another program without commercials), an internal timer will count down a preset time interval before returning the device to the original channel. -
Page 36: Operating Commercial Skip
60 seconds. Press SELECT once to accept the 60-second setting. SELECT You will see [SUCCESS] appear in the display, followed by [EXIT SETUP]. The URC-9910 remote control will automatically exit the programming mode and return to normal operation. Operating Commercial Skip In our example, let’s assume you are watching a national sports... -
Page 37: Restoring Factory Default Settings
RESTORING FACTORY DEFAULT SETTINGS The URC-9910 remote control includes an Operation Reset program that you can use to restore the unit to factory default settings. IMPORTANT: Executing this program will erase all custom settings, including Home Theater assignments, Macros, Learned Keys, Keymoved Keys, and all device assignments. -
Page 38: About Upgrading
URC-9910 remote control. If necessary, the Customer Support representative can instruct you how to begin the capture procedure. NOTE: One For All reserves the right to replace a returned remote control with a new one of equal or superior functionality. Upgrade Exclusions •... -
Page 39: Using The Ir/Rf Command Center
IR/RF Command Center will convert the RF signals into Infrared (IR) signals to control your home theater devices. NOTE: The URC-9910 remote control transmits both an IR and an RF signal simultaneously. It is your option whether you want to install the IR/RF Command Center for extended remote control range. -
Page 40: Adding The Ir Signal Extension Cord
Adding The IR Signal Extension Cord Included with the URC-9910 remote control package is an IR Signal Extension Cord for use with a home theater device that is not in direct line-of-sight of the IR/RF Command Center. If you are having problems remotely controlling a home theater... -
Page 41: Optimizing Ir/Rf Command Center Reception
Remote Control Power ........ -
Page 42: Troubleshooting
Use the VCR codes for your brand. Some combo units may require both a TV code and a VCR code for full operation. PROBLEM: The URC-9910 remote control does not turn on Sony or Sharp TV/VCR Combo. SOLUTION: For Power On, these products require programming TV codes. -
Page 43: Error Messages
TROUBLESHOOTING (continued) PROBLEM: The URC-9910 remote control turns on audio devices and controls volume, but does not change preset channels. SOLUTION: Some products may need both a Tuner/Receiver code and an Audio Amplifier code for remote control of all features on your audio device. -
Page 44: Compliance With Fcc Rules And Regulations
1. This device may not cause harmful interference and 2. This device must accept any interference received, including interference that may cause undesired operation. FCC ID #: DI29910 IR/RF LCD 8-Device With Learning: URC-9910 Command Center: IC Authorization Label IC:1700-IMPKH9P The term "IC: 1700-IMPKH9P"... -
Page 45: Key Index
(if applicable). Use the keypad (1 ~ 9 and 0) to select audio sources (e.g., 1~ 10). If the original remote control required pressing an Enter key to change the audio source, also press the ENTER key after the source number (e.g., 9 -ENTER). - Page 46 Audio Cassette Deck Functions SELECT Use the transport keys to control your CD player (if applicable). Use SLEEP to activate your audio amplifer’s sleep timer (not available for all devices). After programming, press M1 ~ M3 once to run a desired macro (see Using Macros on page 34).
- Page 47 (if applicable). Use the keypad (1 ~ 9 and 0) to directly select tracks. If the original remote control required pressing an Enter key to select a track, also press the ENTER key after the track number (e.g., 1-2 -ENTER).
- Page 48 (if applicable). Use the keypad (1 ~ 9 and 0) to select audio sources (e.g., 1~ 10). If the original remote control required pressing an Enter key to change the audio source, also press the ENTER key after the source number (e.g., 9 -ENTER).
- Page 49 KEY INDEX Audio Receiver Functions (continued) Audio Turntable Functions 37.) SELECT Use the transport keys to control your CD player (if applicable). Use SLEEP to activate your audio receiver’s sleep timer (not available for all devices). After programming, press M1 ~ M3 once to run a desired macro (see Using Macros on page 34).
- Page 50 (if applicable). Use the keypad (1 ~ 9 and 0) to directly select tracks. If the original remote control required pressing an Enter key to select a track, also press the ENTER key after the track number (e.g., 1-2 -ENTER).
- Page 51 Use the keypad (1 ~ 9 and 0) to directly select channels (e.g., 009 or 031). If the original remote control required pressing an Enter key to change the channel, also press the ENTER key after the channel number (e.g., 0-3-1-ENTER).
- Page 52 Press ENTER once after entering the channel numbers on some TVs. Use TV/VID to switch the TV’s input to view TV or cable programs. Use the transport keys to control your cable converter’s VOD service (if applicable). Use SLEEP to activate your cable converter’s sleep timer (not available for all devices).
- Page 53 (if applicable). Use the keypad (1 ~ 9 and 0) to directly select tracks. If the original remote control required pressing an Enter key to select a track, also press the ENTER key after the track number (e.g., 1-2 -ENTER).
- Page 54 41.) Use the keypad (1 ~ 9 and 0) to directly select chapters (e.g., 09 or 31). If the original remote control required pressing an Enter key to select a chapter, also press the ENTER key after the chapter number (e.g., 3-1-ENTER).
- Page 55 KEY INDEX DVD Player Functions (continued) Use TV/VID to switch the TV’s input to view TV or DVD programs. Use the transport keys to control your DVD player. After programming, press M1 ~ M3 once to run a desired macro (see Using Macros on page 34).
-
Page 56: Home Automation Functions
Home Automation Functions Press AUX once to control home automation. (See Re-assigning Device Keys on page 37.) Press POWER once to turn on home automation. Use VOL+ (or VOL-) to brighten (or dim) the lights controlled by home automation. Press MUTE once to turn off home automation. - Page 57 (if applicable). Use the keypad (1 ~ 9 and 0) to directly select chapters (e.g., 09 or 31). If the original remote control required pressing an Enter key to select a chapter, also press the ENTER key after the chapter number (e.g., 3-1-ENTER).
- Page 58 Satellite Receiver Functions SELECT After programming, press M1 ~ M3 once to run a desired macro (see Using Macros on page 34). After programming, press L1 ~ L4 once to activate a learned function. (See Using Learning on page 29.) Use to turn on or off the key backlight.
- Page 59 Use the keypad (1 ~ 9 and 0) to directly select channels (e.g., 009 or 031). If the original remote control required pressing an Enter key to change the channel, also press the ENTER key after the channel number (e.g., 0-3-1-ENTER).
- Page 60 After programming, use COM SKIP to skip commercials on your satellite receiver. (See Using Commercial Skip on page 48.) Use to turn on or off the key backlight. When this feature is activated, keys will remain backlit for 5 seconds after the last key press.
- Page 61 TV’s main menu. Use the keypad (1 ~ 9 and 0) to directly select channels (e.g., 009 or 031). If the original remote control required pressing an Enter key to change the channel, also press the ENTER key after the channel number (e.g., 0-3-1-ENTER).
-
Page 62: Vcr Functions
After programming, use COM SKIP to skip commercials on your TV. (See Using Commercial Skip on page 48.) Use to turn on or off the key backlight. When this feature is activated, keys will remain backlit for 5 seconds after the last key press. - Page 63 VCR’s main menu. Use the keypad (1 ~ 9 and 0) to directly select channels (e.g., 009 or 031). If the original remote control required pressing an Enter key to change the channel, also press the ENTER key after the channel number (e.g., 0-3-1-ENTER).
-
Page 64: Limited Warranty
The limited warranty does not cover damage or failure caused by products or services not supplied by ONE FOR ALL® , or which result from accident, misuse, abuse, neglect, mishandling, misapplication, faulty installation, set-... -
Page 65: Additional Information
One For All 3 Device (BIG KEYS) ....URC-3300 One For All Access 3....... . URC-3605 One For All Video Expert 4 Device .