Garmin Fishfinder 160C Owner's Manual
Color sonar
Hide thumbs
Also See for Fishfinder 160C:
- Owner's manual (34 pages) ,
- Specification (2 pages) ,
- Declaration of conformity (1 page)
Table of Contents
Advertisement
Quick Links
Advertisement
Table of Contents

Related Manuals for Garmin Fishfinder 160C


Summary of Contents for Garmin Fishfinder 160C
- Page 1 Fishfinder 160C ® color sonar owner’s manual...
- Page 2 Information in this document is subject to change without notice. Garmin reserves the right to change or improve its products and to make changes in the content without obligation to notify any person or organization of such changes or improvements. Visit the Garmin Web site (www.garmin.com) for current updates and supplemental information concerning the use and operation of this and other Garmin products.
-
Page 3: About This Manual
Thank you for choosing the Garmin Fishfinder 160C. The ® Fishfinder 160C is a color sonar that offers many features, including the following: • Ultrascroll , which gives you a much faster update rate on ™ your Sonar Pages. -
Page 4: Table Of Contents
Introduction ...i About This Manual ... i Product Registration ... iii Contact Garmin ...iii Caring for the Fishfinder 160C ... iii Caring for the Screen ...iii Warnings ... iv Important Information ... iv Getting Started ...1 Understanding the Fishfinder and Sonar ... -
Page 5: Product Registration
Serial Number: ___ ___ ___ ___ ___ ___ ___ __ Contact Garmin Contact Garmin if you have any questions while using your Fishfinder 160C. In the USA contact Garmin Product Support by phone: (913) 397-8200 or (800) 800-1020, Monday–Friday, 8 AM–5 PM Central Time;... -
Page 6: Warnings
California’s Proposition 65. If you have any questions or would like additional information, please refer to our Web site at http://www.garmin.com/prop65. Hg - lAmPS INSIDe thIS PRODuct cONtAIN meRcuRy AND muSt be RecycleD OR DISPOSeD Of AccORDING tO lOcAl, StAte, OR feDeRAl lAWS. -
Page 7: Getting Started
ettInG tarted Understanding the Fishfinder and Sonar The Fishfinder 160C is a fully automatic, color sonar unit that allows you to go out on the water and find fish without having to configure a lot of settings. However, you can customize each setting as you prefer. If you have used a Fishfinder before, you might already know how to interpret the sonar information on the screen, so you can skip this section. -
Page 8: Using Dual Beam
ettIng tArted nderstAndIng the IshfInder And The bottom of the water is always going to be the strongest signal, and therefore the bottom is the continuous, intense red line running across the bottom of the screen. The Fishfinder 160C includes the latest technology in interpreting bottom signals;... -
Page 9: Whiteline
Soft Bottom Fishfinder 160C Owner’s Manual Thermoclines Garmin’s See-Thru technology allows the Fishfinder 160C to “see” through thermoclines and helps locate fish where they live; and fish love thermoclines! A rough definition of a thermocline is a break in water where the water temperature changes faster than the water above it. -
Page 10: Installing The Fishfinder 160C
When in doubt, seek professional assistance. Be sure the wiring harness reaches the unit and transducer location before beginning installation. The Garmin Fishfinder 160C hardware allows for installation on either the transom or trolling motor. Check the packing list below. If you are missing any items, contact your Garmin dealer. -
Page 11: Unit Installation
Unit Installation Choose a location that provides optimal viewing and allows easy access to the unit’s keypad. Select a mounting surface strong enough to support the weight of the unit and protect it from excessive vibration or shock. DO NOT mount the bracket in a location where the unit is exposed to extreme temperature conditions. -
Page 12: Transducer Installation
nstAllIng the IshfInder rAnsducer To install the unit on the mounting bracket: 1. Align the slot on the back of the unit with the long mounting knob and slide into place. It may be necessary to adjust the long knob to spread the bracket arms apart. (Turn counter- clockwise to widen the bracket arms, clockwise to tighten.) 2. Adjust the unit angle and tighten the long mounting knob until snug. 3. Tilt the unit by loosening the long knob on the right side of the bracket assembly. 4. Rotate the entire bracket by twisting it left or right. (NOTE: You will hear clicks as you turn the bracket.) 5. Tighten all knobs when the viewing angle you want is obtained. nstAllAtIon Transducer Installation Once you’ve installed the Fishfinder 160C unit, you must install the transducer for it to function. -
Page 13: Selecting A Transom Mount Location
160c > nstAllIng the IshfInder rAnsducer nstAllAtIon Selecting a Transom Mount Location For your sonar to operate properly, the transducer has to be located in clean (non-turbulent) water. The transducer should be mounted as Do not mount the transducer behind near the center of the boat as possible. -
Page 14: Mounting The Transducer On A Transom
nstAllIng the IshfInder rAnsducer Mounting the Transducer on a Transom tool list (not included)—drill, 3/8" wrench or socket, 5/32" and 1/8" drill bits, masking tape, #2 Phillips screwdriver, marine sealant. To mount the transducer on a transom: 1. Position the transom mount at the selected location, making sure the transducer is parallel with the water line. Mark the center locations of each hole on the transom mount (see figures to the right). -
Page 15: Mounting The Transducer On A Trolling Motor
Mounting the Transducer on a Trolling Motor To mount the transducer on a trolling motor: 1. Slide the large cable tie through the slot on the transducer mount with the ridges of the band facing up until equal lengths extend on both sides of the mount. (NOTE: For cold water, or heavy timber or debris areas, a metal 4-5" worm gear clamp is recommended.) 2. Position the mount gasket on the curved top of the transducer mount. 3. Place the transducer assembly against the motor body of the trolling motor, with the front of the transducer pointed away from the trolling motor propeller. 4. Wrap the two ends of the cable tie around the motor body. Place the pointed end of the cable tie through the fastener hole on the opposite end and pull it through until it is snug but not tight. (The cable tie clicks when you pull it.) 5. Position the transducer so that it is parallel with the bottom when in use, and make sure the gasket is aligned properly. Pull the cable tie end until tight. Trim off the excess, if necessary. Tighten the 10-32 locking nut until it touches the mounting bracket and then tighten 1/4 turn more. (Do not overtighten.) Fishfinder 160C Owner’s Manual nstAllIng the IshfInder... -
Page 16: Testing The Transom Mount Installation
AWG wire. DO NOT cut the transducer cable, because this will void your warranty. Transducer extension cables are available from your Garmin Dealer. If your boat has an electrical system, it may be possible to wire the unit directly to an unused holder on your current fuse block. If you are using the boat’s fuse block, remove the in-line fuse supplied with... -
Page 17: Wiring Diagram
To Unit Black - Red + Fishfinder 160C Owner’s Manual nstAllIng the IshfInder To Transducer (red) + 10-18 VDC Power 10-18 volts (black) - Ground (Power/Data) (blue) Port 1 Data OUT RXD + GPS/NMEA Device TXD + (yellow) Alarm Low Alarm Relay 100ma max coil current... -
Page 18: Using The Fishfinder 160C
PerAtIng nstructIons eyPAd And sInG the IshfInder If you are turning on your Fishfinder 160C for the first time, use the following procedure. If you have already turned on your Fishfinder, and you are just familiarizing yourself with the basic functions, please go to “Using the Keypad”... -
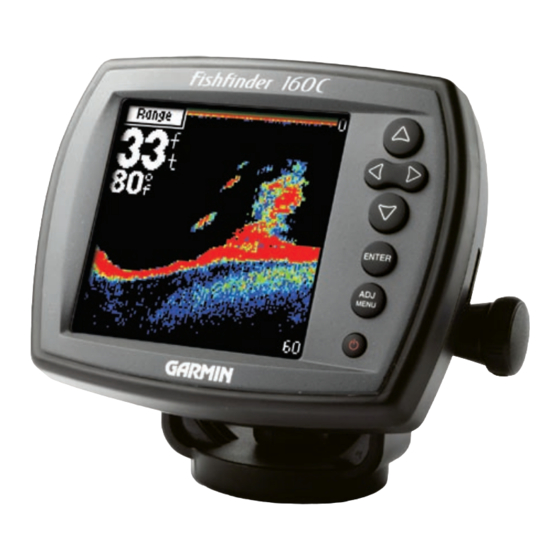
Page 19: The Fishfinder 160C Display
Fishfinder 160C Owner’s Manual PerAtIng page 18). page 16), Bottom Shape and Type Garmin’s Auto Gain system provides a clear graphic representation of the bottom type and its shape. nstructIons IshfInder IsPlAy (Simulated display) -
Page 20: The Adjustment Bar
PerAtIng nstructIons djustMent The Adjustment Bar The Adjustment Bar allows quick access to the settings most commonly changed while using the unit. The Adjustment Bar settings are: Range, Gain, Scroll, Zoom, and View. Press the meNu key to view the current Adjustment Bar settings. Press meNu again to hide the window. -
Page 21: Zoom
Zoom Selects a screen zoom scale. Available settings are: Off (default), 2X, and 4X zoom. View View is only available when a Zoom scale other than Off is selected. This setting allows you to select a specific zoom area to view on the screen, or allows the unit to automatically select a zoomed viewing area based on the bottom. -
Page 22: Graph
PerAtIng nstructIons etuP Shallow The Shallow Alarm sounds a warning at a determined depth between 1 and 900 ft. Deep The Deep Alarm sounds a warning at a determined depth between 1 and 900 ft. Fish Alarm Sounds an alarm when the unit detects what it determines to be a fish. -
Page 23: Auto Gain
Beam The Beam setting allows the selection of a Narrow Beam or Wide Beam for the transducer. A narrow beam provides higher detail structure returns of a smaller bottom area. The wide beam shows a larger fish return area with poorer detail of non-bottom structure. Whiteline The Whiteline setting controls how the unit displays information about the bottom type (hard or soft). -
Page 24: Numbers
PerAtIng nstructIons etuP Background Use this setting to change the Background color. The available settings are: black, blue, and White. Numbers Keel Offset Use the Keel Offset setting to offset the surface reading for the depth of a keel. This makes it possible to measure depth from the bottom of your keel instead of from the transducer’s location. -
Page 25: Calibrate Speed
Calibrate Speed This only appears if you are using a speed-capable transducer. Calibration is required to ensure that the speed shown on your unit is accurate. Use the boat’s speedometer, a stopwatch, or a GPS device to determine your speed. If using a stopwatch, measure the distance that the boat travels in a period of time (distance / time = speed). -
Page 26: Units
PerAtIng nstructIons etuP Reset Distance Reset Distance appears only if you are using a speed-capable transducer. Reset Distance resets the displayed Distance to zero. Units Depth Choose to show measurements in feet (ft, default), meters (m) or fathoms (fa). Temperature Choose to show the water temperature in fahrenheit (°F, default) or celsius (°C). -
Page 27: Nmea Output
NMEA Output Choose to turn the NMEA Output On or Off (default). The Fishfinder 160C can output NMEA data for Water Depth, Water Temperature, and Water Speed. The NMEA output is NMEA 0183 version 3.01. Beeper Choose to turn the Beeper On or Off. When the Beeper is On, a beep is sounded when a key is pressed, a message is shown or an alarm activated. -
Page 28: Appendix
PPendIx PecIfIcAtIons ppendIx Specifications Physical Specifications Size: 4.9" H x 6.1" W x 2.9" D (12.4 cm x 15.5 cm x 7.4 cm) Weight: 1.1 lbs. (0.5 kg) Display: 4.4" diagonal (11.3 cm), 3.14" H x 3.14" W (8.0 cm x 8.0 cm) high-contrast, 16-color CSTN display with adjustable brightness (128 x 128 pixels) case: Fully gasketed, high-impact plastic alloy, waterproof to IEC... -
Page 29: Limited Warranty
Within this period, Garmin will, at its sole option, repair or replace any components that fail in normal use. Such repairs or replacement will be made at no charge to the customer for parts or labor, provided that the customer shall be responsible for any transportation cost. -
Page 30: Software License Agreement
FOLLOWING SOFTWARE LICENSE AGREEMENT. PLEASE READ THIS AGREEMENT CAREFULLY. Garmin grants you a limited license to use the software embedded in this device (the “Software”) in binary executable form in the normal operation of the product. Title, ownership rights, and intellectual property rights in and to the Software remain in Garmin. -
Page 31: Index
clutter 2 ndex color 1 contrast 21 adjustment bar, the 14 Declaration of Conformity 24 alarms 15 deep alarm 16 arches 2 defaults 21 arrow keys 12 depth 20 auto gain 13, 17 distance 13, 18, 20 dual beam 2 background 18 battery 15, 18 electrical system 10... - Page 32 ndex temperature 20 water testing the transom mount depth 13 installation 10 temperature 3, 13, 18 thermoclines 3 weakest returns 1 and structure 13 whiteline 3, 17 tool list 5 wide beam 2, 17 transducer 1 wiring assembling 6 diagram 11 installing 6, 9 harness installation 10 mounting on a transom 8...
- Page 34 © Copyright 2007 Garmin Ltd. or its subsidiaries Garmin International, Inc. 1200 East 151 Street, Olathe, Kansas 66062, USA Garmin (Europe) Ltd. Liberty House, Hounsdown Business Park, Southampton, Hampshire, SO40 9RB UK Garmin Corporation No. 68, Jangshu 2 Road, Shijr, Taipei County, Taiwan www.garmin.com...