ATEN CS1732B, CS1734B - 2/4-Port USB 2.0 KVMP Switch Quick Start Guide
- User manual (56 pages) ,
- Specification (1 page) ,
- Executive overview (11 pages)
Advertisement
Package Contents
1 CS 1732 B / CS 1734 B KVMP Switch
2 Custom USB KVM Cable Sets (CS 1732B)
4 Custom USB KVM Cable Sets (CS 1734B)
1 USB-to-PS/2 Converter
1 Firmware Upgrade Cable
1 Power Adapter
1 User Manual
1 Quick Start Guide
2 OSD / Hotkey Stickers
Online Registration
International:
http://support.aten.com
North America:
http://www.aten-usa.com/product_registration (ATEN TECH)
http://support.aten.com (ATEN NJ)
Technical Phone Support
International:
886-2-86926959
North America:
1-888-999-ATEN (ATEN TECH)
1-732-356-1703 (ATEN NJ)
Requirements
Console
- A VGA, SVGA, or Multisync monitor capable of the highest resolution that you will be using on any computer in the installation.
- A USB mouse
- A USB keyboard
- PS/2 keyboard and mouse can be used with converter included in package
Computer
The following equipment must be installed on each computer:
- A VGA, SVGA or Multisync card.
- USB Type A port, or PS/2 keyboard and mouse ports.
Cables
Only cable sets specifically designed to work with this switch may be used to link to the computers. 2/4 cables sets are provided with the CS1732
Hardware Review
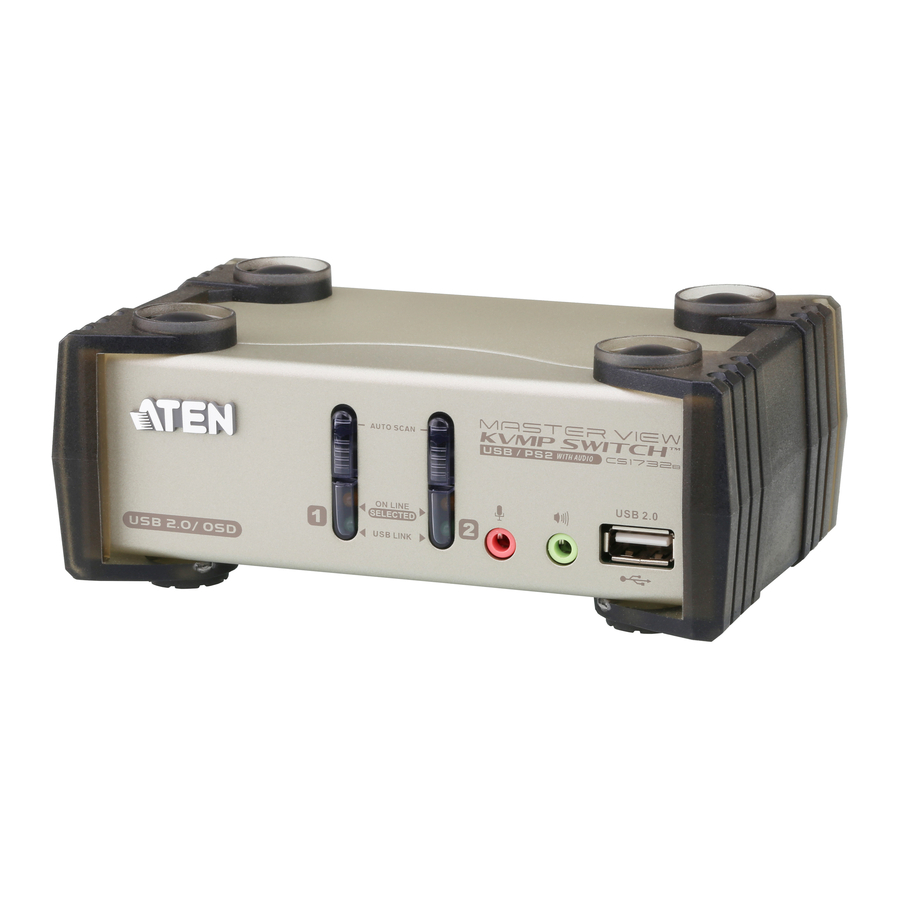
Front View

- Port Selection Switches
- Port LEDs
- Console Ports (Audio)
- USB 2.0 Peripheral Port
Rear View

- Firmware Upgrade Port
- USB 2.0 Peripheral Port
- Power Jack
- Console Port Section
- KVM Port Section
Hardware Installation


Make sure that power to all the devices you will be connecting up have been turned off. You must unplug the power cords of any computers that have the Keyboard Power On function.
- Plug your USB keyboard and USB mouse into the USB Ports located on the unit's back panel.
- Plug your monitor into the Console monitor port located on the unit's rear panel.
- Plug your main microphone and speakers into the Console microphone and 2.1 surround sound speaker jacks located on the unit's front panel. The microphone and speakers plugged into the rear panel are secondary to those plugged into the front panel.
- Using a KVM cable set (provided with this package), plug the custom SPHD connector into any available KVM Port on the switch and plug the accompanying microphone and speaker connectors into the KVM Port's microphone and speaker jacks.
Note:- The connectors and jacks are color coded and marked with an appropriate icon for easy installation.
- Be sure that all the plugs are in the same KVM Port sockets (all in Port 1, all in Port 2, etc.).
- At the other end of the cable:
- For a USB connection, plug the USB, video, microphone and speaker cables into their respective ports on the computer.
- For a PS/2 connection, plug the keyboard, mouse, video, microphone and speaker cables into their respective ports on the computer
Repeat steps 4 and 5 for any other computers you are connecting up.
- Plug the power adapter that came with your switch into an AC power source, then plug the power adapter cable into the switch's Power Jack.
- Plug your USB peripherals into the USB hub sections on the front and back panels.
- Turn on the power to the computers
Port Selection
The CS1732 B / CS1734 B provides four methods to obtain instant access to any computer in your installation: Manual, Hotkey, mouse, and OSD.
Manual
Simply press the appropriate Port Selection Switch on the CS1732
- Press a button once to bring only the KVM focus simultaneously to the computer attached to its corresponding port (in 2 secs).
- Press a button twice to bring the Audio focus to the computer attached to its corresponding port (in 2 secs).
- Press a button for longer than 2 seconds to bring the KVM, Audio and USB focus to the computer attached to its corresponding port.
Hotkey
All Hotkey operations begin by invoking Hotkey Mode. Invoking Hotkey Mode takes three steps:
- Hold down the Num Lock key;
- Press and release the asterisk or the minus key;
- Release the Num Lock key: [Num Lock] + [-];
| Hotkey | Action |
| [Num Lock] [-] [n] [Enter] | Brings the KVM, USB hub, and the audio focus to the computer attached to the port corresponding to the specified Port ID. Note: The KVM, USB hub, and audio focus all go to this port even if they were on different ports to begin with. |
| [Num Lock] [-] [n] [K] [Enter] | Brings only the KVM focus to the computer attached to the specified port. |
| [Num Lock] [-] [n] [U] [Enter] | Brings only the USB focus to the computer attached to the specified port. |
| [Num Lock] [-] [n] [S] [Enter] | Brings only the audio focus to the computer attached to the specified port. |
Note: The n stands for the computer's Port ID number (1, 2, 3, 4).
Mouse
Simply double-click the scroll wheel on the mouse to switch between ports. The mouse port-switching function allows you to cycle through the ports in sequence.
Note:
- The default setting for the mouse port switching function is OFF. To enable the mouse port-switching function, use the OSD.
- The mouse port-switching function is only supported when Mouse Emulation is set to ON.
OSD (On Screen Display)

The On Screen Display (OSD) is a menu driven method to handle computer control and switching operations. All procedures start from the OSD Main Screen. To pop up the Main Screen, tap the [Scroll Lock] key twice.
- Before the OSD Main Screen comes up, a dialog box appears that asks you to provide your password. If the password function has been set, you must provide the password in order to access the OSD Main Screen.
Note: If this is the first time that the OSD is being run, or if the password function has not been set, simply press [Enter].
- To bring the focus to a port, press the [F1], [F2], [F3] or [F7] key, then move the Highlight Bar to the port you want to switch to, press [Enter] or double click it.
© Copyright 2007 ATEN ® International Co., Ltd. ATEN and the ATEN logo are trademarks of ATEN International Co., Ltd. All rights reserved. All other trademarks are the property of their respective owners.

Documents / Resources
References
Download manual
Here you can download full pdf version of manual, it may contain additional safety instructions, warranty information, FCC rules, etc.
Download ATEN CS1732B, CS1734B - 2/4-Port USB 2.0 KVMP Switch Quick Start Guide
Advertisement
Thank you! Your question has been received!


Need Assistance?
Do you have a question about the CS1732B that isn't answered in the manual? Leave your question here.