Advertisement
Quick Links
Day One+
EX4100 and EX4100-F
IN THIS GUIDE
Step 1: Begin | 1
Step 2: Up and Running | 10
Step 3: Keep Going | 14
Step 1: Begin
IN THIS SECTION
Meet the EX4100 and EX4100-F Ethernet Switches | 2
Install the EX4100 and EX4100-F | 5
Power On | 7
In this guide, we provide a simple, three-step path, to quickly get you up and running with your new EX4100 and
EX4100-F switch. We've simplified and shortened the installation and configuration steps, and included how-to videos.
You'll learn how to install an AC-powered EX4100 and EX4100-F in a two-post rack, power it up, and configure basic
settings.
NOTE: Are you interested in getting hands-on experience with the topics and operations covered in this guide?
Visit
Juniper Networks Virtual Labs
and reserve your free sandbox today! You'll find the Junos Day One
Advertisement

Related Manuals for Juniper EX4100


Summary of Contents for Juniper EX4100
- Page 1 Power On | 7 In this guide, we provide a simple, three-step path, to quickly get you up and running with your new EX4100 and EX4100-F switch. We’ve simplified and shortened the installation and configuration steps, and included how-to videos.
- Page 2 Power over Ethernet (PoE+) ports for powering network devices connected to the switches. NOTE: In this guide, we show you how to install a EX4100 and EX4100-F switch model with an AC power supply. If you need instructions for installing fans and power supplies on EX4100 switch models see the...
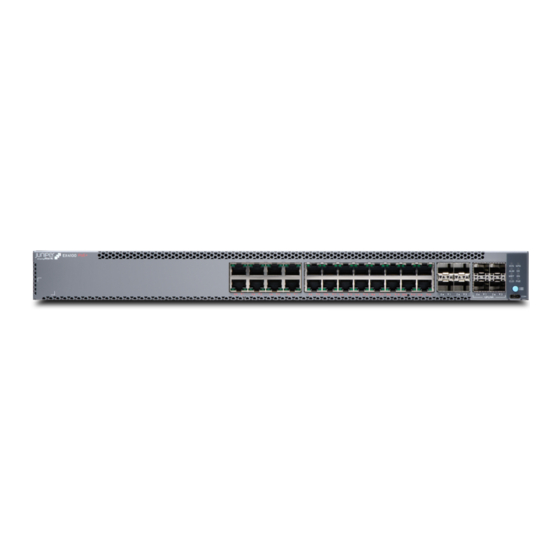
- Page 3 EX4100-24P, EX4100-24T, EX4100-48P, and EX4100-48T Switches EX4100-24P EX4100-24T EX4100-48P EX4100-48T Here are the port configuration details for the EX4100 switch models: Models Access Ports EX4100-24P, EX4100-24T, EX4100-24T-DC Twenty four 10/100/1000-Mbps RJ-45 ports, four 10/25 Gbps SFP28 Virtual Chassis ports, and four 1/10 Gbps SFP+ uplink ports on the front panel.
- Page 4 EX4100-F-24P, EX4100-F-24T, EX4100-F-48P, and EX4100-F-48T Switches EX4100-F-24P EX4100-F-24T EX4100-F-48P EX4100-F-48T Here are the port configuration details for the EX4100-F switch models: Models Access Ports EX4100-F-24P and EX4100-F-24T Twenty four 10/100/1000-Mbps RJ-45 ports, four 1/10 Gbps SFP+ Virtual Chassis ports, and four 10 Gbps SFP+ uplink ports on the front panel.
- Page 5 Install the EX4100 and EX4100-F Switch in a Rack | 6 What's in the Box? • EX4100 switch with two preinstalled fan modules and one preinstalled power supply unit or EX4100-F switch with built-in fans and power supplies • One AC power cord appropriate for your geographical location.
- Page 6 You can install the EX4100 and EX4100-F switch on a desktop or other level surface, in a two-post or four-post rack, or on a wall. The mounting kit that ships in the box has the brackets you need to install the switch in a two-post rack. We’ll walk you through how to install the switch in a two-post rack.
- Page 7 5. Check that the mounting brackets on each side of the rack are lined up with each other. Power On Now you’re ready to connect the EX4100 and EX4100-F switch to a dedicated AC power source. The switch comes with the AC power cord for your geographic location.
- Page 8 Ensure that the power supply is fully inserted in the rear panel of the switch. Note that this step is applicable for EX4100-24P, EX4100-24T, EX4100-48P, and EX4100-48T switches. Connect the power cord retainer clip to the AC power supply on the rear panel: a.
- Page 9 11. If the AC power source outlet has a power switch, turn it on. The switch powers on as soon as you plug it in. 12. Note that this step is applicable for EX4100 switches. Check to see that the DC OK LED on the power supply is lit steadily green.
-
Page 10: Step 2: Up And Running
Customize the Basic Configuration Using the CLI | 10 Now that the EX4100 and EX4100-F switch is powered on, let’s do some initial configuration to get the switch up and running on your network. It’s simple to provision and manage the switch and other devices on your network. Choose the configuration tool that’s right for you:... - Page 11 • DCD state—Disregard Connect the console port on the EX4100 and EX4100-F switch to a laptop or desktop PC using the Ethernet cable and the RJ-45 to DB-9 serial port adapter that came in the box with the switch. If your laptop or desktop PC doesn't have a serial port, use a serial-to-USB adapter (not provided).
- Page 12 Enter configuration mode. {master:0} root> configure {master:0}[edit] root# Delete the ZTP configuration. Factory default configurations can vary over different releases. You may see a message that the statement does not exist. Don’t worry, it’s safe to proceed. {master:0}[edit] root# delete chassis auto-image-upgrade Add a password to the root administration user account.
- Page 13 11. Configure the default gateway for the management network. {master:0}[edit] root# set routing-options static route 0/0 next-hop address 12. Configure the SSH service. By default the root user cannot log in remotely. In this step you enable the SSH service and also enable root login via SSH.
-
Page 14: What's Next
General Information | 15 Learn With Videos | 15 Congratulations! You’ve completed the initial steps to get your EX4100 and EX4100-F switch up and running. Let’s keep going and learn more about what you can do with the switch. What's Next... -
Page 15: General Information
Juniper Learning Portal Juniper Juniper Networks, the Juniper Networks logo, Juniper, and Junos are registered trademarks of Juniper Networks, Inc. in the United States and other countries. All other trademarks, service marks, registered marks, or registered service marks are the property of their respective owners.