natus Madsen Zodiac User Manual
Quick check stand-alone
Hide thumbs
Also See for Madsen Zodiac:
- Reference manual (149 pages) ,
- User manual (62 pages) ,
- User manual (53 pages)

Related Manuals for natus Madsen Zodiac


Summary of Contents for natus Madsen Zodiac
- Page 1 Madsen Zodiac Quick Check Stand-alone User Guide Doc. No.7-50-1600-EN/09 Part No.7-50-16000-EN...
- Page 2 Copyright notice © 2016, 2019, 2021, 2022 Natus Medical Denmark ApS. All rights reserved. ® Otometrics, the Otometrics Icon, AURICAL, Madsen, HI-PRO 2, Otoscan, ICS and HORTMANN are registered trademarks of Natus Medical Denmark ApS in the U.S.A. and/or other countries.
-
Page 3: Table Of Contents
Zodiac probes The Quick Check front panel The Zodiac menu Testing with Zodiac Quick Check - Stand-alone Managing test results in Madsen Zodiac 10 Printing and data transfer from Zodiac 11 Troubleshooting 12 Service, cleaning and calibration 13 Technical specifications... -
Page 4: Overview
Printing test results Some versions of Madsen Zodiac have a built-in thermal printer for printing test results. When Madsen Zodiac is used in connection with the Otosuite Immittance software module, test results can be transferred to Otosuite for printing as Otosuite reports. -
Page 5: Intended Use
User Guide Intended use Madsen Zodiac is an auditory impedance tester intended to change the air pressure in the external auditory canal and measure and graph the mobility characteristics of the tympanic membrane to evaluate the functional condition of the middle ear. -
Page 6: Unpacking
Note Indicates that you should take special notice. • To obtain a free printed copy of the user documentation, contact Natus Medical Denmark ApS (www.natus.com). Unpacking 1. Unpack the device carefully. When you unpack the device and accessories, retain the packing material. If you need to send the device in for service, the original packing material will protect against damage during transport. -
Page 7: Installation
User Guide Installation To ensure safe performance of the device, make sure that Madsen Zodiac is correctly installed and that the requirements listed as warning notes are complied with. Warning notes ► Location Warning Do not store the device at temperatures below -20°C (-4°F) or above +60°C (95°F). - Page 8 The first time you switch on the device, or if the device has been without power off for more than two weeks, the internal clock runs out of power. When you start the device, you can set the time manually or connect to Otosuite where the time is set automatically. Madsen Zodiac...
- Page 9 User Guide Switching Madsen Zodiac on and off 1. To switch on Zodiac, press the On/Off button on the lower right side. – In the stand-alone versions of the device, the display and some function buttons light up. 2. To switch off Zodiac, press the On/Off button.
- Page 10 Loading a new paper roll Caution • Be careful when opening the paper compartment to avoid injury from the cutter blades. Note Use only Natus replacement printer paper. • 1. Open the printer cover. 2. Remove the empty paper roll.
- Page 11 6. Tear off the part of the paper where glue has held the roll together. 7. Make sure that the loose end of the paper roll emerges through the paper slot 8. To close the printer cover, press the printer cover into place until the lock clicks shut. Madsen Zodiac...
-
Page 12: Zodiac Probes
Using the probe • Fitting the eartip on the probe ► 15 Cleaning the probe and probe tip ► 22 • Caution • Always fit an eartip on the probe before inserting it into the ear of the patient. Madsen Zodiac... - Page 13 User Guide Holding the probe • Underhand grip • Overhand grip Madsen Zodiac...
- Page 14 Starting the test Once you press the screening eartip gently into the ear canal and the seal forms, the test starts automatically. Stopping the test You can stop the test by removing the probe from the test ear. Madsen Zodiac...
-
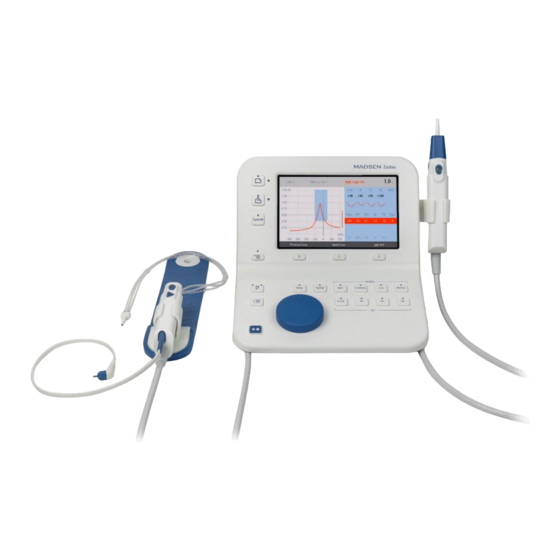
Page 15: The Quick Check Front Panel
Zodiac with a built-in printer: Press this button to print all test results for the current patient. Measurement selections Tymp Press this button to select the Tympanometry test. (tympanometry) Reflex (Reflex Screening) Press this button to select the Reflex Screening test. Madsen Zodiac... - Page 16 • Press this button until you highlight the desired area on the screen. Arrow Down This function is enabled when you activate the Menu function. • Press this button until you highlight the desired area on the screen. Madsen Zodiac...
-
Page 17: The Zodiac Menu
To save the changed protocol settings permanently, select the left column, scroll to Save to [Protocol name] , and press • the Save soft button. Canceling changed test settings To cancel any saved settings, select the protocol and press the Reload soft button. • Madsen Zodiac... -
Page 18: Testing With Zodiac Quick Check - Stand-Alone
Ipsi Reflex testing. All tests are performed in one single sequence. Madsen Zodiac is used in combination with the hand-held Quick Check probe fitted with an eartip. The measurements are performed automatically when the probe is pressed gently against the patient's ear canal and hermetic seal is achieved. - Page 19 Fit the eartip on the probe. Note that the color and shape of the eartip may vary. When removing the eartip, use your index finger to steady the probe and secure the tube cover housing (see image below). Madsen Zodiac...
- Page 20 Firmly push and twist the eartip onto the probe tip, until it rests firmly against the base of the probe tip. Removing the eartip To remove the eartip, grasp the stem of the eartip and pull the eartip straight off the probe tip. Madsen Zodiac...
- Page 21 Any leakage will interrupt the test. The probe will indicate if there is a leak. When you get a leak detection signal, you must briefly remove the probe from the ear before trying again. Quick Check Probe Gen 2 Quick Check Probe Gen 1 Madsen Zodiac...
- Page 22 The left test ear has been selected • The device is in idle mode Green • The test is running Yellow • Leak Otosuite indications Color Status Green • During measurements, Otosuite shows a green background to the online values. Madsen Zodiac...
- Page 23 • screen. If there is a probe leak during testing, this icon will be shown on the Madsen Zodiac and Otosuite screens. If you are using the Quick Check probe, the leakage indication will remain until you remove the probe from the ear and try again.
- Page 24 Type (Jerger types A, As, Ad, B, C, D and E denote the shape of the 226 Hz curve). You can set the type to be • determined automatically, and you can subsequently change it manually, if necessary. Madsen Zodiac...
-
Page 25: Managing Test Results In Madsen Zodiac
Managing test results in Madsen Zodiac The following directions apply to managing test results in Madsen Zodiac. To perform these actions in Otosuite, see the Otosuite User Guide or Otosuite Reference Manual. Swapping ear results If you have tested a patient with the wrong ear selected, you can swap the ear results both during a session and after a session so that the results are assigned to the other ear. -
Page 26: Printing And Data Transfer From Zodiac
Hairs in the ear canal get between the eartip and the wall of the ear canal • The probe tip is occluded by debris or fluid • Perform a probe check to rule out malfunction of the probe. Madsen Zodiac... -
Page 27: Service, Cleaning And Calibration
Caution • A Zodiac probe should only be disconnected or replaced by an authorized service technician. Caution • Replacing a probe with a Madsen Zodiac gen 2 probe can be done by the user by following the instructions. Make sure to disconnect power line from the main unit before disconnecting the currently connected probe, and connect the new probe to the main unit before reconnecting the power. - Page 28 User Guide 8. Remove the second screw. 9. Disconnect probe connector from main unit. 10. Secure replacement probe to main unit. Insert first and second screws and re-connect the pressure tube. 11. Re-connect the power. 12. Perform Admittance Calibration. Madsen Zodiac...
- Page 29 You can mount the probe home on a wall, using the optional probe home wall-mount kit. Device / Wall Mount You can mount the device/wall mount on the device with the two applied screws or on the wall using the optional device/wall mount kit. Madsen Zodiac...
- Page 30 Set a schedule for cleaning Zodiac and accessories such as probes and/or earphones. Prerequisites • Before cleaning, switch off Madsen Zodiac and disconnect it from any external power source. Cleaning the printer's paper compartment Cleaning the printer ► Cleaning the probe tip Cleaning the probe and probe tip ►...
- Page 31 If the probe tip is only slightly blocked, use the probe tip flossing thread to clean the probe tip channels. To replace the Tip and Tubes for the Quick Check Probe Gen 2 Fluid or debris is detected inside the tubing. Remove the tube cover to expose the tube ends. Madsen Zodiac...
- Page 32 User Guide 3. Gently remove the tubes from the channels. Note Do not clean the sound channels in the probe body, as this may damage the probe. • Madsen Zodiac...
- Page 33 User Guide 4. Remove the tip from the ends of the tubes. 5. Discard the used tubes. 6. Replace the tubes with new tubes from the Quick Check Probe Gen 2 Tubing Kit. Madsen Zodiac...
- Page 34 User Guide 7. Attach the tip to the ends of the tubes. 8. Attach the tubes to the channels. Madsen Zodiac...
- Page 35 User Guide 9. Insert the probe tip into the probe tip holder. 10. Reattach the Probe tube cover to the probe body. 11. Perform Admittance Calibration. Warning Use Madsen Zodiac Gen 2 probes only with tube cover attached. • Madsen Zodiac...
- Page 36 The system includes replacement probe tips. If needed, you can quickly replace a probe tip and clean or discard the old probe tip. If the probe tip is only slightly blocked, use the probe tip flossing thread to clean the probe tip channels. Note Make sure that you comply with local infection control regulations. • Madsen Zodiac...
- Page 37 Never clean the sound channels in the probe body, as this may damage the probe. • Sound channels Fit the probe tip on the probe and twist the probe ring clockwise to lock the probe tip in place on the probe. Madsen Zodiac...
- Page 38 Prerequisites • Before cleaning, switch off Madsen Zodiac and disconnect it from any external power source. Caution • Be careful when opening the paper compartment to avoid injury from the cutter blades. Warning When you clean the paper compartment, never use metal objects or liquids.
- Page 39 In case of a probe error, the probe may be occluded or faulty. • If the probe is occluded, clean or replace the probe tip. • If the probe is faulty, contact an authorized service department for repair. Madsen Zodiac...
-
Page 40: Technical Specifications
User Guide Technical Specifications Type identification Madsen Zodiac is type 1096 from Natus Medical Denmark ApS Compliance measuring system Probe tone: 226 Hz at 85 dB SPL ± 3 dB Dynamic probe tone level: The probe tone level will be compensated to accommodate varying ear canal volumes. - Page 41 70 dB (for stimulus level > 95 dB HL) Tympanometry accuracy description (daPa/s) Pump speed Min.TW, 5% error Min. TW, 10% error Min. SA, 5% error Min. SA, 10% error (daPa) (daPa) (daPa) (daPa) 50 daPa/s 100 daPa/s 200 daPa/s 400 daPa/s 600 daPa/s Madsen Zodiac...
- Page 42 1000 2000 4000 Notes: 1. From ANSI/ASA S3.6-2010, Table 7. 2. Based on Natus internal data. Air pressure system Range: Normal +200 to -400 daPa/s Pressure sweep rate: 50, 100, 200, 400, 600 daPa/s ± 20% in 20% to 80% of the total pressure range Pressure accuracy: ±...
- Page 43 The admittance of a cavity depends on the atmospheric pressure. This means that when the atmospheric pressure changes, the relation between mmho and ml changes. The following table can be used to calculate the difference. Altitude (m) Increase in mmho (%) 1000 1500 2000 2500 3000 Madsen Zodiac...
- Page 44 Built-in printer. Prints 832 dot line/s on 112 mm paper width 2 cc coupler Calibration Equipment should be calibrated regularly according to EN 60645-5 and ANSI S3.39 Essential performance Madsen Zodiac has no essential performance and accordingly, the applicable requirements are as stated in the Standards section. Madsen Zodiac...
- Page 45 1 cm 3 = 10 –6 m 3 Equivalent volume Relative pressure daPa 1 daPa = 10 Pa 1 mm H2O = 0,98 daPa Quantity Zodiac symbols IEC 606045-5 symbols ANSI 3.39 symbols Acoustic admittance Acoustic conductance Acoustic susceptance Equivalent volume Relative pressure Δp Madsen Zodiac...
- Page 46 User Guide 13.1 Accessories The accessories listed depend on the configuration of the Madsen Zodiac supplied. Group/Family Part Number Product Software 8-49-75800 1052 Otosuite DVD 8-66-10000 1096 Quick-Check Probe Gen 1 Probes 8-66-10100 1096 Diagnostic Classic Probe 8-66-10200 1096 Diagnostic Comfort Probe...
- Page 47 1096 Zodiac Power cord, US (UL approved) with Ferrite Bead 8-71-96100 1096 Zodiac Power Cord, DK with Ferrite Bead Cable 8-62-45900 USB Cable, 3m with 2 Ferrite 8-35-47800 1096 Cavity, 2cc, Integrated (SA only) Cavity 8-35-47900 1096 Cavities, Multi-Frequency Kit Madsen Zodiac...
- Page 48 IEC 60601-1-2:2014 (EN 60601-1-2:2015) and IEC 60601-1-2:2014+AMD1:2020 Guidance and manufacturer's declaration - electromagnetic emissions for all equipment and systems Madsen Zodiac is intended for use in the electromagnetic environment specified below. The Madsen Zodiac user should ensure that it is used in such an environment.
- Page 49 User Guide Guidance and manufacturer's declaration - electromagnetic immunity for all equipment and systems Madsen Zodiac is intended for use in the electromagnetic environment specified below. The Madsen Zodiac user should ensure that it is used in such an environment.
- Page 50 Guidance and manufacturer's declaration - electromagnetic immunity for equipment and systems within Professional Healthcare use environment Madsen Zodiac is intended for use in the electromagnetic environment specified below. The Madsen Zodiac user should ensure that it is used in such an environment.
- Page 51 IEC 60601-1-2:2007, EN 60601-1-2:2007, IEC 60601-1-2:2014 + AMD1:2020 (Edition 4.1) Guidance and manufacturer's declaration - electromagnetic emissions for all equipment and systems Madsen Zodiac is intended for use in the electromagnetic environment specified below. The Madsen Zodiac user should ensure that it is used in such an environment.
- Page 52 Guidance and manufacturer's declaration - electromagnetic immunity - for equipment and systems that are NOT life-supporting Madsen Zodiac is intended for use in the electromagnetic environment specified below. The Madsen Zodiac user should ensure that it is used in such an environment.
- Page 53 Recommended separation distances between portable and mobile RF communications equipment and Madsen Zodiac The Madsen Zodiac is intended for use in an electromagnetic environment in which radiated RF disturbances are controlled. The customer or the Madsen Zodiac user can help prevent electromagnetic interference by maintaining a minimum distance between portable and mobile RF communications equipment (transmitters) and the Madsen Zodiac as recommended below, according to the maximum output power of the communications equipment.
-
Page 54: Standards And Warnings
User Guide Standards and warnings 14.1 Definition of symbols Madsen Zodiac and Otosuite immittance module Symbol Standard Standard Title of Symbol Symbol Title Explanation Reference as per Referenced Standard ISO 15223-1 Medical Device An indication of This product is a medical Symbol 5.7.7... - Page 55 10 information such as Medical electrical equipment warnings and precautions — Part 1: General that cannot, for a variety of requirements for basic safety reasons, be presented on and essential performance. the medical device itself. Madsen Zodiac...
- Page 56 5.3.1. (ISO shall be handled with care. 7000-0621) ISO 7000 / IEC Graphical symbols for use on Non-ionizing Indicates generally 60417 equipment electromagnetic elevated, potentially radiation hazardous, levels of non- Symbol 5140 ionizing radiation. Madsen Zodiac...
- Page 57 • The following conditions or practices might present possible risk of death or serious injury to the user or patient: • Use Madsen Zodiac equipment only in a hospital or clinic under the guidance of a health care professional. •...
- Page 58 Make sure that there are no contraindications for performing the Reflex Decay Test. • Do not use Madsen Zodiac for purposes other than the applications defined in the intended use. • Use new ear tips for each patient to prevent cross-infection.
-
Page 59: Other References
Member State in which the user and/or patient is established. Other references For more information, see the online Help in Otosuite, which contains detailed reference information about Madsen Zodiac and the Otosuite modules. For Otosuite installation instructions, see the Otosuite Installation Guide, on the Otosuite installation medium. -
Page 60: Disposal
WEEE is reused or recycled safely. In line with that commitment Natus Medical Incorporated may pass along the obligation for take back and recycling to the end user, unless other arrangements have been made.