
Related Manuals for natus ALGO 3i


Summary of Contents for natus ALGO 3i
- Page 1 Instructions for Use ® ALGO 3i Newborn Hearing Screener IFU 024913 RevD Revision Date 08/05/2020...
- Page 2 E-mail: technical_service@natus.com Global Sales & Support: 1-800-303-0306 Fax: 1-650-802-0401 www.natus.com Technical Contact Information: In the United States, contact Natus Technical Service at +1-888-496-2887 or +1-650-802-0400. Outside the United States, please contact your authorized service representative. Natus Manufacturing Limited IDA Business Park Gort Co.
-
Page 3: Table Of Contents
IV. User Interface Navigation ................... 11 Description of Keys ......................... 11 Scrolling/Selecting in the ALGO 3i Screener ................12 Data entry in the ALGO 3i Device ....................13 ALGO 3i Screening Procedure ................16 Overview of Screening Procedure ....................16 Detailed Instructions of Screening Procedure ................ - Page 4 Contents Prepping Tips ..........................32 VII. Data Management ....................34 Overview of the DataManagement Window .................. 34 To select records ..........................34 To print screening records ......................36 To print a screening record directly after screening: ................. 36 To print ALL screening records: ......................37 To print SELECTED screening records: ...................
-
Page 5: Intended Use
The ALGO 3i screener is simple to operate and does not require special technical skills or interpretation of results. Basic training with the equipment is sufficient to learn how to screen infants correctly. - Page 6 I. Intended Use Read all sections of the user manual prior to using the ALGO 3i screener to screen infant hearing. Inspect the ALGO 3i device and cables for any damage prior to screening an infant. Do not use if damage is present. Contact Natus Technical Service or an authorized service representative.
- Page 7 Battery chargers not approved by Natus may not meet electrical and safety standards. Use of other chargers may cause damage to the device and Natus is not liable for damages caused in their use. Caution: Incorrect use of the ALGO 3i screener and its accessories, or the use of parts and accessories not supplied by Natus Medical Incorporated, can lead to incorrect results.
-
Page 8: Overview Of The Algo Screening Technology
Each click from the ALGO coupled with a response to that click is called a “sweep”. Natus sensors on the baby’s skin capture the ABR and transmit it to the ALGO 3i screener. Since these signals are very small compared to other bio-electrical activity in the baby’s brain, it is important that the baby is sleeping or in a quiet state. -
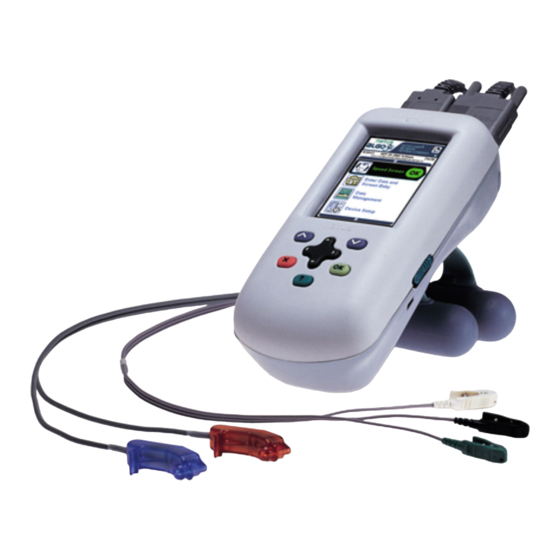
Page 9: Screening Device And Components
Natus sensors, and a preamplifier to transmit responses back to the ALGO 3i screener. The earphone and sensor cables are each available in two different lengths, 31 inches (78.7 cm) and 90 inches (228.6 cm). The short cables are the ATA 3i (earphone) cable and the Preamp 3i (sensor) cable. - Page 10 Natus Sensors Natus sensors are specialized low impedance electrodes which allow the ABR signals to be transmitted across the infant’s skin to the ALGO 3i screener. Natus sensors are coated with a conductive adhesive designed for use on neonates. Natus earphones isolate the ear from background noise while avoiding introduction of probe tips into the infant’s ear canal.
-
Page 11: User Interface Navigation
MainMenu. ? key: This key controls the Help system and will access the section of the ALGO 3i screener’s help system corresponding to the area of the interface where the user is located. The user can scroll through the Help system to access different information as desired. -
Page 12: Scrolling/Selecting In The Algo 3I Screener
IV. User Interface Navigation Scrolling/Selecting in the ALGO 3i Screener The ALGO 3i screener will show you which keys are “active” or “inactive” at all times. “Inactive” keys or functions will turn light blue to indicate they are not available to the user. -
Page 13: Data Entry In The Algo 3I Device
Enter Comment info (alpha-numeric, up to 24 characters) Data is entered into the ALGO 3i screener by using the up/down toggle keys to scroll through a keypad containing the numbers 0–9, the Roman character alphabet A–Z, a blank space,’+’, ’-‘, ’/’, ‘,’(comma), ‘.’(period) and ‘?’... - Page 14 IV. User Interface Navigation There is a blank space in the keypad between A and 9 (or between 9 and 0 if alphanumeric entry is disabled). This allows users to insert blank spaces if needed in the data fields or to remove characters.
- Page 15 You may re-enter any data field within the Infant Data window as long as you remain within these two pages. Once you have exited the Infant Data window, you may not re-enter this area. The ALGO 3i screener will prompt you to confirm your intent to exit the area. Be careful to enter all infant data accurately! ®...
-
Page 16: Algo 3I Screening Procedure
Refer to Chapter VIII. Service Manual: Device Set-Up. Overview of Screening Procedure Step 1. Power on: Turn on the ALGO 3i screener by sliding the On/Off switch upward, and releasing it. Start-up/Warnings: The ALGO 3i screener will briefly display a Start-Up window while it performs a self-check. -
Page 17: Detailed Instructions Of Screening Procedure
Power on the ALGO 3i screener by sliding the On/Off switch upward, and releasing it. The switch will spring back to its original position. During the start-up, the ALGO 3i screener will run through a series of self-checks, and will alert you of any important messages such as: ... -
Page 18: Step 2: Observe Mainmenu
System error: The ALGO 3i screener may provide information on any system errors which have occurred, and will only proceed to the MainMenu if the system is verified. If the current time and date has been lost, the ALGO 3i screener will prompt you to reset these values prior to proceeding. -
Page 19: Step 4: Prepare Baby And Attach Supplies
V. ALGO 3i Screening Procedure Note: Because the ALGO 3i screener may only be used for infants up to 6 months of age, the year options in the Date of Birth window will only be current and prior year, as well as a blank field. - Page 20 Gently hold each sensor in place for a few seconds to allow them to warm and create good adhesion to the baby’s skin. iv. Attach the ATA cable to Natus earphones by inserting the acoustic transducer into the round opening, and clicking it into place along the side of the earphone.
- Page 21 V. ALGO 3i Screening Procedure BLUE transducer is for the baby’s Left ear. Ensure that the transducer is in the front, i.e., towards the baby’s face. This ensures that the clicks are directed into the infant’s ear and will speed the test time.
-
Page 22: Step 5: Select Screening Parameters
40 dBnHL screening option enabled The ALGO 3i does not support 40 dBnHL screenings using an N2 ATA cable (ATA Cables with serial numbers starting with N2, J3 or J4). If the screener is configured to allow 40 dBnHL screenings AND an N2 ATA cable is attached, the following screen will be displayed. -
Page 23: Step 6: Start Screening/Check Impedances
A. Screening immediately begins after screening parameter is selected. Caution: When screening a baby, position the ALGO 3i display so that it is facing away from the baby. Facing the display to the baby may cause non-physiologic noise and prolong screening times. -
Page 24: Step 7: Monitor Screening In Progress
Screening Progress bar This indicates ear-specific, relative progress toward a PASS. When the bar is completely filled in, the ALGO 3i screener has reached the required statistical confidence level to issue a PASS result, and screening will stop for that ear. - Page 25 If a result for at least one ear has been obtained, the ALGO 3i screener will save and confirm a screening record. If neither ear has obtained a result, no screening record will be saved.
-
Page 26: Step 8: Observe Screening Complete
Cable(s) disconnected; battery charger connected Caution: If either cable is disconnected from the ALGO 3i screener or if the battery charger is plugged in during the screening, an Error message will appear and the ALGO 3i screener will terminate the screening without saving a screening record. -
Page 27: Step 11: Power Off
Note: In non-screening modes, if the ALGO 3i screener has not been active for a period of 10 minutes (i.e. no buttons have been pushed), it will turn itself off. This is to preserve battery power. However, the ALGO 3i screener will not turn itself off during screening. - Page 28 V. ALGO 3i Screening Procedure A. Prepare infant for screening (See Chapter VI. Baby Preparation) B. Turn on the ALGO 3i screener, wait for the MainMenu to appear, and click on SpeedScreen. (If required fields are set, SpeedScreen will not be available.) C.
-
Page 29: Information About Speedscreen And Screening Complete
Once you click “OK”, the device will advance to the Screening Complete mode, where it will save the screening record and display the screening results. Printing (or Exporting) a Record Immediately after Screening Note: To print or export a record, an ALGO 3i Printer Option or an ALGO 3i Export Option is required. ®... - Page 30 PC’s IR dongle is and that the printer’s IR port or IR situated in plain view of the ALGO 3i dongle is situated in plain view of the screener IR port.
- Page 31 (“Records Now Selected: 1”) Note: During printing, do not disturb either device or obstruct the path between the ALGO 3i screener’s IR port and the label printer’s IR dongle. Ensure that other IR devices do not interfere with printing. Incomplete printing of screening results or misaligned labels may result.
-
Page 32: Baby Preparation
VI. Baby Preparation Baby Preparation Skin Prepping Techniques Skin prepping reduces electrical impedance across the baby’s skin, which allows for better conductivity of the very small electrical signals that constitute the ABR. Conductivity is enhanced by moisture, for example skin fluid or saline solution. Conductivity is impeded by dry skin or oil on the skin. - Page 33 At this point, you may wish to leave the infant to re-settle before resuming. Natus supplies provide the low impedances necessary for ALGO screening. If you have persistent impedance problems, ensure that you are using Natus supplies, then contact Natus technical service or your authorized service representative for assistance.
-
Page 34: Data Management
DataManagement window, no records will be selected, and the “Selected” functions will not be available. You may immediately choose any of the “All Records” functions. If you wish to print, export, or delete a subset of the records stored in the ALGO 3i screener, you will first need to select them. - Page 35 VII. Data Management The display will advance to the Review/Select Records area. At the top of the window is a one-line review of all the screening records stored in the display (a maximum of four reviews are visible at any one time, and the arrow keys allow you to scroll through the review of all records stored).
-
Page 36: To Print Screening Records
The ALGO 3i screener offers users the ability to print a screening record directly after completion of the test, or to print any set of stored screening records. An ALGO 3i Printer Option is required in order to print screening records. Please refer to Natus Technical Notice (ALGO 3i Printing Option.doc) located on the CD delivered with your ALGO 3i screener, and... -
Page 37: To Print All Screening Records
Data Export to a PC The ALGO 3i screener allows you to export all, or any subset of the records stored in the device to a personal computer (PC). To perform data export, the ALGO 3i DUS (Data Utility Software) option is required and must be installed onto the PC. -
Page 38: To Delete Screening Records
Once a record has been deleted from the ALGO 3i screener, it cannot be retrieved. The ALGO 3i screener will always ask for confirmation before deleting a record from its memory. -
Page 39: To Delete Selected Screening Records
Click OK to continue. The ALGO 3i screener will warn you if any of the records you have selected have not previously been exported to a PC. Click “X” to return to DataManagement WITHOUT deleting records. -
Page 40: Viii. Equipment Check
Technical Verification using the ALGO Check Kit: There are three equipment checks which can be performed to verify that the ALGO 3i system is operating correctly. Performing these checks requires the Natus ALGO Check Kit (REF 040527), delivered with the ALGO 3i screener and shown below. -
Page 41: Technical Verification Using Algo Check Kit
“Check EACH Sensor, Vertex Impedance > 99 kOhms, Nape Impedance > 99 kOhms” If there is a discrepancy between the ALGO 3i screener impedance measurements and the values listed above, contact Natus Technical Service or your authorized service representative. Acoustic Check: Connect ATA transducers into the Check Kit. -
Page 42: Reference
FAIL indicates that either the environment or the ALGO 3i screener is the source of interference. Move the ALGO 3i screener to another location and repeat the test. If the result is now PASS, the source for the interference is likely in the environment. Monitor the screening environment for other equipment which may be causing interference. -
Page 43: Error Messages
Error messages are most likely to occur during Start-up or Pre-screening self tests, during the screening process, or during Exporting. Following is a table describing ALGO 3i screener Error Messages and a Reference to the Manual and section where more information is available. -
Page 44: Symbols Used
Symbols Used Symbol Meaning Type BF Applied Part On / Off Power Button Batch code / lot number Part number / Reorder number Serial number Expiration date / Use by date Do not reuse, single patient use only Label Printer Paper feed Attention, consult accompanying documentation AC Power DC Power... -
Page 45: Specifications
IX. Reference Specifications Sweep Rates 37 clicks/second (nominal) or 34 clicks/second (nominal) alternating Power Supply Battery 7.4V 2,500 mAh 18.50 Wh, Li Ion Full Charge Operation minimum 4 hours run time Recharge Time ≈6 hours Battery Charger Input: 100-240V, 50-60 Hz, Output: 12V DC at 3.3A Device Electrical Ratings 12V DC at 1A Nominal Dimensions... -
Page 46: Appendix A: Electromagnetic Compatibility (Emc)
ALGO 3i meets Class B (CISPR Classification) while used in the screening mode and Class A when used in conjunction with the charger for charging the battery or for data management, which allows use of ALGO 3i under jurisdiction of a health care professional. - Page 47 IX. Reference Table 4 - Immunity Test Levels - Enclosure Port Immunity Test Levels - Professional Phenomenon Basic EMC Standard Healthcare Facility Environment ± 8 kV contact Electrostatic Discharge IEC 61000-4-2 ± 2 kV, ± 4 kV, ± 8 kV, ± 15 kV air 3 V/m 80 MHz –...
- Page 48 Table 7 – Patient Coupling Port Immunity Test Levels - Professional Phenomenon Basic EMC Standard Healthcare Facility Environment ± 8 kV contact Electrostatic Discharge IEC 61000-4-2 ± 2 kV, ± 4 kV, ± 8 kV, ± 15 kV air 0,15 MHz – 80 MHz Conducted Disturbances Induced by 6 V in ISM bands between 0,15 MHz and 80 IEC 61000-4-6...
- Page 49 IX. Reference Table 9 - Test specifications for ENCLOSURE PORT IMMUNITY to RF wireless communications equipment Test Maximum Immunity Band Distance Frequency Service Modulation Power Test Level (MHz) (MHz) (V/m) 380 – 390 TETRA 400 Pulse modulation 18 Hz GMRS 460, ±...
- Page 50 ITEM MODEL MANUFACTURER Cable length [mm] EEG Preamplifier Cable (short) 040656 Natus Medical 812 mm EEG Preamplifier Cable (long) 030697 Natus Medical 1,727 mm EEG Leads (used with long EEG cable only) 040740 Natus Medical...