
Related Manuals for Sony SU-WL51


Summary of Contents for Sony SU-WL51
- Page 1 2-652-380-11 (1) To Customers and Sony Dealers Wall-Mount Bracket Instructions Mode d’emploi Instrucciones Gebrauchsanweisung Instructies Istruzioni Instruções Vejledning Bruksanvisning SU-WL51 © 2005 Sony Corporation...
- Page 2 Sony is not liable for any damages or dropping can result. injury caused by mishandling or improper installation. Please give this manual to the customer after installation.
- Page 3 Be sure to subcontract moving or Do not lean on or hang from the TV dismounting of the TV or monitor to or monitor. licensed contractors. Do not lean on or hang from the TV or monitor as it may fall on you and cause If persons other than licensed contractors transport or serious injury.
-
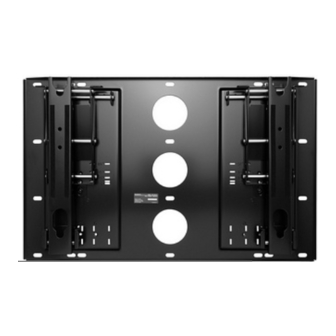
Page 4: Installing The Wall-Mount Bracket
Sufficient expertise is required for installing this product. surface. Be sure to subcontract the installation to Sony dealers or licensed contractors and pay special attention to safety Do not install the Wall-Mount Bracket on during the installation. - Page 5 Be sure to tighten the screws Before installation securely in the designated position. If you intend to install a TV or monitor that is not If you fail to do so, the TV or monitor may fall, and cause specified on page 2, be sure to refer to the leaflet bodily injury to someone or damage to the TV or monitor.
- Page 6 Step 2: Step 3: Deciding on the Installing the Plate Unit installation location on the wall Referring to the TV or monitor Secure the Plate Unit to the wall installing dimensions table on using four or more M8 or page 12 and placing the supplied equivalent screws (not supplied).
- Page 7 Adjust the angle of the arms. Change the position of the Mounting Hook Unit support When installing the TV or monitor perpendicularly (0 degrees), adjustment of the arm angle (procedures 1 shafts. and 2 below) is not necessary. Make sure that each 1 Remove the screws securing the both left and right arm base is screwed in securely.
- Page 8 Step 4: Detach the Table-Top Stand from the TV or monitor. Preparing for the installation of the TV or monitor The procedure differs depending on the TV or monitor. Apply the procedure appropriate for the TV or monitor you are installing. KDL-40S2000/KDL-40S2010....
- Page 9 Step 5: Connect the AC power cord and the connecting cable(s) supplied Installing the TV or with the TV or monitor to the TV or monitor. monitor on the Plate Unit Connect the AC power cord and the connecting cable(s) to the connectors on the rear side of the TV or monitor.
-
Page 10: Confirming The Completion Of The Installation
Step 5: 6 Firmly tighten the securing screws screwed in temporarily in procedure 1. Installing the TV or monitor on the Plate Unit (Continued) Install the TV or monitor onto the Plate Unit. 1 Insert the screws (+B6×L20, supplied) into the screw holes on the outer left and right sides of the Mounting Hook Unit support shafts, and tighten them temporarily.