Table of Contents
Advertisement
Advertisement
Table of Contents

Related Manuals for MSI MS-6390


Summary of Contents for MSI MS-6390
- Page 1 MS-6390 (v3.X) M-ATX Mainboard G52-M6390X2...
-
Page 2: Fcc-B Radio Frequency Interference Statement
Shielded interface cables and A.C. power cord, if any, must be used in order to comply with the emission limits. VOIR LA NOTICE D’INSTALLATION AVANT DE RACCORDER AU RESEAU. Micro-Star International MS-6390 Tested to comply with FCC Standard For Home or Office Use... -
Page 3: Copyright Notice
Alternatively, please try the following help resources for further guidance. Visit the MSI website for FAQ, technical guide, BIOS updates, driver updates, and other information: http://www.msi.com.tw/ Contact our technical staff at: support@msi.com.tw... -
Page 4: Safety Instructions
Safety Instructions Always read the safety instructions carefully. Keep this User’s Manual for future reference. Keep this equipment away from humidity. Lay this equipment on a reliable flat surface before setting it up. The openings on the enclosure are for air convection hence protects the equipment from overheating. -
Page 5: Table Of Contents
FCC-B Radio Frequency Interference Statement ... ii Copyright Notice ... iii Trademarks ... iii Revision History ... iii Technical Support ... iii Safety Instructions ... v Chapter 1. Getting Started ... 1-1 Mainboard Specifications ... 1-3 Mainboard Layout ... 1-4 Chapter 2. - Page 6 Parallel Port Connector: LPT1 ... 2-13 Audio Port Connectors ... 2-14 Connectors ... 2-15 Floppy Disk Drive Connector: FDD1 ... 2-15 Internal Speaker Connector: JSP1 ... 2-15 Hard Disk Connectors: IDE1 & IDE2 ... 2-16 Fan Power Connectors: CPUFA1/SYSFA1 ... 2-17 CD-In Connector: JCD1 ...
-
Page 7: Chapter 1. Getting Started
Chapter 1. Getting Started Getting Started Thank you for purchasing the MS-6390 v3.X Micro ATX mainboard. The MS-6390 is based on VIA chipsets for optimal system efficiency. Designed to fit the ad- ® vanced AMD Athlon™, Athlon™ XP or Duron™ processors, the MS-6390 delivers a high performance and professional desk- top platform solution. -
Page 8: Mainboard Specifications
6390 M-ATX Mainboard MS-6390 M-ATX Mainboard Mainboard Specifications Supports Socket A (Socket-462) for AMD processors. Supports up to 2600 or higher speed. Chipset ® KM266 North Bridge - 200/266MHz FSB. - Integrated ProSavage8 2D/3D graphic controller. - AGP 4x and high bandwidth V-link host controller. -
Page 9: Mainboard Specifications
- One serial port (COM A) - One VGA port - One parallel port supports SPP/EPP/ECP mode - One RJ-45 LAN port - Vertical audio ports - One 3-pin internal speaker connector - Six USB 2.0 ports (Rear * 4/ Front * 2) Audio 5.1 channel AC’97 software audio integrated on VT8235 south bridge. -
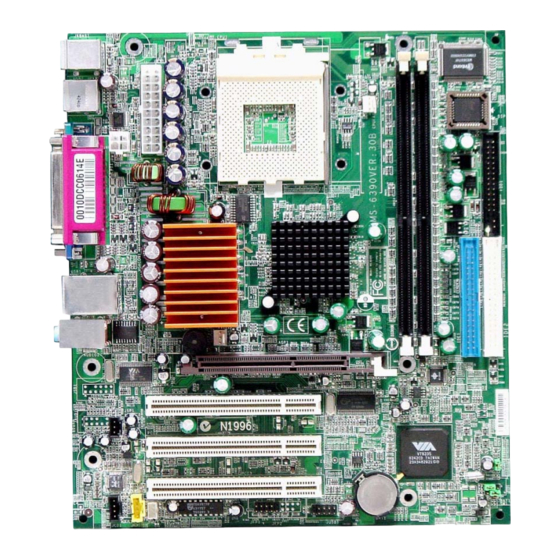
Page 10: Mainboard Layout
VGA Port T: RJ45 LAN Jack B: USB Ports Line-In Line-Out VT6103 JSP1 Codec JCD1 JFMIC JAUX1 MS-6390 v3.X Micro ATX Mainboard CPUFA1 KM266 SYSFA1 AGP Slot PCI Slot 1 PCI Slot 2 PCI Slot 3 BATT JFP1 JUSB1 Winbond... -
Page 11: Chapter 2. Hardware Setup
Chapter 2. Hardware Setup Hardware Setup This chapter provides you with the information about hard- ware setup procedures. While doing the installation, be careful in holding the components and follow the installation procedures. For some components, if you install in the wrong orientation, the components will not work properly. -
Page 12: Quick Components Guide
MS-6390 M-ATX Mainboard 6390 M-ATX Mainboard Quick Components Guide CONN1, p.2-9 JPW1, p.2-9 Back Panel I/O, p.2-10 SYSFA1, p.2-17 AGP Slot, p.2-24 JSP1, p.2-15 JCD1, p.2-18 JAUX1, p.2-18 JFP1, p.2-19 JFMIC, p.2-18 CPU, p.2-3 CPUFA1, p.2-17 DIMM1/2, p.2-7 FDD1, p.2-15 IDE1/2, p.2-16... -
Page 13: Central Processing Unit: Cpu
Central Processing Unit: CPU The mainboard supports AMD processors in the 462 pin package. The mainboard uses a CPU socket called Socket A for easy CPU installation. When you are installing the CPU, make sure the CPU has a heat sink and a cooling fan attached on the top to prevent overheating. -
Page 14: Cpu Installation Procedures For Socket 462
MS-6390 M-ATX Mainboard 6390 M-ATX Mainboard CPU Installation Procedures for Socket 462 1. Please turn off the power and unplug the power cord before installing the CPU. 2. Pull the lever sideways away from the socket. Make sure to raise the lever up to a 90- degree angle. -
Page 15: Installing Amd Athlon Cpu (Socket 462) Cooler Set
Installing AMD Athlon CPU (Socket 462) Cooler Set The following instructions will guide you through the heat sink installation procedures. Please consult your agent for the proper CPU cooler set. 1. Position your CPU cooler set onto the CPU. 2. Use one end of the clip to hook the latch of the CPU sliding plate. -
Page 16: Setting Cpu Clock Frequency Through Jumper
6390 M-ATX Mainboard Setting CPU Clock Frequency through Jumper The hardware configuration for CPU clock frequency of the motherboard is set to 133MHz by default. Therefore, to make a 100MHz CPU run at 100MHz when it is installed on the board, you have to adjust the CPU clock frequency through jumper. -
Page 17: Memory
The mainboard provides 2 slots for 184-pin DDR SDRAM DIMM (Double In-Line Memory Module) modules and supports the memory size up to 2GB. You can install PC2100/DDR266 or PC1600/DDR200 modules on the DDR DIMM slots (DIMM 1~2). Introduction to DDR SDRAM DDR (Double Data Rate) SDRAM is similar to conventional SDRAM, but doubles the rate by transferring data twice per cycle. -
Page 18: Dimm Module Combination
MS-6390 M-ATX Mainboard 6390 M-ATX Mainboard DIMM Module Combination Install at least one DIMM module on the slots. Memory modules can be installed on the slots in any order. You can install either single- or double-sided modules to meet your own needs. -
Page 19: Power Supply
The mainboard supports ATX power supply for the power system. Be- fore inserting the power supply connector, always make sure that all compo- nents are installed properly to ensure that no damage will be caused. ATX 20-Pin Power Connector: CONN1 This connector allows you to connect to an ATX power supply. -
Page 20: Back Panel
MS-6390 M-ATX Mainboard 6390 M-ATX Mainboard The back panel provides the following connectors: Mouse Keyboard USB COM A Mouse/Keyboard Connector The mainboard provides a standard PS/2 connector for attaching a PS/2 keyboard directly into this connector. The connector location and pin assign-... -
Page 21: Usb Connectors
USB Connectors The mainboard provides four UHCI (Universal Host Controller Interface) Universal Serial Bus roots for attaching USB devices such as keyboard, mouse or other USB-compatible devices. You can plug USB devices directly into the connectors. 1 2 3 4 USB Ports RJ-45 LAN Jack The mainboard provides one standard RJ-45 jack for connection to Local... -
Page 22: Serial Port Connector: Com A
MS-6390 M-ATX Mainboard 6390 M-ATX Mainboard Serial Port Connector: COM A The mainboard provides one 9-pin serial port connector COM A. This port is a 16550A high speed communication port that sends/receives 16 bytes FIFOs. You can attach a serial mouse or other serial devices directly to the connector. -
Page 23: Parallel Port Connector: Lpt1
Parallel Port Connector: LPT1 The mainboard provides a 25-pin female centronic connector as LPT. A parallel port is a standard printer port that supports Enhanced Parallel Port (EPP) and Extended Capabilities Parallel Port (ECP) mode. SIGNAL STROBE DATA0 DATA1 DATA2 DATA3 DATA4 DATA5... -
Page 24: Audio Port Connectors
MS-6390 M-ATX Mainboard 6390 M-ATX Mainboard Audio Port Connectors Line Out is a connector for Speakers or Headphones. Line In is used for external CD player, Tape player, or other audio devices. Mic is a connector for microphones. Line In 1/8”... -
Page 25: Connectors
The mainboard provides connectors to connect to FDD, IDE HDD, case, modem, LAN, USB Ports, IR module and CPU/System/Power Supply FAN. Floppy Disk Drive Connector: FDD1 The mainboard provides a standard floppy disk drive connector that supports 360K, 720K, 1.2M, 1.44M and 2.88M floppy disk types. Internal Speaker Connector: JSP1 This connector is used to connect the internal speaker if available. -
Page 26: Hard Disk Connectors: Ide1 & Ide2
MS-6390 M-ATX Mainboard 6390 M-ATX Mainboard Hard Disk Connectors: IDE1 & IDE2 The mainboard has a 32-bit Enhanced PCI IDE and Ultra ATA 66/100 controller that provides PIO mode 0~4, Bus Master, and Ultra ATA 66/100 function. You can connect up to four hard disk drives, CD-ROM, 120MB Floppy (reserved for future BIOS) and other devices. -
Page 27: Fan Power Connectors: Cpufa1/Sysfa1
Fan Power Connectors: CPUFA1/SYSFA1 The CPUFA1 (processor fan) and SYSFA1 (system fan) support system cooling fan with +12V. It supports three-pin head connector. When connecting the wire to the connectors, always take note that the red wire is the positive and should be connected to the +12V, the black wire is Ground and should be connected to GND. -
Page 28: Cd-In Connector: Jcd1
MS-6390 M-ATX Mainboard 6390 M-ATX Mainboard CD-In Connector: JCD1 The connector is for CD-ROM audio connector. Aux Line-In Connector: JAUX1 The connector is for DVD add-on card with Line-in connector. Front Microphone Connector: JFMIC This connector is used to connect the front panel microphone if available. -
Page 29: Front Panel Connector: Jfp1
Front Panel Connector: JFP1 The mainboard provides one front panel connector for electrical connec- tion to the front panel switches and LEDs. The JFP1 is compliant with Intel Front Panel I/O Connectivity Design Guide. SIGNAL HD_LED_P FP PWR/SLP HD_LED_N FP PWR/SLP RST_SW_N PWR_SW_P RST_SW_P... -
Page 30: Front Usb Connector: Jusb1
MS-6390 M-ATX Mainboard 6390 M-ATX Mainboard Front USB Connector: JUSB1 The mainboard provides one USB 2.0 pin header JUSB1 (optional USB 2. 0 bracket available) that is compliant with Intel USB 2.0 technology increases data transfer rate up to a maximum throughput of 480Mbps, which is 40 times faster than USB 1.1, and is ideal for connecting... -
Page 31: Jumpers
The motherboard provides the following jumpers for you to set the computer’s function. This section will explain how to change your motherboard’s function through the use of jumpers. Clear CMOS Jumper: JBAT1 There is a CMOS RAM on board that has a power supply from external battery to keep the data of system configuration. -
Page 32: Fsb Clock Jumper: Sw1
MS-6390 M-ATX Mainboard 6390 M-ATX Mainboard FSB Clock Jumper: SW1 These two jumpers provide 100MHz and 133MHz Front Side Bus fre- quency selection for overclocking purpose. FSB = 100MHz FSB = 133MHz 2-22... -
Page 33: Clear Bios Password Jumper: Jpwd1
Hardware Setup Clear BIOS Password Jumper: JPWD1 The jumper is used to clear the BIOS password. To clear the password, open the jumper and restart your computer. JPWD1 Clear Normal 2-23... -
Page 34: Slots
MS-6390 M-ATX Mainboard 6390 M-ATX Mainboard The motherboard provides one AGP slot and three 32-bit Master PCI bus slots. AGP Slot PCI Slots AGP (Accelerated Graphics Port) Slot The AGP slot allows you to insert the AGP graphics card. AGP is an interface specification designed for the throughput demands of 3D graphics. -
Page 35: Pci Interrupt Request Routing
PCI Interrupt Request Routing The IRQ, acronym of interrupt request line and pronounced I-R-Q, are hardware lines over which devices can send interrupt signals to the microprocessor. The PCI IRQ pins are typically connected to the PCI bus INT A# ~ INT D# pins as follows: Order 1 PCI Slot 1 INT A#... -
Page 36: Chapter 3. Bios Setup
Chapter 3. BIOS Setup BIOS Setup This chapter provides information on the BIOS Setup pro- gram and allows you to configure the system for optimum use. You may need to run the Setup program when: An error message appears on the screen during the system booting up, and requests you to run SETUP. -
Page 37: Entering Setup
6390 M-ATX Mainboard Entering Setup Power on the computer and the system will start POST (Power On Self Test) process. Press <F1> to enter the BIOS Setup. If you fail to press <F1> and the system enters to the Windows OS and you still wish to enter Setup, restart the system by turning it OFF and On or pressing the RESET button. -
Page 38: Getting Help
Getting Help After entering the Setup menu, the first menu you will see is the Main Menu. Main Menu The main menu lists the setup functions you can make changes to. You can use the arrow keys ( highlighted setup function is displayed at the bottom of the screen. Sub-Menu If you find a right pointer symbol (as shown in the right view) appears to the left of certain fields that means a sub-... -
Page 39: Main
6390 M-ATX Mainboard Once you enter Phoenix-Award menu will appear on the screen. The Main menu allows you to select some basic information about the system. Use arrow keys to select among the items and press <Enter> to accept or enter the sub-menu. System Date This allows you to set the system to the date that you want (usually the current date). - Page 40 BIOS Setup Floppy Diskette A This item allows you to set the type of floppy drives installed. Available options: Disabled, 720K, 3.5 in., 1.44M, 3.5 in., 2.88M, 3.5 in. Primary/Secondary Master/Slave Press PgUp/<+> or PgDn/<-> to select Manual, None or Auto type. Note that the specifications of your drive must match with the drive table.
-
Page 41: Advanced
6390 M-ATX Mainboard Advanced CPU Type / CPU Speed / CPU Cache RAM These items show the related information of CPU. (read-only) Plug and Play Aware O/S When set to Yes, BIOS will only initialize the PnP cards used for booting (VGA, IDE, SCSI). - Page 42 BIOS Setup PS/2 Mouse If your system has a PS/2 mouse port and you install a serial pointing device, select Disabled. Setting options: Auto Detected, Disabled, Enabled. Local Bus IDE Adapter The chipset contains a PCI IDE interface with support for two IDE channels. Select Primary to activate the only primary IDE interface, if you install an add- in secondary interface.
- Page 43 6390 M-ATX Mainboard I/O device Configuration Press <Enter> to enter the sub-menu screen. Serial Port Setting to Enabled to use the serial port. Setting options: Enabled, Disabled. Base Address/Interrupt This item is to select an address and corresponding address/inter- rupt for the first and second serial ports, and it is available only when Serial Port is set to Enabled.
- Page 44 On-Board Audio Options Press <Enter> to enter the sub-menu screen. Codec This item is used to enable or disable the onboard AC’97 (Audio Codec’97) feature. Selecting Auto allows the mainboard to detect whether an audio device is used. If an audio device is detected, the onboard AC’97 controller will be enabled;...
-
Page 45: Power
6390 M-ATX Mainboard After AC Power Failure This setting specifies whether your system will reboot after a power failure or interrupt occurs. Available settings are: Stay Off Leaves the computer in the power off state. Power On Leaves the computer in the power on state. Auto Restores the system to the previous status before power failure or interrupt occurred. -
Page 46: Boot
Quick Boot Mode Setting the item to Enabled allows the system to boot within 5 seconds since it will skip some check items. Available options: Enabled, Disabled. Boot Device Priority Press <Enter> to enter the sub-menu and the following screen appears: Boot Device Priority: 1st/2nd/3rd/4th The items allow you to set the sequence of boot devices where BIOS attempts to load the disk operating system. - Page 47 6390 M-ATX Mainboard MSI Reminds You... Available settings for “1st/2nd/3rd/4th Boot Device” vary de- pending on the bootable devices you have installed. For example, if you did not install a floppy drive, the setting “Floppy” does not show up. Hark Disk Boot Priority Press <Enter>...
-
Page 48: Exit
Exit Saving Changes / Exit Discarding Changes / Load Setup Default / Discard Changes / Save Changes You may choose one of these options before leaving the BIOS setup utility. Exit Saving Change Exit System Setup utility and saves your changes Exit Discarding Changes Load Setup Default Load the default values for all the setup items.