Table of Contents
Advertisement
Quick Links
Advertisement
Table of Contents

Related Manuals for Husqvarna QCE9450X


Summary of Contents for Husqvarna QCE9450X
- Page 1 QCE9450X User Manual Steam oven USER MANUAL...
-
Page 2: Table Of Contents
DEAR CUSTOMER Thank you for choosing this Husqvarna-Electrolux product. We have created it to give you impeccable performance for many years, with innovative technologies that help make life simpler – features you might not find on ordinary appliances. Please spend a few minutes reading to get the very best from it. -
Page 3: Safety Information
SAFETY INFORMATION 8.2 How to set: Clock functions... 21 12.4 How to clean: Water tank.....35 12.5 Cleaning Reminder...... 36 9. HOW TO USE: ACCESSORIES....23 12.6 How to remove and install: Door..36 9.1 Inserting accessories..... 23 12.7 How to replace: Lamp....38 9.2 Food Sensor........ -
Page 4: General Safety
SAFETY INFORMATION hazards involved. Children of less than 8 years of age and persons with very extensive and complex disabilities shall be kept away from the appliance unless continuously supervised. Children should be supervised to ensure that they do not •... -
Page 5: Safety Instructions
SAFETY INSTRUCTIONS WARNING: Ensure that the appliance is switched off before • replacing the lamp to avoid the possibility of electric shock. WARNING: The appliance and its accessible parts become • hot during use. Care should be taken to avoid touching heating elements or the surface of the appliance cavity. -
Page 6: Electrical Connection
SAFETY INSTRUCTIONS Cabinet width 560 mm Cabinet depth 550 (550) mm Height of the front of the appliance 594 mm Height of the back of the appliance 576 mm Width of the front of the appliance 595 mm Width of the back of the appliance 559 mm Depth of the appliance 569 mm... -
Page 7: Use
SAFETY INSTRUCTIONS • Use only correct isolation devices: line protecting cut-outs, fuses (screw type fuses removed from the holder), earth leakage trips and contactors. • The electrical installation must have an isolation device which lets you disconnect the appliance from the mains at all poles. The isolation device must have a contact opening width of minimum 3 mm. -
Page 8: Care And Cleaning
SAFETY INSTRUCTIONS • To prevent damage or discoloration to the enamel: – do not put ovenware or other objects in the appliance directly on the bottom. – do not put aluminium foil directly on the bottom of cavity of the appliance. –... -
Page 9: Steam Cooking
INSTALLATION – Remove any pets (especially birds) from the vicinity of the appliance location during and after the Pyrolytic cleaning and first use maximum temperature operation to a well ventilated area. • Small pets can also be highly sensitive to the localized temperature changes in the vicinity of all Pyrolytic Ovens when the Pyrolytic self cleaning program is in operation. -
Page 10: Building In
INSTALLATION 3.1 Building in (*mm) min. 550 min. 560 (*mm) min. 550 min. 560 10/48... -
Page 11: Securing The Oven To The Cabinet
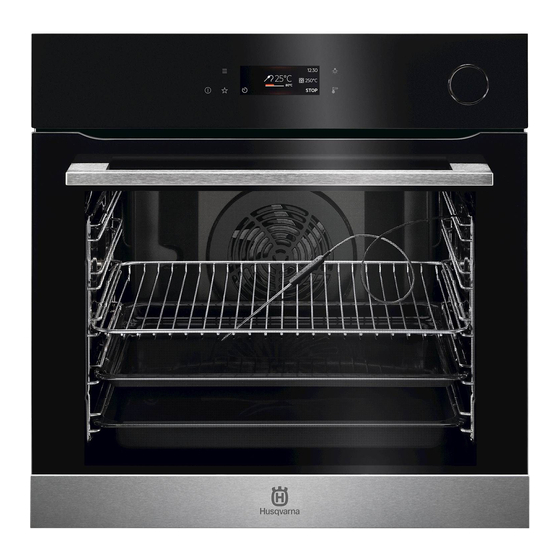
PRODUCT DESCRIPTION 3.2 Securing the oven to the cabinet 4. PRODUCT DESCRIPTION 4.1 General overview Control panel Electronic programmer Water drawer Socket for the food sensor Heating element Lamp Shelf support, removable Draining pipe Water outlet valve Shelf positions Steam inlet 11/48... -
Page 12: Accessories
HOW TO TURN APPLIANCE ON AND OFF 4.2 Accessories • Wire shelf For cookware, cake tins, roasts. • Easy2Clean: Non-stick baking tray For baking without baking paper. • Grill- / Roasting pan To bake and roast or as pan to collect fat. •... -
Page 13: Display
HOW TO TURN APPLIANCE ON AND OFF Press Move Press and hold Touch the surface with finger‐ Slide fingertip over the sur‐ Touch the surface for 3 sec‐ tip. face. onds. 5.2 Display After turning on, the display shows the main 12:30 12:30 screen with the heating function and the default... -
Page 14: Before First Use
BEFORE FIRST USE To go one To confirm the selection / set‐ To undo the To turn the options on and level back in ting. last action. off. the menu. Sound alarm function indicators - when the set time of cooking ends, the signal sounds. The function is on. -
Page 15: Daily Use
DAILY USE Preheat the empty oven before the first use. Step 3 Set the maximum temperature for the function: Let the oven operate for 15 min. The oven can emit an odour and smoke during preheating. Make sure that the room is ventila‐ ted. - Page 16 DAILY USE Step 2 Set the steam heating function. Step 3 Press: . The display shows the temperature settings. Step 4 Set the temperature. Step 5 Press: Step 6 Press the cover of the water drawer to open it. Step 7 Fill the water drawer with cold water to the maximum level (around 900 ml) until the signal sounds or the display shows the message.
-
Page 17: Water Tank
DAILY USE 7.3 Water tank Water tank indicator The tank is full. The tank is half full. The tank is empty. Refill the tank. If you put too much water into the tank, the safety outlet moves the excess water to the bottom of the cavity. -
Page 18: Heating Functions
DAILY USE Step 3 Press: . Enter: Assisted Cooking. Step 4 Choose a dish or a food type. Step 5 Press: Take a shortcut! 7.5 Heating functions STANDARD Heating function Application To grill thin pieces of food and to toast bread. Grill To roast large meat joints or poultry with bones on one shelf position. - Page 19 DAILY USE Heating function Application To bake cakes with crispy bottom and to preserve food. Bottom Heat To speed up the rising of the yeast dough. It prevents dough surface from drying and keeps the dough elastic. Dough Proving SPECIALS Heating function Application To preserve vegetables (e.g., pickles).
-
Page 20: Notes On: Moist Fan Baking
DAILY USE Heating function Application This function is designed to save energy during cooking. When you use this function, the temperature in the cavity may differ from the set temper‐ ature. The residual heat is used. The heating power may be reduced. For Moist Fan Baking more information refer to "Daily Use"... -
Page 21: Clock Functions
CLOCK FUNCTIONS 8. CLOCK FUNCTIONS 8.1 Clock functions description Clock function Application Cooking time To set the length of cooking. Maximum is 23 h 59 min. End action To set what happens when the timer ends counting. Delayed start To postpone the start and / or end of cooking. Time extension To extend cooking time. - Page 22 CLOCK FUNCTIONS How to choose end option Step 1 Choose the heating function and set the temperature. Step 2 Press: Step 3 Set the cooking time. Step 4 Press: Step 5 Press: End action. Step 6 Choose the preferred: End action. Step 7 Press: .
-
Page 23: How To Use: Accessories
HOW TO USE: ACCESSORIES How to change timer settings Step 1 Press: Step 2 Set the timer value. Step 3 Press: You can change the set time during cooking at any time. 9. HOW TO USE: ACCESSORIES 9.1 Inserting accessories A small indentation at the top increases safety. -
Page 24: Food Sensor
HOW TO USE: ACCESSORIES Wire shelf, Deep pan: Push the tray between the guide bars of the shelf support and the wire shelf on the guide bars above. 9.2 Food Sensor Food Sensor- measures the temperature inside the food. You can use it with every heating function. - Page 25 HOW TO USE: ACCESSORIES Insert the tip of Food Sensor into the centre Insert the tip of Food Sensor exactly in the centre of meat, fish, in the thickest part if possible. of the casserole. Food Sensor should be stabi‐ Make sure that at least 3/4 of Food Sensor is lized in one place during baking.
-
Page 26: Accessories For Steam Cooking
HOW TO USE: ACCESSORIES Take a shortcut! 9.3 Accessories for steam cooking The steam kit accessories are not supplied with the oven. For more information, please contact your local supplier. The dietary baking dish for steam cooking functions Dietary Baking dish consists of a glass bowl (A), a lid (B), injector tube (C), injector (D), and a steel grill (E). -
Page 27: Steam Cooking In A Dietary Baking Dish
HOW TO USE: ACCESSORIES Injector, injector tube, and a steel grill. Steel grill (E) • Do not put the hot baking dish on cold / wet surfaces. • Do not pour cold liquids into the baking dish when it is hot. •... -
Page 28: Additional Functions
ADDITIONAL FUNCTIONS 10. ADDITIONAL FUNCTIONS 10.1 How to save: Favourites You can save your favourite settings, such as the heating function, the cooking time, the temperature or the cleaning function. You can save 3 favourite settings. Step 1 Turn on the appliance. Step 2 Select the preferred setting. -
Page 29: Cooling Fan
HINTS AND TIPS (°C) 250 - maximum The Automatic switch-off does not work with the functions: Light, Food sensor, End time, Slow Cooking. 10.4 Cooling fan When the appliance operates, the cooling fan turns on automatically to keep the surfaces of the appliance cool. - Page 30 HINTS AND TIPS (°C) (min) Swiss Roll baking tray or dripping 25 - 35 Brownie baking tray or dripping 25 - 30 Soufflè, 6 pieces ceramic ramekins on 25 - 30 wire shelf Sponge flan base flan base tin on wire shelf 15 - 25 Victoria sandwich baking dish on wire shelf...
-
Page 31: Moist Fan Baking - Recommended Accessories
HINTS AND TIPS (°C) (min) Tartlets, 8 pieces baking tray or dripping 20 - 30 Vegetables, baking tray or dripping 35 - 45 poached, 0.4 kg Vegetarian ome‐ pizza pan on wire shelf 25 - 30 lette Mediterranean baking tray or dripping 25 - 30 vegetables, 0.7 11.3 Moist Fan Baking - recommended accessories... - Page 32 HINTS AND TIPS (°C) (min) Small Conven‐ Baking 20 - 30 cakes, tional tray 20 per Cooking tray Small True Fan Baking 150 - 20 - 35 cakes, Cooking tray 20 per tray Small True Fan Baking 2 and 4 150 - 20 - 35 cakes,...
-
Page 33: Care And Cleaning
CARE AND CLEANING (°C) (min) Short True Fan Baking 140 - 20 - 40 bread Cooking tray Short True Fan Baking 2 and 4 140 - 25 - 45 bread Cooking tray Short Conven‐ Baking 140 - 25 - 45 bread tional tray... -
Page 34: How To Remove: Shelf Supports
CARE AND CLEANING Clean the cavity after each use. Fat accumulation or other residue may cause fire. Moisture can condense in the appliance or on the door glass panels. To de‐ crease the condensation, let the appliance work for 10 minutes before cooking. Do not store the food in the appliance for longer than 20 minutes. -
Page 35: How To Clean: Water Tank
CARE AND CLEANING Before the Pyrolytic Cleaning: Turn off the oven and wait Remove all accessories. Clean the oven floor and the in‐ until it is cold. ner door glass with warm water, a soft cloth and a mild detergent. Step 1 Step 2 Step 3... -
Page 36: Cleaning Reminder
CARE AND CLEANING To prevent limestone residue empty the water tank after each steam cooking. When the cleaning ends: Turn off the oven. Empty the water Rinse the water tank and Clean the drain pipe tank. Refer to Daily clean the remaining lime‐ with warm water use, "Emptying the stone residue with a soft... - Page 37 CARE AND CLEANING Step 1 Open the door fully and hold both hinges. Step 2 Lift and pull the latches until they click. Step 3 Close the oven door halfway to the first opening position. Then lift and pull to remove the door from its seat. Step 4 Put the door on a soft cloth on a sta‐...
-
Page 38: How To Replace: Lamp
CARE AND CLEANING Step 8 Clean the glass panels with water and soap. Dry the glass panels carefully. Do not clean the glass panels in the dishwasher. Step 9 After cleaning, install the glass panels and the oven door. If the door is installed correctly, you will hear a click when closing the latches. Make sure that you put the glass panels (A and B) back in the correct sequence. -
Page 39: Troubleshooting
TROUBLESHOOTING Back lamp Step 1 Turn the glass cover to remove it. Step 2 Clean the glass cover. Step 3 Replace the lamp with a suitable 300 °C heat-resistant lamp. Step 4 Install the glass cover. 13. TROUBLESHOOTING WARNING! Refer to Safety chapters. 13.1 What to do if... -
Page 40: How To Manage: Error Codes
TROUBLESHOOTING Components Description Remedy The lamp is burnt out. Replace the lamp, for details refer to "Care and Cleaning" chapter, How to replace: Lamp. Cleaning Description Remedy There is water in the appliance cavity. There is not too much water in the water tank. The steam cooking does not work. -
Page 41: Service Data
Serial number (S.N.) ......... 14. ENERGY EFFICIENCY 14.1 Product Information and Product Information Sheet* Supplier's name Husqvarna Model identification QCE9450X 949494792 Energy Efficiency Index 81.2 Energy efficiency class Energy consumption with a standard load, conventional 0.93 kWh/cycle mode Energy consumption with a standard load, fan-forced 0.69 kWh/cycle... -
Page 42: Energy Saving
ENERGY EFFICIENCY Heat source Electricity Volume 72 l Type of oven Built-In Oven Mass 36.1 kg * For European Union according to EU Regulations 65/2014 and 66/2014. For Republic of Belarus according to STB 2478-2017, Appendix G; STB 2477-2017, Annexes A and B. -
Page 43: Menu Structure
MENU STRUCTURE 15. MENU STRUCTURE 15.1 Menu Press to open Menu. Menu item Application Assisted Cooking Lists automatic programmes. Cleaning Lists cleaning programmes. Favourites Lists the favourite settings. Options To set the appliance configuration. Settings Setup To set the appliance configuration. Service Shows the software version and con‐... -
Page 44: Submenu For: Setup
MENU STRUCTURE Submenu Application Child Lock Prevents accidental activation of the appliance. When the option is on, the text "Child Lock" appears on the display when you turn on the appliance. To enable the appliance use, choose the code letters in the alphabetical order. When the Child Lock is on and the appliance is turned off the ap‐... -
Page 45: S Easy
IT'S EASY! 16. IT'S EASY! Before first use you have to set: Display bright‐ Language Key tones Buzzer volume Time of day ness Familiarize yourself with the basic icons on the control panel and the display: ON / OFF Menu Favourites Timer Food sensor... -
Page 46: Take A Shortcut
IT'S EASY! Steam cooking 130 °C 200 - 220 °C 150 - 210 °C 160 - 200 °C Get to know how to cook quickly Use the automatic programmes to prepare a dish quickly with the default settings: Assisted Step 1 Step 2 Step 3 Step 4... -
Page 47: Environmental Concerns
TAKE A SHORTCUT! How to delay: Start and end of cooking How to cancel: Set Timer How to use: Food Sensor 18. ENVIRONMENTAL CONCERNS Recycle materials with the symbol . Put the packaging in relevant containers to recycle it. Help protect the environment and human health by recycling waste of electrical and electronic appliances. - Page 48 www.husqvarna-electrolux.se/shop...