Advertisement
- 1 CONTENTS & PARTS CHECKLIST
- 2 IMPORTANT SAFETY INSTRUCTIONS
- 3 TECHNICAL INFORMATION
- 4 INSTALLING YOUR W425 PRO
- 5 WALL MOUNTING YOUR W425 PRO
- 6 BATTERY INFORMATION
- 7 FEATURE LIST AND OVERVIEW
- 8 PROGRAMMING/DIALING MEMORY KEYS
- 9 FEATURE LIST AND OVERVIEW
- 10 BOOST FUNCTION - AMPLIFY INCOMING SOUNDS
- 11 TROUBLESHOOTING
- 12 Documents / Resources
CONTENTS & PARTS CHECKLIST
Your package includes all the items as shown here. If there is anything missing, please contact our Customer Care Department immediately.
NOTE: PLEASE RETAIN A COPY OF PROOF OF PURCHASE FOR YOUR RECORDS.

IMPORTANT SAFETY INSTRUCTIONS
When using your telephone equipment, basic safety precautions should always be followed to reduce the risk of fire, electric shock and injury to persons including the following:
- Read and understand all instructions.
- Follow all warnings and instructions marked on the telephone.
- Do not use this telephone near a bathtub, wash basin, kitchen sink or laundry tub, in a wet basement, near a swimming pool or any where else there is water.
- Avoid using a telephone (other than a cordless type) during a storm. There may be a remote risk of electrical shock from lightning.
- Do not use the telephone to report a gas leak in the vicinity of the leak.
- Unplug this telephone from the wall outlets before cleaning. Do not use liquid cleaners or aerosol cleaners on the telephone. Use a damp cloth for cleaning.
- Place this telephone on a stable surface. Serious damage and/or injury may result if the telephone falls.
- Do not cover the slots and openings on this telephone. This telephone should never be placed near or over a radiator or heat register. This telephone should not be placed in a built-in installation unless proper ventilation is provided.
- Operate this telephone using the electrical voltage as stated on the base unit or the owner's manual. If you are not sure of the voltage in your home, consult your dealer or local power company.
- Do not place anything on the power cord. Install the telephone where no one will step or trip on the cord.
- Do not overload wall outlets or extension cords as this can increase the risk of fire or electrical shock.
- Never push any objects through the slots in the telephone. They can touch dangerous voltage points or short out parts that could result in a risk of fire or electrical shock. Never spill liquid of any kind on the telephone.
- To reduce the risk of electrical shock, do not take this phone apart. Opening or removing covers may expose you to dangerous voltages or other risks. Incorrect reassembly can cause electric shock when the appliance is subsequently used.
- Unplug this product from the wall outlet and refer servicing to the manufacturer under the following conditions: when the power supply cord or plug is frayed or damaged; if liquid has been spilled into the product; if the telephone has been exposed to rain or water; if the telephone does not operate normally by following the operating instructions. Adjust only those controls that are covered by the operating instructions. Improper adjustment may require extensive work by a qualified technician to restore the telephone to normal operation; if the telephone does not operate normally by following the operating instructions; if the telephone has been dropped or the case has been damaged; if the telephone exhibits a distinct change in performance.
- Never install telephone wiring during a lightning storm.
- Never install telephone jacks in wet locations unless the jack is specifically designed for wet locations.
- Never touch uninsulated telephone wires or terminals unless the telephone line has been disconnected at the network interface.
- Use caution when installing or modifying telephone lines.
- Use only the power cord and batteries indicated in this manual. Do not dispose of batteries in a fire. They may explode. Check with local codes for possible special disposal instructions. 20. Plug the DC adapter into the outlet that is nearest and most accessible to the telephone.
![]()
Risk of explosion if battery is replaced by an incorrect type. Dispose of used batteries according to the instructions.
SAVE THESE INSTRUCTIONS
TECHNICAL INFORMATION
Amplified dB Level: 45dB
Dimensions
Handset Size: 7" x 2" x 1 1/4" (H x W x D)
Base Size: 3" x 5 1/2" x 4" (H x W x D)
Weight
Handset Weight: 3.14 oz.
Base Weight: 5.04 oz.
Power Requirements:
AC Adapter: 7.5VDC, 500 mA;
Battery: 3.6V 600mAh Ni-MH, GP60AAAH3BMJ, GPI International Ltd.
(Radio Shack Equivalent Part Number: 23-959)
INSTALLING YOUR W425 PRO
 Connect your telephone as shown - see detailed steps below.
- Connect one end of the phone cord into the (square) LINE port on the back of the phone; connect the other end of the phone cord into your wall telephone outlet.
- Connect the DC adapter cord into the (round) DC 7.5V 500mA port on the back of your phone; plug the adapter into your wall electrical outlet.
- Remove the handset battery door and install the battery pack; align red wire of battery connector to red dot; reattach the battery door.
- When finished, allow the handset to charge for at least 12 hours by placing the handset in the base (face down, as shown below).
After 12 hours of charging, lift the handset and press the TALK button. If you hear a dial tone, your telephone is ready for use. If not, check all connections again.
WALL MOUNTING YOUR W425 PRO

- Pull the handset hook out of the base and reverse its position so that the hook points up and will hold the handset when you hang up. See Figure 1.
- Plug one end of the short flat telephone line cord into the jack marked LINE located on the back of the telephone. Then run the cord through the groove on the back of the phone. Insert the tabs of the mounting bracket into the slots in the back of the phone. Push the mounting bracket in and down firmly until it snaps into place. See Figure 2.
- Plug the flat telephone line cord into the wall plate jack, then align the mounting bracket's keyhole slots with the wall plate studs and slide the base of the phone downward to secure it on the wall. See Figure 3.
BATTERY INFORMATION
The battery in the handset must be fully charged for 12 hours before using the telephone for the first time.
BATTERY LIFE: Talk Time: 6 hours; Standby: 5 days without usage. Actual times will vary depending on the amplifier settings used. Replace battery every two (2) years.
REPLACEMENT BATTERIES: The W425 Pro uses a 3.6Volt 600mAHr NiMH Rechargeable battery GP60AAAH3BMJ, GPI International Ltd.
To Install Batteries: remove battery cover; install battery; close battery cover.
FEATURE LIST AND OVERVIEW

PROGRAMMING/DIALING MEMORY KEYS
The W425 Pro has 3 direct (one-touch) memory locations and 10 indirect (two-touch) memory locations on the telephone (0-9) that can be programmed to dial frequently called numbers of up to 16 digits. 
To Store numbers into memory
- Press the MEM button.
- Dial the number you wish to store.
- Press the MEM button again.
- Press either the emergency button or the number on the dial pad that you wish to store the number to.
- A long beep will indicate the programming process is complete.
To Change a Number Stored into Memory
Replace a stored number by programming a new number in its place.
To Dial from Memory
- Press the TALK button.
- Press the MEM button.
- Press the number on the dial pad where the desired number has been stored.
- The call will automatically dial.
- Adjust volume, tone and Clarity Power as needed.
To Dial From Emergency Storage Location
- Press the TALK button.
- Press the desired emergency button.
- The call will automatically dial.
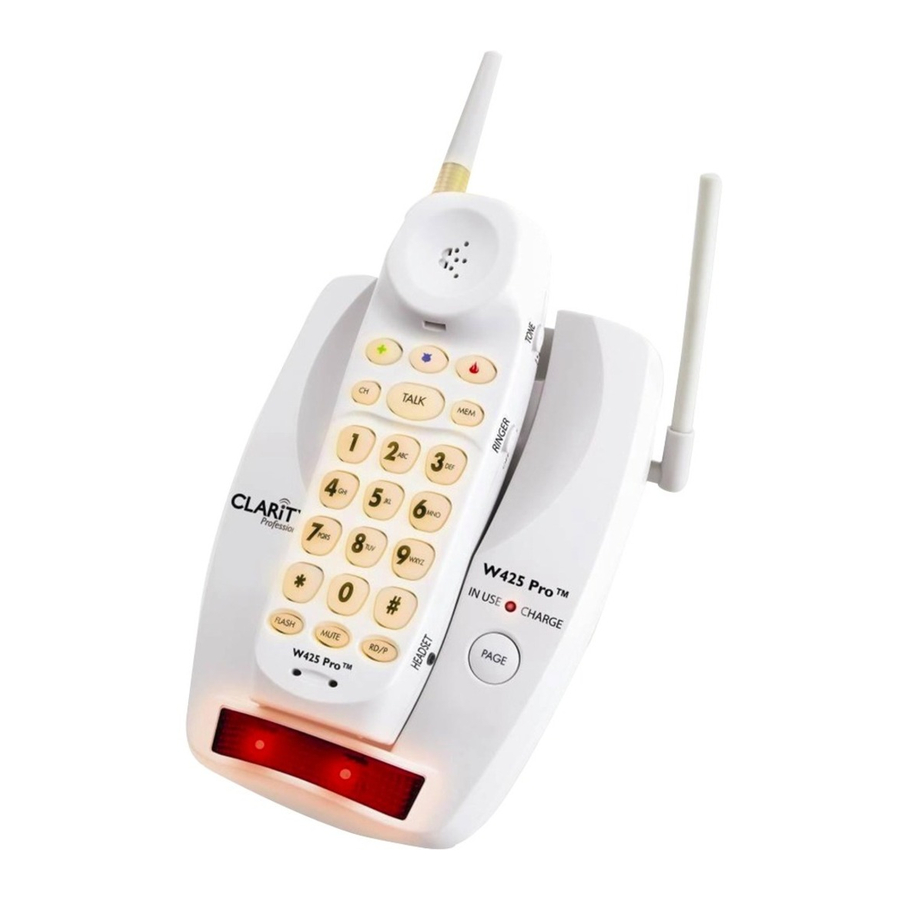
FEATURE LIST AND OVERVIEW
- Antenna/Handset Visual Ringer: the handset antenna lights up when the phone rings and when the BOOST function is engaged.
- Dial Pad: used to dial the phone numbers. The keys also serve as the location for 10 two-touch 2 memory locations (see details under PROGRAMMING section). The dial pad is backlit for ease of use.
- CH (Channel Button): press this button to change channels in case you experience any interference. There are 10 channels available to ensure clear conversations.
- TALK (Talk Button): press TALK to start an outgoing phone call or to answer an incoming call. The TALK button lights up red when the phone is in use.
- MEM (Memory Button): use this button to program the memory keys (see details under PROGRAMMING SECTION).
- Emergency Memory Storage Buttons: 3 one-touch memory keys. To dial out using any of these 6 saved numbers, press the desired key and the handset dials out.
- FLASH (Flash Button): to use custom calling services such as Call Waiting or Three Way Calling.
- MUTE (Mute Button): allows you to conduct a private conversation that you do not want the person on the other end to hear. Pressing the MUTE button again will disengage the MUTE feature.
- RD/P (Redial/Pause): when you hear the dial tone, press this button to redial the last number dialed (up to 32 digits). Press this while programming the memory keys to insert a 4-seconds pause.
- Temporary Tone Button (*): while on a PULSE call, press this key to temporarily change to 10 TONE dialing mode.
- TONE Switch: use this switch to pick one of the 3 tone settings available
- RINGER ON/OFF: set this switch to OFF position if you want to turn off the handset ringer.
- BOOST Clarity Power: press this button to engage the extra amplification (see details on other page). When Boost function is enabled, the antenna light turns on.
- VOLUME Dial: use the rotary control to increase or decrease the volume of the incoming call.
- HEADSET port: use a standard 2.5mm plug headset with your W425 Pro handset.
- Visual Ringer: it lights up when the phone rings.
- Handset Tab: use this if you wish to wall mount your W425 Pro (see section below).
- Base Antenna: ensure that the base antenna is in the upright position for best performance.
- IN USE/CHARGE light (GREEN): the light turns on green if the phone is in use or is charging.
- PAGE: press this key to locate the handset. Once the handset is found, press the TALK key to end the location sounds.
- PULSE/TONE: choose the appropriate dialing mode according to your local settings.
- BOOST ON/OFF: BOOST override function, sets the state of the BOOST function at the beginning of each call (see section BOOST FUNCTION - AMPLIFY INCOMING SOUNDS below).
- RINGER ON/OFF (base): set to OFF if you want to turn off the base ringer.
- VOLUME (UP/DOWN): use these keys to increase/decrease the ringer volume on the base.
- RING STYLE: use this key to choose the most comfortable base ring tone for your environment.
BOOST FUNCTION - AMPLIFY INCOMING SOUNDS

- While on a call, press the BOOST button to engage the Clarity Power amplifier; the antenna light turns on. See Figure 5.
- Adjust the VOLUME rotary control to achieve the desired sound level (up to 45dB of amplification). See Figure 6.
- Adjusting the TONE switch allows you to customize your hearing experience. Since we all have different hearing preferences we suggest exploring each setting to find the one most comfortable for you. See Figure 7. The three available settings are:
- Flat frequency response: best for hearing aid users;
- High Frequency emphasis: best used to hear high frequency sounds;
- Clarity Power: makes words clearer and easier to understsand.
Boost Override Function
On the back of the W425 Pro base, there is a BOOST ON/OFF switch, to enable the Boost Override Function. When this is set to "ON" the Boost function is automatically enabled every time the phone is picked up. In standard use, when the Boost Override switch is set to "OFF" the Boost function will turn off after the phone is hung up. Setting this switch to "ON" is suggested if all the users of the phone need the amplification. Setting this switch to "OFF" is useful when people with varying hearing ability use the phone. During a call, the BOOST CLARITY POWER button can toggle the Clarity Power ON or OFF according to the user's needs. See Figure 8.

VOLUME MAY BE LOUD!
TROUBLESHOOTING
The Unit Will Not Operate/No Dial Tone
- Verify the TALK Button is lit.
- Verify the AC adapter is securely plugged into the AC power outlet and the telephone.
- Verify the telephone line cord is securely plugged into the wall jack and the telephone.
- Make sure the base antenna is in an upright position.
- Make sure the handset battery is fully charged.
- Verify the telephone is in the correct dialing mode, tone (touch) or pulse (rotary).
- Make sure you are in the usable range of the base station.
- Reset the security code by placing the handset in the base for 5-10 seconds.
The Phone Does Not Ring When You Receive a Call
- Make sure the RINGER switch on the handset and base are set to ON.
- Verify the AC adapter is securely plugged into the base and the telephone.
- Verify the telephone line cord is securely plugged into the wall jack and the telephone.
- Make sure you are in the usable range of the base station.
- You may have too many extensions on your line. Try unplugging a few devices.
Noise, Static, Interference or Other Calls Heard while Using the Handset
- Try changing channels.
- Make sure the base antenna is in an upright position.
- Make sure you are in the usable range of the base station.
- Make sure the handset battery is fully charged.
- Try relocating the base unit to another location.
- Make sure the AC adapter is not plugged into the wall outlet with other appliances.
Phone Will Not Hold Charge
- Make sure the charging contacts on the handset and base are free of dust and dirt.
- Clean the contacts with a soft cloth.
- Make sure CHARGE LED on the base is lit when handset is in the cradle. If necessary, replace the handset battery. (See Battery Information.)
Difficulty in Placing or Receiving Calls
- Move closer to the base and try again.
- If moving closer does not work, you may have lost the security code. Reset code by placing the handset back on the base for 5-10 seconds.
- Make sure you have selected the correct dialing mode, tone or pulse.
- Make sure the AC adapter is not plugged into a wall outlet with other appliances.
- Disconnect for 5-10 seconds then reconnect. Place the handset back on the base and reinsert the AC adapter.
- Make sure the handset battery is fully charged.
Clarity, a Division of Plantronics, Inc.
4289 Bonny Oaks Drive, Suite 106
Chattanooga, TN 37406
1-800-426-3738
www.clarityproducts.com
© 2009 Clarity, a division of Plantronics, Inc. All rights reserved. Amplifying your life, Clarity, the amplification device, Clarity and the amplification device combined, Clarity Professional, W425 Pro, Clarity Power are trademarks or registered trademarks of Plantronics, Inc.

Documents / ResourcesDownload manual
Here you can download full pdf version of manual, it may contain additional safety instructions, warranty information, FCC rules, etc.
Advertisement
Thank you! Your question has been received!


Need Assistance?
Do you have a question about the Clarity W425 Pro that isn't answered in the manual? Leave your question here.