Plantronics CT14 User Manual
Headset
Hide thumbs
Also See for CT14:
- User manual (37 pages) ,
- Specifications (2 pages) ,
- User manual (37 pages)
Table of Contents
Advertisement
Advertisement
Table of Contents

Related Manuals for Plantronics CT14


Summary of Contents for Plantronics CT14
- Page 1 Plantronics CT14 ™ User Guide...
- Page 2 Cordless Headset Telephone from ™ Plantronics. This guide contains instructions for setting up and using your system. Please refer to the safety instructions on page 28 of this guide for important product safety information prior to installation or use of the product.
-
Page 3: Table Of Contents
Contents Getting Started Package Contents ....................1 Components .......................2 Installing the Dial Pad Battery ................4 Wearing the Dial Pad with the Belt Clip ..............5 Hooking up the Base ...................6 Charging the Dial Pad ..................6 Wearing the Headset ...................7 Placing, Receiving and Ending Calls ..............8 Adjusting Volume and Muting Calls ..............8 Traveling Out-of-Range ..................9 Settings... - Page 4 Seven-digit Dialing ..................23 Accessing Your Voicemail Service ..............24 One-touch Voice Mail Access ..............24 Setting Voice Mail Signaling Tone ...............25 Resetting the Voice Message Indicator ............25 Using Multiple CT14 Units Together ...............26 Troubleshooting ....................26 Safety Instructions ..................28 Limited Warranty .....................29 Regulatory Notices ..................30...
-
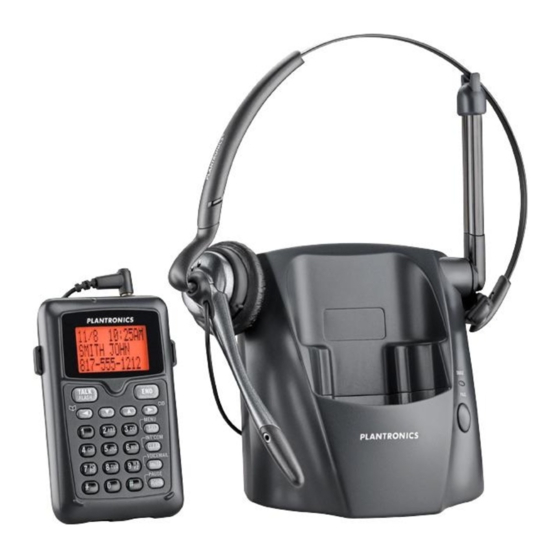
Page 5: Package Contents
Package Contents Base Convertible Headset Dial Pad Battery Pack Battery Door Belt Clip User Guide Telephone Cable AC Power Adapter User Guide... -
Page 6: Components
Base Components Front View Back View Base antenna / headset holder CHARGE indicator (LED) PAGE key DC power input Telephone line jack... - Page 7 Dial Pad Components Front View Top View Headset Jack MESSAGE WAITING* indicator (LED) TALK / FLASH key PHONEBOOK / LEFT (Phonebook / left cursor) key DOWN key UP key END key CID / RIGHT (Caller ID* / right cursor) key MENU / SEL (Menu / Select) key INT’COM / CLEAR (Intercom / Clear) key VOICEMAIL */ MUTE key...
-
Page 8: Installing The Dial Pad Battery
Installing the Dial Pad Battery Black White Remove the belt clip by pulling one side of the belt clip to release the tab from the hole. Squeeze the latch on the battery compartment cover and lift the cover. Connect the Battery Pack connector. Do not force. -
Page 9: Wearing The Dial Pad With The Belt Clip
Wearing the Dial Pad with the Belt Clip Cable route Plug the headset cord into the 2.5mm jack on the top of the dial pad. Route the cord through the dial pad’s cable routing slot on the back of the dial pad. Attach the belt clip only after you have routed the cord. -
Page 10: Hooking Up The Base
Hooking Up the Base Back View Connect the AC adapter power cord to the base and an active AC outlet. Route the power cord as shown in the illustration. Raise the Base Antenna to a vertical position. Charging the Dial Pad Insert the dial pad into the charging cradle on the base. -
Page 11: Wearing The Headset
Wearing the Headset Place the headset on your head so the speaker covers your ear. Adjust the tip of the microphone boom toward the corner of your mouth. You can wear the headset on either ear. The headset has two wearing options: over-the-head or over-the-ear. -
Page 12: Placing, Receiving And Ending Calls
Placing, Receiving and Ending Calls Placing Calls Press and listen for the dial tone. Dial the number. Dial the number and then press Receiving Calls Press (If Any Key Answer is on, press any key on the dial pad.) If dial pad is on base, pick up the dial pad and press (If Auto Talk is on, the phone will answer when you pick up the dial pad from the base.) For information on setting up Any Key Answer or Auto Talk, see page 11. -
Page 13: Traveling Out-Of-Range
Traveling Out-of-Range Your CT14 has a range of up to 300 ft. from the charging base. If you travel out of range while the dial pad is in standby, the dial pad will display Out Of Range, and you will not be able to place/answer calls. -
Page 14: Ringer Tone Setting
Settings Ringer Tone Setting You may choose from three tones or four melodies for your phone’s primary ring tone. Tones Melodies Flicker Fur Elise (Elise) Clatter We Wish You A Merry Christmas (Merry-Xmas) Wake Up Beethoven’s Symphony #9 (Beethoven9) Home Sweet Home (Hm Swt Hm) To Change the Ring Tone Press Select the Handset Setup menu, and then the Ringer Tones submenu. -
Page 15: Activating Auto Talk
Settings Activating Auto Talk Auto Talk allows you to answer the phone simply by picking up the dial pad from the base. You do not have to press a button to answer the call. Press Select the Handset Setup menu, and then the Auto Talk submenu. Move the cursor to select On or Off. -
Page 16: Setting The Dial Mode
Settings Setting Dial Mode Your CT14 is set to tone dialing by default, but you can change the dial mode to pulse dialing. To change the dial mode, press Select the Global Setup menu, and then the Dial Mode submenu. -
Page 17: Changing The Line Mode For Multiple Extensions
Settings Changing the Line Mode for Multiple Extensions Line mode refers to the method that telephones use to signal each other that an extension is in use. Customer service may recommend changing the line mode if you have any of the following problems: Your phone keeps ringing after someone answers on an extension phone. -
Page 18: Re-Registering The Dial Pad
Settings Re-registering the Dial Pad After the dial pad is de-registered, you must re-register the dial pad before you can use it. Place the dial pad in the base cradle for several seconds. When the dial pad has registered to the base, the LCD will display Registration complete, then show the dial pad ID number. -
Page 19: Deleting A Redial Record
Calling Features Deleting a Redial Record With the phone in standby, press to scroll through the redial list. When you find the redial number you want to delete, press select Delete Entry. When the phone asks you to confirm, select Yes. Adjusting the Audio Tone If you aren’t satisfied with the audio quality of your phone, you can adjust the Audio Tone of the headset while on a call. -
Page 20: Phonebook
Phonebook The phonebook in the dial pad holds up to 70 names and numbers. When the phonebook is full, the dial pad beeps and shows Memory Full on the display. You will not be able to add any names and numbers in the dial pad phonebook until you delete some of the existing ones. -
Page 21: Entering Text From Dial Pad
Phonebook Entering Text from Your Dial Pad You can use the number keypad on your dial pad to enter text by referring to the letters printed on each number key. When you press the number key in a text entry field, the phone displays the first letter printed on the number key. -
Page 22: Assigning Ring Tones
Phonebook Assigning Ring Tones You can attach a special ring tone to each phonebook entry; the phone will use this ring tone when this person calls. To assign a ring tone: Find the phonebook entry you would like to assign a ring tone and hit . -
Page 23: Making Calls From The Phonebook
Phonebook Making Calls from the Phonebook With the phone in standby, press to open the phonebook. Find the phonebook entry you want to call. Press to dial the number. You can also press before you open the phonebook. Find the phone number you want to dial, and then press Editing an Existing Phonebook Entry With the phone in standby, press to open the phonebook. -
Page 24: Storing Caller Id Or Redial Numbers
Phonebook Storing Redial or Caller ID Numbers in the Phonebook You can store redial numbers or Caller ID records in the phonebook so you can use them later. Go to the Caller ID or Redial list and select the number you want to store. If the Caller ID information did not include the number, then you will not be able to store it. -
Page 25: Subscription Services
Subscription Services In order to use voice mail, Caller ID or Call Waiting services, you need to subscribe to those services from your telephone service provider. Using Call Waiting If you have Call Waiting service and a second call comes in when you are on the phone, a call waiting tone will sound. -
Page 26: Deleting One Or All Numbers From The Caller Id List
Subscription Services Deleting One Number from the Caller ID List Press when the phone is in standby, and then find the number you want to delete. Press and select Delete Entry. When the phone asks you to confirm, select Yes. Deleting All Numbers from the Caller ID List Press when the phone is in standby. -
Page 27: Seven-Digit Dialing
Subscription Services Seven-digit Dialing If you can make a local call by dialing only seven digits instead of ten, you can tell the phone to hide your local area code in the Caller ID list; any calls from outside your area code will show all ten digits. To program your local area code, press Select the Global Setup menu, and then the Area Code submenu. -
Page 28: Accessing Your Voicemail Service
Subscription Services Accessing Your Voice Mail Service If you subscribe to a voice mail service, you can use your phone to access your voice mailbox. When there are messages waiting in your voice mailbox, the MESSAGE WAITING Indicator on the dial pad flashes, and appears in the dial pad display. -
Page 29: Setting Voice Mail Signaling Tone
Subscription Services Setting Voice Mail Signaling Tone If your message waiting indicator on your phone is not illuminating when you have waiting messages, you need to contact your service provider and ask them which type of message notification signal — either Frequency Shift Keying (FSK) or Stutter Dial Tone (SDT) —... -
Page 30: Using Multiple Ct14 Units Together
CT14 bases, and the base supports a total of six cordless dial pads. Features like intercom, conferencing and transferring are only available if you have multiple units. If you purchase two or more CT14 units, please refer to the instructions posted on the resource tab at: www.plantronics.com/ct14... - Page 31 Troubleshooting When you have this problem Try this The MESSAGE WAITING Reset the MESSAGE WAITING Indicator. indicator flashes, but there are (See page 25) no new messages. The outside caller’s audio If the caller’s voice sounds weak or soft, is weak. the signal might be blocked by large metal objects or walls;...
-
Page 32: Safety Instructions
Important Safety and Operational Information Please read the following safety and operational instructions before using your Plantronics ® headset and accessories. Please keep these instructions for your reference. Additional warnings may be present on the product or packaging. This symbol identifies and alerts the user to the presence of important safety warnings. -
Page 33: Limited Warranty
We may use functionally equivalent reconditioned/refurbished/remanufactured/pre-owned or new Products or parts. • To obtain service in the U.S. contact Plantronics at (800) 544-4660 and in Canada call (800) 540-8363. If you need additional information, please contact our service centers at the numbers provided. -
Page 34: Regulatory Notices
Regulatory Notices FCC Registration Information Changes or modifications to this product not expressly approved by our company, or operation of this product in any way other than as detailed by the owner’s manual, could void your authority to operate this product. This equipment complies with Part 68 of the FCC rules and the requirements adopted by the ACTA. - Page 35 The antenna(s) used for the base-unit must be installed to provide a separation distance of at least 20 cm from all persons and must not be collocated or operated in conjunction with any other antenna or transmitter. Radio interference may occasionally cause buzzing and humming in your cordless dial pad, or clicking noises in the base.