Cleveland 21CET16 Operator's Manual
Cleveland electric steamer operators manual
Hide thumbs
Also See for 21CET16:
- Brochure & specs (6 pages) ,
- Specifications (2 pages) ,
- Operation installation maintenance manual (38 pages)
Table of Contents
Troubleshooting

Related Manuals for Cleveland 21CET16


Summary of Contents for Cleveland 21CET16
- Page 1 Operators Manual Use and Care Instructions Electric Models, SteamCraft Ultra 3, 5, 10 Series: 21CET8, 21CET16, 24CEA10 1333 East 179 Street Cleveland, Ohio 44110 Phone: (216) 481-4900 Fax: (216) 481 3782 Part No. CET-OPM Rev A 1/01...
- Page 2 Disconnect power before servicing IMPORTANT A QUALIFIED CLEVELAND RANGE TECHNICIAN MUST PERFORM ALL SERVICE. RETAIN THIS MANUAL FOR YOUR REFERENCE You may wish to record the following items for future use. Model Number _________________________...
-
Page 3: Table Of Contents
Chapter SECTION 1: INTRODUCTION ______________________________________________ A. OPERATIONAL SAFETY __________________________________________________ B. PRODUCT INFORMATION ________________________________________________ (1) Serial Number ______________________________________________________ (2) Model Number ______________________________________________________ (3) Product information Plate ______________________________________________ C. PRODUCT DESCRIPTION ________________________________________________ SECTION 2: COMPARTMENT CONTROL PANELS _____________________________ A. DIAL TIMER CONTROL PANEL (1) Cooking Operations –... - Page 4 SECTION 7: STEAM COOKING GUIDELINES A. INTRODUCTION ________________________________________________________ B. SIZING UP PAN CAPACITY (1) Serving Sizes – How Much? How Many? (2) Reference Charts for Typical Pan Capacities C. CONVECTION STEAMER – SUGGESTED TIMER SETTING GUIDELINES ___________ D. STEAMING TIPS -LOBSTER -CRAB -SHRIMP (1) Live lobsters and Crabs (2) Lobster Tail 8 oz.
-
Page 5: Introduction
SECTION 1: INTRODUCTION To use a SteamCraft Convection Steamer safely and effectively, each operator must read and understand this Manual completely before starting operation. The owners and operators of the steamer should retain this Manual in an easily accessible location for future reference and training. The owner(s) and operator(s) of the steamer must be aware that steam can cause serious injuries and equipment damage. -
Page 6: Product Information
This manual covers model numbers 21CET8, 21CET16 and 21CEA10. (3) Product Information Plate The Product Information Plate located on the rear (Model 21CET8 and 21CET16) or the left side (Model 24CEA10) of the unit lists the model and serial number as well as the power... -
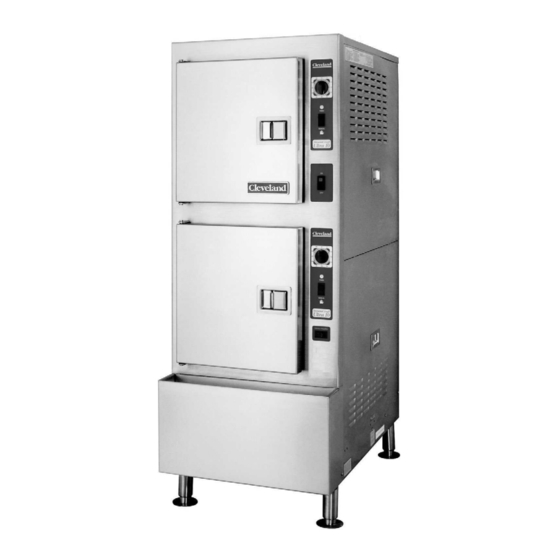
Page 7: Product Description
C. Product Description Models 21CET8, 21CET16 Model 21CET8 (Pictured) Model 24CEA10 Descaling Port Descaling Instructions Compartment Timer TIMED/MANUAL Operation Switch Main Power ON/OFF Switch Descaling Required Switch 4” Adjustable Legs Descaling Ports (2 total, not visible) Descaling Instructions Compartment Timer... -
Page 8: Compartment Control Panels
SECTION 2: The standard steamer control panel, illustrated in Figure 2-1 has a mechanical timer. An optional electronic keypad timer illustrated in Figure 2-2 of SECTION 2, Part B and an ON/OFF control panel are also available. The Electronic timer uses a temperature compensation circuit, which allows the timer to count down only while the cooking compartment is at cooking temperature. -
Page 9: Keypad Timer Control Panel
B. KEYPAD TIMER CONTROL PANEL (1) Cooking Operations – Keypad Control Panel For safe, efficient operation of the steamer, the operator must, at a minimum, comply with all cautions, warnings and instructions in the detailed operating procedures and be familiar with the control panel shown in Figure 2-2. - Page 10 c) Shutting Off Alarm/When Timer is Done When the timer counts down to zero, the alarm sounds continuously, the generator stops steaming, and steam flow to the cooking compartment gradually stops. Press the START/STOP key to silence the alarm. The cooking time display returns to the last time set.
-
Page 11: General Operation
SECTION 3: GENERAL OPERATION A. EXTERNAL MAIN POWER SWITCH (Junction Box) Usually the kitchen’s external main power switch is left ON. If the external main power switch was left in the OFF position, turn it ON as follows. (1) Check that the water supply valves to the steamer are open. (2) Turn the steamers ON/OFF Switch to the OFF position. -
Page 12: Inspecting The Cooking Compartment
D. INSPECTING THE COOKING COMPARTMENT At the back of the cooking compartment, a drain screen covers the drain. Refer to Figure 3-3. The screen prevents large food particles from entering and blocking the drain line. Any blockage of the drain line or screen can reduce drainage from the cooking compartment resulting in reduced cooking performance, equipment damage, and a hazard to the operator. -
Page 13: Cooking With The Steamer
SECTION 4: COOKING WITH THE STEAMER When checking inside the steamer always open the door slowly and stand to the side and back away from the steamer. Water leaking from the door gasket can be a sign of a blocked drain. If the drain is blocked, hot water can accumulate inside the compartment and spill out when the door is opened. -
Page 14: Operating And Cooking Procedure - Manual Mode
(8) Carefully open the cooking compartment door, and remove the pans from the slide racks. • If the steamer will be used again in a few minutes shut the door to maintain the cooking compartment temperature. • If another use is not planned for more than half an hour, leave the cooking compartment door slightly open to reduce internal pressure while the steam condenses and the compartment cools. -
Page 15: Shutdown And Cleaning Procedures
6. To stop manual mode steaming, press the TIMED (top) end of the TIMED/MANUAL rocker switch. The generator stops steaming, and steam flow to the cooking compartment gradually stops. SEVERE BURNS may result from exposure to steam. Do not open the steamer door before steam flow stops. Stand back when opening the compartment door. -
Page 16: Blowdown Procedure
(3) Blowdown Procedure When the steamer is turned off, its blowdown cycle starts and runs automatically. The complete cycle takes approximately 3 minutes. 1. Turn the ON/OFF Switch to the OFF position to turn off the steamer. The red indicator light in the ON/OFF switch turns off. - Page 17 (4) Remove any spilled food from inside compartment and clear any residue from the drain screen. Clean the interior of the compartment thoroughly. Use a soft bristle brush to remove stubborn food particles. Do not use abrasive cleaning compounds or steel wool. Rinse inside of steamer compartment with clean water.
-
Page 18: Section 6: Preventative Maintenance And Troubleshooting
SECTION 6: PREVENTATIVE MAINTENANCE AND TROUBLESHOOTING A. MAINTENANCE Maintenance on the steamer must be performed on a regular basis to keep the unit running properly. By following the maintenance instructions in this Section and in the separate Installation Manual, problems with the steamer will be kept to a minimum. - Page 19 When this light comes on arrangements should be made to descale the steam generator as soon as feasible. Cleveland Range, Inc. recommends the use of DISSOLVE ® Descaler Solution, Cleveland Range Part No. 106174. No other system of steamer descaling should be used.
-
Page 20: Weekly/Monthly Maintenance Descale Steam Generator
Weekly/Monthly Maintenance (continued) ATMOSPHERIC STEAM GENERATOR DESCALING PROCEDURE (For DISSOLVE Descaler Solution Part No. 106174) ® 1. This procedure will take approximately 1 hour and 30 minutes to complete. This entire procedure should be read and fully understood, before beginning the actual descaling operation. -
Page 21: Operators Troubleshooting Guide
Scale build-up in generator. Bad high limit. Inoperative controls. WARNING Table 6-1 Trouble Shooting Guide POSSIBLE CAUSE (21CET8 and 21CET16 only) (21CET16 only) (Continued on next page) REMEDY/REFERENCE Turn ON power at external main power switch or circuit breaker. Reset circuit breaker. If condition repeats itself see note #1. - Page 22 See note #1. See note #1. Switch to timed mode for timer to be effective. See note #1. (21CET16 only) See note #1. Turn off electricity at main external power switch. See note #1. This is normal operation of the unit. No action is necessary.
- Page 23 See note #1. (21CET16 & 24CEA10 only) See note #4. Blowdown unit to rinse drain. The unit has to be descaled with a Cleveland Range approved descaler as soon as possible. If condition persists, see note #1. See note #1.
- Page 24 TROUBLESHOOTING NOTES 1. If problem is inside the steamer, call an authorized service representative. Cleveland Range, Inc. will not pay for warranty repairs by unauthorized repair centers. 2. Proper installation of the SteamCraft steamer is the responsibility of the owner or installer. Refer to Cleveland Range, Inc.
-
Page 25: Steam Cooking Guidelines
SECTION 7: STEAM COOKING GUIDELINES A. Introduction: Steam Cooking is an excellent way to prepare countless foods. With large and small quantities you will find cooking to be efficient, economical, fast and convenient. Food can never burn-pans will never boil over-there is no heavy lifting of water in pots-no scouring of containers-no waiting for boiling to start. -
Page 26: Sizing Up Pan Capacity
B. SIZING UP PAN CAPACITY: (1) Serving Sizes – How Much? How Many? How to estimate portion size and number of servings from a standard steam table pan. • A 12” x 20” x 2½” (65mm-1/1GN) solid pan will hold 1-7/8 gallons or 240 fluid ounces (30 liters or 7200ml). -
Page 27: Convection Steamer - Suggested Timer Setting Guidelines
C. CONVECTION STEAMER – SUGGESTED TIMER SETTING GUIDELINES ELECTRONIC CONTROLS WITH THE COMPENSATING THERMOSTAT Timer settings are approximate due to the differences in food quality, age, shape and the degree of doneness desired. It is not necessary to add water. Perforated pans are recommended. Starred items (*) must be cooked in solid pans. - Page 28 (continued from previous page) FRUIT: Fresh Apple, cored Grapefruit Orange Apricot Pineapple, whole Dried: add water to re-hydrate Apple Apricot Peach Pear Prune MEATS & POULTRY: Cook meats and poultry in nested pans, as juices can be used for gravy, sauces, beef stock and soups. The portion size, thickness, grades, should be considered when selecting a timer setting for doneness.
-
Page 29: Steaming Tips -Lobster -Crab -Shrimp
D. STEAMING TIPS - LOBSTER - CRAB - SHRIMP (1) Live Lobster and Crabs a. Live lobsters and crabs are steamed according to the time on the Suggested Timer Setting Guide. b. Steam them on a perforated pan with a catch pan (a solid pan) on a lower pan slide. Discard the juices and non-edible matter collected during steaming. -
Page 30: Limited Warranty
CLEVELAND RANGE agrees to repair or replace, at its option, f.o.b. factory, any part which proves to be defective due to defects in material or workmanship during the warranty period, providing the equipment has been unaltered, and has been PROPERLY INSTALLED, MAINTAINED, AND OPERATED IN ACCORDANCE WITH THE CLEVELAND RANGE OWNER’S MANUAL.