
Related Manuals for Clarity Telephone


Summary of Contents for Clarity Telephone
- Page 1 4289 Bonny Oaks Drive • Chattanooga, TN 37406 TEL: (800) 426-3738 • FAX: (800) 325-8871 Email: claritycs@plantronics.com Website: www.clarityproducts.com...
-
Page 2: Operating Instructions
Tel: (800) 426-3738 Fax: (800) 325-8871 Email: claritycs@plantronics.com Website: www.clarityproducts.com ©2004 Clarity, a Division of Plantronics, Inc. All rights reserved. Ameriphone, Amplifying Your Life, Clarity and The Talking Phone are trademarks or regis- tered trademarks of Plantronics, Inc. ™ Ç... -
Page 3: Table Of Contents
Contents Important Safety Instructions ..... . ii Introduction ....... . . 2 Package Checklist . -
Page 4: Important Safety Instructions
(other than a cordless type) during a storm. There may be a remote risk of electrical shock from lightning. 5.Do not use the telephone to report a gas leak in the vicinity of the leak. 6.Unplug this telephone from the wall outlets before cleaning. - Page 5 A. When the power supply cord or plug is frayed or damaged. B. If liquid has been spilled into the product. C. If the telephone has been exposed to rain or water. D. If the telephone does not operate normally by following the operating instructions.
- Page 6 Users should ensure for their own protection that the electrical ground connections of the power utility, telephone lines and internal metallic water pipe system, if present, are connected together. This precaution may be particularly important in rural areas.
- Page 7 The Ringer Equivalent Number is an indication of the maximum number of terminals allowed to be connected to a telephone interface. The termination on an interface may consist of any combination of devices subject only to the requirement that the...
- Page 8 Please read these operating instructions thoroughly before using your telephone. Keep this manual for future reference. You must save your sales receipt as proof of purchase in the event that you need warranty service.
-
Page 9: Introduction
Package Checklist Handset Base Unit Phone Cords JV-35 OPERATING Telephone Line Cords INSTRUCTIONS QUICK GUIDE Handset Operating Guides Coil Cord Phone Base Plate Figure 1 - Package Components... -
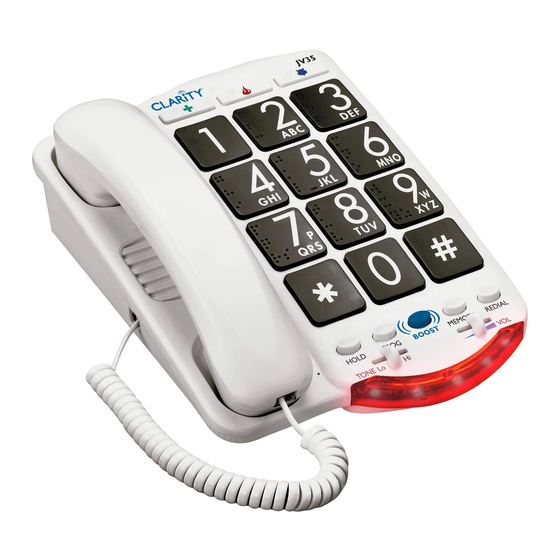
Page 10: Features Identification
Features on the JV-35 HOLD button TONE selector Figure 2 - Base Unit Controls Ringer volume control switch Audio output jack AC adapter Announcement switch Tone / Pulse switch Emergency buttons Braille characters Raised letters for easy identification REDIAL button MEMORY button VOL control (volume) AMPLIFY button... -
Page 11: Installation
Installation A. Desk Mounting 1. Plug in the long phone cord. 2. Plug the handset cord into the telephone. Fig.3 - Connections and installation 3. Insert the AC Adapter cord into the receptacle on the back of the JV-35. Then plug the AC Adapter into an electrical outlet. -
Page 12: Batteries
Installation 3. Plug in the short phone cord. 4. Insert the AC Adapter cord into the receptacle on the back of the JV-35. Then plug the AC Adapter into an electrical outlet. Fig. 6 - Wall mounting installation. 5. Align the posts on the wall mount with the holes in back of the JV-35. - Page 13 Installation Fig. 7 - Battery installation...
-
Page 14: Operating Your
Operating your JV-35 A. Dialing Pick up the handset and dial like any other telephone. As you dial, the numbers you are dialing will be announced (Seven, five, two, etc.) If you read Braille, you can use the small bump on the 5 button to help identify correct buttons. -
Page 15: Adjusting The Tone
Diagram A). Diagram A - JV35 handset Note: In standard use, the amplifier turns off whenever you hang up the telephone. This is a useful feature if many people use the phone. If you want the amplifier to always remain on, slide the... -
Page 16: Hold
Operating your JV-35 Fig. 13 - Ringer Switch E. Hold 1. To put the phone on hold, press the HOLD button and put the handset in its cradle. The red light in the Ring Flasher shows HOLD is on. Fig. 14 - Hold button 2. -
Page 17: Programming The Emergency Buttons
Operating your JV-35 G. Programming The Emergency Buttons The Emergency Buttons can be programmed to dial numbers with one touch. You may wish to use these buttons for police, fire or medical response. 1. Lift the handset and press the PROG button. Fig. -
Page 18: Dialing With An Emergency Button
Operating your JV-35 H. Dialing With An Emergency Button 1. Lift the handset. 2. Press one of the Emergency buttons. You will hear an announcement similar to: “Emergency One” and then the number you have stored for that button will be automatically dialed. -
Page 19: Memory Dialing
Operating your JV-35 7. To change a stored number or to program another memory button, repeat this process from step 1. J. Memory Dialing 1. Lift the handset. 2. Press MEMORY and one of the number buttons. Fig. 21- Memory Button You will hear an announcement such as “Memory One”... - Page 20 Operating your JV-35 beep” sound. This confirms the JV-35 is ready to be programmed. Fig. 22 - Announcement Switch 3. Press the desired Emergency button. After the “beep,” speak into the handset to record an announcement like “Police” or “Fire” for that button.
-
Page 21: Recording Memory Button Identification Announcements
Operating your JV-35 position and your recordings will be played when you press an Emergency button. Fig. 24 - Custom Announcement L. Recording Memory Button Identification Announcements Factory pre-recorded announcements identify each memory button. You can erase these announcements and record your own announcements, such as “Bob’s Number,”... -
Page 22: Recording Number Button Announcements
Operating your JV-35 “Bank” for that button. Your recording can be up to three seconds long. Fig. 26 - Memory Button 4. After three second there will be a “beep” to tell you recording has stopped. Your recording will be played back immediately so you can check it, followed by a... - Page 23 Operating your JV-35 number buttons. If you choose, you can record announcements for the number buttons in your own voice by following these steps. 1.Pick up the handset. 2.Slide the ANNOUNCEMENT switch to the PROG position. You will hear “Program Mode, Program Mode”...
-
Page 24: Selecting Number Button Announcements
Operating your JV-35 the rest of the number buttons. 6. When you are finished recording, hang up the handset. 7. Slide the ANNOUNCEMENT switch to the CUSTOM position. Your announcements will be played when you press a number button. Fig. 30 - Custom Announcements N. -
Page 25: Direct Audio Connection
Operating your JV-35 To turn off the voice announce feature, turn the phone over and slide the “VOICE ANNOUNCE” switch to OFF. Fig. 33 - Setting Voice Announce O. Direct Audio Connection To connect an assistive listening device, plug a compatible auxiliary cable into the Audio Output port, then plug the other end into... - Page 26 Operating your JV-35 Connecting the Speech Processor: Caution: Before plugging any cord into your speech processor, you must consult your implant manufacturer. • Plug the mono end of the plug into the speech processor. • Plug the stereo end of the plug into the Audio Output socket on the phone.
-
Page 27: Troubleshooting Chart
Troubleshooting Chart If any problem should arise during operation of your JV-35, go through the suggestions listed below. Should the difficulty persist, contact Ameriphone or your authorized dealer for assistance. CAUSE AND SYMPTOM CORRECTIVE ACTION Check all phone cord No dial tone connections. -
Page 28: Regulatory Compliance
Excessive RENs on a telephone line may result in the devices not ringing in response to an incoming call. In most but not all areas, the sum of RENs should not exceed five (5.0). - Page 29 Walker / Ameriphone, 1-800-874-3005. If the equipment is causing harm to the telephone network, the telephone company may request that you disconnect the equipment until the problem is resolved. DO NOT DISASSEMBLE THIS EQUIPMENT.
- Page 30 (2) this device must accept any interference received, including interference that may cause undesired operation. Your JV-35 Telephone has been tested and found to comply with the limits of a Class B digital device, pursuant to Part 15 of FCC rules.
- Page 31 (This increases the separation between the telephone equipment and the receiver.) 3. Connect the telephone equipment into an outlet on a circuit difference from that to which the television, radio, or other receiver is connected.
- Page 32 (telephone extension cord). The customer should be aware that compliance with the above conditions may not prevent degradation of service in some situations.
- Page 33 The Ringer Equivalence Number is an indication of the maximum number of terminals allowed to be connected to a telephone interface. The termination on an interface may consist of any combination of devices subject only to the requirement that the sum of the...
-
Page 34: Warranty
This warranty applies only to Ameriphone products that are purchased and used in the United States or Canada. Clarity warrants the JV-35 telephone against any defect in materials or workmanship for the period of one year from the date of purchase. - Page 35 United States or Canada, fire, flood, and acts of God, nor do we warrant the product to be compatible with any particular telephone equipment, party line, key...
- Page 36 Warranty telephone systems or more sophisticated switching systems. If your JV-35 is not covered by this warranty, call (800) 426-3738 for advice as to whether we will repair your JV-35 and other repair information. The repair shall be warranted for 90 days.
-
Page 37: Specifications
Important Instructions Specifications - JV-35 DECIBEL GAIN Maximum gain: 37dB at 3000Hz (Volume at Maximum setting and Tone at High setting) PHYSICAL DIMENSIONS Size: 9.5" x 7" x 3.25" Weight: 2.52 lbs. POWER AC Adapter 4 AA Alkaline non-rechargeable batteries (not included)