Advertisement
- 1 Features
- 2 Film Counter Display
- 3 Getting Started
- 4 How To Take Your First Photo
- 5 Tips For Making Great Photos
- 6 Special Features
- 7 Charging
- 8 Cleaning
- 9 Troubleshooting
- 10 Customer Support
- 11 Warranty
- 12 Technical Specifications
- 13 Safety Information
- 14 Compliance
- 15 Videos
- 16 Documents / Resources
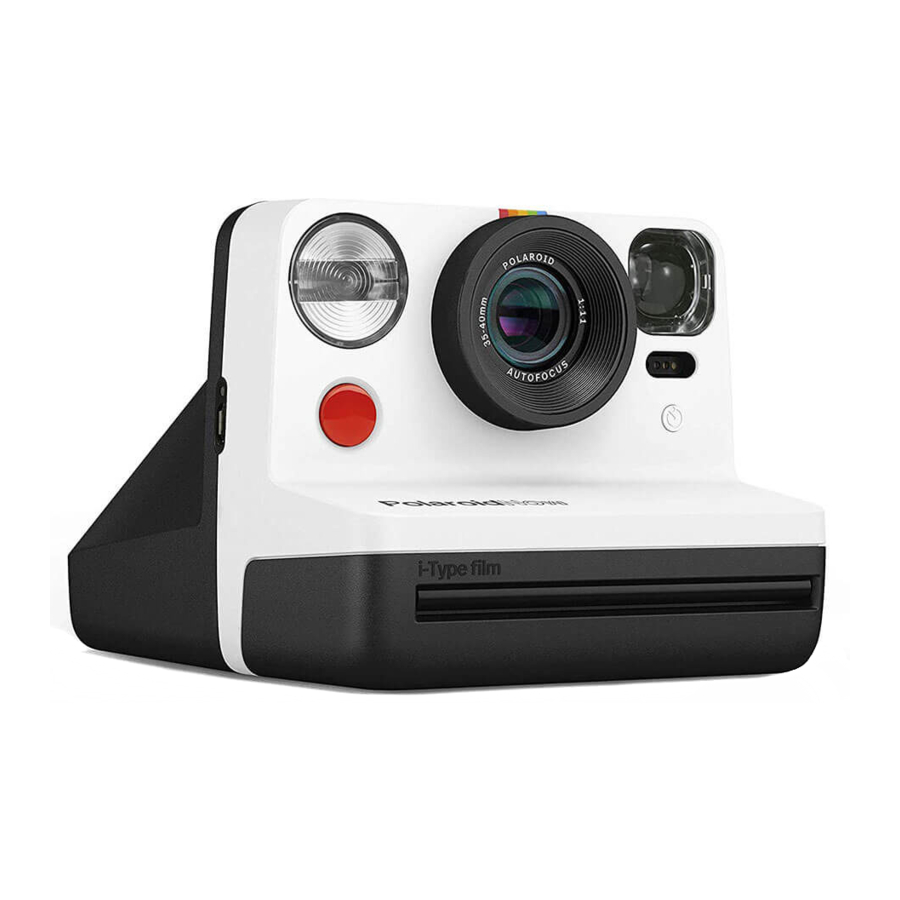
Features


- Shutter Button
- Lens
- Flash
- Viewfinder
- Self-timer & Double Exposure
- Film Door Button
- Flash ON | OFF Button
- ON | OFF Button
- Film Counter LED
- Neck Strap Loop
- Battery Level Indicator
Film Counter Display
| Display | This means: |
| Unlit | → Camera is off |
| 0 | → No film |
| 1 | → One photo remaining |
| 2 | → Two photos remaining |
| 3 | → Three photos remaining |
| 4 | → Four photos remaining |
| 5 | → Five photos remaining |
| 6 | → Six photos remaining |
| 7 | → Seven photos remaining |
| 8 | → Eight photos remaining |
| - | → Darkslide is inside |
| 1 (flashing) | → Exposure 1 of Double Exposure |
| 2 (flashing) | → Exposure 2 of Double Exposure |
| d o o r | → Film Processing Unit door is open |
| L | → Lens select failure |
| c | → Object too close |
| b (flashing 5x) | → Battery Low |
 | → Eject film animation |
 | → EV Trim +½ EV |
 | → EV Trim Normal |
 | → EV Trim -½ EV |
Getting Started
Open the Polaroid Now box and check that you have everything you need:
- Polaroid Now Camera
- Micro USB Charging Cable
- Quick Start Guide
- Camera Neck Strap
Charge your camera
The Polaroid Now won't be fully charged straight out of the box, so you will need to charge it to get started. Plug the Micro USB side of the cable into the side of the camera and the USB side into your USB charging adapter. The battery level indicator LED next to the Micro USB slot will flash green while the camera is plugged in and charging. It will turn off once the camera is fully charged.
A full charge usually takes about 2 hours through a wall socket with a USB power adapter. A fully-charged Polaroid Now will have enough power to shoot 15 packs of film, depending on usage. Remember to turn off the Polaroid Now after use to save battery life.
Attach your neck strap


Find your instant film
The Polaroid Now uses i-Type and 600 instant film. Get that iconic Polaroid frame in color, black and white, or with our special edition frames. Find your next film here, then you're ready to take your first Polaroid photograph.
How To Take Your First Photo
Turn on the Polaroid Now camera
Press the ON | OFF button for ½ a second. The film counter display will show the number '0' because there is currently no film in the camera.
Insert your film pack
Push the film door button to open the film door, then insert the film pack into film chamber of your camera. Push the film pack all the way in with the darkslide facing up and the tab facing toward you. Close the film door. The darkslide will eject. Remove the darkslide and allow the film shield to roll back in. This shield is designed to protect images from light as they develop, so don't remove it. If the darkslide has not ejected, remove the film pack and re-insert it to make sure it is pushed all the way into the back of the camera.
We recommend using i-Type film as the camera is optimized for use with this particular film.
To make sure the camera always displays the right film count, always finish the film pack before inserting a new one. If you decide to switch packs anyway, be aware that one photo will be wasted as it will be exposed to light. That's why every pack has a darkslide.
Set the flash mode
In any situation where you are not shooting in bright, direct sunlight, we recommend using the flash to achieve the best shots. That's why the flash will trigger by default every time you use the Polaroid Now.
Shooting without the flash can give you some beautiful results as well, but remember you need another source of light to make sure your photo will turn out. To shoot without the flash, press the flash button on the back panel once.
After taking the photo the flash will be reenabled. To disable the flash until you power off the camera, double press the flash button.
Position yourself
Make sure you are at least 55cm (1.8ft) away from your subject.
Aim at your subject
The Polaroid Now uses a viewfinder located on the left side of the lens barrel. To aim at your subject, simply align your eye with the viewfinder barrel and use the image you see to compose your shot.
Press the shutter button
Press the shutter button to take your photo. The photo will be ejected from the slot at the front of the camera as soon as you let go of the shutter button. You will see that the photo will be covered with a film shield to protect it from light.
Remove the photo
Gently lift the film shield so it rolls back into the camera. Remove the photo and place it face down to continue shielding it from light as it develops. Don't shake it! Check the back of your film packet for the correct developing times.
Turn the camera off
Press the ON | OFF button for ½ a second to turn off the Polaroid Now.
Tips For Making Great Photos
Natural light
Light is your best friend when it comes to instant photograph, so we recommend to always use the flash. However, on a sunny day outdoors, you don't need to use your flash at all. Make sure not to shoot towards the sun, shoot with the sun behind you instead, facing your subject directly or side-on, to give you a bright and clear picture without shadow on your subject. For the best results without the flash, the most important thing to remember is to keep your camera as steady as possible. For example, by holding your camera with both hands and putting your elbows on a table.
Framing
Be aware that your photo will not exactly reflect what you see through the viewfinder. For subjects closer than 1.2m (3.93ft) you should adjust your aim slightly up and to the left.
Composition
It's possible to change the photo composition after focusing on your subject. The shutter button has two positions. First half-press the shutter button, then change the composition and fully press to take the photo.
Special Features
Self-Timer
Get yourself in the photograph with the self-timer. Tap the self-timer button once. The LED will light up orange, indicating that the self-timer is activated. Once you have framed your photo, press the shutter button. The orange LED will blink to indicate the self-timer countdown. You have 9 seconds before the photo is taken.
To make self-timer photos without flash, first activate the self-timer, then press the flash button.
If you change your mind, you can cancel the self-timer by pressing the self-timer button again.
Double Exposure
Express yourself in more ways than one with the Double Exposure feature, which allows you to combine two images in one photo. Press the self-timer button twice to enable double exposure mode. The display will flash '1' until the first shot is taken, then flash '2' until the second shot is taken.
Flash
Double tap to disable flash until the camera is powered off.
Exposure compensation (Trim EV)
For the more experienced photographers, the camera has an exposure compensation mode. This mode allows you to make your photo brighter or darker. This might be to intentionally under- or over-expose, or could be to compensate for scenes with atypical distribution of light and dark elements, such as a landscape with a bright sky or subject with a contrasting background.
+½ EV and -½ EV settings are available which make your photos slightly brighter or darker respectively. To access the Trim EV mode, hold the flash button down for one second. A small line will appear in the display. Tapping the flash button cycles through +½ EV → Normal EV → -½ EV. When you have chosen your EV setting, press the shutter button as you normally would. Remember: the flash is on during this time unless you turned it off previously. After two seconds, the screen will alternate displaying the film count and EV setting.
Charging
Above the Micro USB slot sits the battery level indicator LED to let you know what your battery level is. To check the camera's battery level, turn the camera on and look at the battery level indicator LED in relation to this table.
| Battery Level Indicator LED | This means: |
| No Light | → Camera is off |
| Green | → Charged (Enough for 15 packs of film) |
| Orange | → Medium battery (Enough for 1 pack of film) |
| Red | → Low battery |
To charge the camera, insert the charging cable into the Micro USB slot. Once you do that, the LED light will let you know how much charge you have remaining.
| Battery Level Indicator LED | This means: |
| No Light | → Camera is fully charged |
| Green | → Charging, battery almost full |
| Orange | → Charging, battery is half full |
| Red | → Charging, battery is low |
Cleaning
To clean the lens, use a microfiber cloth designed for that purpose. This will ensure that you do not scratch the lens or leave behind any strands that may impact the quality of your photos.
Spotted marks on your photographs? Dirty rollers could be one of the reasons.
When you take a Polaroid photograph, the film goes through two metal rollers. This is where the developer paste is spread between the negative and positive components of the photo before it exits through the film door. If these rollers are dirty or just a little uneven, the chemistry will not spread evenly across the photograph and you get small marks.
To clean the rollers, open the film door compartment of the camera (the film can remain in the camera while cleaning) and grab a soft, damp cloth. Rotate the rollers by turning the black plastic gear on the bottom left and wipe the cloth across the rollers as they move. Make sure the rollers are dry before you use your camera again.
We recommend that you check the rollers between every pack of film, and clean them every 2-3 packs even if they look perfectly clean.
Troubleshooting
- My Polaroid Now won't eject my photo or darkslide.
Make sure your Polaroid Now camera is charged. The camera's battery level indicator LED will blink red if it doesn't have enough charge to operate. If this is the case, you should recharge your camera then try again.
Still having trouble? Check how many photos you have left. Hold down the power button for two seconds and the film counter display will indicate how many shots you have left in the film pack. If the LED shows '0' this means that there are no shots left in the film pack. - The flash doesn't fire when I take a photo.
The Polaroid Now automatically turns the flash on when you power on the camera. If it's not firing, press the flash button once until you see the lightning bolt illuminate. When taking photos make sure you don't accidentally press the flash button. - My photo turned out too dark.
Polaroid cameras love light, so the more light you have the better.
Make sure you are not shooting towards the sun. When shooting towards sunlight, the excessive light may cause the camera to overcompensate when exposing the image, creating an image that is too dark to expose your subject properly.
If you're taking photos inside and you don't want to use the flash, make sure you find another light source – or use the flash. The flash is also useful at night-time, dusk, and cloudy days. - My photo turned out blurry or fuzzy.
Make sure you are at least 55cm (1.8ft) away from your subject. When shooting, make sure you hold the camera steady, especially in low light conditions, and have a strong light source to illuminate your subject. - The film counter display shows the wrong number.
The display resets to '8' every time a cassette is inserted. If a part-used cassette is inserted, the camera will display '8' and countdown as each photo is taken. When you next insert a full film pack, the counter will correctly show 8 remaining photos. - I took the first shot of a double exposure photo, but I changed my mind.
Switch off your camera, press and hold down the shutter button. Switch on the camera again and the film count will display "-". Continue to hold the shutter button for over 10 seconds until the film is ejected.
Customer Support
We're here to help.
Get in touch using the details below.
USA/Canada
usa@polaroid.com
+1 212 219 3254
Europe/Rest of World
service@polaroid.com
00 800 577 01500
Polaroid Film B.V.
P.O. Box 242
7500 AE Enschede
The Netherlands
For more detailed and up-to-date information, visit polaroid.com/help.
Warranty
You can find the warranty for the Polaroid Now here: polaroid.com/warranty
Technical Specifications
General
Dimensions
150mm (L) ×111.2mm (W) ×94mm (H)
Weight
445 grams (without film pack)
Operating Temperature
40–108°F / 4–42°C, 5–90% relative humidity
Compatible Film
Polaroid i-Type and 600 film in both color and black & white, including special editions.
Battery
High performance lithium-ion battery, 750mAh, 3.7V nominal voltage, 2.775Wh
Materials
Outer shells
Polycarbonate + ABS plastics
Lens
Optical grade polycarbonate lens, coated
Shutter system
Custom design using precision step motor
Optical System
Lens
Fixed focus lens
Focal length
Standard lens: 103 mm
Portrait lens: 95 mm
Field of view
41° vertical, 40° horizontal
Flash System
Vacuum discharge tube strobe
Safety Information
Camera
![]()
risk of electric shock.- Do not open or disassemble the motorized roller system.
- Do not disassemble the device. Incorrect reassembly can cause electrical shock if the device is used again.
- Do not immerse the device in water or other fluids.
- Do not operate the device in a high humidity environment or very dusty environments.
- Do not attempt to tamper with, adjust or remove the battery and/or the electronics located inside the camera.
- Do not attempt to remove the door itself, as it is connected to the body of the device. Doing so is unsafe, will likely damage your device, and will void your warranty.
- Do not insert metal objects into the device.
- Do not insert any objects into the rollers or gears.
- Keep small children and infants away from the device to avoid them being injured by the device's moving parts.
- Do not use or store the device near any heat source or any type of equipment that generates heat, including stereo amplifiers.
- Do not use the device near flammable or explosive gases.
- Do not charge the device if you notice any unusual odors, noise or smoke.
- Do not attempt to disassemble the film's battery or modify it in any way (if using 600 type film). If battery fluid gets in your eyes, immediately rinse your eyes with fresh, cold running water, and seek medical attention immediately.
- Do not cover the flash.
Battery & Charger
- This device uses a custom lithium-ion battery that is non-removable and mounted inside the camera body.
- No other type of battery can be used. Battery replacement can only be done by authorized service centers. The battery will provide many years of service if properly used.
- Power consumption varies depending on the environment the device is used in and how the device has been stored. Used immediately after full charge, the battery will power the processing of up to 15 film packs with flash exposures. Due to the high energy requirements of the flash, we recommend charging the camera fully before every session for best results.
- Once the battery energy level falls below a certain level, the device will no longer process film. The battery LED will blink and signal when it needs to be recharged. This is to avoid a photo getting stuck as it is being processed through the roller system.
- The rechargeable battery is not fully charged at the time of purchase. Charge the battery fully with the USB charging cable provided. This usually takes 1-2 hours (can vary depending on usage).
- The supplied battery charging cable has been tested to work with the Apple iPhone power adaptors. While it can be used in other USB ports e.g. computer, USB power adaptors, TVs, cars etc., correct operation cannot be guaranteed.
- When the device is no longer in use, please recycle it properly.
Usage Environment
- To protect the high-precision technology contained in this device, never leave the camera in the following environments for extended periods of time: high temperature (+42°C/108°F), high humidity, places with extreme changes in temperature (hot and cold), direct sunlight, sandy or dusty environments such as beaches, damp places, or places with strong vibrations.
- Do not drop the device or subject it to severe shocks or vibrations.
- Do not push, pull or press on the lens.
Compliance
Important directions for using Lithium–Ion Batteries:
- Do not throw into fire.
- Do not short circuit.
- Do not disassemble.
- Do not continue to use when damaged.
- Dispose correctly after use.
- Keep away from water.
EU Declaration of Conformity
Hereby, Polaroid Film B.V. declares that the Polaroid Now analog instant camera is in compliance with the essential requirements of the Electromagnetic Compatibility Directive (2014/30/EU), Low Voltage Directive (2014/35/EU) and RoHs Directive (2011/65/ EU) and other relevant provisions, when used for its intended purpose.
FCC Compliance Statement
This device complies with Part 15 of the FCC Rules. Operation is subject to the following two conditions:
- this device may not cause harmful interference, and
- this device must accept any interference received, including interference that may cause undesired operation.

the user is cautioned that changes or modifications not expressly approved by the party responsible for compliance could void the user's authority to operate the equipment. This equipment must not be co-located or operated in conjunction with any other antenna or transmitter.
Note This equipment has been tested and found to comply with the limits for a Class B digital device, pursuant to part 15 of the FCC rules. These limits are designed to provide reasonable protection against harmful interference in a residential installation. This equipment generates, uses and can radiate radio frequency energy and, if not installed and used in accordance with the instructions, may cause harmful interference to radio communications. However, there is no guarantee that interference will not occur in a particular installation. If this equipment does cause harmful interference to radio or television reception, which can be determined by turning the equipment off and on, the user is encouraged to try to correct the interference by one or more of the following measures:
- Reorient or relocate the receiving antenna.
- Increase the separation between the equipment and receiver.
- Connect the equipment into an outlet on a circuit different from that to which the receiver is connected.
- Consult the dealer or an experienced radio/ TV technician for help.
This equipment complies with FCC radiation exposure limits set forth for an uncontrolled environment. End user must follow the specific operating instructions for satisfying RF exposure compliance.
Industry Canada (IC)
This device complies with part 15 of the FCC Rule and Industry Canada license– exempt RSS standard(s). Operation is subject to the following two conditions:
- This device may not cause harmful interference, and
- this device must accept any interference received, including interference that may cause undesired operation.
![]() The symbol means that according to local laws and regulations your product should be disposed of separately from household waste. When this product reaches its end of life, take it to a collection point designated by local authorities. Some collection points accept products for free. The separate collection and recycling of your product at the time of disposal will help conserve natural resources and ensure that it is recycled in a manner that protects human health and the environment.
The symbol means that according to local laws and regulations your product should be disposed of separately from household waste. When this product reaches its end of life, take it to a collection point designated by local authorities. Some collection points accept products for free. The separate collection and recycling of your product at the time of disposal will help conserve natural resources and ensure that it is recycled in a manner that protects human health and the environment.

![]() End of life disposal warning: When the product has come to the end of life, dispose of it in accordance with local regulations. This product is subject to the EU directive 202/96/EC on Waste Electrical and Electronic Equipment (WEEE) and should not be disposed as unsorted municipal waste.
End of life disposal warning: When the product has come to the end of life, dispose of it in accordance with local regulations. This product is subject to the EU directive 202/96/EC on Waste Electrical and Electronic Equipment (WEEE) and should not be disposed as unsorted municipal waste.
Made in China for and distributed by Polaroid Film B.V. (P.O. Box 242, 7500 AE), Enschede, The Netherlands. The POLAROID word and logos (including the Polaroid Classic Border Logo) and Polaroid Now are protected trademarks of Polaroid.
© 2020 Polaroid. All Rights Reserved.

VideosHow to use the Polaroid Now (video)
POLAROID NOW - TESTING VIDEO
Documents / Resources
References
Download manual
Here you can download full pdf version of manual, it may contain additional safety instructions, warranty information, FCC rules, etc.
Advertisement
Thank you! Your question has been received!


Need Assistance?
Do you have a question about the Now that isn't answered in the manual? Leave your question here.