Polaroid PDC 5070 - Photo Camera Quick Start Guide
- User manual (83 pages) ,
- User manual (82 pages)
Advertisement
- 1 Product Overview
- 2 Installing the Batteries
- 3 Turning the Camera on and Off
- 4 Setting Display Language
- 5 Checking Camera Status
- 6 Taking a Picture
- 7 Setting the Flash Mode
- 8 Recording Video Clips
- 9 Using the SD (Secure Digital) Card
- 10 Installing the Software Onto a Computer
- 11 Connecting to Your Computer
- 12 Transferring Pictures and Video Clips to a Computer
- 13 Documents / Resources
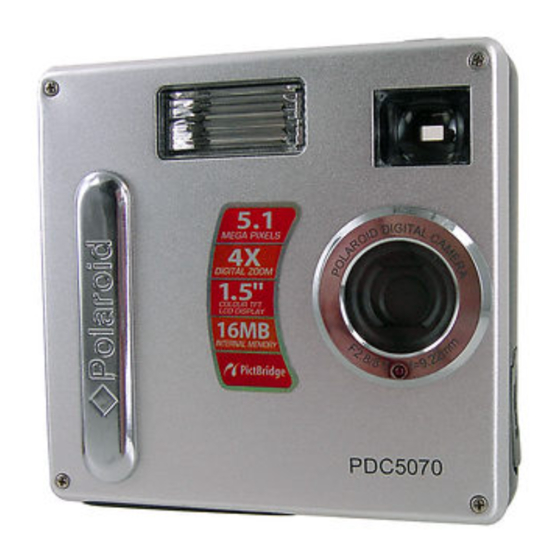
Product Overview
Front View

Back View

Top View
 Bottom View

Side view

Installing the Batteries
Four AAA-size batteries are supplied with the product.
- To open the battery door, slide the button in the direction as shown to release.
- Insert the batteries as shown, ensuring you follow the +/- signs correctly.
- Close the battery door.


Turning the Camera on and Off
To turn on the camera, fully press and hold the Power button until the Status LED turns green. The LCD screen is activated. Press and hold the Power button again, "Goodbye" will show on the LCD screen and the camera will turn off.
Setting Display Language
Under this setting, you can select the language you prefer for the LCD screen.
- Turn on the camera.
- Set the camera to Still Image mode.


Checking Camera Status
Turn on the camera, view the camera LCD screen to check which camera settings are active. If feature icon is not displayed, that particular feature is not activated.
Still Image Mode
 Video Mode

Playback Mode

Taking a Picture
Taking pictures at approximately 3.2 feet to infinity (1 metre to infinity).
- Turn on the camera.
- Set the camera to Still Image mode.
- Frame your subject using the LCD screen or the viewfinder.
- Press the Shutter button to take a picture. A beep will sound. Hold the camera steady until the conclusion of the beep. The end of the beep indicates the picture has been taken.
Setting the Flash Mode
The Flash Range is approximately 3.2 feet to 6.5 feet (1 to 2 metres).
- Turn on the camera.
- Set the camera to Still Image mode.
- Press Flash
![]() button to cycle through the flash mode until the one you want is shown on the LCD screen.
button to cycle through the flash mode until the one you want is shown on the LCD screen.
 button to cycle through the flash mode until the one you want is shown on the LCD screen.
Recording Video Clips
- Turn on the camera.
- Set the camera to Video mode.
- Frame your subject using the LCD screen.
- Press the Shutter button completely down to start recording.
- Press the Shutter button again to stop recording, or recording stops when the current memory is full.
Using the SD (Secure Digital) Card
Your camera comes with built-in flash memory for storing pictures and video clips. You can expand the memory using a commercially available SD card (up to 1GB). The camera senses whether a memory card is inserted, and automatically saves pictures and video clips accordingly. Note that you cannot save pictures or video clips to the built-in flash memory while a memory card is installed in the camera.
Inserting a SD Card
Turn off the camera and open the SD slot cover as illustrated. Insert the SD ensuring the card is inserted the correct position as illustrated. On the inner side of the SD slot cover, there is a diagram showing the proper insertion orientation.

Removing the SD Card
To remove the SD, turn off your camera and open the SD slot cover. Gently push the SD inwards and then release it for the SD to eject. Take the SD card out and close the card slot cover.
Installing the Software Onto a Computer
 For Windows® Users:

- Please backup all the necessary data before any driver and software installation.
- The CD-ROM is tested and recommended to use under English Windows OS.
- Please restart the computer after installing the software.
(For Windows® 98SE)
Windows® 98SE needs to install the PDC 5070 Camera Driver for Mass Storage function.
After the installation, please restart the Windows before connecting the camera to the PC.
To experience higher performance in graphics and sound when you're watching video clips on your PC, it is recommended to install the DirectX ver. 9.0 or above. It can be from http://www.microsoft.com/directx
(For Windows® Me, 2000, XP)
Directly plug-in the camera to transfer and play the pictures and video clips. No need to install the camera driver.
- Before you begin, close all other software applications open on your computer.
- Insert the CD supplied into the computer CD-ROM Drive.
- The CD User Interface Screen will automatically launch.
- With the mouse, click on each software interface button in turn and follow the on screen instructions.
![]() NOTE:
NOTE:
If the setup screen does not appear after loading the CD, then you can manually start it by double-clicking the "My Computer" Icon on your desktop, then double-clicking the icon for the CD-ROM drive. When the CD-ROM window opens, double-click the "INSTALL-E.EXE" icon.
![]()
 NOTE:
NOTE:
 For Macintosh Users:
- Before you begin, close all other software applications opened on your computer.
- Insert the CD supplied into the computer CD-ROM Drive.
- Double click the CD-ROM icon "Polaroid".
- Install the software included.
Connecting to Your Computer
For Windows® and Macintosh Users:
Connecting with the USB Cable.
- Turn on the camera.
- Plug the labelled end
![]() of the USB cable into the socket marked
of the USB cable into the socket marked ![]() on your computer.
on your computer. - Plug the other end of the USB cable into the port on your camera.
- Turn on the camera and an interface "New Hardware Found" will show on the computer desktop.
- A removable disk drive will be installed onto your computer automatically.

 of the USB cable into the socket marked
Transferring Pictures and Video Clips to a Computer
Make sure the camera's driver type is the Mass Storage mode before transferring pictures and
video clips to a computer.
For Windows® Users:
- Turn on the camera
- Set the camera to Playback mode.
- Connect the camera to a computer via the USB cable.
- Open the Windows® Explorer and then you can see a "Removable Disk" drive.
- Double click "Removable Disk" -> double click "DCIM"-> double click "100MEDIA".
- All the pictures and video clips are in the "100MEDIA" folder. Highlight the pictures or video clips and drag them to a folder of your choice. You can also create sub-folders to group them or use the Arcsoft software to edit and manage the pictures or video clips.
For Macintosh Users:
- Turn on the camera
- Set the camera to Playback mode.
- Connect the camera with Mac via USB cable, the systems will automatically recognize the MASS STORAGE drive named "untitled".
- Double click the folder "untitled" to enter sub-folder "DCIM".
- Double click the folder "DCIM" to enter sub-folder "100MEDIA".
- You can copy the pictures and video clips from this folder "100MEDIA" and paste to the hard disk.
Refer to the user guide (included in the CD-ROM in PDF format) for detail use of the camera and software installation. Please install Adobe Acrobat Reader in order to read the user guide.

Documents / Resources
References
Download manual
Here you can download full pdf version of manual, it may contain additional safety instructions, warranty information, FCC rules, etc.
Advertisement
Thank you! Your question has been received!


Need Assistance?
Do you have a question about the PDC 5070 that isn't answered in the manual? Leave your question here.