Table of Contents
Advertisement
Advertisement
Table of Contents

Related Manuals for Polaroid A530


Summary of Contents for Polaroid A530
-
Page 3: Fcc Statement
FCC STATEMENT This device complies with Part 15 of the FCC Rules. Operation is subject to the following two conditions: (1) This device may not cause harmful interference, and (2) This device must accept any interference received, including interference that may cause undesired operation. - Page 4 As a consumer, you are responsible for ensuring that this product is disposed of properly. To find out how to properly dispose of this product, please go to www.polaroid.com and click on "Company" or call the customer service number for your country listed in the instruction manual.
-
Page 5: Read This First
READ THIS FIRST Trademark Information ® ® Microsoft and Windows are U.S. registered trademarks of Microsoft Corporation. ® Pentium is a registered trademark of Intel Corporation. Macintosh is a trademark of Apple Computer, Inc. SD™ is a trademark. Other names and products may be trademarks or registered trademarks of their respective owners. -
Page 6: Safety Instructions
SAFETY INSTRUCTIONS Read and understand all Warnings and Cautions before using this product. Warnings If foreign objects or water have entered the camera, turn the power off and remove the batteries. Continued use may cause an injury. Please call our friendly customer service for assistance. - Page 7 Cautions Load the batteries paying careful attention to the polarity (+ or –) of the terminals. Loading the batteries with their polarities inverted might cause fire and injury, or damage to the surrounding areas due to the battery rupturing or leaking.
-
Page 8: Using Your Batteries
Remove exhausted batteries from the camera immediately. Do not short the supply terminals. Please dispose of the batteries properly. These instructions should be retained for future reference. Questions? Call our toll-free customer service number. Look for the insert with this icon: Or visit www.polaroid.com. EN-6... -
Page 9: Table Of Contents
Contents INTRODUCTION 32 TRANSFERRING FILES TO Overview YOUR COMPUTER 32 Downloading Your Files Package Contents 33 EDITING SOFTWARE GETTING TO KNOW YOUR INSTALLATION CAMERA Front View 34 USING THE CAMERA AS A PC 10 Rear View CAMERA 11 LCD Monitor Display 34 Install the PC camera driver 13 GETTING STARTED 35 SPECIFICATIONS... -
Page 10: Introduction
Software CD-ROM USB cable Camera strap Camera pouch 2 x AAA size batteries Common (Optional) Accessories: SD/SDHC memory card (We recommend the use of a Polaroid memory card up to 4 GB.) Accessories and components may vary by retailer. EN-8... -
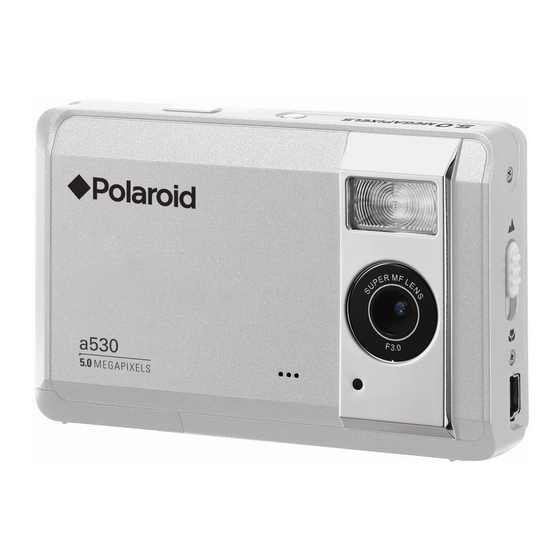
Page 11: Getting To Know Your Camera
GETTING TO KNOW YOUR CAMERA Front View 1. Shutter button 2. Power button 3. Flash 4. Focus switch Normal mode Macro mode 5. Lens 6. Beeper 7. USB connector 8. Self-timer LED EN-9... -
Page 12: Rear View
Rear View 1. LCD monitor 7. Battery door 2. Status LED 8. SD/SDHC memory card slot 3. OK OK button 9. Tripod socket Digtal Zoom button 4. Strap holder 5. 4-way control button Up button MENU Menu button Right button Flash button Down button MODE Mode button... -
Page 13: Lcd Monitor Display
LCD Monitor Display 1. Mode indicator ] Auto Mode ] Sport Mode ] Night Mode ] Portrait Mode ] Landscape Mode ] Backlight Mode 2. Flash mode +0.3 +0.3 +0.3 ] Auto Flash 00154 00154 00154 ] Always On ] Flash Off 3. - Page 14 Video mode [S] 1. Video indicator icon 2. Available recording time 3. Main focus area 59:59 59:59 59:59 4. Battery level 5. Storage media 6. Video resolution 7. Exposure compensation 8. White Balance +0.3 +0.3 +0.3 9. Focus setting Playback mode [x] - Still image playback 1.
-
Page 15: Getting Started
GETTING STARTED Preparation 1. Attach the camera strap. 2. Open the battery door. 3. Load the batteries with correct orientation as shown. 4. Close the battery door and make sure it is locked securely. 5. Insert an SD/SDHC memory card (Optional). The camera has 16MB internal memory (13.5MB available for image storage), but you can load an SD/SDHC memory card (SDHC memory card up to... -
Page 16: Turning The Power On/Off
LED indicator Blinking green Reading/Writing files. LED indicator Blinking green Charging the flash. Self-timer indicator Blinking red The self-timer function is activated. Questions? Call our toll-free customer service number. Look for the insert with this icon: Or visit www.polaroid.com. EN-14... -
Page 17: Choosing The Language
Choosing the Language Specify in which language menus and messages are to be displayed on the LCD monitor. 1. Press the MENU button. Setup 2. Select [Setup] menu with the button. 3. Select [Language] with the buttons, and Next Menu Format press the OK button. -
Page 18: Capture Mode
CAPTURE MODE Capturing Images Your camera is equipped with a 2.48" full color LTPS-TFT LCD monitor to help you compose images, playback recorded images/video clips or adjust menu settings. 1. Press the Power button to turn the power on. The status LED lights green and the camera is initiated. -
Page 19: Using The Zoom Function
Using the Zoom Function This camera is equipped with 4x digital zoom. You can enlarge the subjects by press- ing the OK / button. A useful feature as it is, however, the more the image is mag- nified, the grainer the image may become. To capture a zoomed image, perform the following steps: 1. -
Page 20: Setting Focus
Setting Focus Images can be captured by sliding the focus switch to set the focus modes: [ macro or [ ] normal mode. The focus range of marco mode is 0.6m (23.6”) ~ 1.45m (57.1”); normal mode is 1.45m (57.1”) ~ Infinity. 1. -
Page 21: Setting The Scene Mode
Setting the Scene Mode You can select the scene mode according to image your wish to capture. There are 6 available modes in this scene mode. ] Auto: Select this mode for most picture taking situations. ] Sport: Select this mode when you want to photograph fast-moving subjects. -
Page 22: Adjusting The Exposure (Ev Compensation)
Adjusting the Exposure (EV Compensation) You can manually adjust the exposure determined by the digital camera. Use this mode when the proper exposure cannot be obtained, for example, when the contrast (different between light and dark) between the subject and the background is extremely large. -
Page 23: Video Mode
In this case, select a video size lower than the current one. The maximum recordable time for one continuous video clip is 00:59:59. Questions? Call our toll-free customer service number. Look for the insert with this icon: Or visit www.polaroid.com. EN-21... -
Page 24: Playing Back Video Clips
Playing Back Video Clips You can play back recorded video clips on the camera. 1. Press the [ ] button. 00:11 00:11 00:11 The last image appears on the screen. 2. Select the desired video clip with the buttons. 3. Press the OK button. A press of the buttons during playback allows fast forward play / fast... -
Page 25: Playback Mode
PLAYBACK MODE Playing Back Still Images You can play back the still images on the LCD monitor. 1. Press the [ ] button. The last image appears on the screen. 2. The images can be displayed in reverse or forward sequence with the buttons. -
Page 26: Thumbnail Display
Thumbnail Display This function allows you to view 9 thumbnail images on the LCD monitor simulta- neously so you may search for a particular image. 1. Press the [ ] button. The last recorded image appears on the LCD monitor. 2. -
Page 27: Protecting Images
Formatting an SD/SDHC memory card or internal memory overrides protection, and erases all images regardless of their protected status. Questions? Call our toll-free customer service number. Look for the insert with this icon: Or visit www.polaroid.com. EN-25... -
Page 28: Erasing Images
Erasing Images Erasing single image / Erasing all images 1. Press the [ ] button. Play The last image will be displayed on the screen. Next Menu Delete 2. Select the image you want to erase with the Copy to Card Next Menu Slide Show 3 sec. -
Page 29: Menu Options
MENU OPTIONS Capture Menu This menu is for the basic settings to be used when capturing still images. Capture Capture Auto Size Color Quality Fine Standard Scene Mode Auto Saturation High Sharpness Hard +0.0 Metering Average W. Balance Auto 1. Press the MODE button to set the camera mode to Camera. 2. - Page 30 Refer to section in this manual titled “Adjusting the Exposure (EV Compensation)” for further details. Metering This sets the metering method for calculating the exposure. * [ o ] Average: The entire area of the screen is measured, and the exposure is calculated.
-
Page 31: Video Menu
Video Menu This menu is for the basic settings to be used when recording video clips. Video Size +0.0 W. Balance Auto 1. Press the MODE button to set the camera mode to [ w ]. 2. Press the MENU button. 3. -
Page 32: Playback Menu
Playback Menu In the [ ] mode, choose which settings are to be used for playback. Play Delete Next Menu Copy to Card Next Menu Slide Show 3 sec. Protect Next Menu Thumbnail Next Menu 1. Press the [ ] button. 2. -
Page 33: Setup Menu
If no operation is performed for a specific period of time, the power to the camera is automatically turned off. This feature is useful for reducing battery consumption. * 1 Min. / 3 Min. / 5 Min. /Off Questions? Call our toll-free customer service number. Look for the insert with this icon: Or visit www.polaroid.com. EN-31... - Page 34 System Reset This returns all basic settings to the camera’s default settings. * Cancel / Execute Light Freq. The function allows to change the light frequency of environment to 60Hz or 50Hz. * [60Hz]: the light frequency of environment is 60Hz like the US. * [50Hz]: the light frequency of environment is 50Hz like the UK.
-
Page 35: Transferring Files To Your Computer
TRANSFERRING FILES TO YOUR COMPUTER System Requirement Windows Macintosh Pentium 166 MHz or higher PowerPC G3/G4/G5 Windows 2000/XP/Vista OS 9.0 or later 128MB RAM 128MB RAM 128MB hard disk space 128MB hard disk space CD-ROM drive CD-ROM drive Available USB port Available USB port Downloading Your Files 1. -
Page 36: Editing Software Installation
EDITING SOFTWARE INSTALLATION MediaOne Gallery SE - makes it the easiest way to manage and share your digital life with family & friends. The intuitive thumbnail library automatically organizes, updates and sorts files for the most natural way to browse your multimedia collection. To install software: 1. -
Page 37: Using The Camera As A Pc Camera
1. Insert the enclosed CD-ROM into your CD-ROM drive. 2. Follow the on-screen instructions to complete the installation. 3. After the driver installation is completed, restart your computer. Questions? Call our toll-free customer service number. Look for the insert with this icon: Or visit www.polaroid.com. EN-35... -
Page 38: Specifications
SPECIFICATIONS Item Description Image sensor 1/2.5” CMOS sensor Effective pixels 5.0 Mega pixels Image resolution Still image 10M: 3648 x 2736 (FW interpolation), 8M: 3264 x 2448 (FW interpolation), 5M: 2560 x 1920, 3M: 2048 x 1536, 1.3M: 1280 x 960, VGA: 640 x 480 Video clip VGA: 640 x 480 (24 fps), QVGA: 320 x 240 (30 fps) Recording media... -
Page 39: Appendix
APPENDIX Possible Number of Shots Possible number of shots (still image) The table shows the approximate shots that you can capture at each setting based on the capacity of the internal memory and the SD/SDHC memory card. SD/SDHC memory card capacity Internal Size Quality... -
Page 40: Troubleshooting
Troubleshooting Refer to the symptoms and solutions listed below before sending the camera for repairs. If the problem persists, contact Polaroid customer service. Solutions / Corrective Symptom Cause Actions The power does not The batteries are not loaded. Load the batteries correctly. -
Page 41: Connecting To A Pictbridge Compliant Printer
Connecting to a PictBridge Compliant Printer Read this section if the model you purchased is included with the PictBridge functions. If a printer that supports PictBridge is available, images can be printed by connecting the digital still camera directly to the PictBridge-compatible printer without using a computer. Connecting the camera to the printer 1. - Page 42 ERROR] will be displayed. The image printing may be failed if the power to the camera is cut off. For service, support and warranty information visit www.polaroid.com. "Polaroid" and “Polaroid and Pixel” are trademarks of Polaroid Corporation, Waltham, MA, USA. EN-40...