Table of Contents
Advertisement
Quick Links
This product requires an AcuRite Atlas Weather Sensor
CONTENTS
Unpacking Instructions ........................2
Package Contents ................................2
Product Registration.............................2
Features & Benefits ..............................3
Setup ....................................................5
Placement Guidelines ..........................6
Using the Weather Station ..................7
Questions? Visit www.acurite.com/ support
SAVE THIS MANUAL FOR FUTURE REFERENCE.
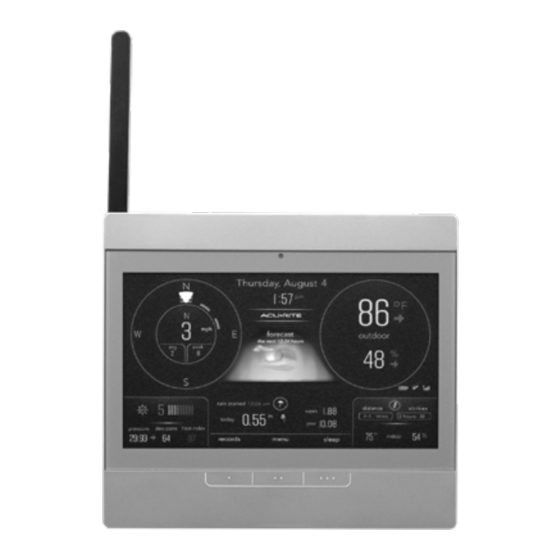
High-Definition Display
(sold separately) to be operational.
AcuRite Atlas
models 06104 / 06105
Troubleshooting ...................................9
Care & Maintenance ...........................10
Specifications .......................................10
FCC Information ..................................10
Customer Support ................................1 1
Warranty..............................................1 1
Instruction Manual
®
Advertisement
Table of Contents

Related Manuals for AcuRite Atlas 06104


Summary of Contents for AcuRite Atlas 06104
-
Page 1: Table Of Contents
Instruction Manual ® AcuRite Atlas High-Definition Display models 06104 / 06105 This product requires an AcuRite Atlas Weather Sensor (sold separately) to be operational. CONTENTS Unpacking Instructions ......2 Troubleshooting ........9 Package Contents ........2 Care & Maintenance ......10 Product Registration......2 Specifications ........10 Features &... -
Page 2: Unpacking Instructions
Congratulations on your new AcuRite product. To ensure the best possible product performance, please read this manual in its entirety and retain it for future reference. Unpacking Instructions Remove the protective film that is applied to the LED screen prior to using this product. -
Page 3: Features & Benefits
Date & Day of the Week Clock 12 to 24 Hour Weather Forecast Self-Calibrating Forecast pulls data from your AcuRite Atlas ® Sensor to generate your personal forecast. Moon phase will be shown during evening hours when visibility allows (see page 8). - Page 4 Features & Benefits Back of Display Integrated Hangers For easy wall mounting. Plug-in for Power Adapter Display Stand Battery Compartment Cover Backup Battery Compartment...
-
Page 5: Setup
SETUP Display Setup Install or Replace Backup Batteries (recommended for backup) 1. Remove the battery compartment cover. 2. Insert 3 x AAA batteries into the battery compartment, as shown. Follow the polarity (+/-) diagram in the battery compartment. 3. Replace the battery cover. Plug in Power Adapter For the best performance, plug in the power adapter as the main power source for this product. -
Page 6: Placement Guidelines
Placement for Maximum Accuracy AcuRite sensors are sensitive to surrounding environmental conditions. Proper placement of both the display and the sensor are critical to the accuracy and performance of this unit. Display Placement Place the display in a dry area free of dirt and dust. Display stands upright for tabletop use and and is also wall-mountable. -
Page 7: Using The Weather Station
OPERATION Using the Weather Station Navigate to the main menu at any time by using the menu navigation buttons below the display. From the main menu, you can set alarms, modify display settings, review your connection with the sensor, and more. 1. - Page 8 Weather Overview Dashboard Weather Forecast AcuRite’s patented Self-Calibrating Forecasting provides your personal forecast of weather conditions for the next 12 to 24 hours by collecting data from a sensor in your backyard. It generates a forecast with pinpoint accuracy - personalized for your exact location.
-
Page 9: Troubleshooting
Problem Possible Solution ® • Relocate the display and/or the AcuRite Atlas sensor. The units must be within 330 ft (100 m) of each other. • Make sure both units are placed at least 3 ft (.9 m) away from electronics that may interfere with the wireless communication (such as TVs, microwaves, computers, etc). -
Page 10: Care & Maintenance
• Make sure both units are positioned away from moisture Inaccurate temperature or sources (see page 6). humidity • Make sure AcuRite Atlas sensor is mounted at least 5 ft (1.5 m) off of the ground. • Calibrate indoor and outdoor temperature and humidity (see “Calibration” on page 8). -
Page 11: Customer Support
Customer Support AcuRite customer support is committed to providing you with best-in-class service. For assistance, please have the model number of this product available and contact us by visiting www.acurite.com support PRODUCT MUST BE REGISTERED IMPORTANT TO RECEIVE WARRANTY SERVICE... - Page 12 © Chaney Instrument Co. All rights reserved. AcuRite is a registered trademark of the Chaney Instrument Co., Lake Geneva, WI 53147. All other trademarks and copyrights are the property of their respective owners. AcuRite uses patented Printed in China 06104_06105 INST 081822 technology.