DeLonghi La Specialista ARTE EC915X Instructions For Use Manual
Hide thumbs
Also See for La Specialista ARTE EC915X:
- Instructions for use manual (56 pages) ,
- Manual (217 pages)
Advertisement
Advertisement
Table of Contents

Related Manuals for DeLonghi La Specialista ARTE EC915X


Summary of Contents for DeLonghi La Specialista ARTE EC915X
- Page 1 수동 커피 머신 Coffee machine Instruction for use...
- Page 2 Optimal Zone Dose level...
- Page 4 INSERT CLOSE FINE 분쇄양 COARSE 가늘게 굵게...
- Page 5 INSERT CLOSE...
- Page 6 1.4 제조사 권장 청소 액세서리(옵션) 기기 사용 전에 반드시 안전 경고를 읽어주십시오. 자세한 내용은 www.delonghi.com에서 참조하십시오. 1. 설명 1.1 기기 설명 - A 2. 기기 준비 A1. 전원 스위치(ON/OFF) A2. 분쇄 단계 다이얼 모든 액세서리를 미지근한 물로 세척하여 물기를 A3. 원두 컨테이너...
- Page 7 필터(C3 또는 C4)에 들어가는 분쇄 커피의 양에 특히 필터에 들어가는 분쇄량 조절 주의하십시오( “ 4.1 1단계 - 분쇄 ” 부분 지침 참조). “ 퍼펙트 도즈 ” 부분의 설명대로 진행합니다. 4. 커피 만들기 4.1 1단계 - 분쇄 분쇄량 컨테이너(A3)에 커피 원두를 넣습니다(그림 9). 바 로...
- Page 8 5. 우유 음료 만들기 “ 퍼펙트 도즈 ” 5.1 우유 거품 만들기 스팀 피처(C8)에 데울/거품을 낼 우유를 채웁니다. 이때 우유의 부피가 2~3배 늘어난다는 점에 유의하십시오 탬핑 후 분쇄량이 적절한지 확인하십시오. 이상적인 • (그림 23). 보다 진하고 고른 거품을 만들기 위해서는 분쇄량을...
- Page 9 7. 설정 몇 초 동안 스팀을 배출하여 추출구를 세척합니다 아래 번호 순서에 따라 진행 합니다. (그림 8). 스팀 추출구가 식을 때까지 기다립니다. 추출구가 오랫동안 효과적으로 작동하게 하려면 특수 청소 1. 메뉴로 들어갑니다. 도구(C10)를 사용하여 구멍(그림 26)이 막히지 않게 두 버튼을 동시에 합니다.
- Page 10 3. OK 버튼(B6)을 눌러 새로운 설정 저장 다음에 유의하십시오. 30초 동안 동작이없으면 설정 메 뉴가 자동으로 종료됩니다. 7.1 기본 설정 리셋 OK 표시등(B6)이 잠시 깜박이며 리셋을 나타냅니다 1. 메뉴로 들어갑니다 버튼을 동시에 3초 동안 누릅니다. 9. 커피 그라인더 청소 2. 기본 설정 리셋 브러시(C9)를...
- Page 11 물 경도 테스트 결과 석회질 제거 단계 (B7) 버튼 석회질 제거제 드롱기 석회질 제거제 용기 용량 2리터 연수 시간 ~40분 표시등(B3)이 켜지면 기기에서 석회질을 제거해야 보통 합니다. 석회질 제거는 언제든지 시작할 수 있습니다. 2. 드립 트레이(A19)를 분리하여 비운 다음 기기에 다시 놓습니다.
- Page 12 OK 버튼(B6)을 3초 이상 길게 누릅니다. OK 표시등이 12. OK 버튼을 누릅니다. 세척 사이클이 시작됩니다. 13. 세척 사이클이 완료되면 물이 더 이상 배출되지 않습 깜빡입니다. 니다. 표시등이 빨간색으로 깜박이고 OK표시등이 석회질 제거 프로그램이 시작되고 추출구에서 꺼집니다. 석회질 제거제 용액이 배출됩니다. 석회질 제거 프로그램이...
- Page 13 표시등 표시등 설명 작동 음료를 만들려고 했지만 물통(A7)이 물통에 물을 채웁니다. 비어 있습니다. 원두가 너무 가늘게 분쇄되어 커피가 필터 홀더(C1)를 분리하고 분쇄도를 너무 느리게 추출되거나 아예 굵게 조절하거나 양을 조절합니다. 추출되지 않습니다. “ 4.1 1단계 - 분쇄 ” 및 “ 4.2 2단계 - 탬 핑...
- Page 14 표시등 표시등 설명 작동 석회질 제거 사이클의 첫 단계가 OK 버튼을 눌러 세척을 완료되었습니다. 이제 세척 단계로 시작하십시오. 진행해야 합니다. 깜빡임 - 켜짐 기기가 석회질 제거 사이클을 석회질 제거 사이클을 완료하여 계속 완료하기 위해 세척 단계를 진행 진행하십시오( “ 12. 석회질 제거 ” 부분 중입니다.
- Page 15 문제 원인 해결 방법 커피 머신이 커피를 분쇄하지 커피 그라인더에 이물질이 선택 다이얼(A2)을 8로 돌리고 않습니다. 들어갔습니다. 진공 청소기를 사용해 원두 컨테이너(A3)에서 원두를 모두 제거하고 청소합니다. 그래도 문제가 계속되면 고객 서비스 센터로 문의하십시오. 다른 종류의 커피로 변경 • 원두 컨테이너(A3)에는 사용할 만큼의...
- Page 16 - 당사에서 지정하지 않은 수리서비스 업체 또는 기사 등이 수리하여 고장 또는 사고 발생 시 3. 그 밖의 경우 - 천재지변 (낙뢰, 화재, 염해, 침수 등)에 의한 고장 발생 시 - 소모성 부품이 수명이 다한 경우 드롱기 코리아 (주) 고객상담 및 서비스 080-848-8800 www.delonghi.co.kr...
-
Page 17: Preparing The Appliance
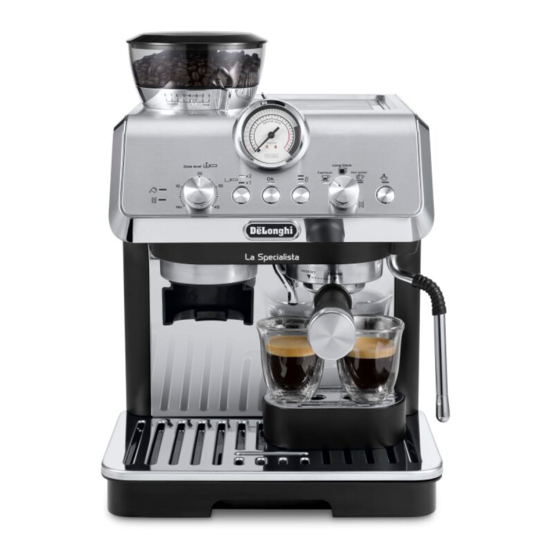
C12. Pressing mat (*certain models only) 1. DESCRIPTION 1.4 Optional cleaning accessories recommended 1.1 Description of appliance - A by the manufacturer A1. Main switch (ON/OFF) For more information, visit www.delonghi.com. A2. Grinding level selector Cleaner A3. Beans container A4. Beans container lid EAN: 8004399333307 A5. -
Page 18: Making Coffee
in the filter ((C3) or (C4)) (see instructions in section “4.1 Step Adjusting the quantity of ground coffee in the filter 1 - Grinding”). Proceed as described in section “The “perfect dose””. 4. MAKING COFFEE 4.1 Step 1 - Grinding 1. - Page 19 The “perfect cup or the temperature of the beverage at the moment of dose” release from the outlets of the filter holder. 5. MAKING MILK BEVERAGES • Make sure the coffee is at the right level after tamping. It 5.1 Frothing the milk might be necessary to adjust the level a few times using the 1.
-
Page 20: Settings Menu
7. SETTINGS MENU 3. Wait until the steam wand has cooled down. To ensure the wand works efficiently over time, use the special cleaning 1. Access the menu: tool (C10) to free the holes (fig. 26) of any obstruction. Press together and hold 6. -
Page 21: Cleaning The Appliance
3. Save the new settings by pressing OK (B6) ✕ ✕ ✕ ✓ ✓ Please note: The appliance exits the settings menu automati- ✕ ✕ ✕ ✕ ✓ cally if there is no activity for 30 seconds. Reset default settings The OK light (B6) flashes briefly to confirm the reset. - Page 22 Water Hardness Test Result (B7) Level To descale button Descaler De’Longhi descaler Container Capacity 2 litres soft water Time ~40min 1. When the indicator light (B3) comes on, you need to medium descale the appliance. You can start descaling at any time. water 2.
-
Page 23: Explanation Of Indicator Lights
8. Press the hold the OK button (B6) for at least 3 seconds. The OK button. The rinse cycle starts. 12. Press the OK light flashes. 13. When rinsing is complete, delivery stops. The light 9. The descaling programme starts and the descaler liquid flashes red and the OK light goes out. - Page 24 LIGHTS EXPLANATION INDICATOR OPERATION LIGHTS An attempt is being made to prepare a bev- Fill the tank with water erage, but with water tank (A7) empty Because the beans are too finely Remove the filter holder (C1) and repeat the ground, the coffee is delivered too coffee-making steps, bearing in mind the slowly or not at all...
-
Page 25: Troubleshooting
LIGHTS EXPLANATION INDICATOR OPERATION LIGHTS The first phase of the descaling cycle Press OK to start rinsing. is complete. You now need to proceed with rinsing. Flashing - On The machine proceeds with the rinsing Proceed by completing the descaling cycle phase to complete the descaling cycle. - Page 26 PROBLEM CAUSE SOLUTION The machine does not grind the coffee Foreign matter has found its way into the Turn the selector (A2) to 8 and remove coffee mill all beans with a vacuum cleaner until the beans container (A3) is empty and clean.
- Page 28 De ’ Longhi Appliances via Seitz, 47 31100 Treviso Italia www.delonghi.com...