Fisher & Paykel 5 Series User Manual
Hide thumbs
Also See for 5 Series:
- User manual (108 pages) ,
- Installation manual (28 pages) ,
- Quick reference manual (2 pages)

Related Manuals for Fisher & Paykel 5 Series


Summary of Contents for Fisher & Paykel 5 Series
- Page 1 CERAMIC COOKTOP CE244DTB1, CE304DTB1 & CE365DTB1 models USER GUIDE US CA 592140A 05.20...
-
Page 3: Table Of Contents
CONTENTS Safety and warnings First use Cooktop use GentleHeat Auto Heat-reduce Cookware Dual cooking zone Locking the control panel Heat settings Care and cleaning Troubleshooting Warranty and service Registration To register your product visit our website: fisherpaykel.com/register... - Page 5 SAFETY AND WARNINGS WARNING! Electric Shock Hazard Failure to follow this advice may result in electric shock or death. • Do not cook on a broken or cracked cooktop. If the cooktop surface should break or crack, switch the appliance off immediately at the mains power supply (wall switch) and contact a qualified technician.
- Page 6 SAFETY AND WARNINGS WARNING! Hot Surface Hazard Failure to follow this advice could result in burns and scalds. • Do not touch surface units or areas near units. Surface units maybe hot even though they are dark in colour. • Surfaces of the appliance may become hot enough to cause burns.
-
Page 7: Safety And Warnings
SAFETY AND WARNINGS READ AND SAVE THIS GUIDE WARNING! To reduce the risk of fire, injury to persons or damage when using the appliance, follow the important safety instructions listed below. Read all the guidance before using the appliance. Take care when frying: oil and fat heat up very quickly, particularly on a high setting. At extremely high temperatures oil and fat will ignite spontaneously and this presents a serious fire risk. - Page 8 SAFETY AND WARNINGS Child Safety Do not allow children to play with the appliance or sit, stand, or climb on it. Do not store items of interest to children in cabinets above the appliance. Children climbing on the cooktop could be seriously injured. Do not leave children alone or unattended in the area where the appliance is in use.
-
Page 9: First Use
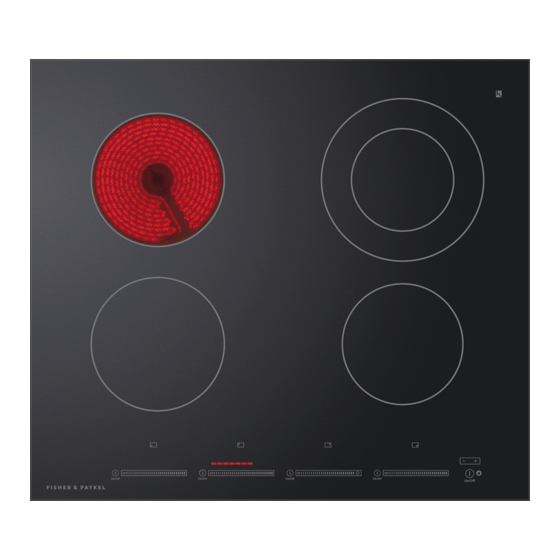
FIRST USE COOKTOP FEATURES 1 Control panel 2 Zone indicator 3 Zone display 4 Zone heat selector 5 Dual zone control 6 Dual zone indicator 7 GentleHeat control 8 GentleHeat indicator 9 COOKING ZONE ON/OFF !0 COOKTOP ON/OFF !1 Timer display !2 Timer control !3 Keylock !4 Cooking zones... -
Page 10: Cooktop Use
COOKTOP USE Turning the cooktop on Touch and hold the On/Off control COOKTOP for 2 seconds. A red indicator light above the control will glow. Touch the On/Off. Control COOKING ZONE of the cooking zone you wish to use. A red indicator light above the control will glow. - Page 11 COOKTOP USE Turning the cooktop off Turn the off by touching COOKING ZONE the cooking zone On/Off control. Turn the entire cooktop off by touching the On/Off control. COOKTOP Beware of hot surfaces: will flash in the window of any cooking zone that is too hot to touch.
- Page 12 COOKTOP USE Setting the timer You can set the timer when you are not using any cooking zones. You can set the timer for up to 1 hour and 59 minutes. The time will be displayed in hours and minutes when the timer is set for longer than 10 minutes.
- Page 13 COOKTOP USE Change or cancel timer setting Turn the cooktop on by touching the On/Off control. COOKTOP – Touch the timer controls together until the timer stops and you hear a beep. To change Set a new time and a few seconds after the timer will start.
-
Page 14: Gentleheat
GENTLEHEAT GentleHeat is ideal for the most delicate cooking tasks, as the cooking zone will provide a very low continuous gentle heat. Setting up a cooking zone for GentleHeat With the cooking zone turned on, touch the setting on the setting selector. GENTLEHEAT The setting indicator above will glow and will show in the display. -
Page 15: Auto Heat-Reduce
AUTO HEAT-REDUCE This feature enables the cooking zones to: HEAT APPROXIMATE TIME Heat up food or liquid quickly at the SETTING AT RAPID HEAT highest setting, and Reduce heat automatically to a 50 seconds pre-selected lower setting to cook the 1 minute food through. - Page 16 AUTO HEAT-REDUCE When Auto Heat-reduce is set Initially, while the cooking zone is at the highest setting, will flash alternately with your selected lower setting. The length of time at the highest setting depends on the selected lower heat setting. When the period of highest setting is over, will stop flashing and the cooking zone will automatically reduce the heat to your pre-...
- Page 17 COOKING GUIDE CE244DTB1 CE304DTB1 CE365DTB1 RECOMMENDED ZONE DIAMETER ZONE POWER MINIMUM PAN SIZE IN (MM) IN (MM) 5 11/16 (145) 1200W 4 3/4 (120) 6 5/16 (160) 1500W 5 3/4 (145) 7 11/16 (195) 2000W 5 3/4 (145) Inner zone: 5 5/16 (135) 1000W 4 3/4 (120) Dual zone: 7 11/16 (195)
-
Page 18: Cookware
COOKWARE The quality of your cookware can affect cooking performance. Only use compatible cookware that has been specifically designed for the cooktop. Suitable cookware material: Unsuitable cookware material: stainless steel glass cast iron wood steel porcelain enamelled steel ceramic or earthenware. Other cookware considerations Ensure the base of your cookware is smooth, sits flat against the glass, and is similar in size as the cooking zone. -
Page 19: Dual Cooking Zone
DUAL COOKING ZONE When using dual cooking zones you can choose to use the inner zone only or the full dual cooking zone. Inner zone Dual zone Activate Dual cooking zone Turn the cooktop on by touching the On/Off control. COOKTOP Touch the On/Off button of the required cooking zone. -
Page 20: Locking The Control Panel
LOCKING THE CONTROL PANEL Lock the cooktop controls to prevent accidental use of the cooktop by children or when cleaning. When locked, the controls are unresponsive and the cooktop will not turn on. For safety reasons you cannot lock the cooktop controls while the cooktop is in use or if automatic cooking options have been set. -
Page 21: Heat Settings
HEAT SETTINGS The settings below are guidelines only. The exact setting will depend on several factors, including your cookware and the amount you are cooking. Experiment with the cooktop to find the settings that best suit you. Heat setting... -
Page 22: Care And Cleaning
CARE AND CLEANING WHAT? HOW? IMPORTANT! Everyday spills Switch the power off at When the power is switched on glass (fingerprints, the wall. off, there will be no hot marks, stains left Apply cooktop cleaner surface indication but the by food or non- while the glass is still warm, cooking zone may still be sugary spillovers... -
Page 23: Troubleshooting
TROUBLESHOOTING PROBLEM POSSIBLE CAUSES WHAT TO DO The cooktop cannot be No power. Make sure the cooktop is turned on. connected to the power supply and that it is switched on at the wall. Check whether there is a power outage in your home or area. - Page 24 TROUBLESHOOTING PROBLEM POSSIBLE CAUSES WHAT TO DO Some or all displays Liquid has spilled onto the Switch the power to the flash and there is a touch control area. cooktop off at the wall and continuous beep. see 'Care and cleaning' for guidance.
-
Page 25: Warranty And Service
WARRANTY AND SERVICE Before you call for service or assistance Refer to the installation instructions and this user guide to check that: Your product is correctly installed. You are familiar with its normal operation. If after checking these points you still need assistance or parts, please refer to the Service &... - Page 26 FISHERPAYKEL.COM © Fisher & Paykel Appliances 2020. All rights reserved. The models shown in this guide may not be available in all markets and are subject to change at any time. The product specifications in this guide apply to the specific products and models described at the date of issue.