Table of Contents
Advertisement
Quick Links
DIGITAL MULTIMETER
OPERATION MANUAL
VR-9807A
1. GENERAL
The instrument is a stable and good performance
digital multi-meter driven by battery. Its LCD with
42mm-high figure makes the reading clear. Overload
protection makes the operation is convenient.
The instrument has the function of measuring DCV,
ACV, DCA, ACA, resistance, capacitance, frequency,
and diode, triode and continuity test. The instrument
takes dual-integral A/D converter as key point, is an
excellent tool.
이 자료는 저작권법에 따라 보호받는 저작물이므로 무단배포 및 무단복제를 금하며, 내용의 전부 또는 일부를 이용하려면,
반드시 한국 VictorRuoshui 社 의 서면동의를 받아야 합니다.
www.victorruoshui.co.kr
Advertisement
Table of Contents

Related Manuals for Victor VR-9807A


Summary of Contents for Victor VR-9807A
- Page 1 DIGITAL MULTIMETER OPERATION MANUAL VR-9807A 1. GENERAL The instrument is a stable and good performance digital multi-meter driven by battery. Its LCD with 42mm-high figure makes the reading clear. Overload protection makes the operation is convenient. The instrument has the function of measuring DCV, ACV, DCA, ACA, resistance, capacitance, frequency, and diode, triode and continuity test.
-
Page 2: Safety Notes
www.victorruoshui.co.kr 2. SAFETY NOTES The meter meets the standard of IEC1010. Please read below notes carefully before operation. 2-1 Do not input the limited voltage of 1000V DC or 700V AC TRUE RMS when measuring voltage. 2-2 Voltage less than 36V is a safety voltage. When measuring voltage higher than DC 36V, AC 25V, please check the connection and insulation of test leads to avoid electric shock. - Page 3 www.victorruoshui.co.kr “ ” exists high voltage, “ ”GND, “ ” dual insulation, “ ” must refer to manual, “ ”low battery 3. SPECIFICATION 3-1.GENERAL 3-1-1.Displaying : LCD displaying 3-1-2.Max. indication: 19999(4 1/2), auto polarity indication 3-1-3.Measuring method: dual slope A/D transfer 3-1-4.Sampling rate: approx.
-
Page 4: Technical Data
www.victorruoshui.co.kr humidity <80% 3-1-8.Power: one 9V battery (NEDA1604/6F22 or equivalent) 3-1-9.Meas.:190*88.5*27.5 mm 3-1-10.Weight: approx. 422g(including battery) 3-1-11 . Accessories: Operation manual, Test leads, Shock-proof cover, Gift box, battery etc. 3-2 TECHNICAL DATA 3-2-1 Accuracy: ± (a% × reading + digits) at 23 ± 5℃, relative humidity <75%. - Page 5 www.victorruoshui.co.kr ·ACA ·Capacitance C Auto power off Backlight display 3-2-3. TECHNICAL DATA 3-2-3-1. DCV Range Accuracy Resolution 200mV 0.01mV 0.0001V ±(0.1%+5) 0.001V 200V 0.01V 1000V ±(0.2%+5) 0.1V Input impedance: 200mV range: 1MΩ other ranges :10MΩ ; Overload protection: 200mV range: DC 250V or AC peak value. Other ranges: DC 1000V or AC peak value 이...
- Page 6 www.victorruoshui.co.kr 3-2-3-2. ACV Accuracy Range Resolution 200mV ±(1.0%+25) 0.1mV ±(0.8%+25) 10mV 200V 100mV 750V ±(1.2%+25) Input impedance: 200mV range: 1MΩ other ranges :10MΩ ; The frequency response of sine wave and triangular wave is 40Hz-1kHz; the frequency response of other waveform is 40Hz-200Hz .
- Page 7 www.victorruoshui.co.kr Displaying:1)True RMS(true value response) 2) It’s normal that Some range do not turn to “0” and it do not affect the measuring accuracy 3-2-3-3.DCA Range Accuracy Resolution 200uA 0.01uA ±(0.5%+4) 0.0001mA 20mA 0.001mA 200mA ±(0.8%+6) 0.01mA ±(2.0%+15) 0.001A Max. measuring volt drop: 200mV Max.
- Page 8 www.victorruoshui.co.kr 20A range: ≤5A , continuous measurement is allowed. 5A~20A : continuous measurement time should be less than 10 sec. Time interval should be more than 5 min. 3-2-3-4. ACA Range Accuracy Resolution 200mA ±(1.5%+15) 0.1mA ±(2.5%+35) 10mA Max. measuring volt drop:200mV Max.
-
Page 9: Resistance(Ω
www.victorruoshui.co.kr 5A~20A : continuous measurement time should be less than 10 sec. Time interval should be more than 5 min. 3-2-3-5. RESISTANCE(Ω) Range Accuracy Resolution 200Ω 0.01Ω ±(0.4%+10) 2kΩ 0.1Ω 20kΩ 1Ω ±(0.4%+5) 200kΩ 10Ω 2MΩ 100Ω 20MΩ 1kΩ ±(1.2%+25) 200MΩ... - Page 10 www.victorruoshui.co.kr 3-2-3-6. CAPACITANCE Range Accuracy Resolution 20nF/200nF 1pF/10pF 100pF 20uF ±(4.0%+50) 200uF 10nF 2000uF 100nF Overload protection:DC 36V or AC peak value 3-2-3-7. FREQUENCY Range Accuracy Resolution 20Hz 0.001Hz 200Hz 0.01Hz 2kHz 0.1Hz ±(0.1%+3) 20kHz 200kHz 10Hz 2MHz 100Hz Input sensitivity:1.5Vrms. Overload protection :...
- Page 11 www.victorruoshui.co.kr DISPLAYING TEST VALUE CONDITION Forward DC current is approx. 1mA , Diode forward volt drop backward voltage is approx. 3V Buzzer rings, impedance between Open voltage the two testing points approx. 3V is less than(50±20)Ω Overload protection:DC 250V or AC peak value. Warning: Do not input any voltage value at this range for safety! 3-2-2-9.
-
Page 12: Operation
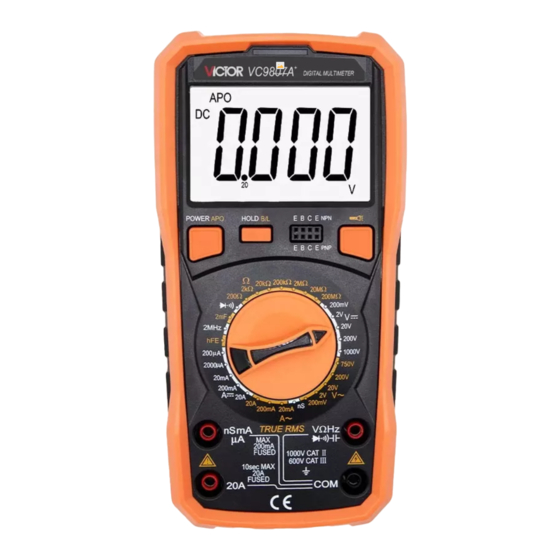
www.victorruoshui.co.kr (1.0%+30 ) 4. OPERATION 4-1.Front panel 4-1-1. LCD: display the measured value 4-1-2. Power, press the hold key to turn it on, auto power-off can be cancelled. 4-1-3. Hold and turn on /off the backlight . 4-1-4.Tride input terminal 4-1-5. - Page 13 www.victorruoshui.co.kr range. 4-1-7. COM for measuring current 20A/2A. 4-1-8.COM for measuring current 200mA. 4-1-9. GND, capacitance and temperature cathode COM. 4-1-10.Voltage ,resistance , temperature and diode anode COM. 4-2.DCV measurement 4-2-1. Apply the black test lead to “COM” terminal and the red one to “V/Ω/Hz”...
- Page 14 www.victorruoshui.co.kr displayed. NOTE: 1. If the voltage under measured is unclear beforehand, should set the range knob to the highest range, then, switch to a proper range according to the displaying value.. If LCD displays “OL”, it means over-range, the range knob must be switched to a higher range. 2.
- Page 15 www.victorruoshui.co.kr the red one to “V/Ω/Hz” terminal. 4-3-2. Set the range knob to a proper ACV range, then, connect the test leads crossly with the measured circuit. NOTE: 1. If the range under measured is unclear beforehand, should set the range knob to the highest range, then, switch it to a proper range according to displaying value..If LCD displays “OL”, it means over-range, should set the range knob to a higher range.
- Page 16 www.victorruoshui.co.kr 5. Be sure to keep the test leads off the testing point after complete all the measurement . 4-4. DC current measurement 4-4-1. Apply the black test lead to “COM” terminal and the red one to “mA” terminal (Max.200mA), or the red test lead to “20A”...
- Page 17 www.victorruoshui.co.kr it to a proper range according to the displaying value; If LCD displays“1”,it means over-range, the range knob must be set to a higher range. 2. The max. input current is 200mA or 20A (subject to the position where the red test lead be inserted), large current may blow the fuse.
- Page 18 www.victorruoshui.co.kr 5.Do not input DCV 36V and ACV 25V between current input terminal and “COM” terminal . 4-5.AC current measurement 4-5-1. Apply the black test lead to "COM” terminal, and the red one to "mA” terminal (max. 200mA), or the red test lead to “20A” terminal (max. 20A); 4-5-2.
- Page 19 www.victorruoshui.co.kr over-range, must set the range knob to a higher range. 2. The max. input current is 200mA or 20A(subject to the position where the red test lead be inserted) , large current might blow the fuse , be careful especially at 20A range, because there is no fuse protection, large current may heat the circuit, even damage the meter.
- Page 20 www.victorruoshui.co.kr point. 6. Do not input DCV 36V and ACV 25V between current input terminal and “COM” terminal . 4-6.Resistance measurement 4-6-1. Apply the black test lead to “COM” terminal, and the red one to “V/Ω/Hz” terminal. 4-6-2. Set the range knob to a proper resistance range, connect up the test leads across the resistance under measured.
- Page 21 www.victorruoshui.co.kr resistance measuring. 2. When input terminal is open-circuit, overload displays. 3. Before measuring in-line resistance, be sure that power is off and all capacitance are released. 4. Do not input voltage at this range. 4-7.Capacitance measurement 1. Apply the black test lead to “COM” terminal,and the red one to “mA”...
- Page 22 www.victorruoshui.co.kr proper range according to the displaying value. If "OL" displays, it means over-range, should set to a higher range. 2. Before taking measurement, LCD displaying might not be zero, the remaining will become smaller and smaller. It could be ignored. 3.
- Page 23 www.victorruoshui.co.kr 4-8-2. Select NPN or PNP , insert separately emitter, base and collector to proper terminal. 4-9.Diode and continuity test 4-9-1. Apply the black test lead to “COM” terminal, and the red one to “V/Ω/Hz” terminal ( the polarity of the red test lead is “+”).
-
Page 24: Frequency Measurement
www.victorruoshui.co.kr under measured, if the inner buzzer sounds and continuity alarm indicator light on , the resistance between two points is less than (50±20)Ω approximately. NOTE: Do not input voltage at” ” range to avoid damage. 4-10.FREQUENCY MEASUREMENT 4-10-1.Apply the test leads or shield cable to “COM” and “V/Ω/Hz”... - Page 25 www.victorruoshui.co.kr maybe over-range. 2.Shielding cable be recommended when measuring small signal under noisy condition. 3.Be careful when measuring high volt circuit. 4.Do not input a voltage over DC 250V or AC peak factor to avoid damage to the meter. 4-11.CONDUCTANCE MEASUREMENT 1.Apply the red test lead to “mA”...
-
Page 26: Auto Power On/Off
www.victorruoshui.co.kr turn the range knob to “Ω”, measuring its resistance. 3.Do not input voltage at this range to avoid damage the meter . S, S=1/Ω。 4.Unit:1nS=10 4-12.DATA HOLD/TURN ON/OFF THE BACKLIGHT Press down the “HOLD B/L” key, LCD display “HOLD” ,the present value is held on the screen ,press it again ,”HOLD”... -
Page 27: Maintenance
www.victorruoshui.co.kr power .Press the “HOLD B/L” key to turn on the power , “APO” disappear from the LCD 5.MAINTENANCE Do not try to modify the electric circuit. 5-1. Keep the meter away from water, dust and shock. 5-2. Do not store and operate the meter under the condition of high temperature, high humidity, combustible, explosive and strong magnetic place. -
Page 28: Troubleshooting
www.victorruoshui.co.kr replacement. 6. TROUBLE SHOOTING If the meter does not work properly, check it as following: ERROR SOLUTION ●Turn on the power ●HOLD key NO DISPLAYING ●Replace battery ●Replace battery symbol displays NO CURRENT ●Replace fuse INPUT ●Replace battery BIG ERROR 601E-9807-002G 이...