Table of Contents
Advertisement
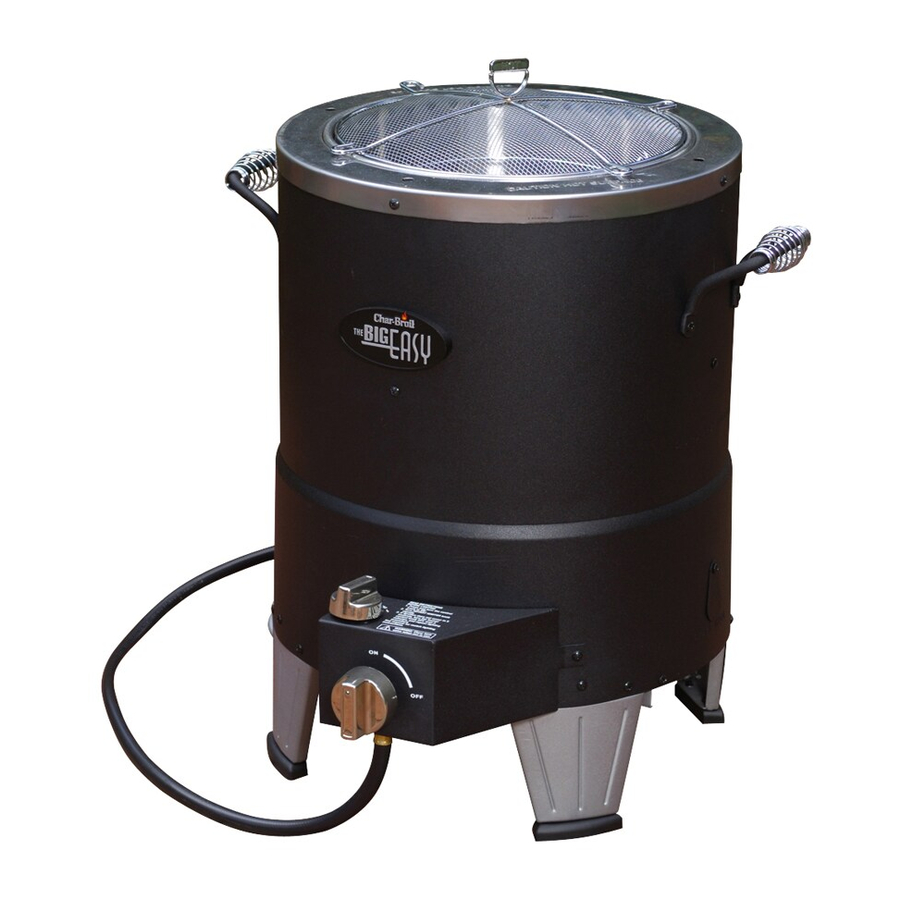
OIL-LESS TURKEY FRYER
Product Manual
Model 07101366
CAUTION:
Read and follow all safety statements, assembly
instructions, and use and care directions before
attempting to assemble and cook.
INSTALLER/ASSEMBLER:
Leave this manual with consumer.
CONSUMER:
Keep this manual for future reference.
If you have questions or need assistance during assembly, please call
To insure your satisfaction and for follow-up service, register your Oil-less Turkey Fryer online at
FOR OUTDOOR USE ONLY
www.grillregistration.com
WARNING:
Failure to follow all manufacturer's instructions could
result in serious personal injury and/or property
damage.
CAUTION:
Some parts may contain sharp edges – especially as
noted in the manual! Wear protective gloves if
necessary.
1-800-241-7548
.
07101366 • 42804236 • 11-20-07
Advertisement
Table of Contents
Troubleshooting

Related Manuals for Char-Broil THE BIG EASY 7101366


Summary of Contents for Char-Broil THE BIG EASY 7101366
- Page 1 Keep this manual for future reference. If you have questions or need assistance during assembly, please call To insure your satisfaction and for follow-up service, register your Oil-less Turkey Fryer online at WARNING: Failure to follow all manufacturer’s instructions could result in serious personal injury and/or property damage.
- Page 2 A 119.2/NFPA 1192, and CSA Z240 RV Series, Recreational Vehicle Code, as applicable. • Oil-Less Turkey Fryer is not for use in or on recreational vehicles and/or boats. • This Oil-Less Turkey Fryer is safety certified for use in the United States and/or Canada only.
-
Page 3: Table Of Contents
See rating label on grill for serial number. Date Purchased To insure your satisfaction and for follow-up service, register your Oil-Less Turkey Fryer online at: www.grillregistration.com WARNING Do not attempt to repair or alter the hose/valve/regulator for any “assumed” defect. Any modification to this assembly will void your warranty and create the risk of a gas leak and fire. -
Page 4: Lp Cylinder Operations
Transportation of Dangerous Goods; and commission, as applicable. See LP cylinder collar for marking. • LP cylinder valve must have: • Type 1 outlet compatible with regulator or Oil-Less Turkey Fryer. • Safety relief valve. • UL listed Overfill Protection Device (OPD). This OPD safety feature is identified by a unique triangular hand wheel. - Page 5 LP Cylinder Exchange • Many retailers that sell Oil-Less Turkey Fryer's option of replacing your empty LP cylinder through an exchange service. Use only those reputable exchange companies that inspect, precision fill, test and certify their cylinders. Exchange your cylinder only for an OPD safety feature-equipped cylinder as described in the "LP...
- Page 6 Hold coupling nut and regulator as shown for proper connection to LP cylinder valve. 6. Turn the coupling nut clockwise and tighten to a full stop. The regulator will seal on the back-check feature in the LP cylinder valve, resulting in some resistance. An additional one-half to three-quarters turn is required to complete the connection.
- Page 7 WARNING For Safe Use of Your Oil-Less Turkey Fryer and to Avoid Serious Injury: • The use of alcohol, prescription or non-prescription drugs may impair the consumer's ability to properly assemble or safely operate the appliance. • When cooking, the appliance must be on a level, stable noncombustible surface in an area clear of combustible material.
-
Page 8: Ignitor Lighting
If knob does not spring back, replace valve assembly before using Oil- less Fryer. Turn knob to HIGH position then turn back to position. Valve should turn smoothly. Hose Check •... -
Page 9: Cleaning The Burner Assembly
CAUTION SPIDER ALERT! SPIDER AND WEBS INSIDE BURNER TUBE If you notice that your grill is getting hard to light or that the flame isn’t as strong as it should be, take the time to check and clean the venturi’s. VALVE CONTROL PANEL In some areas of the country, spiders or small insects have been... - Page 10 • Store indoors ONLY if LP cylinder is turned off and disconnected, removed from appliance and stored outdoors. • When removing appliance from storage, follow “Cleaning the Burner Assembly” instructions before starting. “For Best Results” Place poultry into Oil-Less Turkey Fryer with breast up as shown.
-
Page 11: Parts Diagram
PARTS DIAGRAM – Model No. 07101366 Key Qty Description Outer Body ..... . 55710184 Inner Body ..... . 55710185 Body Top Ring . -
Page 12: Assembly
ASSEMBLY – Model No. 07101366 • Remove lid, roaster basket and cooking pot. • Turn fryer upside down. • Attach legs to body using two #10-24 x 1/2" screws for each leg. Screw on from outside. Assure leg with rating label is attached behind burner tube outlet as pictured. -
Page 13: Assembly
Control Panel and body and underneath Ignitor wire holding valve in correct position using two #6-32x3/8" threaded screws (A). fryer body and louver side of control panel. Secure with two #10x3/8" self-tap #6-32x3/8" Threaded Screw View is shown with fryer upside-down... - Page 14 • Turn fryer upright on its legs. Push on control knob and ignitor knob (A). • If not already assembled, slide handle springs onto side handles (B). • Attach side handles to fryer body using two #10-24x1/2" screws on each handle (C).
- Page 15 NOTE: Before cooking on your fryer for the first time, refer to the seasoning supplement on how to prepare the fryer for cooking. It is recommended that you season you fryer prior to cooking • Once seasoning is complete, the fryer is now ready for use. We recommend cooking foods on the “Low”...
-
Page 16: Troubleshooting
Connecting Regulator to the LP Cylinder. • Turn off control knob and LP cylinder valve. Allow flames to die down. After fire is out and fryer is cold, remove burner and inspect for spider nests or rust. See Natural Hazard and Cleaning the Burner Assembly pages. -
Page 17: Troubleshooting
Bradley Company. Thermos® is a registered trademark of the Thermos Company and its affiliates. Artisan Collection by Char-Broil ™, C3 and Design™, Char-Broil and Design™, Flame Design™, FlavorTents™, Grill 2 Go™, Grillin’ Stick™, Keeper of the Flame™, Keepers of the Flame™, Natural Grip™, Outdoor Cooking Collection and Design™, Patio Bistro™, PrecisionFlame™, Pro-Check™, QuickSet Grills and Design™, SmokerTents™, The Big Easy™, The Minute Grill™, The Edge™, The Tuscan Collection™, and The Urban Grill™... -
Page 18: Limited Warranty
Consumer returns will not be accepted unless a valid Return Authorization is first acquired by calling 1-800-241-7548 and then clearly marked on the outside of the package and the package is shipped freight/postage pre-paid to the address above. 18 • 07101366 Char-Broil Consumer Relations P. O. Box 1240 Columbus, GA 31902-1240... - Page 19 Page Intentionally Blank 07101366 • 19...
- Page 20 Always ensure control knobs are in OFF position and regulator is attached to tank BEFORE opening tank valve to avoid low flames. Perform leak test regularly. Thank You for Your Purchase! © 2007 Char-Broil, LLC • Columbus, GA 31902 • Printed in China...