Table of Contents
Advertisement
Quick Links
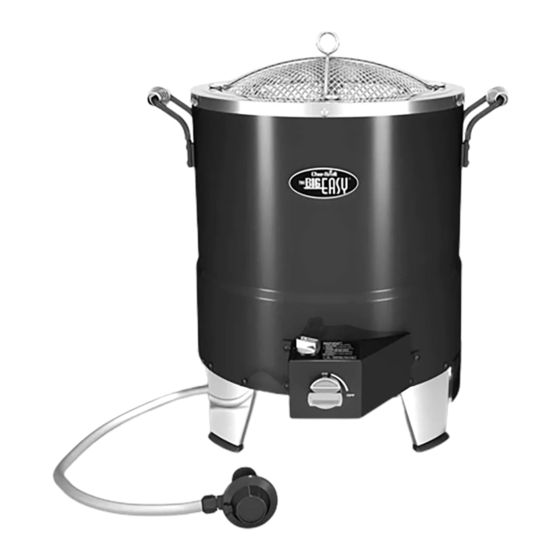
OIL-LESS TURKEY FRYER
Product Guide
Model 08101480
1600 Series
IMPORTANT: Fill out the product record information below.
Serial Number
Date Purchased
See rating label on unit leg for serial number.
CAUTION:
Read and follow all safety statements, assembly
instructions, and use and care directions before
attempting to assemble and cook.
INSTALLER/ASSEMBLER:
Leave this manual with consumer.
CONSUMER:
Keep this manual for future reference.
If you have questions or need assistance during assembly, please call
To insure your satisfaction and for follow-up service, register your appliance online at www.charbroil.com/register
The following are trademarks registered by W.C. Bradley Co. in the U.S. Patent and Trademark Office: Char-Broil®; America's Legendary Barbeque Company®; American Gourmet®; Bandera®; BrushHawg®;
CB940®; Char-Diamonds®; Char-Broil Charcoal/Gas®; DiamondFlame®; Everybody Grills®; Everybody Outside®; FastStart®; Fireball®; Firenzy®; FlavorMaster®; Grill2Go®; Grill2Go® Express®; Grill Lovers®;
H20 Smoker®; Keepers of the Flame®; New Braunfels Smoker Company®; Oklahoma Joe's®; Patio Bistro®; Patio Caddie®; Patio Kitchen®; Precision Flame®; Quantum®; Santa Fe®; Sear and Grill®; Sierra®;
Signature Series®; The Big Easy®; The Minute Grill®; Trentino®; Wild West Tradition®; and the following marks:
The following are trademarks of W.C. Bradley Co.: Commercial Series™; Designer Series™; Grill2Go® Advantage™; Longhorn™; Double Chef™; QuickSet™; Ready When You Are™; Hog and Yard Bird™; You Bring
the Party™; SureFire™; Universal Grill Parts™
TEC™ is a trademark of Tec Infrared Grills.
Protected under one or more of the following U.S. Patents: 4,989,579; 5,421,319; 5,458,309; 5,579,755; 5,996,573; 6,114,666; 6,135,104; 6,209,533; 6,279,566; 6,331,108; 6,484,900; 6,526,876; 6,595,197; 6,640,799; 6,640,803; 6,729,873; 6,739,473; 6,749,424;
6,863,100; 6,935,327; 6,951,213; 6792,935; 7,047,590; D364,535; D372,637; D373,701; D377,735; D383,035; D397,910; D405,643; D406,005; D406,009 ; D413,043; D413,229; D414,982; D415,388; D416,164; D416,441; D417,587; D417,588; D422,516;
D423,876; D428,303; D430,772; D435,396; D436,004; D438,059; D438,060; D438,427; D439,110; D442,505; D443,179; D443,354; D443,464; D447,384; D447,385; D447,909; D448,610; D448,614; D448,615; D448,616; D448,975; D449,492; D450,544;
D451,759; D454,028; D454,031; D455,205; D455,206; D456,202; D456,222; D456,223; D457,789; D458,520; D458,760; D458,802; D459,088; D459,148 D459,149; D459,161; D459,163; D459,586; D459,943; D460,312; D460,313; D460,318; D461,359;
D465,123; D465,693; D466,307; D466,439; D466,752; D473,414; D474,371; D477,498; D477,501; D477,504; D477,506; D477,746; D478,471; D478,472; D480,914; D491,410; D494,009; D494,413; D498,523; D500,359; D504,048; D530,098; D535,000; Canada:
87,743; 87,744; 97,504; 99,355; 102,037; 104,200; 2,315,567; 2,336,036; France: 010,231; 010,422; 010,590; 010,849; 1,089,646; Germany: 1,089,646; South Korea: 384,565; China: 99,127,066.5; United Kingdom: 2,099,402; 1,089,646. Other Patents Pending.
© 2008 W.C. Bradley Company
© 2008 Char-Broil, LLC
• Columbus, GA 31902 •
FOR OUTDOOR USE ONLY
Printed in China
• Assembly Instructions © 2008
Estimated Assembly Time: 1 Hour
WARNING:
Failure to follow all manufacturer's instructions could
result in serious personal injury and/or property
damage.
CAUTION:
Some parts may contain sharp edges – especially as
noted in the manual! Wear protective gloves if
necessary.
®
®
1-800-241-7548
.
08101480• 42804326 • 09-05-08
TM REVISION 00
Advertisement
Table of Contents

Related Manuals for Char-Broil Big Easy 08101480


Summary of Contents for Char-Broil Big Easy 08101480
-
Page 1: Product Record Information
To insure your satisfaction and for follow-up service, register your appliance online at www.charbroil.com/register The following are trademarks registered by W.C. Bradley Co. in the U.S. Patent and Trademark Office: Char-Broil®; America's Legendary Barbeque Company®; American Gourmet®; Bandera®; BrushHawg®; CB940®; Char-Diamonds®; Char-Broil Charcoal/Gas®; DiamondFlame®; Everybody Grills®; Everybody Outside®; FastStart®; Fireball®; Firenzy®; FlavorMaster®; Grill2Go®; Grill2Go® Express®; Grill Lovers®;... -
Page 2: Table Of Contents
TABLE OF CONTENTS DANGER Product Record Information ......1 1. Never operate this appliance unattended. For Your Safety . -
Page 3: Installation Safety Precautions
Installation Safety Precautions • Use your appliance, as purchased, only with LP (propane) gas and the regulator/valve assembly supplied. • The appliance installation must conform with local codes, or in their absence of local codes, with either the National Fuel Gas Code, ANSI Z223.1/ NFPA 54, Natural Gas and Propane Installation Code, CSA B149.1, and Propane Storage and Handling, CSA B149.2, Canadian Electrical Code, CSA C22.1... -
Page 4: Food Safety
Food Safety Storing Your A ppliance • Clean cooking basket. Food safety is a very important part of enjoying the outdoor • Store in dry location. cooking experience. To keep food safe from harmful bacteria, • When LP cylinder is connected to appliance, store outdoors in follow these four basic steps: a well-ventilated space and out of reach of children. -
Page 5: Use And Care
LP Cylinder Valve • A disconnected LP cylinder in USE AND CARE storage or being transported must have a safety cap installed (as shown). Do not store an LP cylinder in enclosed spaces DANGER such as a carport, garage, porch, covered Safety patio or other building. - Page 6 LP Cylinder Exchange Connecting Regulator to the LP Cylinder • Many retailers that sell this appliance offer you the option of 1. LP cylinder must be properly secured onto appliance . (Refer to replacing your empty LP cylinder through an exchange service. assembly section.) Use only those reputable exchange companies that inspect, 2.
- Page 7 Leak Testing Valves, Hose and Regulator 1. Turn control knob to OFF. 2. Be sure regulator is tightly connected to LP cylinder. 3. Completely open LP cylinder valve by turning hand wheel counterclockwise. If you hear a rushing sound, turn gas off immediately.
- Page 8 • Apartment Dwellers: WARNING Check with management to learn the requirements and fire codes for using an LP gas appliance in your For Safe Use of Your appliance and to Avoid Serious apartment complex. If allowed, use outside on the ground Injury: floor with a three (3) foot clearance from walls or rails.
- Page 9 Ignitor Lighting Burner Flame Check • Do not lean over appliance while lighting. • Light burner. Looking through viewing hole on top of appliance, you should see the flame height as shown below. Turn control 1. Turn ON LP gas cylinder. knob from ON to OFF.
- Page 10 Cleaning the Burner Assembly (Continued) CAUTION 7. Clean inner burner as recommended below, shown E. We suggest three ways to clean the burner tube. Use the one easiest for you. SPIDER ALERT! (A) Bend a stiff wire (a light weight coat hanger works well) into a small hook.
-
Page 11: Limited Warranty
LIMITED WARRANTY This warranty only applies to units purchased from an authorized retailer. Manufacturer warrants to the original consumer-purchaser only that this product shall be free from defects in workmanship and materials after correct assembly and under normal and reasonable home use for the periods indicated below beginning on the date of manufacture*. -
Page 12: Parts List/ Parts Diagram
PARTS DIAGRAM Key Qty Description Part # Key Qty Description Part # Outer Body ..... . 55710184 Control Knob ....29101558 Inner Body . -
Page 13: Assembly
ASSEMBLY Tools required for assembly: Phillips Screwdriver (Not Supplied); Small Adjustable Wrench (Not Supplied) • Remove top cover, cooking basket and cooking pot. • Turn appliance upside down. • Attach legs to body using three #10-24 x 1/2" screws and three #10-24 Keps nuts for each leg. Insert screw through appliance body from outside, then through matching hole in leg and apply the #10-24 Keps nut. - Page 14 • Attach rotary ignitor to control panel using two #8x1/2" self-tap screws (A). • Attach round end of ignitor wire to rotary ignitor (A). • Attach valve to control panel holding valve in correct position using two #6-32x3/8" threaded screws (A). •...
- Page 15 • Turn appliance upright on its legs. Push on control knob and ignitor knob (A). • If not already assembled, slide handle springs onto side handles (B). • Attach side handles to appliance body using two #10- Qty: 4 #10-24x1/2" Screw 24x1/2"...
- Page 16 • Place cooking pot and cooking basket into appliance body and place the top cover as shown. • When cooking hang top cover on handle as shown. NOTE: Before cooking on your appliance for the first time, refer to the seasoning supplement on how to prepare the appliance for cooking.
-
Page 17: Troubleshooting
EMERGENCIES: If a gas leak cannot be stopped, or a fire occurs due to gas leakage, call the fire department. Emergencies Possible Cause Prevention/Solution Gas leaking from • Damaged hose. • Turn off gas at LP cylinder or at source on natural gas systems. If cracked/cut/burned hose is cut or cracked, replace valve/hose/regulator. - Page 18 Troubleshooting (continued) Problem Possible Cause Prevention/Solution Burner will not light • Rotary knob rotates without clicking. • Replace knob. using ignitor. • Sparking between ignitor and electrode. • Inspect wire insulation and proper connection. Replace wire if insulation is broken. •...
-
Page 20: Registration Card
Please register your product online at: www.charbroil.com/register (If you register online, you do not need to send in this registration card.) PLEASE FILL OUT THIS CARD AND RETURN IT WITHIN 10 DAYS OF PURCHASE. FAILURE TO RETURN MAY AFFECT YOUR WARRANTY COVERAGE. FOR WARRANTY SERVICE PROOF OF PURCHASE WILL BE REQUIRED.