Table of Contents
Advertisement
Quick Links
Advertisement
Table of Contents

Related Manuals for La Crosse Technology WS-7042


Summary of Contents for La Crosse Technology WS-7042
- Page 1 WS-7042TWC Wireless 433 MHz Weather Station with Forecast Instruction Manual...
-
Page 2: Table Of Contents
TABLE OF CONTENTS Topic Page Inventory of Contents/Additional Equipment Quick Set-Up Guide Detailed Set-Up Guide Battery Installation Program Mode Function Keys Time Setting Features Weather Forecast Indoor Temperature and Humidity Outdoor Temperatures Minimum & Maximum Records (Indoor, Outdoor & Resetting) Additional Remote Temperature Sensor 10-11 Units (Set-Up, Viewing &... -
Page 3: Inventory Of Contents/Additional Equipment
INVENTORY OF CONTENTS 1. The indoor weather station (Figure 1). 2. One TX6U remote temperature sensor with mounting bracket (Figure 2). 3. Three each, ½” Philips screws. 4. One strip double-sided adhesive tape. 5. Instruction manual and warranty card. Figure 2 Time LCD Indoor LCD Mounting... -
Page 4: Quick Set-Up Guide
QUICK SET-UP GUIDE Hint: Use good quality Alkaline Batteries and avoid rechargeable batteries. 1. Have the indoor weather station and remote temperature sensor 3 to 5 apart. 2. Batteries should be out of both units for 10 minutes. 3. Place the batteries into the remote temperature sensor first then into the indoor weather station. -
Page 5: Detailed Set-Up Guide
DETAILED SET-UP GUIDE Battery Installation A. Remote Temperature Sensor 1. Remove the mounting bracket. bracket snaps on and off easily. 2. Remove the battery cover, by sliding the cover down. 3. Observing the correct polarity install 2 AA batteries. The batteries will fit tightly (to avoid start-up problems make sure they do not spring free). -
Page 6: Program Mode
Program Mode Programming Note: If 30 seconds are allowed to pass or either the IN or the OUT button is pressed during programming modes, the unit will set the last information entered—the display will stop flashing and return to normal time-date readings A. -
Page 7: Weather Forecast
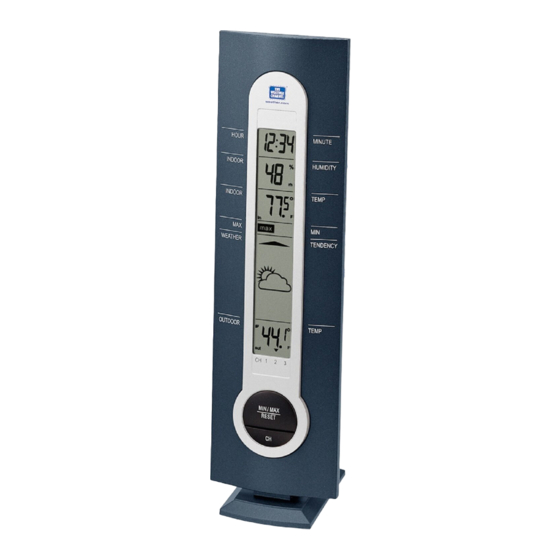
FEATURES OF THE WS-7042TWC Time Display Indoor Humidity Indoor Temperature Forecast icon Weather Tendency Arrow Outdoor Temperature I. Weather Forecast The weather forecasting feature is estimated to be 75% accurate. The weather forecast is based solely upon the change of air pressure over time. The WS-7042TWC averages past air-pressure readings to provide an accurate forecast—creating a necessity to disregard all weather forecasting for 12-24 hours after the unit has been set-up, reset, or moved from one... - Page 8 A. Weather Icons There are 3 possible weather icons that will be displayed in the FORECAST LCD: Sunny—indicates that the weather is expected to improve (not that the weather will be sunny). Sun with Clouds—indicates that the weather is expected to be fair (not that the weather will be sunny with clouds).
-
Page 9: Indoor Temperature And Humidity
II. Indoor Temperature and Humidity The current indoor relative humidity (viewed below the time) and temperature (viewed below the relative humidity) are displayed in the INDOOR LCD. III. Outdoor Temperature The outdoor temperature is viewed in the OUTDOOR LCD. When there is more than one remote temperature sensor unit in operation, a arrow will appear above the CH 1 2 3 area at the bottom of the LCD. -
Page 10: Units (Set-Up, Viewing & Operation)
WS-7042TWC. These extra remote temperature sensors can be purchased through the same dealer as this unit, or by contacting La Crosse Technology directly. A TX6U will monitor temperature only, a TX3U will monitor... - Page 11 B. Viewing and Operating Multiple Remote Sensors To view the temperature of a different remote sensor unit, press and release the “CH” button. An arrow over one of the numbers at the bottom of the LCD will be seen. To view the minimum/maximum temperature: 1.
-
Page 12: Mounting
MOUNTING Note: To achieve a true temperature reading, avoid mounting in direct sunlight. We recommend that you mount the remote temperature sensor on a North-facing wall. The sending range is 80ft; obstacles such as walls, concrete, and large metal objects will reduce the range. Also, extreme and sudden changes in temperature will decrease the accuracy of the indoor weather station and changes in elevation will result with inaccurate weather forecasting for the next 12 to 24 hours. - Page 13 B. MOUNTING WITH ADHESIVE TAPE 1) With a nonabrasive solution, clean and dry the back of the mounting bracket and the mounting surface to ensure a secure hold. The mounting surface should be smooth and flat. 2) Remove the protective strip from one side of the tape.
-
Page 14: Troubleshooting
Under non-laboratory conditions, it is difficult to compensate for the above factors and obtain an accurate comparison. NOTE: For problems not solved, please contact La Crosse Technology. -
Page 15: Maintenance & Care
They may mark the displays and casings. • Do not submerge in water. • Immediately remove all low powered batteries to avoid leakage and damage. • Opening the casings invalidates the warranty. Do not try to repair the unit. Contact La Crosse Technology for repairs. -
Page 16: Specifications
SPECIFICATIONS Temperature measuring range: Indoor 32°F to 139.8°F with 0.2°F resolution (0°C to 59.9°C with 0.1°C resolution) “OFL” displayed if outside this range Outdoor -21.8°F to 157.2°F with 0.2°F resolution (-29.9°C to 69.9°C resolution) “OFL” displayed if outside this range Indoor relative humidity 19% to 95% with 1% resolution measuring range... -
Page 17: Warranty Information
WARRANTY INFORMATION La Crosse Technology provides a 1-year warranty on this indoor weather station. Contact La Crosse Technology immediately upon discovery of any defects covered by this warranty. Before sending the indoor weather station in for repairs, contact La Crosse Technology. - Page 18 For warranty work, technical support or information contact: La Crosse Technology 1116 South Oak Street La Crescent, MN 55947 Phone: 507.895.7095 Fax: 507.895.8000 e-mail support@lacrossetechnology.com (warranty work) sales@lacrossetechnology.com (information on other products) Website www.lacrossetechnology.com FCC ID: OMO-01RX (Receiver), OMO-01TX (transmitter) THIS DEVICE COMPLIES WITH PART 15 OF THE FCC RULES.