
Related Manuals for AeroGarden AeroGarden 100302-BLK


Summary of Contents for AeroGarden AeroGarden 100302-BLK
- Page 1 Quick Start Guide Simple Steps To Get Your Up and Growing AeroGarden 3 Model #s – 100302-BLK; 100302-WHT; 100302-SLR; 100302-BSS; 100302-RED Input Voltage: 120V, 60Hz, 0.45A Replace Nutrient Bulb Date Code:...
-
Page 2: Important Safety Instructions
5. Use AeroGarden only for its intended use as described in instructions. Do not use attachments not recommended by manufacturer. 6. Never operate AeroGarden if it has a damaged cord or plug, if it is not working properly, if it has been dropped and damaged, or if it has been dropped in water. -
Page 3: Quick Start Assembly
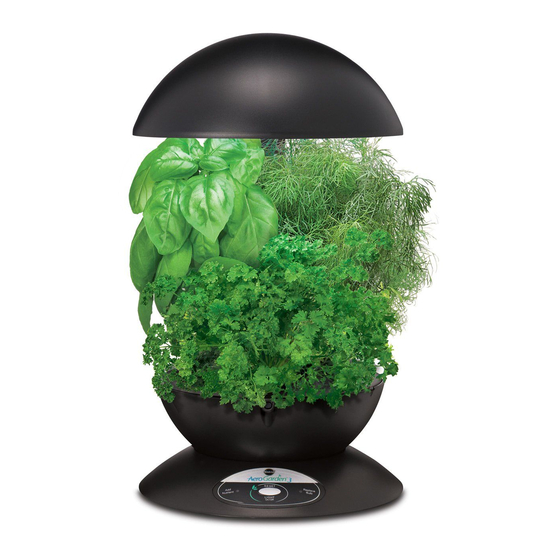
Quick Start Assembly Unpack Your AeroGarden Lamp Hood (front view) Bowl Replace Nutrient Bulb Base (front view) Insert Grow Bulb into Lamp Hood DO NOT TWIST BULB! Grow Bulb (1) (front view) (back view) Lamp Arm Seed Kit Push straight in. - Page 4 “click.” Moving Your AeroGarden Use one hand to grasp Lamp Arm. Nutrient Gently slide AeroGarden 3 toward the surface edge and place other hand under Base. Set Bowl into Base Check to be sure that Bowl is securely (back view) need AddITIonAl HelP? For supplies and information, visit…...
- Page 5 Place Your Garden Under: A space that allows 21” (54cm) clearance for the full height of raised lamp On: A sturdy, water- tolerant surface (Metal surfaces may cause noise due to vibration) Near: A standard electrical outlet, per local regulations Away From Reach of children and pets Direct sources of heat (e.g., stove, furnace vents)
-
Page 6: Planting Your Garden
“Fill To Here” inside Bowl. It is okay to add water up to “Fill To Here” before water level indicator turns red. Plant Your Garden Plant your AeroGarden. Check to see that: • There is a Seed/Plant Pod or Plant Spacer in every Grow Surface opening. - Page 7 *Special Seed Kit option* Split a 6-pod Seed Kit and Grow Two Gardens! Important guidelines to consider when splitting a 6-pod Seed Kit… • Arrange Seed Pods where they receive enough light. See Tending & Harvesting Guide for plant- specifi c pruning & harvesting information. •...
- Page 8 Bulb • Your light will stay on for 17 hours and will shut off for 7 hours. • Your light will come on every day at the time you plugged in your AeroGarden 3. Replace Nutrient Bulb Your Light Timer is Set To Start Growing Your Plants...Starting now!
- Page 9 *The exceptions to this are Flower & Vegetable plants. They require a daily dark period in order to produce fl owers. If plants will receive any room light during the day (natural or artifi cial) we recommend setting your AeroGarden 3 light to be on during the day.
- Page 10 Basic Reminders About Your AeroGarden AeroGarden control Panel RESET Use to reset “Add Nutrient” and “Replace Bulb” timers when each light illuminates. Nutrient ADD NUTRIENT (Feed Garden - Basic Feeding) When “Add Nutrient” light illuminates (every 2 weeks), add 1 nutrient tablet and fill Bowl with water up to “Fill To Here.”...
- Page 11 Raise lamp Hood (light) As plants grow to 1-2” from light, raise Lamp Hood one notch at a time. Be sure Lamp Arm is in the lowest position when starting your AeroGarden 3. Unplug AeroGarden 3 and remove Bowl from Base.
- Page 12 IMPORTANT: To avoid burning, be sure Grow Bulb is cool before handling. • Insert new Grow Bulb into Lamp Hood. • Plug in AeroGarden 3 and press and hold “Reset” button until “Replace Bulb” light blinks (3 seconds). Release “Reset” button, then press and re- lease again.
- Page 13 Prepare For Your Next Garden cleaning Instructions for your AeroGarden Use only water and mild soap when cleaning your AeroGarden (except when Sanitizing - Step 6). Do not use abra- sive cleaners or run through the dishwasher. When your garden has completed its growing cycle…...
- Page 14 Prepare For Your Next Garden Replanting Your AeroGarden If you have already grown a garden in your AeroGarden 3, please follow the instructions below to reset the nutrient timer: • Press and hold “Reset” button until red “Add Nutrient” light blinks (about 6 seconds).
- Page 15 Notes…...
- Page 16 U.S. CAUTION – You are cautioned that any changes or modifications not expressly approved in this manual could void your author- ity to operate this equipment. noTe: This equipment has been tested and found to comply with the limits for a Class B digital device, pursuant to Part 15 of the FCC Rules.