Table of Contents
Advertisement
Quick Links
NX-200/ NX-300
NX-200G/ NX-300G
NX-200S/ NX-300S
VHF DIGITAL TRANSCEIVER/
UHF DIGITAL TRANSCEIVER
INSTRUCTION MANUAL
ÉMETTEUR-RÉCEPTEUR NUMÉRIQUE VHF/
ÉMETTEUR-RÉCEPTEUR NUMÉRIQUE UHF
MODE D'EMPLOI
TRANSCEPTOR DIGITAL VHF/
TRANSCEPTOR DIGITAL UHF
MANUAL DE INSTRUCCIONES
© B62-2608-00 (K)
09 08 07 06 05 04 03 02 01 00
Advertisement
Table of Contents

Related Manuals for Kenwood NX-200GK


Summary of Contents for Kenwood NX-200GK
- Page 1 NX-200/ NX-300 NX-200G/ NX-300G NX-200S/ NX-300S VHF DIGITAL TRANSCEIVER/ UHF DIGITAL TRANSCEIVER INSTRUCTION MANUAL ÉMETTEUR-RÉCEPTEUR NUMÉRIQUE VHF/ ÉMETTEUR-RÉCEPTEUR NUMÉRIQUE UHF MODE D’EMPLOI TRANSCEPTOR DIGITAL VHF/ TRANSCEPTOR DIGITAL UHF MANUAL DE INSTRUCCIONES © B62-2608-00 (K) 09 08 07 06 05 04 03 02 01 00...
- Page 2 VHF DIGITAL TRANSCEIVER/ UHF DIGITAL TRANSCEIVER NX-200/ NX-300 NX-200G/ NX-300G NX-200S/ NX-300S INSTRUCTION MANUAL...
- Page 3 Terminal Descriptions Universal connector It is possible to use a resin-based cover for the Universal connector. Name Impedance Description Ext/Int Speaker Switch Input High Impedance BTL Output + for External Speaker 8 Ω/ 16 Ω BTL Output - for External Speaker Ext/Int MIC Switch Input High Impedance External MIC Input...
- Page 4 HANK We are grateful you have chosen KENWOOD for your land mobile radio applications. This instruction manual covers only the basic operations of your NEXEDGE portable radio. Ask your dealer for information on any customized features they may have added to your radio.
- Page 5 For information on Li-ion battery recycling in your area, call (toll free) 1-800-8-BATTERY (1-800-822-8837). KENWOOD’s involvement in this program is part of our commitment to preserve our environment and conserve our natural resources.
- Page 6 Ensure that there are no metallic items located between the transceiver and the battery pack. • Do not use options not specified by KENWOOD. • If the die-cast chassis or other transceiver part is damaged, do not touch the damaged parts.
- Page 7 Turn the transceiver power off in the following locations: • Near explosives or blasting sites. • In aircrafts. (Any use of the transceiver must follow the instructions and regulations provided by the airline crew.) • Where restrictions or warnings are posted regarding the use of radio devices, including but not limited to medical facilities.
- Page 8 If an abnormal odor or smoke is detected coming from the transceiver, switch the transceiver power off immediately, remove the battery pack from the transceiver, and contact your KENWOOD dealer. • Use of the transceiver while you are driving may be against traffic laws.
- Page 9 NFORMATION CONCERNING THE ION BATTERY PACK The battery pack includes flammable objects such as organic solvent. Mishandling may cause the battery to rupture producing flames or extreme heat, deteriorate, or cause other forms of damage to the battery. Please observe the following prohibitive matters. •...
- Page 10 • Do not charge the battery near fires or under direct sunlight! If the battery’s protection circuit is damaged, the battery may charge at extreme current (or voltage) and an abnormal chemical reaction may occur. The battery may generate heat or smoke, rupture, or burst into flame.
- Page 11 • Do not reverse-charge or reverse-connect the battery! The battery pack has positive and negative poles. If the battery pack does not smoothly connect with a charger or operating equipment, do not force it; check the polarity of the battery. If the battery pack is reverse-connected to the charger, it will be reverse-charged and an abnormal chemical reaction may occur.
-
Page 12: Table Of Contents
CONTENTS UNPACKING AND CHECKING EQUIPMENT ......1 ...............1 UPPLIED CCESSORIES PREPARATION ................2 ....2 NSTALLING EMOVING THE PTIONAL ATTERY ..........2 NSTALLING THE PTIONAL NTENNA ............3 NSTALLING THE ....3 NSTALLING THE AP OVER THE NIVERSAL ONNECTOR ..3 NSTALLING THE PTIONAL PEAKER ICROPHONE OR EADSET GETTING ACQUAINTED .............4 ..................7... - Page 13 GPS R ................22 EPORT ADVANCED OPERATIONS ............23 DTMF (D ......23 ULTI REQUENCY ALLS ..............24 RUNKING ALLS ..............25 MERGENCY ALLS ................25 CRAMBLER ................26 IGNALING (VOX) ........27 OICE PERATED RANSMISSION BACKGROUND OPERATIONS ..........29 (NX-200/ NX-300/ NX-200G/ NX-300G O ) ...29 LOCK .................29 IBRATOR (TOT) .............29 IMER...
-
Page 14: Unpacking And Checking Equipment
UNPACKING AND CHECKING EQUIPMENT Note: These unpacking instructions are for use by your KENWOOD dealer, an authorized KENWOOD service facility, or the factory. Carefully unpack the transceiver. We recommend that you identify the items listed in the following list before discarding the packing material. -
Page 15: Preparation
PREPARATION NSTALLING EMOVING THE PTIONAL ATTERY 1 Match the guides of the battery pack with the grooves on the upper rear of the transceiver, then firmly press the battery pack in place. 2 Lock the safety catch to prevent accidentally releasing the battery pack. -
Page 16: Nstalling The Elt Lip
NSTALLING THE Belt clip Attach the belt clip using the supplied M3 x 8 mm screws. Note: If the belt clip is not installed, its mounting location may get hot during continuous transmission or when left sitting in a hot environment. M3 x 8 mm screws Do not use glue which is designed to prevent screw loosening when installing the belt clip. -
Page 17: Getting Acquainted
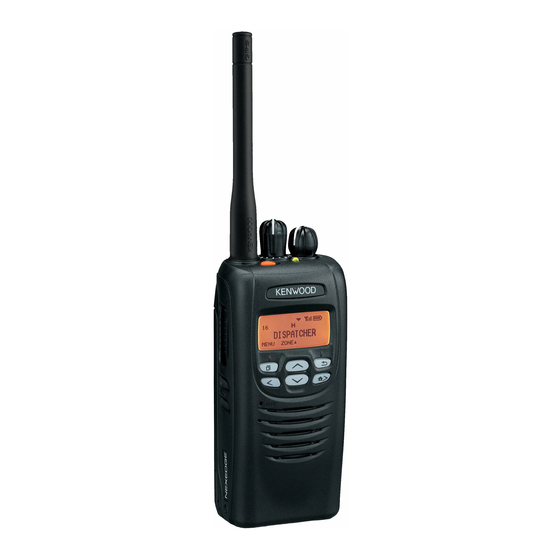
GETTING ACQUAINTED NX-200S/ NX-300S a Selector knob Rotate to select a zone or channel/group ID (default). b Power switch/ Volume control Rotate to turn the transceiver ON/OFF and to adjust the volume. c Auxiliary key Press to activate its programmable function {page 8}. d Transmit/ Receive/ Battery low indicator If enabled by your dealer, lights red while transmitting, green while receiving a call (Conventional channels only),... - Page 18 NX-200/ NX-300/ NX-200G/ NX-300G a Selector knob Rotate to select a zone or channel/group ID (default). b Power switch/ Volume control Rotate to turn the transceiver ON/OFF and to adjust the volume. c Auxiliary key Press to activate its programmable function {page 10}. d Transmit/ Receive/ Battery low indicator If enabled by your dealer, lights red while transmitting, green while receiving a call (Conventional channels only),...
- Page 19 h Keypad (keypad models only) Press these keys to send DTMF tones. These keys can also be programmed with secondary functions {page 10} if a programmable function key is programmed as “Function”. Press to activate its programmable function {page 10}. The default is Menu.
-
Page 20: Display
ISPLAY Indicator Description Monitor or Squelch Off is activated. Blinks when an incoming call matches your Optional Signaling. The current zone (left icon) or CH/GID (right icon) is added to scan. Scan is in progress. Blinks while scan is paused. A message is stored in memory. -
Page 21: Programmable Functions
PROGRAMMABLE FUNCTIONS Following is a list of available programmable functions. Please contact your dealer for further details on those functions which have been programmed on your transceiver. NX-200S/ NX-300S ROGRAMMABLE FUNCTIONS FOR • Low Transmit Power • Auto Telephone • Monitor •... - Page 22 Available only for Analog Conventional operation. Available only for Analog Trunking operation. Available only for NXDN Trunking operation. Can be programmed only on the Selector knob. Available only for NXDN Conventional operation. Can be programmed only on the Auxiliary key and the optional speaker/ microphone PF1 (orange) key.
- Page 23 ROGRAMMABLE FUNCTIONS FOR NX-200/ NX-300/ NX-200G/ NX-300G • 2-tone • Individual + Status (NXDN) • Auto Reply Message • Key Lock • Auto Telephone • Lone Worker • Autodial • Low Transmit Power • Autodial Programming • Maintenance • • Menu •...
- Page 24 • Vibrator • Zone Down • Voice Memo • Zone Select • • Zone Up • Zone Delete/Add Available only for Analog Conventional operation. Available only if the VGS-1 optional board has been installed. Available only for Analog Trunking operation. Available only for Analog Conventional, Analog Trunking, and NXDN Conventional operation.
-
Page 25: Basic Operations
BASIC OPERATIONS ON/OFF WITCHING OWER Turn the Power switch/ Volume control clockwise to switch the transceiver ON. Turn the Power switch/ Volume control counterclockwise fully to switch the transceiver OFF. ■ Transceiver Password (NX-200/ NX-300/ NX-200G/ NX-300G Only) If the transceiver is password protected, “PASSWORD” will appear on the display when the power is turned ON. -
Page 26: Transmitting
Select the desired channel/group ID using the Selector knob (default). Each channel/group ID is programmed with settings for transmitting and receiving. • You can toggle the display between the zone and channel/group ID names and number by pressing the key programmed as Display Format, or by accessing the Menu (NX-200/ NX-200G/ NX-300/ NX-300G Only) {page 15}. -
Page 27: Receiving
■ Making Individual Calls (Digital) (NX-200/ NX-300/ NX-200G/ NX-300G Only) If a key has been programmed with Individual or Individual + Status, you can make calls to specific persons. 1 Press the key programmed as Individual or Individual + Status. 2 Press to select a unit ID from the list. -
Page 28: Menu Mode (Nx-200/ Nx-300/ Nx-200G/ Nx300G Only )
MENU MODE (NX-200/ NX-300/ NX-200G/ NX-300G ONLY) Many functions on this transceiver are selected or configured through the Menu instead of physical controls. Once you become familiar with the Menu system, you will appreciate the versatility it offers. CCESS 1 Press the key programmed as Menu. •... - Page 29 Display Description CLOCK Clock ON/OFF CLOCK ADJUST Clock Adjustment mode DIRECT CH1 SEL Direct CH/GID 1 ~ 5 Select DISP FORMAT Display Format ON/OFF EXT MIC TYPE External Microphone Type mode FIXED VOLUME Fixed Volume FORCED SEARCH Forced Search GPS POS DISP GPS Position Display mode GROUP Group mode...
-
Page 30: Character Entry
Display Description SITE No. Display Site Number SITE Site Select Mode SQUELCH LEVEL Squelch Level mode SQUELCH OFF Squelch Off ON/OFF STACK Stack mode STATUS Status mode SHORT MESSAGE Short Message mode TALK AROUND Talk Around ON/OFF TX AUDIO EQ TX Audio Equalizer mode TX AGC TX Audio Gain Control mode... -
Page 31: Scan
SCAN Scan monitors for signals on the transceiver channels. While scanning, the transceiver checks for a signal on each channel and only stops if a signal is present. To begin scanning, press the key programmed as Scan. • icon appears on the display (NX-200/ NX-300/ NX-200G/ NX-300G Only). -
Page 32: Scan Revert
EVERT The Scan Revert channel is the channel selected when you press the PTT switch to transmit during scan. Your dealer can program one of the following types of Scan Revert channels: • Selected: The last channel selected before scan. •... -
Page 33: Fleetsync: Alphanumeric 2-Way Paging Function
FleetSync: ALPHANUMERIC 2-WAY PAGING FUNCTION FleetSync is an Alphanumeric 2-way Paging Function, and is a protocol owned by JVC KENWOOD Corporation. Note: ◆ This function is available only in analog operation. ◆ Ask your dealer for further information regarding the NX-200S/ NX-300S. -
Page 34: Status Message
• Select “ALL” Fleet and “ALL” ID to make a call to all units (Broadcast call). TATUS ESSAGE You can send and receive 2-digit Status messages which may be decided in your talk group. Messages can contain up to 16 alphanumeric characters. -
Page 35: Short /Long Messages
■ Reviewing Messages in the Stack Memory (NX-200/ NX-300/ NX-200G/ NX-300G Only) 1 Press the key programmed as Stack, or press and hold the key programmed as Selcall, Status, or Selcall + Status to enter Stack mode. • The last received message is displayed. 2 Press to select the desired message. -
Page 36: Advanced Operations
ADVANCED OPERATIONS DTMF (D ULTI REQUENCY ALLS ■ Making a DTMF Call (NX-200/ NX-300/ NX-200G/ NX-300G Only) Manual Dialing (Keypad Models Only) 1 Press and hold the PTT switch. 2 Enter the desired digits using the DTMF keypad. • If you release the PTT switch, transmit mode will end even if the complete number has not been sent. -
Page 37: Trunking Calls
3 Press the PTT switch to make the call. ■ Stun Code This function is used when a transceiver is stolen or lost. When the transceiver receives a call containing a stun code, the transceiver becomes disabled. The stun code is cancelled when the transceiver receives a call with a revive code. -
Page 38: Emergency Calls
MERGENCY ALLS If your transceiver has been programmed with the Emergency function, you can make emergency calls. 1 Press and hold the key programmed as Emergency. • Ask your dealer for the length of time necessary to hold this key before the transceiver enters Emergency mode. •... -
Page 39: Signaling
turned ON encrypts the transmitted signal. IGNALING ■ Quiet Talk (QT)/ Digital Quiet Talk (DQT) Your dealer may have programmed QT or DQT signaling on your transceiver channels. A QT tone/ DQT code is a sub-audible tone/code which allows you to ignore (not hear) calls from other parties who are using the same channel. -
Page 40: Voice Operated Transmission (Vox)
■ Optional Signaling Your dealer may also program several types of optional signaling for your transceiver channels. 2-tone Signaling: 2-tone Signaling opens the squelch only when your transceiver receives a call containing matching 2 tones. DTMF Signaling: DTMF Signaling opens the squelch only when the transceiver receives a call containing a matching DTMF code. - Page 41 ■ VOX Operation 1 Connect the headset to the transceiver. 2 Press and hold the key programmed as VOX for 2 seconds (NX-200/ NX-300/ NX-200G/ NX-300G Only). 3 To transmit, simply speak into the microphone. • The transceiver recognizes sound levels depending on the VOX Gain level.
-
Page 42: Background Operations
BACKGROUND OPERATIONS Your dealer can activate a variety of transceiver functions to perform without any additional operation on your part. (NX-200/ NX-300/ NX-200G/ NX-300G O LOCK If activated by your dealer, you can view the clock by pressing the key programmed as Clock. Note: Removing or leaving the battery pack uncharged for extended periods will clear the clock time. -
Page 43: Battery Saver
ATTERY AVER The Battery Saver can be activated only on Conventional channels. This function decreases the amount of power used when a signal is not being received and no operations are being performed. Press the key programmed as Key Lock to lock and unlock the transceiver keys. -
Page 44: Compander
Strong Sufficient Weak Very weak flashes when out of range (NXDN Trunking only). OMPANDER If programmed by your dealer for a channel, the compander will remove excessive noise from transmitted signals, to provide higher clarity of signals. Note: PTT ID can be made only in analog operation. (BCL) HANNEL OCKOUT... -
Page 45: Vgs-1 Optional Voice Guide & Storage Unit
VGS-1 OPTIONAL VOICE GUIDE & STORAGE UNIT OICE ECORDER The voice recorder allows you to record conversations and create voice memos. ■ Auto Recording (NX-200/ NX-300/ NX-200G/ NX-300G Only) If activated, the auto recorder will continuously record all transmitted and received signals. The recording storage area retains only the last 30 seconds of recording. -
Page 46: Voice Guide
and they can leave you a recorded message. When a message is stored on your transceiver, “NEW MESSAGE” appears on the display. • If no memory is available on your transceiver, “I am not available” will be sent to the caller and “MEMORY FULL” appears on the display.