Table of Contents
Advertisement
Quick Links
Find Quality Products Online at:
IMPORTANT:
Read Before Using
Operating/Safety Instructions
Consignes de fonctionnement/sécurité
Instrucciones de funcionamiento y seguridad
MS20
Call Toll Free for
Pour obtenir des informations
Consumer Information
et les adresses de nos centres
& Service Locations
For English Version
See page 2
GlobalTestSupply
www.
IMPORTANT :
Lire avant usage
de service après-vente,
appelez ce numéro gratuit
IMPORTANTE:
Leer antes de usar
Llame gratis para
obtener información
para el consumidor y
ubicaciones de servicio
.com
sales@GlobalTestSupply.com
Advertisement
Table of Contents

Related Manuals for Dremel MS20-01


Summary of Contents for Dremel MS20-01
- Page 1 IMPORTANT: IMPORTANT : IMPORTANTE: Read Before Using Lire avant usage Leer antes de usar Operating/Safety Instructions Consignes de fonctionnement/sécurité Instrucciones de funcionamiento y seguridad MS20 Call Toll Free for Pour obtenir des informations Llame gratis para Consumer Information et les adresses de nos centres obtener información &...
-
Page 2: General Power Tool Safety Warnings
General Power Tool Safety Warnings Read all safety warnings and instructions. Failure to follow the warnings WARNING and instructions may result in electric shock, fire and/or serious injury. SAVE ALL WARNINGS AND INSTRUCTIONS FOR FUTURE REFERENCE The term “power tool” in the warnings refers to your mains-operated (corded) power tool or battery-operated (cordless) power tool. - Page 3 Many accidents are caused by poorly maintained power tools. Safety Rules for Coping Saw Hold power tool by insulated gripping Use only Dremel Moto-Saw blades. Use surfaces, when performing an operation the right blade size, style and cutting where the cutting accessory may contact speed for the material and the type of cut.
- Page 4 Loose table or guards could shift in use and cause you to Use base only with the Dremel Moto-Saw. lose control of the workpiece. Other tools may not fit and cause a Always adjust drop foot to just clear the hazardous condition.
-
Page 5: Additional Safety Warnings
Do not use dust extraction with explosive Do not use dust extraction when working dusts, varnish, polyurethane coatings, on metal. Particles from sanding, grinding or cleaners, or oil-based paints. The electrical cutting metal may be hot and may spark vacuum and tool components may create which may melt plastic adaptors, vacuum sparks which may ignite dust or fumes. - Page 6 Symbols IMPORTANT: Some of the following symbols may be used on your tool. Please study them and learn their meaning. Proper interpretation of these symbols will allow you to operate the tool better and safer. Symbol Name Designation/Explanation Volts Voltage (potential) Amperes Current Hertz...
- Page 7 Symbols (continued) IMPORTANT: Some of the following symbols may be used on your tool. Please study them and learn their meaning. Proper interpretation of these symbols will allow you to operate the tool better and safer. This symbol designates that this tool is listed by Underwriters Laboratories. This symbol designates that this component is recognized by Underwriters Laboratories.
-
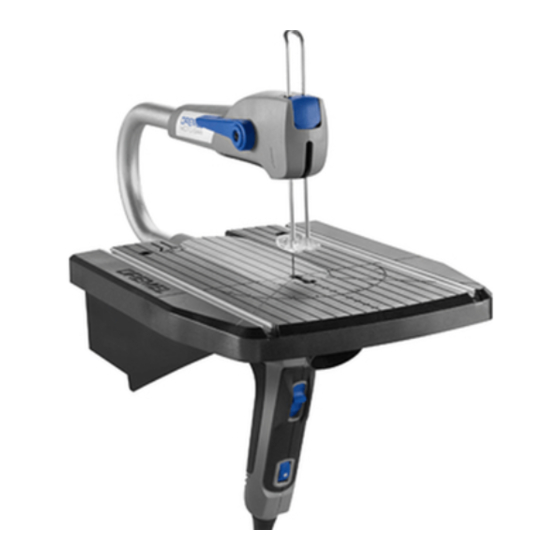
Page 8: Functional Description And Specifications
FIG. 1 A. Hold-Down Foot Release Button B. Hold-Down Foot C. Fence Lock Lever D. Guide Rail Dremel Moto-Saw 2-in-1 E. Base Compact Scroll Saw MS20 F. Vacuum-Cleaner Connection G. On/Off Switch Voltage Rating... - Page 9 Assembly Disconnect the plug from FIG. 2 WARNING the power source before making any assembly, adjustments or changing accessories. Such preventive safety measures reduce the risk of starting the tool accidentally. Attaching Blade onto Moto-Saw 1. When facing front of tool, pull quick change lever towards yourself to the loosened position, Fig.
- Page 10 Assembling Base Station for FIG. 6 Stationary Use Disconnect the plug from WARNING the power source before making any assembly, adjustments or changing accessories. Such preventive safety measures reduce the risk of starting the tool accidentally. Mount the Base Station to a flat working surface of a comfortable height.
- Page 11 To remove the Moto-Saw for hand held use FIG. 10 1. Unplug the Moto-Saw. 2. Press the release lock release button at the rear of the saw station work surface. 3. Slide the Moto-Saw back to release from the lock mechanism. 4.
- Page 12 Installing Fence / Miter Gauge FIG. 12 (Optional Accessory) Your Moto-Saw can use a combination fence and miter gauge. For use as a miter gauge: 1. To use the miter gauge slide the metal T section into the track in the surface of the saw station, Fig.
- Page 13 PVC or soft sheet metal using the the blades tendency to follow the wood grain applicable accessories recommended by as you are cutting. Dremel. Operation - Hand-Held Mode FIG. 15 Using the Moto-Saw in hand-held mode is advised when the work piece is too big or fixed and therefore cannot be put onto and maneuvered about the base.
- Page 14 5. Slowly feed the workpiece into the blade while guiding the cut. Do not force the saw into WARNING through workpiece. accuracy compromised and the blade may break from excessive force. 6. When the cut is complete, move the tool and blade clear of the workpiece and turn the switch to OFF.
- Page 15 Interior Cutting – Hand-Held Mode FIG. 17 1. Lay-out the design of the workpiece. Drill a ¼“ hole into the workpiece. 2. Remove the blade from the saw. Refer to the section “Attaching Blade onto Moto- Saw.” 3. Refer to the section “Attaching Blade onto Moto-Saw”...
-
Page 16: Maintenance Information
The tool may be cleaned most effectively with The product must only be serviced by a compressed dry air. Always wear safety Dremel Factory Service Center. This goggles when cleaning tools with product does not contain user serviceable compressed air. Ventilation openings and... - Page 17 Moto-Saw Accessories Use only Dremel Moto-Saw blades. Use the right blade size, style and WARNING cutting speed for the material and the type of cut. Using the proper blade minimizes the risk of breakage. Teeth on Moto-Saw blades wear out and...
-
Page 18: Speed Settings
Speed Settings MS51 Wood MS52 Fine MS53 MS50 Side Tool Recommended Material & Plastic Wood Metal Cutting Speed Thickness Blade Blade Blade Blade Plywood .75” Pine .75” Wood Poplar .75” Balsa 1.75” Laminate Flooring .5” HVAC 20-ga. 20-ga. Metal AL sheet 20-ga. -
Page 19: Limited Warranty
WORKMANSHIP ARE NOT COVERED BY THIS WARRANTY. No employee, agent, dealer or other person is authorized to give any warranties on behalf of Dremel. If Dremel inspection shows that the problem was caused by problems with material or workman ship within the limitations of the warranty, Dremel will repair or replace the product free of charge and return product prepaid.