Table of Contents
Advertisement
Quick Links
Advertisement
Table of Contents

Related Manuals for Omron IntelliSense HEM-629CAN


Summary of Contents for Omron IntelliSense HEM-629CAN
- Page 1 Instruction Manual Automatic Wrist Blood Pressure Monitor with HEM-629CAN Model...
-
Page 2: Table Of Contents
CONTENTS Before Using the Monitor Introduction ........3 Important Safety Notes . -
Page 3: Introduction
Perfect for people who frequently monitor their own blood pressure. Omron digital blood pressure monitors use the oscillometric method of blood pressure measurement. This means the monitor detects your blood’s movement through your artery and converts the movements into a digital reading. -
Page 4: Important Safety Notes
Do not use a cellular phone near the unit. It may result in operational failure. Changes or modifications not approved by Omron Healthcare will void the user warranty. Do not disassemble or attempt to repair the unit or components. -
Page 5: Before Taking A Measurement
BEFORE TAKING A MEASUREMENT 1. Avoid eating, drinking alcohol, smoking, exercising and bathing for 30 minutes before taking a measurement. Rest for at least 15 minutes before taking the measurement. 2. Stress raises blood pressure. Avoid taking measurements during stressful times. 3. -
Page 6: Know Your Unit
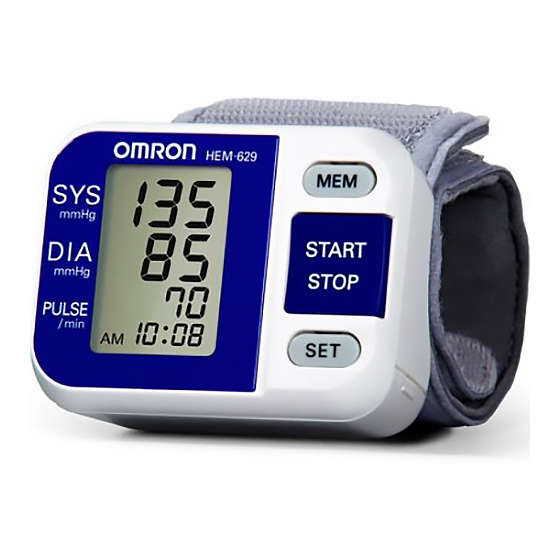
KNOW YOUR UNIT Main Unit Wrist Cuff Display MEM Button START/STOP Button SET Button Battery Compartment Components Two “AAA” Alkaline Batteries Storage Case... -
Page 7: Unit Display
UNIT DISPLAY Heart Symbol Systolic Blood Pressure Diastolic Blood Pressure Average Value Symbol Pulse Display Cuff Deflation Symbol Memory Value Symbol Date/Time Display Beep Symbol Low Battery Symbol... -
Page 8: Battery Installation
BATTERY INSTALLATION 1. Press both sides of the battery cover and lift the cover off in the direction of the arrow. 2. Install 2 “AAA” size batteries so the + (positive) and - (negative) polarities match the polarities of the battery compartment as indicated. -
Page 9: Setting The Beep Symbol
SETTING THE BEEP SYMBOL The Blood Pressure Monitor automatically stores up to 60 measurement values with the date and time. The monitor also calculates an average reading based on the last three measurements taken within 10 minutes of the last reading. NOTE: •... -
Page 10: Setting The Date And Time
SETTING THE DATE AND TIME Set the monitor to the current date and time before taking a measurement for the first time. If the current date and time is not set, a default date and time will display. 2. SETTING THE YEAR The year can be set between 2005 and 2030. - Page 11 SETTING THE DATE AND TIME 4. SETTING THE DAY Press the MEM button to advance by increments of one day. Press the SET button to set the current day. The hour flashes on the display. 5. SETTING THE HOUR The time is set using AM or PM. Press the MEM button to advance by increments of one hour.
-
Page 12: Applying The Wrist Cuff
APPLYING THE WRIST CUFF Wrapping the wrist cuff is one of the most important points for taking a correct measurement. APPLYING THE CUFF ON THE LEFT WRIST 1. Roll up sleeve. Make sure your sleeve is not rolled up too tightly on your arm. This may constrict the flow of blood in your arm. -
Page 13: Taking A Measurement
TAKING A MEASUREMENT 1. Sit comfortably in a chair with your feet flat on the floor. 2. Hold your arm across your chest at heart level. Hold your elbow firmly to avoid body movement. Sit still and do not talk or move during the measurement. - Page 14 TAKING A MEASUREMENT 4. After the monitor has detected your blood pressure and pulse rate, a beep will sound and the cuff automatically deflates. Your blood pressure and pulse rate are displayed. Alternating Display NOTES: • The time and date of the measurement are displayed alternately.
-
Page 15: Using The Memory Function
USING THE MEMORY FUNCTION Every time you complete a measurement the monitor stores the blood pressure and pulse rate in the memory. The Blood Pressure Monitor automatically stores up to 60 measurement values. When 60 sets of measurement values are stored in the memory, the oldest record is deleted to save the most recent measurement values. - Page 16 USING THE MEMORY FUNCTION TO DISPLAY THE MEASUREMENT VALUES 1. Press the MEM button to display the measurement values stored in the memory beginning with the most recent values to the oldest values. NOTES: • The date and time are alternately displayed. •...
-
Page 17: Care And Maintenance
CARE AND MAINTENANCE To keep your digital blood pressure monitor in the best condition and protect the unit from damage follow the directions listed below: Clean the monitor with a soft dry cloth. Do not use any abrasive or volatile cleaners. Do not attempt to clean the cuff. Never immerse the monitor or any components in water. -
Page 18: Error Indicators
ERROR INDICATORS SYMBOL CAUSE CORRECTION Press the START/STOP button to turn the unit off. Remove the monitor from your wrist. Refer to Movement during “Taking a Measurement” measurement. on page 13. Wait 2-3 minutes. Take another measurement. Remove the monitor from your wrist. -
Page 19: Troubleshooting Tips
TROUBLESHOOTING TIPS PROBLEM CAUSE Replace worn batteries. Check the battery installation for No power. No display appears on the unit. proper placement of the battery polarities. Blood pressure varies constantly. Many factors including stress, time of day, how you wrap the Measurements values appear cuff, may affect your blood too high or too low. -
Page 20: Fcc Statement
FCC STATEMENT NOTE: POTENTIAL FOR RADIO/TELEVISION INTERFERENCE (for U.S.A. only) This product has been tested and found to comply with the limits for a Class B digital device, pursuant to part 15 of the FCC rules. These limits are designed to provide reasonable protection against harmful interference in a residential installation. -
Page 21: Warranty
ABOVE. Some provinces do not allow limitations on how long an implied warranty lasts, so the above limitation may not apply to you. OMRON SHALL NOT BE LIABLE FOR LOSS OF USE OR ANY OTHER INCIDENTAL, CONSEQUENTIAL OR INDIRECT COSTS, EXPENSES OR DAMAGES. -
Page 22: Specifications
SPECIFICATIONS Name: Automatic Wrist OMRON ® Blood Pressure Monitor Model: HEM-629CAN (HEM-6021-CAN) Display: Digital Display Measurement: Oscillometric method Measurement Range: Pressure: 0 to 299 mmHg Pulse: 40 to 180 beats/min Memory: 60 measurements with date and time Accuracy: Pressure: Within ±3 mmHg Pulse rate: Within ±5% of reading... -
Page 23: Notes
NOTES... - Page 24 Made in China OMRON HEALTHCARE, INC. 1200 Lakeside Drive Bannockburn, Illinois 60015 www.omronhealthcare.com Copyright © 2009 Omron Healthcare, Inc.