Table of Contents
Advertisement
Quick Links
Advertisement
Table of Contents

Related Manuals for Roland JX-08


Summary of Contents for Roland JX-08
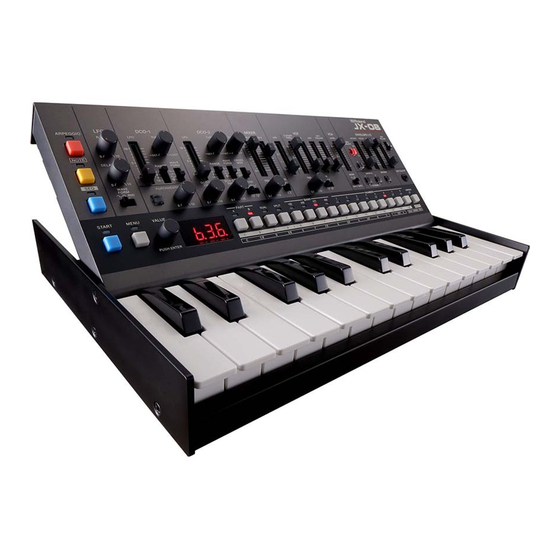
- Page 1 JX-08 Owner’s Manual...
-
Page 2: Table Of Contents
Table of contents Table of contents Saving a Pattern..............35 Panel Descriptions ..............3 Backing Up Data ..............36 Control Section 1 (Modes) ............3 Control Section 2 ..............4 Restoring the Settings (Restore) ........37 LFO section ................5 DCO-1/DCO-2 Section ............. -
Page 3: Panel Descriptions
Panel Descriptions Panel Descriptions Control Section 1 (Modes) Controller Explanation Turns the arpeggio on/off. The arpeggio plays in note mode or when you play a note on the keyboard of [ARPEGGIO] the K-25m. button Long-press the button to show the arpeggio settings menu. [NOTE] button If this is on, note mode is enabled. -
Page 4: Control Section 2
Panel Descriptions Control Section 2 Controller Explanation Plays back (the button lights up) or stops the sequencer (the button goes dark). [START] button Press this button together with the [1]–[16] buttons to switch to different patterns. [MENU] button Displays the menu screen. Turn: Edits the parameter’s value. -
Page 5: Lfo Section
Panel Descriptions LFO section Adds cyclical change (a swelling effect) to the sound. Controller Value Explanation (Parameter) [RATE] knob 0–10 Sets the speed of the LFO cycle. 0–10 Sets the time it takes before the LFO effect begins after you press a key. -
Page 6: Dco-1/Dco-2 Section
Panel Descriptions DCO-1/DCO-2 Section This section is used to select the waveforms that determine the character of the sound, and to set the pitch. Controller Value Explanation (Parameter) [LFO] slider 0–10 Sets how much LFO modulation is applied to DCO-1 and DCO-2. [TUNE] knob -1OCT–+1OCT Shifts the pitch in units of a semitone. -
Page 7: Mixer Section
Panel Descriptions MIXER section Controller Value Explanation (Parameter) [DCO-1] slider 0–10 Adjusts the volume of DCO-1 and DCO-2. [DCO-2] slider 0–10 Sets how much the DCO-2 volume is changed by the envelope selected with the [MODE] [ENV] knob switch. [MODE] switch 1 ,2 Sets the envelope used for DCO-2. -
Page 8: Vcf Section
Panel Descriptions VCF Section This section controls the filter to alter the sound of the tone. Controller Value Explanation (Parameter) [HPF] slider 0–3 Specifies the cutoff frequency of the high-pass filter. [CUTOFF FREQ] 0–10 Sets the cutoff frequency of the low-pass filter. This gives the sound a more mellow slider feel, by removing frequency components that are higher than the cutoff frequency. -
Page 9: Vca Section
Panel Descriptions VCA section This section controls the volume. Controller (Parameter) Value Explanation [LEVEL] slider 0–100 Adjusts the volume. This selects the mode used to adjust the volume. [MODE] switch ENV 2 Adjusts the volume using the envelope set in ENVELOPE 2. GATE Sound is played at a set volume only while a key is played. -
Page 10: Envelope-1/2 Section
Panel Descriptions ENVELOPE-1/2 section This section controls how the pitch and filter changes. Controller Value Explanation (Parameter) ENV SELECT [1], [2] 1, 2 Selects the envelope to edit. buttons [ATTACK] slider 0–10 Sets the attack time. [DECAY] slider 0–10 Sets the decay time. [RELEASE] slider 0–10 Sets the release time. -
Page 11: Portamento Section
Panel Descriptions PORTAMENTO Section Portamento is an glide effect that smoothly connects the pitches of the first and second notes that you play on the keyboard. The portamento effect is applied when the [PORTAMENTO] button is on. Controller (Parameter) Value (Status) Explanation Plays the notes by smoothly changing the pitch (portamento). -
Page 12: Effects Section
Panel Descriptions Effects section This section is used for applying effects to the sound. Controller Explanation (Parameter) Turns the chorus effects I, II on and off. CHORUS [1], [2] Long-press the buttons to configure the effects. When you press both CHORUS [1] and [2] buttons at buttons the same time, you can get other effects besides chorus. -
Page 13: Ext Clk In Jack
Panel Descriptions EXT CLK IN jack Use this jack to input clock signals from an external source. You can make the steps of the sequencer advance in sync with the clock (pulse) that’s inputted. -
Page 14: Rear Panel
USB MIDI and USB audio. USB Type- You must install the USB driver if you want to connect this unit to your computer. Download the software ® port from the Roland website. http://www.roland.com/global/support/ [VOLUME] Adjusts the volume. knob PHONES jack Used for connecting headphones (sold separately). -
Page 15: Turning The Power On
Turning the Power On Turning the Power On Before turning the unit on/off, always be sure to turn the volume down. Even with the volume turned down, you might hear some sound when switching the unit on/off. However, this is normal and does not indicate a malfunction. To turn on the power, slide the [POWER] switch to “ON.”... -
Page 16: Selecting A Tone (Patch)
Selecting a Tone (Patch) Selecting a Tone (Patch) The settings for each tone are stored in a block of memory called a “patch.” By selecting (switching between) patches, you can use a variety of sounds. The patches are further organized by group (A–D), bank (1–8) and number (1–8), letting you save a total of 4 x 8 x 8 = 256 patches. Press the NUMBER [1]–[8] buttons. - Page 17 Selecting a Tone (Patch) Press the NUMBER [1]–[8] buttons. The selected group and bank’s patch is selected (the unit switches to that patch).
-
Page 18: Switching Between Parts
Selecting a Tone (Patch) Switching Between Parts The JX-08 features two sound generator parts, you can switch between the parts when you play. Also, you can select a patch for each part. Press the PART [A] or [B] button. This switches between parts. -
Page 19: Playing Part A And Part B At The Same Time (Dual Mode)
Selecting a Tone (Patch) Playing PART A and PART B at the Same Time (DUAL Mode) In DUAL mode, both PART A and PART B sound at the same time when you play the keyboard. Press the [DUAL] button to make the indicator light. DUAL mode turns on. -
Page 20: Using The Keyboard Split To Play Different Parts (Split Mode)
Selecting a Tone (Patch) Using the Keyboard Split to Play Different Parts (SPLIT Mode) In SPLIT mode, the keyboard is divided into two zones, and either PART A or PART B plays depending on which zone you play in. All notes you play in the lower zone of the keyboard at or below the position on the keyboard that divides the zones (called the “split point”) play PART A, and all notes played in the higher zone play PART B. -
Page 21: Saving A Tone
Saving a Tone Saving a Tone Any settings you have edited for a tone are lost if you select a different patch or turn off the power after editing. For this reason, be sure to save your important settings. A dot is shown in the display once you edit a tone. Press the BANK [1 (5)]–[4 (8)] buttons to select the group and bank where you want to save the data. -
Page 22: Using The [1]-[13] Buttons As A Keyboard (Note)
Using the [1]–[13] Buttons as a Keyboard (NOTE) Using the [1]–[13] Buttons as a Keyboard (NOTE) You can play the [1]–[13] buttons like a keyboard. Press the [NOTE] button. The [1]–[13] buttons light up. At this time, you can use the [1]–[13] buttons as if they were keys on a keyboard. ●... -
Page 23: Switching Between Sound Modes
Switching Between Sound Modes Switching Between Sound Modes Here’s how to set the way the sound generator of the JX-08 plays. Press the [NOTE] button to make the indicator light. Press the [16] button or [PAGE/TIE] button. This selects the sound mode. -
Page 24: Using The Arpeggio
Using the Arpeggio Using the Arpeggio The arpeggio function is used to make the notes of the chords you play sound separately (with “chords” meaning any stack of two or more different pitches). Turn the arpeggio on to arpeggiate what you play, using various patterns. Press the [ARPEGGIO] button to make the indicator light. - Page 25 Using the Arpeggio Step Indication Value Explanation buttons You can create a shuffle rhythm by varying the upbeat timing. Larger values give more of a bouncing, dotted-note rhythmic feel. When this is set to “0,” the downbeat and upbeat are played at equal intervals.
-
Page 26: Using The Sequencer
Using the Sequencer Using the Sequencer The sequencer is a function that lets you repeatedly play back the notes you’ve recorded in a pattern. You can record and play back up to 64 steps (64 notes) per pattern. A pattern can contain patch numbers for parts A and B, as well as the recorded sequence data. For this reason, you can record and play back two tracks of your performance per pattern. - Page 27 Using the Sequencer You can select the group (A/B) by holding down the [START] button and repeatedly pressing the BANK [1 (5)]–[4 (8)] buttons. Hold down the [START] button and press the NUMBER [1]–[8] buttons. This selects the pattern. ● You can also turn the [VALUE] knob while holding down the [SHIFT] button to select the bank and pattern.
-
Page 28: Playing Patterns
Using the Sequencer Playing Patterns Here’s how to play back a pattern you’ve selected. Select the pattern to play back ( (P.26)). 8.1. Selecting a Pattern Press the [START] button to make the indicator light. This plays back the pattern. By holding down the [START] button and pressing the PART [A] or [B] button, you can mute the playback of the respective part. -
Page 29: Creating A Pattern (Note Input)
Using the Sequencer Creating a Pattern (Note Input) Input some notes (from the scale on the keys) into the sequencer to create a pattern. Select the pattern to record ( (P.26)). 8.1. Selecting a Pattern Press the [SEQ] button to make the indicator light. The unit enters sequencer mode (STEP SEQ). -
Page 30: Inputting Notes For Steps After Step 17 (Page)
Using the Sequencer Inputting Notes for Steps After Step 17 (PAGE) You can switch between step numbers assigned to the [1]–[16] buttons (in other words, switch to a different “page” of steps). When you want to input a note whose length stretches into step 17 and afterwards in the pattern, switch the page and then input the note. -
Page 31: Connecting Notes (Tie Input)
Using the Sequencer Connecting Notes (Tie Input) This shows how to connect two notes (from the scale on the keys) with a tie. Select the pattern to record ( (P.26)). 8.1. Selecting a Pattern Press the [SEQ] button to make the indicator light. The unit enters sequencer mode (STEP SEQ). -
Page 32: Recording Your Performance In Real Time
Using the Sequencer Press the [NOTE] button to make the indicator light. Press the [1]–[13] buttons to input the notes. Once you input a note, the sequence automatically advances to the next step. Repeat this for each step. Input mode ends once you input the note for the last step. -
Page 33: Setting The Note Loudness And Length (Velocity/Gate Time)
Using the Sequencer The movement of the knobs and sliders (MOTION) can also be recorded in the pattern. To exit recording, press the [MENU] button. Inputting notes in real time using the K-25m (sold separately) You can input notes using the keyboard of the K-25m instead of following steps 4 and 5. For installation/removal/angle adjustment, refer to the K-25m’s Owner’s Manual. -
Page 34: Making Sequencer Settings
Using the Sequencer Making sequencer settings With these settings, you can set how the sequencer operates, and access useful functions (utilities) for input. While in sequencer mode, press the [MENU] button. The sequencer menu appears. Use the [VALUE] knob to select the item, and press the [VALUE] knob. The setting for the item you selected is shown. -
Page 35: Saving A Pattern
Using the Sequencer Saving a Pattern Any settings you have edited for a pattern are lost if you select a different pattern or turn off the power after editing. For this reason, be sure to save your important settings. When you’ve edited a pattern and then long-press the [START] button, a dot is shown next to the pattern number in the display. -
Page 36: Backing Up Data
While holding down the [MENU] button, turn on the power. The JX-08 operates in USB mass storage mode. The JX-08 is recognized by your computer as an external storage device. It takes around 20 seconds for the connection to be recognized. -
Page 37: Restoring The Settings (Restore)
While holding down the [MENU] button, turn on the power. The JX-08 operates in USB mass storage mode. The JX-08 is recognized by your computer as an external storage device. It takes around 20 seconds for the connection to be recognized. -
Page 38: Configuring The Settings Of This Unit
Configuring the Settings of This Unit Configuring the Settings of This Unit This shows you how to configure the settings that apply to the entire unit, such as part settings, system settings and so on. If the [SEQ] button is lit, press the [SEQ] button to make it go dark (which turns SEQ off). Press the [MENU] button. - Page 39 Configuring the Settings of This Unit Step Parameter (as Value Explanation buttons displayed) Adjusts how much the effect changes the MIXER envelope according to 0–3 N. U EL how hard you press the keys (velocity). Sets the variable pitch range for the pitch bend. bEnd 2, 3, 4, [10]...
-
Page 40: Keyboard Settings
Configuring the Settings of This Unit Keyboard Settings Step Parameter (as Value Explanation buttons displayed) Transposes (moves) the pitch range of the keyboard in semitone steps. -5–6 T. P OS This configures the function that detects how hard you play the keyboard (the UELO velocity). -
Page 41: Midi Settings
Configuring the Settings of This Unit MIDI Settings Here’s how to make MIDI-related settings. Step Parameter (as Value Explanation buttons displayed) Sets the MIDI transmitting/receiving channel for the system. 1–16, ● Use the MIDI channel you set here when using an external MIDI keyboard in place of the K-25m. -
Page 42: System Settings
Configuring the Settings of This Unit System Settings Configures the system settings. Step Parameter (as Value Explanation buttons displayed) Adjusts the input level of the MIX IN jack. 0–127 In. L U Specifies whether the unit will turn off automatically after a A. -
Page 43: Using The Utilities
Configuring the Settings of This Unit Using the Utilities The utilities on this unit provide functionality that’s useful when editing. Step buttons Parameter (as displayed) Explanation Initializes the selected pattern. P. C Lr Initializes the selected tone. T. C Lr Replaces the currently selected tone with a random tone. -
Page 44: Restoring The Factory Settings (Factory Reset)
The [PAGE/TIE] button blinks. To cancel the factory reset, turn off the power. Press the [PAGE/TIE] button. Initialization begins. Once the JX-08 is restored to factory default settings, “donE” appears in the display. Turn the power of the JX-08 off and then on again. -
Page 45: Prioritizing The Battery (Battery Fixed Operation Mode)
Prioritizing the Battery (Battery Fixed Operation Mode) This mode lets you operate the JX-08 on battery power, even when connected to another device via USB. In this mode, this unit does not use (or switch to) USB bus power, even when you connect the unit to another USB port. This lets you use this unit on battery power while the USB port is connected to a device that can’t supply it with power. -
Page 46: Effect Parameters
Effect Parameters Effect Parameters This explains about the parameters of the effects built into the JX-08. CHORUS&MFX parameters Here’s how to configure the effects. Use the Type parameter to select an effect. The parameter types that you can configure depend on the effect you’ve selected. For details on the parameters you can set, refer to the individual pages that explain each effect. - Page 47 You can also press a step button to select the parameter items. SDD-320 Step Parameter Value Explanation buttons This models Roland’s DIMENSION D (SDD-320). It provides a clear chorus tyPe Cho3 sound. Turns the effects on/off. Sľ Off, On Switches the mode.
-
Page 48: Timectrldly
Effect Parameters You can also press a step button to select the parameter items. TimeCtrlDly Step Parameter Value Explanation buttons This is a delay in which the delay time can be varied smoothly. tyPe dLy1 Turns the effects on/off. Sľ Off, On When this is ON, the effect synchronizes with the tempo of the Sync... -
Page 49: Mod Delay
Effect Parameters Step Parameter Value Explanation buttons The delay sound is heard both at the left and tyPe dLy2 at the right. Turns the effects on/off. Sľ Off, On When this is ON, the effect synchronizes with Sync Off, On the tempo of the rhythm. - Page 50 Effect Parameters When Feedback Mode is “CroS” (CROSS) Step Parameter Value Explanation buttons Adds a wavering feel to the delay tyPe dLy3 sound. Turns the effects on/off. Off, On Sľ When this is ON, the effect synchronizes L. S nc Off, On with the tempo of the rhythm.
-
Page 51: Reverse Dly
Effect Parameters You can also press a step button to select the parameter items. Reverse Dly Step Parameter Value Explanation buttons This is a reverse delay that adds a reversed and delayed sound to the tyPe R. d Ly input sound. A tap delay is connected immediately after the reverse delay. -
Page 52: Fuzz
Effect Parameters Step Parameter Value Explanation buttons Also changes the volume. Sound quality of the overdrive effect tonE 0–127 Output level 0–127 You can also press a step button to select the parameter items. Fuzz Step buttons Parameter Value Explanation Adds overtones and intensely distorts the sound. -
Page 53: Bit Crusher
Effect Parameters You can also press a step button to select the parameter items. Bit Crusher Step buttons Parameter Value Explanation Produces an extreme lo-fi effect. tyPe bit. C Turns the effects on/off. Sľ Off, On Adjusts the sample rate. rAtE 0–127 Adjusts the bit depth. -
Page 54: Script 90
Effect Parameters You can also press a step button to select the parameter items. Script 90 You can also press a step button to select the parameter items. M StagePhsr Step Parameter Value Explanation buttons This creates extremely large phase differences for a deep tyPe PhA2 phaser effect. -
Page 55: Pitchshiftr
Effect Parameters Step Parameter Value Explanation buttons This is a filter with an extremely sharp slope (attenuation tyPe FiLt characteristics). The cutoff frequency can be varied cyclically. Turns the effects on/off. Sľ Off, On Frequency range that passes through each filter tyPE Frequencies at or below the cutoff Frequencies in the region of the cutoff... -
Page 56: 2V Pshifter
Effect Parameters Parameter Value Explanation When this is ON, the effect synchronizes with the tempo of the rhythm. Sync OFF, ON “8.2.1. Tempo Settings(P.28)” Adjusts the delay time from the direct sound until the pitch-shifted tiNe 1–1300 sound is heard. “12.1.18. -
Page 57: About Note Values
Effect Parameters Step Parameter Value Explanation buttons that is fed back into the effect. (Negative values invert the phase.) Panning for pitch-shift 1 sound 1. P An L 64–R 63 Pitch-shift 1 volume 0–127 1. L EU Amount of pitch shift applied for pitch-shift 2 (in semitones) -24–12 (semitones) 2. -
Page 58: Reverb
Effect Parameters REVERB Step Parameter Value Explanation buttons Adjusts the amount of reverb. 0– SEnd If you don’t want to add the reverb effect, set it to 0. Selects the types of reverb. tyPE roN. 1 roN. 2 haL. 1 haL. -
Page 59: Sound List
Sound List Sound List This is a list of the patches stored in this unit by factory default. Group/bank/patch number Tone name JX 5th Synth A. 1 1 Sqr Lead A. 1 2 Velo Reso Bass A. 1 3 Gamelon Cans A. - Page 60 Sound List Group/bank/patch number Tone name Beef Brass A. 7 8 Classic Poly JX A. 8 1 Velo Brassman A. 8 2 Sizzle Brass A. 8 3 Reso Quack Brass A. 8 4 Soft Brass Fader A. 8 5 Galaxy Funk A.
- Page 61 Sound List Group/bank/patch number Tone name ORGAN II B. 7 6 SYNTH BASS B. 7 7 SOUNDTRACK B. 7 8 FAT FIFTH B. 8 1 T O M S B. 8 2 CLAV B. 8 3 SQUARELEAD B. 8 4 POLY BRASS B.
-
Page 62: Midi Implementation Chart (Part)
MIDI Implementation Chart (Part) MIDI Implementation Chart (Part) Model: JX-08 Date: Oct. 13, 2021 Version: 1.00 Function Transmitted Recognized Remarks Basic Channel Default 1–16 1–16 Changed 1–16 1–16 Mode Default Mode 3 Mode 3 Messages × × Altered × Note Number 0–127... - Page 63 MIDI Implementation Chart (Part) Function Transmitted Recognized Remarks ○ ○ ENVELOPE2 DECAY ○ × Reverb Send Level ○ ○ ENVELOPE2 SUSTAIN ○ ○ ENVELOPE2 RELEASE ○ ○ ENVELOPE1 KEY FOLLOW ○ ○ ENVELOPE2 KEY FOLLOW ○ ○ AMP ENVELOPE MODE ○...
-
Page 64: Midi Implementation Chart (System)
MIDI Implementation Chart (System) MIDI Implementation Chart (System) Model: JX-08 Date: Oct. 13, 2021 Version: 1.00 Function Transmitted Recognized Remarks Basic Channel Default 1–16, OFF 1–16, OFF Changed 1–16, OFF 1–16, OFF Mode Default Mode 3 Mode 3 Messages ×... -
Page 65: Main Specifications
Main Specifications Main Specifications Sound Patch User Memories Pattern Chorus: 3 types Delay: 4 types Overdrive FUZZ Drive Effects Bit crusher LOFI Comp Phaser: 2 types Filter Pitch Shifter: 2 types 64 steps Step Sequencer 8 notes (Polyphonic) Display 7 segments, 4 characters (LED) EXT CLOCK IN jack Mono miniature phone type PHONES jack... - Page 66 Main Specifications JX-08 Owner’s Manual 1.00 Roland Corporation © 2021 Roland Corporation...