Table of Contents
Advertisement
Available languages
Available languages
INSTRUCTION MANUAL
EN 21" 3-in-1 GAS SELF PROPELLED LAWN MOWER
FR 21 POUCES 3-in-1 Tondeuse autopropulsée de gaz
ES 21" 3-en-1
Model # DB2194SR
Have product questions or need technical support? Please feel free to contact us!
Website:
www.Amerisuninc.com
www.powersmartusa.com
Toll free: 1-800-791-9458 Mon-Fri 9-5 EST
Email: support@amerisuninc.com
CORTADORA DE CÉSPED AUTOPRO PULSADO A GASOLIN
1
Advertisement
Chapters
Table of Contents

Related Manuals for Power smart DB2194SR


Summary of Contents for Power smart DB2194SR
- Page 1 EN 21" 3-in-1 GAS SELF PROPELLED LAWN MOWER FR 21 POUCES 3-in-1 Tondeuse autopropulsée de gaz ES 21" 3-en-1 CORTADORA DE CÉSPED AUTOPRO PULSADO A GASOLIN Model # DB2194SR Have product questions or need technical support? Please feel free to contact us! Website: www.Amerisuninc.com www.powersmartusa.com...
-
Page 3: Table Of Contents
Maintenance……………………………………………………………... Storage……………………………………………………………………. 21 Troubleshooting…………………………………………………………. Exploded view & parts list……………………………………………… Warranty………………………………………………………………… TECHNICAL DATA 21" 3-in-1 Gas Self Propelled Lawn Mower Model # DB2194SR Engine type: 4 Stroke, OHV, single cylinder with forced air-cooling system Displacement: 170cc Fuel tank capacity: 0.21 Gallon Oil capacity: 16.9 fl.oz... -
Page 4: Introduction
INTRODUCTION ® Thank You for Purchasing a PowerSmart Product. This manual provides information regarding the safe operation and maintenance of this product. Every effort has been made to ensure the accuracy of ® the information in this manual. PowerSmart reserves the right to change this product and specifications at any time without prior notice. -
Page 5: General Safety Procedures
GENERAL SAFETY PROCEDURES For any questions regarding the hazard and safety notices listed in this manual or on the product, please call (800) 791-9458 Mon-Fri 9-5 EST before using the engine. DANGER: CARBON MONOXIDE Using an engine indoors CAN KILL YOU IN MINUTES. Engine exhaust contains carbon monoxide (CO). -
Page 6: Important Safety Instructions
IMPORTANT SAFETY INSTRUCTIONS This machine is capable of amputating hands and feet and throwing objects. Failure to observe the following safety instructions could result in serious injury or death. I.General Operation 1. Read, understand, and follow instructions and warnings in this manual and on the machine, engine and attachments. - Page 7 V. SLOPE SPECIFIC Slopes are a major factor related to accidents. Operation on slopes requires extra caution. 1. Travel in the manufacturer recommended direction on slopes. Use caution while operating near drop offs. 2. Avoid mowing wet grass. (Poor footing could cause a slip and fall accident.) 3.
-
Page 8: Warning Label Instructions
WARNING LABLE INSTRUCTIONS Read carefully the manual before use. Danger-flying objects; keep safe distance from the machine as long as the engine is running. Do not open or remove safety shields while engine is running. Pay more attention to the operator’s hands and feet to avoid injury Do not open or remove safety shields while engine is running. - Page 9 Look behind while backing Steep slope hazard When repairing, please pull off the spark plug boot, then repair it according to the operational manual Hot surfaces When mowing,please wear the glasses ad ear plugs to defend the operator himself Keep bystanders away. Safety label found on the lawn mower: KEEP HANDS AND FEET AWAY.
-
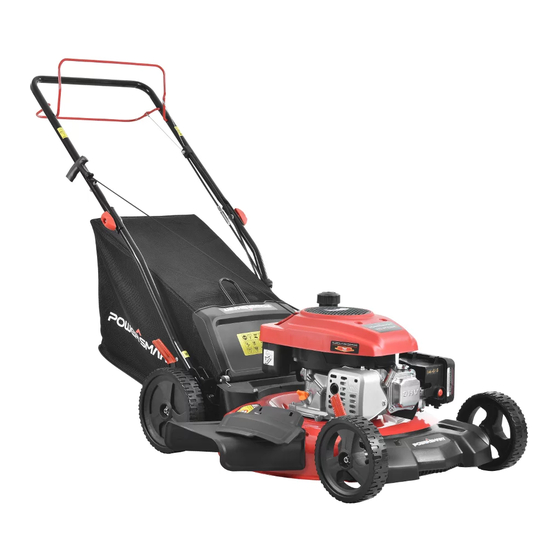
Page 10: Knowing Your Lawn Mower
KNOWING YOUR LAWN MOWER Please use the illustration below to familiarize yourself with the location and function of the components that control of your lawn mower. Recoil starter handle Primer bulb Grass catcher Fuel tank cap Cutting height adjustment lever Rear discharge door Rear wheel Lower handle... -
Page 11: Lawn Mower Preparation
LAWN MOWER PREPARATION The following section describes steps necessary to prepare the lawn mower for use. If after reading this section, you are unsure about how to perform any of the steps please call (800) 791-9458 Mon-Fri 9-5 EST for customer service. Failure to perform these steps properly can damage the lawn mower or shorten its lifespan. - Page 12 ATTACH LOWER & UPPER HANDLE 1. Loosen two knobs and turn the folded upper tube to match the lower tube, and tighten the knob. 2. Turn the lower tube to an angle that maches the base and tighten with two screws. (Two screws are in the accessories bag.)...
- Page 13 SIDE DISCHARGE CHUTE To convert mower for side discharge, the grass catcher has been removed and that the rear discharge door is closed. 1. Lift the spring-loaded discharge cover located on the side of the mower. 2. Slide two hooks of the side discharge chute under the hinge pin and lower the spring on the side discharge cover.
-
Page 14: Operation
OPERATION GAS AND OIL FILL-UP The engine comes shipped without oil or gasoline. Be sure to add oil and gasoline before starting the engine. 1. Add oil before starting mower for the first time. 2. Service the engine with gasoline as instructed. Warning: Use extreme care when handling gasoline. - Page 15 Warning: 1. Gasoline is extremely flammable and is explosive under certain conditions. 2. Refueling in a well-ventilation area with the engine stopped. Do not smoke and allow flames or sparks in the area where gasoline is stored or where the fuel tank is refueled. 3.
- Page 16 START THE ENGINE To start the engine, perform the following steps: 1. Check the oil and fuel levels. 2. Press the primer bulb 3 times. 3. Engage the engine Start/Stop Control and simultaneously pull on the recoil starter. Pull on the recoil starter handle slowly until a slight resistance is felt, then pull quickly to start the engine.
- Page 17 USING AS SIDE DISCHARGE You should close the rear cover with mulching adapter in order to use the side discharge. 1. On the side of the mower, lift the side discharge cover. 2. Slide two hooks of side discharge chute under hinge pin on the side discharge cover. Lower the side discharge cover.
-
Page 18: Maintenance
MAINTENANCE Proper routine maintenance of this mower will help prolong the life of the machine. Always observe safety rules when performing any maintenance. The warranty on this lawn mower does not cover items that have been subjected to operator abuse or negligence. - Page 19 CHANGING/ADDING OIL Change the oil according to the Recommended Maintenance Schedule. Change the oil when the engine is warm. This will allow for complete drainage. Change oil more often if operating under heavy load or high ambient temperatures. It is also necessary to drain the oil from the crankcase if it has become contaminated with water or dirt.
- Page 20 MAINTENANCE SCHEDULE Item Action Before 5 Hours of First 25 50 hours of 100 hours of 150 hours of use each use or first hours of use or every use or every or every two month 6 months year years Blade Inspect Blade...
-
Page 21: Storage
STORAGE CAUTION: Never place any type of storage cover or tarp on the MOWER while it is still hot. If the MOWER is being stored for extended periods of time (30 days or more), drain fuel tank and carburetor bowl. When storing the mower for extended periods of time: 1. -
Page 22: Exploded View & Parts List
EXPLODED VIEW AND PARTS LIST... - Page 23 Item Stock # Description Item Stock # Description 303190312A Engine 303020339 Bolt M6*14 303020627 Screw M8×25 303160471A Drive gear Left 203050381B Side discharge deflector 203050498A 8 inch Left wheel 303090066A Torsional spring pin 303020625 Tapping screw 303130335 Torsional spring 203021336 Rear axle sleeve 303160833 Side discharge bracket...
- Page 24 ENGINE EXPLODE VIEW AND PART LIST...
- Page 25 Item Stock # Description Item Stock # Description CRANKCASE E01-1 11310-Z3C0110-00A0 E04-3 90408-Z030210-0000 WASHER, FLAT SUBASSEMBLY. E01-2 90682-Z240110-0000 SEAL, OIL E04-4 14200-Z2P0110-00A0 CAMSHAFT ASSY. E01-3 90682-Z030210-0000 SEAL, OIL E04-5 13122-Z240110-00A0 CLIP, PISTON PIN E01-4 90103-0410-51 SCREW E04-6 13121-Z240110-00A0 PIN, PISTON E01-5 11321-Z2P0110-0000 PIECE, BREATH...
-
Page 26: Warranty
PowerSmart is committed to building equipment that will provide years of dependable service. Our warranties are consistent with our commitment and dedication to quality. THREE (3) YEARS LIMITED WARRANTY OF POWER SMART PRODUCTS FOR HOME USE. PowerSmart (“Seller") warrants to the original purchaser only, that all PowerSmart consumer power tools will be free from defects in material or workmanship for a period of three (3) years from date of purchase. - Page 27 Vue éclatée et liste des pièces………………………………………………... 46 Garantie…………………………………………………………………....50 DONNÉES TECHNIQUES 21" 3-in-1 Tondeuse autopropulsé e de gaz à essence Modè le # DB2194SR Type de moteur: 4 Course, Soupage en tê te, monocylindre avec systè me de refroidissement à air forcé Dé placement: 170cc Capacité...
- Page 28 INTRODUCTIONS Merci d'avoir acheté un produit de PowerSmart®, Ce manuel fournit des informations sur l'utilisation et la maintenance en toute sé curité de ce produit. Tous les efforts ont é té faits pour assurer l'exactitude des informations contenues dans ce manuel. PowerSmart® se ré serve à tout moment le droit de la modification de ce produit et des spé...
- Page 29 PROCEDURES GENERALES DE SECURITE Pour toute question concernant les avis de danger et de sé curité figurant dans ce manuel ou sur le produit, veuillez appeler (800)791-9458 Lun-Ven 9-5 EST avant le fonctionnement de la machine. DANGER : MONOXYDE DE CARBONE L'utilisation d'un moteur dans la piè...
- Page 30 CONSIGNES DE SÉCURITÉ IMPORTANTES Cette machine est capable d'amputer les mains et les pieds et de lancer des objets. Des blessures graves ou la mort seront entraî né es si vous ne respectez pas les consignes de sé curité suivantes. I.Opé...
- Page 31 V. PENTE SPÉCIFIQUE Les pentes sont un facteur majeur lié aux accidents. L'exploitation sur les pentes exige une prudence accrue. 1. Dé placez-vous dans la direction recommandé e par le fabricant sur les pentes. Soyez prudent lorsque vous vous dé placez à proximité de dé nivellations. 2.
- Page 32 INSTRUCTIONS SUR L'ÉTIQUETTE D'AVERTISSEMENT Lisez attentivement le manuel avant de l'utiliser. Objets volants dangereux; gardez une distance de sé curité par rapport à la machine tant que le moteur est en marche. N’ouvrez pas ni retirez les boucliers de sécurité lorsque le moteur est en marche. Faites plus attention aux mains et aux pieds de l'opé...
- Page 33 Emission de gaz toxique, n’utilisez pas la tondeuse dans un endroit proche ou mal ventilé. Regardez derriè re vous tout en soutenant Danger des pentes raides Lors de la ré paration, retirez le soufflet de la bougie, puis ré parez-le conformé ment au manuel d'utilisation.
- Page 34 CONNAÎ TRE VOTRE TONDEUSE À GAZON Veuillez vous familiariser avec l'emplacement et la fonction des composants qui contrô lent votre tondeuse à gazon avec l'illustration ci-dessous. Poigné e de dé marrage à rappel Ampoule d'amorç age Ramasseur d'herbe Bouchon de ré servoir à gaz Levier de ré...
- Page 35 PRÉPARATION DE LA TONDEUSE À GAZON La section suivante dé crit les é tapes né cessaires pour pré parer la tondeuse à gazon à l'utilisation. Si, vous n'ê tes pas sû r de savoir comment effectuer l'une ou l'autre de ces é tapes aprè s avoir lu cette section, veuillez appeler le (800) 791-9458 du lundi au vendredi 9-5 EST pour le service clientè...
-
Page 36: Poigné E De Dé Marrage À Rappel
FIXEZ LA POIGNÉE INFÉRIEURE ET SUPÉRIEURE 1. Desserrez deux boutons et tournez le tube supé rieur plié pour qu'il corresponde au tube infé rieur, puis serrez le bouton. 2. Tournez le tube infé rieur à un angle qui correspond à la base et serrez avec deux vis. (Les deux vis se trouvent dans le sac d'accessoires.)... -
Page 37: Ramasseur D'herbe
GOULOTTE D'ÉJECTION LATÉRALE Pour convertir la tondeuse à é jection laté rale, le ramasseur d'herbe a é té enlevé et la porte d'é jection arriè re est fermé e. 1. Soulevez le couvercle de dé charge à ressort situé sur le cô té de la tondeuse. 2. -
Page 38: Jauge D'huile
ÉRATION REMPLISSAGE DE GAZ ET DE PÉTROLE Le moteur est livré sans huile ni essence. Veillez à ajouter de l'huile et de l'essence avant de dé marrer le moteur. 1. Ajoutez de l'huile avant de dé marrer la tondeuse pour la premiè re fois. 2. -
Page 39: Contrô Le Du Dé Marrage/Arrê T Du Moteur
Avertissement 1. L'essence est extrê mement inflammable et est explosive dans certaines conditions. 2. Faites le plein dans une zone bien ventilé e avec le moteur arrê té . Ne fumez pas et ne laissez pas de flammes ou d'é tincelles dans la zone où l'essence est stocké e ou dans celle où le ré servoir est rempli. 3. - Page 40 DÉMARRER LE MOTEUR Pour dé marrer le moteur, effectuez les é tapes suivantes: 1. Vé rifiez les niveaux d'huile et de carburant. 2. Appuyez 3 fois sur la poire d'amorç age. 3. Engagez la commande de dé marrage/arrê t du moteur et tirez simultané ment sur le dé marreur à rappel. Tirez lentement sur la poigné...
- Page 41 En utilisant comme dé charge laté rale Vous devez fermer le couvercle arriè re avec l'adaptateur de mulching afin d'utiliser la dé charge laté rale. 1. Sur le cô té de la tondeuse, soulevez le couvercle de l'é jection laté rale. 2.
- Page 42 ENTRETIEN Un entretien de routine de cette tondeuse aidera à prolonger la duré e de vie de la machine. Respectez toujours les rè gles de sé curité lors de toute opé ration de maintenance. La garantie sur cette tondeuse à gazon ne couvre pas les articles qui ont fait l'objet d'abus ou de né gligence de la part de l'opé...
- Page 43 La tondeuse à gazon doit ê tre vé rifié e avant chaque utilisation pour vé rifier le niveau d'huile approprié . Ceci est une é tape critique pour un dé marrage correct du moteur. Pour vé rifier le niveau d'huile: 1.
- Page 44 2. Dé vissez la bougie du moteur en utilisant la clé de bougie fournie. Il y a un espace limité pour que la clé puisse tourner. Utilisez les deux rangé es de trous dans la clé de bougie pour obtenir un effet de levier afin de desserrer la bougie.
- Page 45 STOCKAGE ATTENTION : Ne placez jamais de type de bâ che de stockage ou de bâ che sur la TONDEUSE tant qu'elle est encore chaude. Si la TONDEUSE est entreposé e pendant de longues pé riodes (30 jours ou plus), vidangez le ré servoir de carburant et le bol de carburateur.
- Page 46 VUE ÉCLATÉE ET LISTE DES PIÈCES...
- Page 47 Item Stock # Description Item Stock # Description Vis à tête hexagonale avec 303190312A Moteur 303020339 rondelle M6X14 303020627 verrou M8X25 303160471A Avance à gauche Déflecteur d’éjection 203050381B 203050498A 8"Roue à gauche latérale Arbre de goupille à Vis auto-taraudeuse 303090066A 303020625 ressort ST6.3*30...
- Page 48 VUE ÉCLATÉE DU MOTEUR ET LISTE DES PIÈCES...
- Page 49 Article N° de stock Description Qté Article N° de stock Description Qté E01-1 11310-Z3C0110-00A0 SOUS-ENSEMBLE DU CARTER. E04-3 90408-Z030210-0000 RONDELLE, PLATE E01-2 90682-Z240110-0000 JOINT D'ÉTANCHÉITÉ, HUILE E04-4 14200-Z2P0110-00A0 ASSEMBLAGE ARBRE À CAMES E01-3 90682-Z030210-0000 JOINT, HUILE E04-5 13122-Z240110-00A0 AGRAFE, AXE DE PISTON E01-4 90103-0410-51 E04-6...
- Page 50 à la qualité . TROIS (3) ANS DE GARANTIE LIMITÉE SUR LES PRODUITS POWER SMART POUR USAGE DOMESTIQUE. PowerSmart (« Vendeur» ) garantit à l'acheteur d'origine uniquement que tous les outils é lectriques grand public PowerSmart sont exempts de tout dé...
-
Page 51: Datos Técnicos
Vista detallada y lista de piezas………………………………………… Garantí a………………………………………………………………… DATOS TÉCNICOS Cortadora de cé sped autopropulsada a gas 3 en 1 de 21 pulgadas , Modelo # DB2194SR Tipo de Motor: 4 tiempos, OHV, cilindro ú nico con sistema de refrigeració n por aire forzado Desplazamiento: 170cc Capacidad del tanque de combustible: 0.21 Galones... -
Page 52: Introducción
INTRODUCCIÓN Gracias por comprar un producto PowerSmart®. Este manual proporciona informació n sobre la operació n segura y el mantenimiento de este producto. Se ha hecho todo lo posible para garantizar la precisió n de la informació n en este manual. PowerSmart® se reserva el derecho de cambiar este producto y especificaciones en cualquier momento sin previo aviso. -
Page 53: Procedimientos Generales De Seguridad
PROCEDIMIENTOS GENERALES DE SEGURIDAD Para cualquier pregunta relacionada con los avisos de peligro y seguridad enumerados en este manual o en el producto, llame al (800) 791-9458 de lunes a viernes de 9 a 5 Horario Está ndar del Este antes de usar el motor. PELIGRO: MONÓXIDO DE CARBONO Usar un motor en interiores PUEDE MATARLO EN MINUTOS. -
Page 54: Instrucciones De Seguridad Importantes
INSTRUCCIONES DE SEGURIDAD IMPORTANTES Esta máquina es capaz de amputar manos y pies, y arrojar objetos. El incumplimiento de las siguientes instrucciones de seguridad puede provocar lesiones graves o la muerte. I. FUNCIONAMIENTO GENERAL 1. Lea, comprenda y siga las instrucciones y advertencias de este manual y de la máquina, el motor y los accesorios. - Page 55 V. COSIDERACIONES ESPECIALES PARA PENDIENTES Las pendientes son un factor importante relacionado con los accidentes. La operación en pendientes requiere precaución adicional. 1. Viaje en la dirección sugerida por el fabricante en pendientes. Tenga precaución al operar cerca de pendientes. 2.
-
Page 56: Instrucciones De Etiqueta De Advertencia
INSTRUCCIONES DE ETIQUETA DE ADVERTENCIA Lea atentamente el manual antes de usar. Peligro, objetos voladores; Mantenga una distancia segura de la máquina mientras el motor esté funcionando. No abra ni quite los protectores de seguridad mientras el motor está funcionando. Preste más atención a las manos y pies del operador para evitar lesiones. - Page 57 Emisión de gases tóxicos, no use la cortadora de césped en un área cerrado o que no esté bien ventilado. Mire hacia atrás mientras retrocede Peligro en pendientes pronunciadas Al cortar, use los anteojos y tapones para los oídos para protejer al operador Superficies calientes Al cortar, use los anteojos y tapones para los oídos para protejer al operador Mantenga a los espectadores alejados.
-
Page 58: Conociendo Su Cortadora De Césped
CONOCIENDO SU CORTADORA DE CÉSPED Utilice la siguiente ilustració n para familiarizarse con la ubicació n y la funció n de los componentes que controlan su cortadora de cé sped. Empuñ adura de retroceso Bomba de cebado de combustible Recolector de hierba Tapa del tanque de gasolina Palanca de ajuste de altura de corte Puerta de descarga trasera... -
Page 59: Preparación De La Cortadora De Césped
PREPARACIÓN DE LA CORTADORA DE CÉSPED La siguiente secció n describe los pasos necesarios para preparar el cortacé sped para su uso. Si despué s de leer esta secció n, no está seguro de có mo realizar alguno de los pasos, llame al (800)791-9458 de lunes a viernes de 9 a 5 horatrio está... - Page 60 FIJE LA MANIJA INFERIOR Y SUPERIOR 1. Afloje dos perillas y gire la manija superior doblada para que coincida con la manija inferior, y apriete la perilla. 2. Gire la manija inferior a un ángulo que coincida con la base y apriete con dos tornillos. (Los dos tornillos se encuentran en la bolsa de accesorios).
- Page 61 CONDUCTO DE DESCARGA LATERAL 1. Levante la cubierta de descarga con resorte ubicada en el costado de la cortadora. 2. Deslice dos ganchos del conducto de descarga lateral debajo del pasador de bisagra y baje el resorte en la cubierta de descarga lateral. Precaució...
-
Page 62: Operación
OPERACIÓN RELLENO DE GAS Y ACEITE El motor se entrega sin aceite ni gasolina. Asegú rese de agregar aceite y gasolina antes de arrancar el motor. 1. Agregue aceite antes de arrancar la cortadora de cé sped por primera vez. 2. - Page 63 Advertencia: 1. La gasolina es extremadamente inflamable y es explosiva bajo ciertas condiciones. 2. Reabastezca el combustible en un á rea bien ventilada con el motor parado. No fume ni permita llamas o chispas en el á rea donde se almacena la gasolina o donde se recarga el tanque de combustible . 3.
- Page 64 ENCENDER EL MOTOR Para arrancar el motor, realice los siguientes pasos: 1. Compruebe los niveles de aceite y combustible. 2. Presione el cebador 3 veces. 3. Active el control de arranque / parada del motor y, simultá neamente, tire del arrancador de retroceso. Tire lentamente la manija del arrancador de retroceso hasta que sienta una ligera resistencia, luego jale rá...
- Page 65 USO COMO DESCARGA LATERAL Debe cerrar la cubierta posterior con el adaptador acolchado para poder utilizar la descarga lateral. 1. En el lado de la cortadora de cé sped, levante la cubierta de descarga lateral. 2. Deslice dos ganchos del canal de descarga lateral debajo del pasador de bisagra en la cubierta de descarga lateral.
-
Page 66: Mantenimiento
MANTENIMIENTO El mantenimiento de rutina adecuado de esta cortadora de cé sped ayudará a prolongar la vida ú til de la má quina. Observe siempre las reglas de seguridad al realizar cualquier mantenimiento. La garantí a de esta cortadora de cé sped no cubre artí culos que hayan sido objeto de abuso o negligencia por parte del operador. - Page 67 COMPROBACIÓN DEL ACEITE La capacidad de aceite del cá rter del motor es de 16.9 fl. onz. Verifique el nivel de aceite del motor de acuerdo con el Programa de mantenimiento recomendado. La cortadora de cé sped debe verificarse antes de cada uso para determinar el nivel de aceite adecuado. Este es un paso crí...
- Page 68 MANTENIMIENTO DE LA BUJÍ A La bují a es importante para el correcto funcionamiento del motor. Una buena bují a debe estar intacta, libre de depó sitos y bien separada. Consulte el programa de mantenimiento recomendado. Para inspeccionar la bují a: 1.
-
Page 69: Almacenamiento
ALMACENAMIENTO PRECAUCIÓN: Nunca coloque ningú n tipo de cubierta de almacenamiento o lona en la CORTADORA DE CÉSPED mientras aú n esté caliente. Si la cortadora de cé sped se almacena durante largos perí odos de tiempo (30 dí as o má s), drene el tanque de combustible y el tazó... -
Page 70: Solución De Problemas
SOLUCIÓN DE PROBLEMAS Problema Causa Solució n Palanca de arranque / Accione la palanca de arranque / parada del parada del motor motor. desconectada. Cable de la bují a Conecte el cable de la bují a. desconectado. Depó sito de combustible Llene el tanque con gasolina limpia y fresca. -
Page 71: Vista Detallada Y Lista De Piezas
VISTA DETALLADA Y LISTA DE PIEZAS... - Page 72 No. De No. De Í tem Descripción Cantidad Í tem Descripción Cantidad Inventario Inventario 303190312A Motor 38 303020339 Tornillo M6*14 Engrenaje avanzado 303020627 Perno M8x25 39 303160471A izquierdo Deflector de descarga 203050381B 40 203050498A Rueda izquierda de 8 lateral Gancho del resorte 303090066A 41 303020625 Tornillo de rosca...
- Page 73 Vista detallada del motor y lista de piezas...
- Page 74 Í tem No. de inventario Descripció n Cantidad Í tem No. de inventario Descripció n Cantidad E01-1 11310-Z3C0110-00A0 CARTER SUBCONJUNTO. E04-3 90408-Z030210-0000 ARANDELA PLANA CONJUNTO DE ARBOL DE E01-2 90682-Z240110-0000 SELLO, ACEITE E04-4 14200-Z2P0110-00A0 LEVAS. Gancho, ALFILER DE E01-3 90682-Z030210-0000 SELLO, ACEITE E04-5 13122-Z240110-00A0...
-
Page 75: Garantí A
PowerSmart se compromete a construir equipos que brinden añ os de servicio confiable. Nuestras garantías son consistentes con nuestro compromiso y dedicación a la calidad. GARANTÍ A LIMITADA DE TRES (3) AÑOS DE PRODUCTOS POWER SMART PARA USO DOMÉSTICO. PowerSmart ("Vendedor") garantiza únicamente al comprador original que todas las herramientas eléctricas de consumo PowerSmart estarán libres de defectos en materiales o mano de obra por un período de tres (3) añ...