Table of Contents
Advertisement
Quick Links
Advertisement
Table of Contents

Related Manuals for Roland VP-7 5100012850-01


Summary of Contents for Roland VP-7 5100012850-01
- Page 2 WARNING 002c • Do not open (or modify in any way) the unit or its AC adaptor. • Do not attempt to repair the unit, or replace parts within it (except when this manual provides specific instructions directing you to do so). Refer all servicing to your retailer, the nearest Roland Service Center, or an authorized Roland distributor, as listed on the “Information” page. • Never install the unit in any of the following locations. • Subject to temperature extremes (e.g., direct sunlight in an enclosed vehicle, near a heating duct, on top of heat-generating equipment); or are • Damp (e.g., baths, washrooms, on wet floors); or are • Exposed to steam or smoke; or are • Subject to salt exposure; or are • Humid; or are • Exposed to rain; or are...
- Page 3 • Objects have fallen into, or liquid has been spilled onto the unit; or • The unit has been exposed to rain (or otherwise has become wet); or • The unit does not appear to operate normally or exhibits a marked change in performance. • In households with small children, an adult should provide supervision until the child is capable of following all the rules essential for the safe operation of the unit. CAUTION 101b • The unit and the AC adaptor should be located so their location or position does not interfere with their proper ventilation. 101c • This (VP-7) for use only with Roland stand PDS-10 and BKT-S. Use with other stands is capable of resulting in instability causing possible injury. 101f • Even though you’ve observed all the precautions listed in the owner’s manual, the stand (PDS-10, BKT-S) could overturn depending on the way you perform. For this reason, you should address all issues concerning safety before using this product. 102c • Always grasp only the plug on the AC adaptor cord when plugging into, or unplugging from, an outlet or this unit. 103b • At regular intervals, you should unplug the AC adaptor and clean it by using a dry cloth to wipe all dust and other accumulations away from its prongs. Also, discon-...
-
Page 4: Power Supply
• Do not expose the unit to direct sunlight, place it near devices that radiate heat, leave it inside an enclosed vehicle, or otherwise subject it to temperature extremes. Excessive heat can deform or discolor the unit. 355b • When moved from one location to another where the temperature and/or humidity is very different, water droplets (condensation) may form inside the unit. Damage or malfunction may result if you attempt to use the unit in this condition. Therefore, before using the unit, you must allow it to stand for several hours, until the condensation has completely evaporated. • Depending on the material and temperature of the surface on which you place the unit, its rubber feet may discolor or mar the surface. You can place a piece of felt or cloth under the rubber feet to prevent this from happening. If you do so, please make sure that the unit will not slip or move accidentally. Copyright © 2010 ROLAND CORPORATION All rights reserved. No part of this publication may be reproduced in any form without the written permission of ROLAND CORPORATION. Roland and Vocal Designer are registered trademarks of Roland Corporation in the United States and/or other countries. Maintenance 401a • For everyday cleaning wipe the unit with a soft, dry cloth or one that has been slightly dampened with water. To remove stubborn dirt, use a cloth impregnated with a mild, non-abrasive detergent. Afterwards, be sure to wipe the unit thoroughly with a soft, dry cloth. • Never use benzine, thinners, alcohol or solvents of any kind, to avoid the possibility of discoloration and/or deformation. Additional Precautions • Unfortunately, it may be impossible to restore the contents of data that was stored in the unit’s memory once it has been lost. Roland Corporation assumes no liability concerning such loss of data. -
Page 5: Table Of Contents
CONTENTS Look What You Can Do with the VP-7 . . . . . . . . Names of Things and What They Do . . . . . . . . . Top Panel . -
Page 6: Look What You Can Do With The
Look What You Can Do with the VP-7 Microphone “Connecting a Microphone” (p. 13) Human Voice Perform realistic human vocals You can perform realistic human vocals simply by playing a connected keyboard. Choose from Female Choir, Kids Choir, Gregorian Choir, or Jazz Scat sounds (p. 18). Keyboard audio player “Performing along with “Connecting a Keyboard” Your Portable Audio (p. 11) Player” (p. 28) Portable Foot pedal “Connecting a Foot Pedal” (p. 14) - Page 7 A superb choir at your side Easy setup, and simple operation. Now it’s easy for anyone to create the finest choral harmonies. Vocoder Transform your voice to a robot voice Sing into a microphone while playing a keyboard, and your voice will morph into a robot voice. Press the [Vocoder] button, and use the keyboard to play sounds ranging from vintage vocoder sounds to the latest electro-styles (p. 20). Vocal Designer Add harmony to your voice By singing into the microphone while you press chords on the keyboard, you can play harmonies using your voice. You can perform richly expressive harmonies that reflect the dynamics of your voice and the lyrics you’re singing (p. 19).
-
Page 8: Names Of Things And What They Do
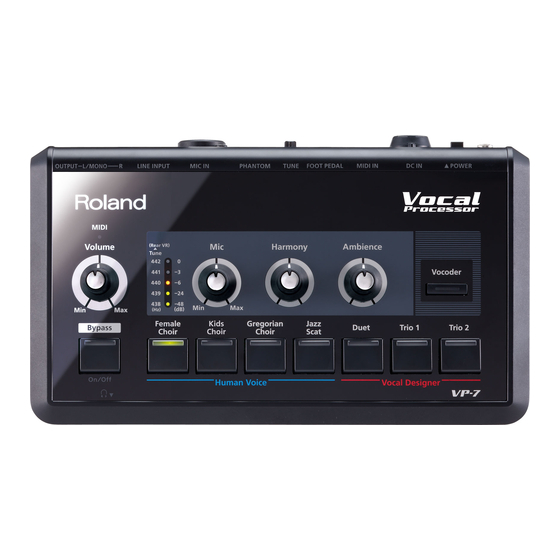
Names of Things and What They Do Top Panel 1 [Volume] Knob (p . 16) This adjusts the overall volume of the VP-7. MIDI Indicator This will light when messages are received from the MIDI IN con- nector. Level (Tune) Indicator (p . 26) This indicates the microphone input level (index markings at the right). -
Page 9: Rear Panel
This is due to an infinitesimal electrical charge, which is absolutely harmless. However, if you are concerned about this, con- nect the ground terminal (see figure) with an external ground. When the unit is grounded, a slight hum may occur, depending on the particulars of your installation. If you are unsure of the connection method, contact the nearest Roland Service Center, or an authorized Roland distributor, as listed on the “Information” page. Unsuitable places for connection • Water pipes (may result in shock or electrocution) • Gas pipes (may result in fire or explosion) • Telephone-line ground or lightning rod (may be dangerous in... -
Page 10: Getting Ready
Getting Ready Connecting the AC Adaptor Connect the included AC adaptor to the DC IN connector on the rear panel of the VP-7. Indicator NOTE • Place the AC adaptor so the side with the indicator (see illustration) faces upwards and the side with textual information faces downwards. The indicator will light when you plug the AC adaptor into an AC outlet. • Securely insert the AC adaptor plug all the way into the connector. • Use only the supplied AC adaptor. Attaching the VP-7 to a stand By using the separately sold PDS-10 and BKT-S, you can attach the VP-7 to a stand as shown in the illustration. * Use only the screws provided with the BKT-S . Other screws may damage the unit . * When using the PDS-10, extend the legs to their maximum spread . -
Page 11: Connecting A Keyboard
Connecting a Keyboard By using the VP-7 in conjunction with a keyboard, you’ll be able to control your performance expression in greater detail. You can play the keyboard to specify the harmony notes or vocal pitches. MIDI IN MIDI Cable MIDI OUT Keyboard MEMO If a keyboard is not connected, the pitch from the microphone input will be detected, and the pitch of the sounds produced will be based on this detected pitch. Changing the MIDI receive mode At the factory settings, the VP-7 is set to MIDI channel 1. If you want to receive multiple channels, you can change the MIDI reception mode so that all channels 1–16 will be received (OMNI). If you set the VP-7’s MIDI reception mode so that only channel 1 is received, you must also set the transmitting MIDI device to channel 1. To check the current MIDI reception mode The button illumination when the VP-7 is powered up will indicate the current MIDI reception mode. Reception mode Button illumination When you turn on the power, the selected... -
Page 12: Connecting Headphones Or Speakers
Connecting Headphones or Speakers The VP-7 does not contain speakers. In order to hear sound, you’ll need to connect it to an audio device, such as monitor speakers or a stereo system, or connect headphones. NOTE To prevent malfunction and/or damage to speakers or other devices, always turn down the volume, and turn off the power on all devices before making any connections. Connecting monitor speakers or a stereo system Use cables to connect the VP-7’s rear panel OUTPUT jacks to your monitor speaker or stereo set. * In order to take full advantage of the VP- 7’s capabilities, we recommend that you use it in stereo . -
Page 13: Connecting A Microphone
Connecting a Microphone A microphone is indispensable when performing with the VP-7. The VP-7 models vocal sounds by using your voice that is input via the microphone. If using a phantom-powered microphone The VP-7’s MIC IN jack can provide phantom power. * Turn this off if you’re using the included microphone . * You must turn the phantom power off unless you’ve connected a condenser microphone that requires phantom power . Supplying phantom power to a dynamic microphone or audio playback device will cause malfunctions . -
Page 14: Connecting A Foot Pedal
Connecting a Foot Pedal The VP-7 allows you to connect a foot pedal (DP series; sold separately). If you connect a foot pedal (DP series; sold separately) to the FOOT PEDAL jack on the rear panel, you’ll be able to use your foot to operate the function of the [Bypass] button (p. 24). When you press the foot pedal, the Human Voice/Vocal Designer/Vocoder sound will be muted (silenced), and only the direct sound from the microphone will be output. When you press the foot pedal once again, muting will be cancelled, and you’ll hear the sound again. Foot Pedal (DP series; sold separately) NOTE Use only the specified foot pedal (DP series; sold separately). Connecting a product made by another manufacturer might cause the VP-7 to malfunction. -
Page 15: Turning The Power On/Off
Turning the Power On/Off Here’s how to turn the VP-7’s power on/off. Turning the Power On * Once the connections have been completed (p . 10–p . 14), turn on power to your various devices in the order specified . By turn- ing on devices in the wrong order, you risk causing malfunction and/or damage to speakers and other devices . 1. Before you turn on the power, check the following points . -
Page 16: Adjusting The Volume
Adjusting the Volume 1. Turn the [Volume] knob to adjust the VP-7’s overall volume . MEMO For best results, adjust the controls of your amp and speaker so that the volume is appropriate when the [Volume] knob is in the range between 12 o’clock and 2 o’clock, as shown in the illustration. Turn the knob toward the right when you want to increase the sound further, or toward the left when you want to decrease the sound. * The [Volume] knob does not affect the LINE INPUT . Use the controls of the connected device to adjust the volume . -
Page 17: Mic Input Level (Mic)
Mic Input Level (Mic) Here’s how to adjust the level of the input from the microphone connected to the MIC IN jack on the rear panel. Your voice will be distorted if the microphone input level is too high. Noise will be heard if the microphone input level is too low. If your voice is distorted, or if there is too much noise, the VP-7 will have difficulty detecting the pitch, and it won’t be possible to add harmonies cleanly. To ensure that the harmonies are added as cleanly as possible, it’s important to adjust the microphone input level until it is as high as you can get it without causing distortion to occur. NOTE If the input from the microphone is at too high a level, acoustic feedback could be produced, or the sound might continue sounding endlessly. Adjust the level of the microphone’s input by following the procedure below. 1. Vocalize into the microphone . You should try to maintain a fixed distance between the microphone and your mouth. 2. Note how the level (Tune) indicator is illuminated . 3. Turn the [Mic] knob to adjust the input level . Adjust the level so that the yellow indicator lights when you sing loudly. -
Page 18: Performing With A Human Voice
Performing with a Human Voice The Human Voice section lets you perform with realistic choir sounds simply by playing the keyboard. Selecting a Human Voice Press one of the Human Voice buttons so it’s lit (green); now you can play the Human Voice section. If one of the Human Voice sounds is selected, the indicator of that sound button will light green. Try out the sound as you adjust the [Harmony] knob and [Ambience] knob (p. 23, p. 25). Sound Explanation Female Choir This is the sound of a female choir. The tone will change according to your keyboard playing dynamics. Kids Choir This is a children’s choir with a beautiful transparent sound. Gregorian Choir This is the sound of a large choir typical of singing in a church. It is suitable for majestic classical songs. Jazz Scat This sound samples a jazz scat vocalist. It is suitable for songs with rapid passages, or scat solos. NOTE You can’t use the Human Voice section and Vocal Designer section at the same time. If you don’t hear sound, check the following • Is the VP-7 correctly connected to your amp, speaker, or headphones? (p. 12) • Is the volume of the VP-7 raised? (p. 16) • Is Bypass turned off ([Bypass] button unlit)? (p. 24) • Is your microphone’s switch turned on? • Is your microphone connected correctly ? (p. 13) • Is the microphone input level raised? (p. 17) -
Page 19: Performing With Vocal Designer
Performing with Vocal Designer By singing into the microphone while you press chords on the keyboard, you can add harmonies to the sound of your voice. Selecting a Vocal Designer Sound To play the Vocal Designer section, press one of the Vocal Designer sound buttons so its indicator is lit (red). When a Vocal Designer sound is selected, that sound button’s indicator will light red. A backing chorus will automatically be added to your vocal. Harmony is automatically produced according to the melody you sing (the pitch detected from the microphone) and the chord that is detected from the keyboard. In addition, the harmony will proceed according to the melody you sing. Try out the sound as you adjust the [Harmony] knob and [Ambience] knob (p. 23, p. 25). Sound Explanation This produces two-part harmony, as though two people were singing. Duet (When a keyboard is not connected via MIDI, pitches a fourth lower will be generated to create the harmony.) This produces three-part harmony, as though three people were singing. One voice at a higher pitch and one voice at a lower pitch will be created, relative to the pitch of the direct sound from the Trio 1 microphone. -
Page 20: Performing With The Vocoder
Performing with the Vocoder By playing the keyboard while you sing into the microphone, you can perform a variety of vocoder sounds, ranging from vintage vocoders to the latest electro-types. Selecting a Vocoder Sound To play vocoder sounds, press the [Vocoder] button so its indicator is lit. The vocoder sounds use the volume and rhythm of the sound from the microphone. The pitch is controlled by the notes you play on the connected keyboard. If no keyboard is connected, the pitch will also be detected from the microphone input, meaning that all aspects of the vocoder sound will be controlled from the microphone. There are three types of vocoder sound. Each time you press the button, the [Vocoder] button’s indicator will change color in the order of red and the vocoder sound will be switched. Try out the sound as you adjust the [Harmony] knob and [Ambience] knob (p. 23, p. 25). Sound Indicator Vocoder 1 Lit red Vocoder 2 Lit green Vocoder 3 Lit orange Explanation This is a metallic talkbox-type sound. It is a more modern sound than “ Vocoder 2, ” and is suitable for styles with a beat, such as R&B. This is the sound of a vintage vocoder. It can be used broadly for songs with rapid passages, such as the pop music of the 1980s. This is suitable for chordal playing. This is a newer type of sound than “Vocoder 1” or “Vocoder 2. ” It is suitable for electro or hiphop styles. (Since this is a mono sound, you won’t be able to play chords.) green orange red ...,... -
Page 21: Selecting A Variation Sound
Selecting a Variation Sound You can choose from seven different variation sounds. While holding down the [Vocoder] button, press one of the Human Voice or Vocal Designer buttons to select a variation sound. Like the vocoder sounds, the variation sounds will generate harmony based on the pitch of the notes you play on the keyboard. If a variation sound is selected, the sound button’s indicator will light orange. Try out the sound as you adjust the [Harmony] knob and [Ambience] knob (p. 23, p. 25). 1. If you hold down the [Vocoder] button when you press one of the Human Voice or Vocal Designer sound buttons, the unit will enter Variation mode . The sound button will light in orange, indicating that you’re in Variation mode. Sound Human Voice Male &... -
Page 22: Using Controllers
Using Controllers Performing with a Keyboard If you connect a MIDI keyboard to the VP-7, you’ll be able to play chords on the keyboard to specify the harmonies that will be produced. 1. Connect your keyboard . For details on connections, refer to ”Connecting a Keyboard” (p. 11). 2. Select a sound . To make it easy to hear the result, turn the [Harmony] knob all the way to the right so that your voice will not be output. 3. Perform . The performance method and the VP-7’s operation will depend on the sound you select and on whether a keyboard is connected. Human Voice Play the keyboard. When a The Human Voice sound will be keyboard is generated according to your connected via playing. MIDI Sing into the microphone. When a The pitch of the microphone input keyboard is not will be detected, and the Human connected via... -
Page 23: Adjusting The Volume Balance (Harmony)
Adjusting the Volume Balance (Harmony) Here’s how to adjust the volume balance between the direct sound from the microphone and the Human Voice/Vocal Designer/ Vocoder sound. 1. Press notes on the keyboard, and vocalize into the microphone . 2. Use the [Harmony] knob to adjust the volume balance . If the [Harmony] knob is turned all the way to the left, your voice will be output directly from the VP-7. If the [Harmony] knob is in the center position, the direct sound and the Vocal Designer sound will be at the same volume. Now try singing a favorite song into the microphone. When doing so, choose one of the Vocal Designer sounds, and play the appropriate chord progression on the keyboard while you sing. A backing chorus generated by Human Voice/Vocal Designer/Vocoder will be added to your voice according to the chords you play. In the case of Vocal Designer, turning the [Harmony] knob toward the right of center will output a sound at the same pitch as your own voice, layered with the direct sound (p. 19). NOTE If you turn the [Harmony] knob all the way to the right, the direct sound from the microphone will no longer be heard. Increase the direct sound from the... -
Page 24: Outputting Only The Direct Sound From
By pressing the [Bypass] button, you can mute the Human Voice/Vocal Designer/Vocoder sound. Only the direct sound from the microphone will be heard. * The sound that’s input via LINE INPUT will always be output, regardless of the on/off state of the [Bypass] button . If Bypass is enabled, the [Bypass] button’s indicator will light. To make the sound reappear, press the [Bypass] button once again. When you have a digital piano (such as one from the Roland HP series) connected via MIDI, you’ll be able to control the on/off of Bypass using the piano’s sostenuto pedal (the middle pedal; CC #66). Using a foot pedal If you connect a foot pedal (DP series; sold separately) to the FOOT PEDAL jack as shown in the illustration, you’ll be able to use your foot to control the function of the [Bypass] button. This allows hands-free operation, so that you can mute the Human Voice/Vocal Designer/Vocoder sound while playing the keyboard. For example, this lets you conveniently add harmonies while you’re singing a melody (Bypass Off ), then turn off the... -
Page 25: Adjusting The Dynamics (Dynamics)
Adjusting the Dynamics (Dynamics) The way in which the Vocal Designer/Vocoder dynamics will respond to changes in the microphone input volume can be ad- justed over a range of seven levels. Changes you make in this value are stored in the unit. Decreasing the dynamics effect means that the Vocal Designer/Vocoder will be able to produce a wide range of sounds from loud to soft, giving you more expressive range. However, this will require you to accurately control the volume of your voice as you sing into the microphone. Increasing the dynamics effect means that the Vocal Designer/Vocoder sound will vary less in volume, but this will make it easier for you to sing, since a stable volume will be obtained even if your voice increases or decreases in volume. 1. Press and hold the [Bypass] button for two seconds . The [Bypass] button will blink. 2. Press one of the sound buttons to select the desired dynamic level . You can choose from seven levels for dynamics, which correspond to the following buttons. Button name Setting Female Choir Kids Choir... -
Page 26: Tuning (Tune)
Tuning (Tune) When performing with an ensemble, you’ll need to adjust the VP-7’s pitch to match the other instruments. To do this, turn the [TUNE] knob located on the VP-7’s rear panel. • Turning the knob toward the position will adjust the pitch of the A4 note toward the 438 Hz or 439 Hz settings. Turning the knob toward the position will adjust the pitch toward 441 Hz or 442 Hz. When the knob is in the center, the pitch is 440 Hz. • Immediately after you change this setting, the Level (Tune) indicators on the top panel will indicate the value you specified. * When you turn on the power, the tuning is set to 440 Hz regardless of the position of the knob . You can adjust the tuning if necessary . 442 Hz indicator (red) 441 Hz indicator (yellow) 440 Hz indicator (yellow) -
Page 27: Using The Vp-7 In Combination With A Sequencer
Using the VP-7 in Combination with a Sequencer By connecting a sequencer, you can use the VP-7 to generate harmony within your studio project, allowing it to be used as a component in your song productions. If you want, you can record sound produced by Human Voice/Vocal Designer/Vocoder on an audio track on your sequencer that is matched to your sequencer’s playback. MIDI messages from an SMF music file can be sent to the VP-7 to specify the chord progression used to generate the harmony. Microphone MIDI IN MIDI OUT MIDI IN Sequencer MIDI OUT 1. Make connections as shown in the illustration . 2. Play your keyboard to record the chord progression on a MIDI track of your sequencer . 3. Play back your sequencer, and vocalize into the microphone connected to the VP-7 . -
Page 28: Performing Along With
Your Portable Audio Player You can perform along with sound from your portable audio player, CD player, sampler, or other external device. For example, you could have an accompaniment be played by your portable audio player while you use a microphone or key- board to perform using Human Voice or Vocal Designer. Connecting your portable audio player 1. Connect your portable audio player or other device to the LINE INPUT jack located on the VP-7’s rear panel . 926a * When connection cables with resistors are used, the volume level of equipment connected to the input (LINE INPUT) may be low . -
Page 29: Changing The Settings
Changing the Settings Changing the Function of the Output L/R Jacks (Output Mode) You can specify whether the output L/R jacks will output a conventional stereo signal, or whether the L-jack will output only the Human Voice/Vocal Designer/Vocoder sound while the R-jack outputs only the direct sound. Normally, the VP-7 is set so that L/R will output a conventional stereo signal when it starts up. Normal state VP-7 OUTPUT L OUTPUT R If LR Output Mode is selected VP-7 OUTPUT L OUTPUT R Changing the function of the output L/R jacks 1. While holding down the [Vocoder] button, turn on the power . -
Page 30: Reset To Default Factory Setting (Factory Reset)
Jazz Scat Duet Trio 1 Trio 2 Vocoder 1 Vocoder 2 Vocoder 3 Male & Female Kids Choir 2 Classic Jazz Scat 2 Background Gospel If a program number from 1 through 17 is received, Bypass will turn off, and the Human Voice/Vocal Designer/Vocoder sound will be heard. If a program number from 18 through 34 is received, Bypass will turn on, and only the direct sound from the microphone will be heard. If you want to turn bypass on/off via MIDI, use CC #66 to control it. If you’ve connected a digital piano (e.g., Roland HP series), you can use the sostenuto pedal to control this. You can also transmit program change messages to turn bypass on/off. -
Page 31: Troubleshooting
Troubleshooting Problem What to check Power will not turn on Is the AC adaptor connected correctly? Are your amp, speakers, or headphones connected correctly? No sound Is the VP-7’s volume at a high enough level? Could Bypass be on? If the input from the microphone is at too high a level, acoustic feedback could be produced, or Sound Does Not Stop the sound might continue sounding endlessly. Adjust the level of the microphone’s input. If a keyboard is connected and you’ve selected a Vocoder sound, vocalizing into the microphone will not produce sound unless you are also playing the keyboard. If a keyboard is connected, there will be no sound unless the MIDI channels of the keyboard and the VP-7 match. Check the VP-7’s MIDI receive mode and your keyboard’s MIDI transmit channel. Could Bypass be on? No sound from Human Is the microphone switched on? Voice/Vocal Designer/ Vocoder Is the microphone connected correctly? Is the microphone input level raised? Is the volume balance (Harmony) set appropriately? When set to LR Output Mode, only the direct sound from the microphone will be output from OUT- PUT (R). The sound from Human Voice/Vocal Designer/Vocoder will be output from OUTPUT (L). -
Page 32: Midi Implementation Chart
MIDI Implementation Chart Model: VP-7 Function... Basic Default Channel Changed Default Mode Messages Altered ************** Note Number : True Voice ************** Note ON Volocity Note OFF Key’s Aftertouch Channel’s Pitch Bend 0, 32 Control Change Program Change True Number ************** System Exclusive System : Song Position Com- : Song Select : Tune System : Clock Realtime : Command : All Sound Off : Reset All Controllers Aux... -
Page 33: Specifications
Specifications VP-7: Vocal Processor • Tones Human Voice Female Choir, Kids Choir, Gregorian Choir, Jazz Scat Vocal Designer Duet, Trio 1, Trio 2 Vocoder Vocoder 1, Vocoder 2, Vocoder 3 Variation Male & Female, Kids Choir 2, Classic, Jazz Scat 2, Background, Pop, Gospel • Maximum Polyphony 64 voices (varies according to the sound generator load) • Master Tune 438 Hz to 442 Hz • Nominal Input Level INPUT (MIC): -50 to -10 dBu • Controller Harmony Knob Ambience Knob Tuning Knob • Connectors Headphone Jack: Stereo miniature phone type Output Jacks (L/MONO, R): 1/4 inch phone type Line Input Jack: Stereo miniature phone type Mic Jack: 1/4 inch phone type or XLR type (phantom power) Foot Pedal Jack (Bypass on/off ) MIDI Connector (IN) -
Page 34: Index
Index AC ADAPTOR ........ 10 AMBIENCE ........ 25 AMBIENCE KNOB . - Page 35 MEMO...
- Page 36 Information When you need repair service, call your nearest Roland Service Center or authorized Roland distributor in your country as shown below. PHILIPPINES AFRICA G.A. Yupangco & Co. Inc. 339 Gil J. Puyat Avenue Makati, Metro Manila 1200, EGYPT PHILIPPINES...
- Page 37 For EU Countries...
- Page 38 For China...
- Page 39 This product complies with the requirements of EMC Directive 2004/108/EC. FEDERAL COMMUNICATIONS COMMISSION RADIO FREQUENCY INTERFERENCE STATEMENT This equipment has been tested and found to comply with the limits for a Class B digital device, pursuant to Part 15 of the FCC Rules.