Table of Contents
Advertisement
Quick Links
Advertisement
Table of Contents

Related Manuals for Planar Planar PR Line PR6020


Summary of Contents for Planar Planar PR Line PR6020
- Page 1 PR6020 ® Projector USER'S MANUAL www.planar.com...
- Page 2 Planar Systems, Inc Corporate Headquarters 1195 NW Compton Drive Beaverton, OR 97006-1992 Planar Customer Support Telephone: US: 1-866-PLANAR1 (866) 752-6271 Outside US: (503) 748-5799 E-mail: PlanarSupport@planar.com Online Technical Library: http://www.planar.com/support Hours: M-F, 8am - 8pm ET, 12pm - 12am GMT...
- Page 3 Register Your Planar Products Today Thank you for choosing Planar. To assure you receive all the benefits of your Pla- nar product and services, register your Planar product today. Visit our website to register your product at http://www.planar.com/support/product_registration.
-
Page 4: Table Of Contents
Powering Off the projector ... 11 Warning Indicator ... 11 Adjusting the Projected Image...12 Adjusting the Projector Image Height ...12 Adjusting the Projector Zoom / Focus ...13 Adjusting Projected Image Size ...13 User Controls ... 14 Control Panel & Remote Control ...14 On-Screen Display Menus...16... -
Page 5: Usage Notice
English Warning- Do not look into the projector’s lens when the lamp is on. The bright light may hurt your eyes. Warning- To reduce the risk of fire or electric shock, do not expose this product to rain or moisture. - Page 6 Turn off the product before cleaning. Use a soft cloth moistened with mild detergent to clean the display housing. Disconnect the power plug from AC outlet if the product is not being used for a long period of time. Don’t: Block the slots and openings on the unit provided for ventila- ...
-
Page 7: Introduction
Introduction Product Features Congratulations and Thank You for choosing the PR6020 projector. This product is a XGA single chip DLP Outstanding features include: English True XGA, 1024 x 768 addressable pixels Texas Instruments Single chip DLP NTSC/NTSC4.43/PAL/PAL-M/PAL-N/SECAM and ... -
Page 8: Package Overview
Package Overview This projector comes with all the items shown below. Check to make sure your unit is complete. Contact your dealer immedi- ately if anything is missing. Projector with lens cap Composite Video Cable 1.8m 2 x AA Batteries Documents: ... -
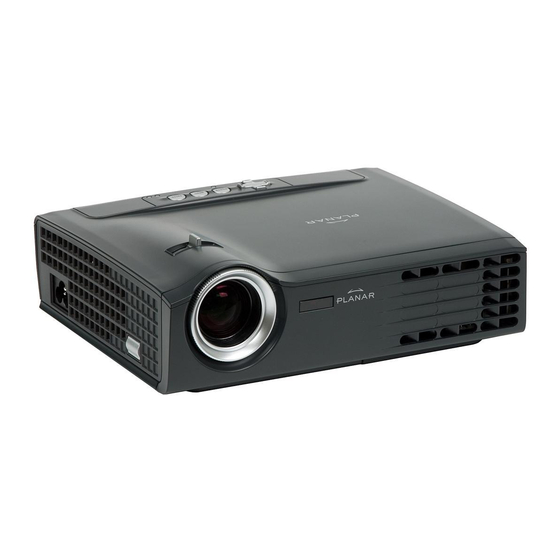
Page 9: Product Overview
Introduction Product Overview 1. Control Panel 2. Zoom Lever 3. Power Socket 4. Speaker 5. Elevator Button 6. Zoom Lens 7. Focus Ring 8. IR Receiver 9. Connection Ports English Main Unit... -
Page 10: Control Panel
Control Panel 1. Enter 2. Menu (On/Off) 3. Power 4. Four Directional Select Keys Connection Ports 1. VGA-In Connector (PC Analog signal/SCART RGB/ HDTV/Component Video Input) 2. Composite Video Input Connector 3. S-Video Input Connector 4. Audio Input Connector 5. Service Connector/Remote page up & page down 6. -
Page 11: Remote Control With Laser Pointer
Introduction English Remote Control with Laser Pointer 1. Enter 2. Four Directional Select Keys 3. Keystone +/- 4. Page Up 5. Page Down 6. Source Select 7. Freeze 8. Power 9. Menu 10. Laser 11. Mute 12. Resync 13. Hide... -
Page 12: Setting Up
1600 x 1200 resolution. Make sure the timing of the display mode is compatible with the projector. Refer to the “Compatibility Modes” section on page 33. -
Page 13: Powering On/Off The Projector
Powering On the Projector connected. The Power LED will flash green. panel and the Power LED will turn green. etc.). The projector will detect your source automatically within “Management” menu; check that “Source Lock” has been set to “Off”. -
Page 14: Powering Off The Projector
Powering Off the Projector 1. Press the “Power” button to turn off the projector lamp; you will see a message displayed on the projector’s screen. Press the “Power” but- ton again to confirm, otherwise the message will disappear after 5 seconds. -
Page 15: Adjusting The Projected Image
Setting Up Adjusting the Projected Image The projector is equipped with elevator foot for adjusting the image height. To raise the image: 1. Press the elevator button 2. Raise the image to the desired height angle 3. Use screw in feet To lower the image: 1. -
Page 16: Adjusting The Projector Zoom / Focus
Setting Up 127.1" (322 76.2" (193.6cm) 161.8" 38.1" (410.9cm) 115.6" (96.8cm) (293.5cm) 69.3" (176.1cm) 277.3" (704.4cm) 208.0" (528.3cm) English... -
Page 17: User Controls
Four Direc- tional Select Keys Enter Resync English Refer to the “Power On/Off the Projector” section on pages 10-11. Press “Source” to select an input signal. Turns the menu On or Off. to navigate through the menus. Confirm your item selection. -
Page 18: Using The Remote Control
Using the Remote Control Power Refer to the “Power On/Off the Projector” section on pages 10-11. Automatically synchronizes the projector to the Resync input source. Laser Aim the remote at the viewing screen, press and hold this button to activate the laser pointer. -
Page 19: On-Screen Display Menus
User Controls On Screen Display Menus The Projector has multilingual On Screen Display menus that allow you to make image adjustments and change a variety of settings. The projector will automatically detect the source. Main Menu English How to Operate To open the OSD menu, press “Menu”... -
Page 20: Menu Tree
User Controls Menu Tree English... -
Page 21: Language
User Controls Language Language Choose the multilingual OSD menu. Use the key to select your preferred language. Press “Enter” to finalize the selection. English... -
Page 22: Image-I
Press the to increase the contrast. Keystone (Keystone Correction) Adjusts image distortion caused by tilting projector. (±16 degrees) Color Press “Enter” to adjust the red, green and blue colors. White Peaking Use the white peaking control to set the white peaking level of DMD chip. - Page 23 User Controls mum peaking. If you prefer a brighter image, adjust towards the maximum setting. For a smooth and more natural image, adjust towards the minimum setting. Color Temp. Adjusts the color temperature. At higher temperature, the screen looks colder; at lower temperature, the screen looks warmer. English...
-
Page 24: Image-Ii (Computer Mode)
User Controls Frequency “Frequency” changes the display data frequency to match the fre- quency of your computer’s graphic card. If you experience a vertical flickering bar, use this function to make an adjustment. Tracking “Tracking” synchronizes the signal timing of the display with the graphic card. - Page 25 User Controls Input Signal 16:9 Image Position Adjust the image position up or down, when you select the aspect ratio of 16:9. “16:9 Image Posi- tion” function is supported under 16:9 aspect ratio. English image down. Press the to move the Press the to move the image up.
-
Page 26: Image-Ii (Video Mode)
Degamma This allows you to choose a degamma table that has been fine-tuned to bring out the best image quality for the input. Saturation Adjusts a video image from black and white to fully saturated color. Press the Press the ... - Page 27 User Controls Input Signal 16:9 Image Position Adjust the image position up or down, when you select the aspect ratio of 16:9. “16:9 Image Posi- tion” function is supported under 16:9 aspect ratio. English image down. Press the to move the Press the to move the image up.
-
Page 28: Audio
User Controls Volume Press to decrease the volume. Press to increase the volume. Mute Choose the left icon to turn mute on. Choose the right icon to turn mute off. Audio English... -
Page 29: Management
When you select this function, the projector reverses the image so you can project from behind a translucent screen. Off: The projector will search for other signals if the current input signal is lost. On: The projector will search specified connection port. -
Page 30: Lamp Setting
“Off” to return to normal mode. Auto Power Off Sets the countdown timer interval. The countdown timer will start, when there is no signal being sent to the projector. Then projector will automatically power off when the countdown has finished. English... -
Page 31: Appendices
Check if the projection lamp has been securely installed. Please refer to the “Replacing the lamp” section. Make sure you have removed the lens cap and the projector is switched on. Ensure “Hide” feature is not turned on. If on, exit by pushing the “Hide”... - Page 32 Check and reconfigure the display mode of your graphic card to make it compatible with the product. Problem: Image is out of focus Adjusts the Focus Ring on the projector lens. Appendices Hewlett- => [Fn] + [F4] Packard NEC=>...
- Page 33 4:3 aspect ratio in the on screen menu. When the lamp reaches its end of life, it will burn out and may make a loud popping sound. If this happens, the projector will not turn on until the lamp module has been replaced. To replace the lamp, follow the procedures in the “Replacing the Lamp”.
- Page 34 Problem: Message Reminders Fan fail: Over temperature: Power Off: Replace the lamp: Appendices English...
-
Page 35: Replacing The Lamp
Appendices Replacing the Lamp The projector keeps track of the lamp usage. It will show you a warning message When you see this message, change the lamp as soon as pos- sible. Make sure the projector has cooled down for at least 30 Warning: Lamp minutes before changing the lamp. -
Page 36: Compatibility Modes
Compatibility Modes Mode VESA VGA VESA VGA VESA VGA VESA VGA VESA VGA VESA VGA VESA VGA VESA VGA VESA VGA VESA SVGA VESA SVGA VESA SVGA VESA SVGA VESA SVGA VESA XGA VESA XGA VESA XGA VESA XGA * VESA SXGA * VESA SXGA * VESA SXGA * VESA SXGA... - Page 37 Online Technical Library: http://www.planar.com/support Hours: M-F, 8am - 8pm ET, 12pm - 12am GMT © 2006 Planar Systems, Inc. Planar is a registered trademark of Planar Systems, Inc. Other brands and names are the property of their respective owners. Technical Information in this document is subject to change without notice.